Flutter – 使用机器学习套件的设备上机器学习
机器学习在当今的项目中被广泛使用。它需要机器学习知识来创建模型,适用于想要在项目中使用机器学习但不知道如何创建模型的应用程序开发人员。在Flutter中,谷歌已经做了一些开发来帮助开发者创建他们想要的应用程序。虽然有一个包 google_ml_kit 但它仅适用于 android。在本文中,我们将使用 ML Kit。
机器学习套件:
ML Kit 由 Google 创建,供开发人员轻松构建涉及机器学习的移动应用程序。它可用于文本识别、面部和姿势检测、条形码扫描等。我们将创建一个应用程序来检测图像中的项目并标记它们。
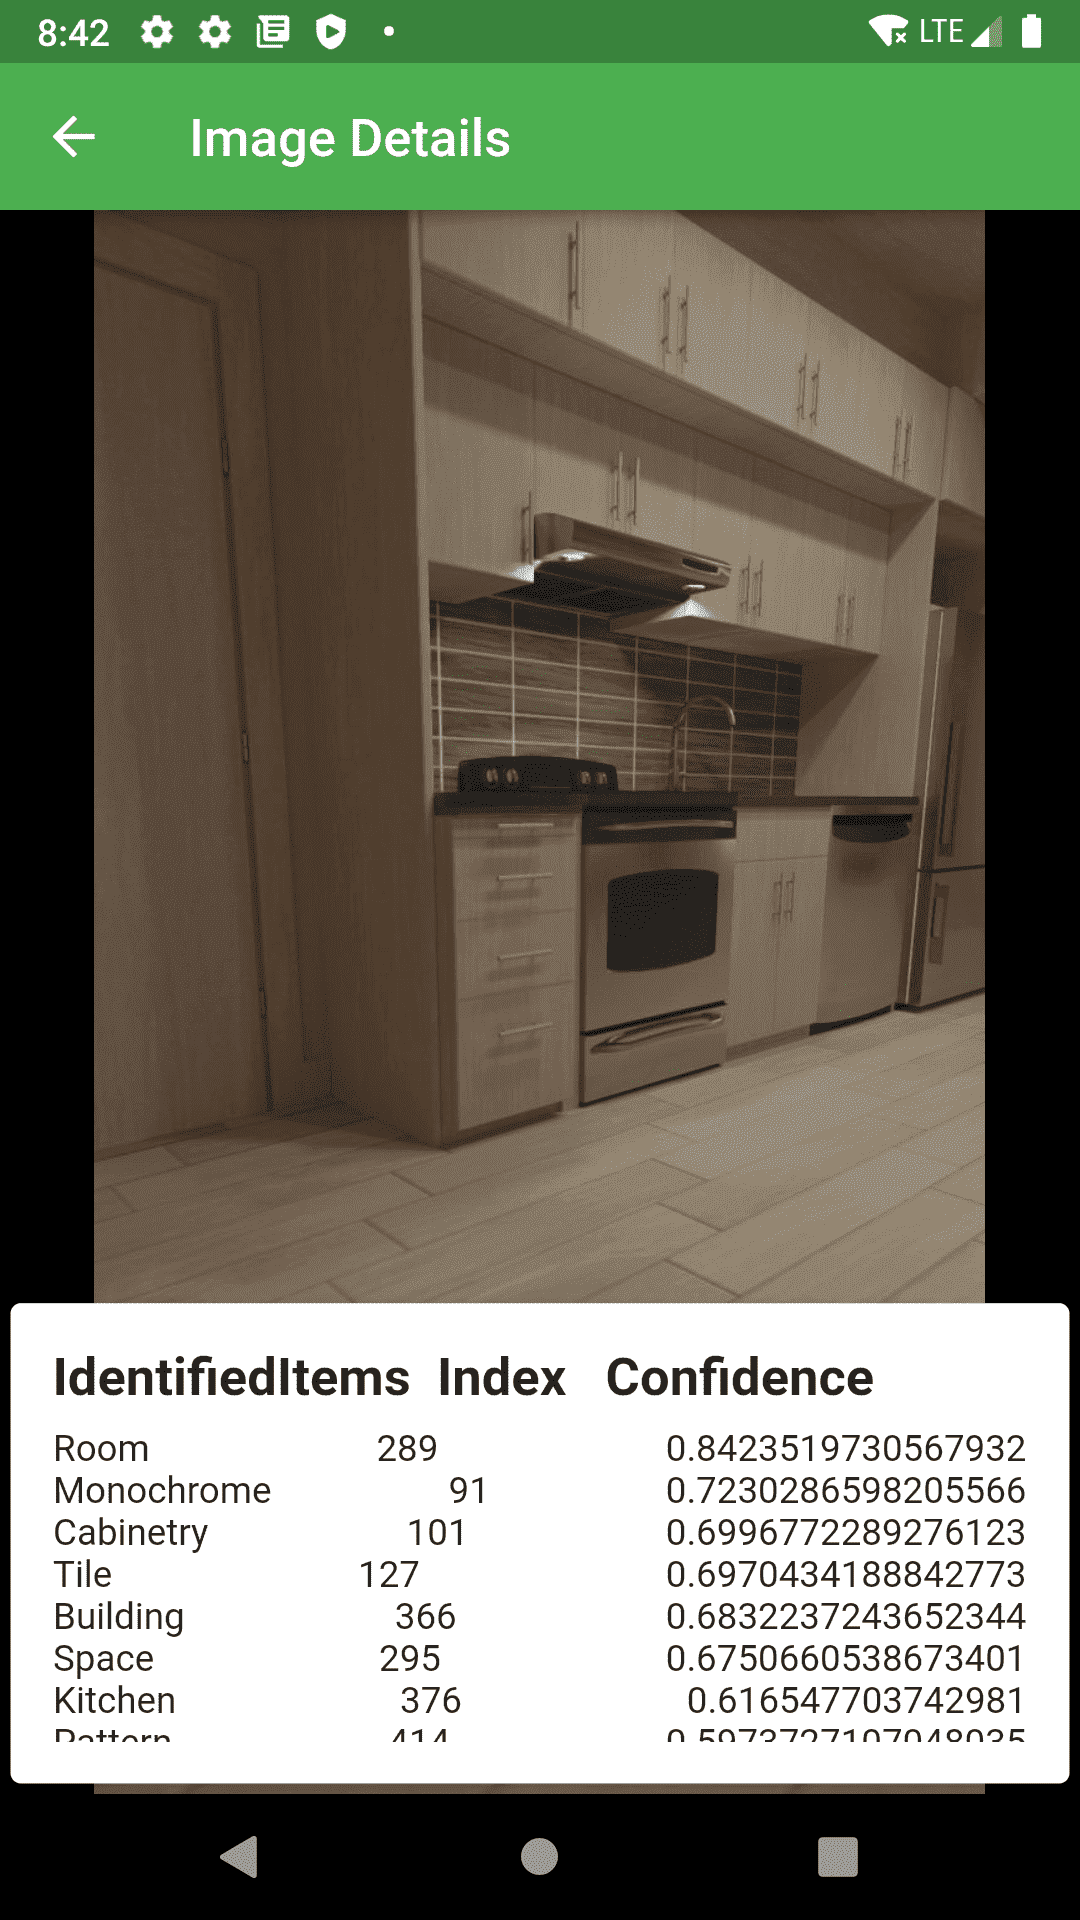
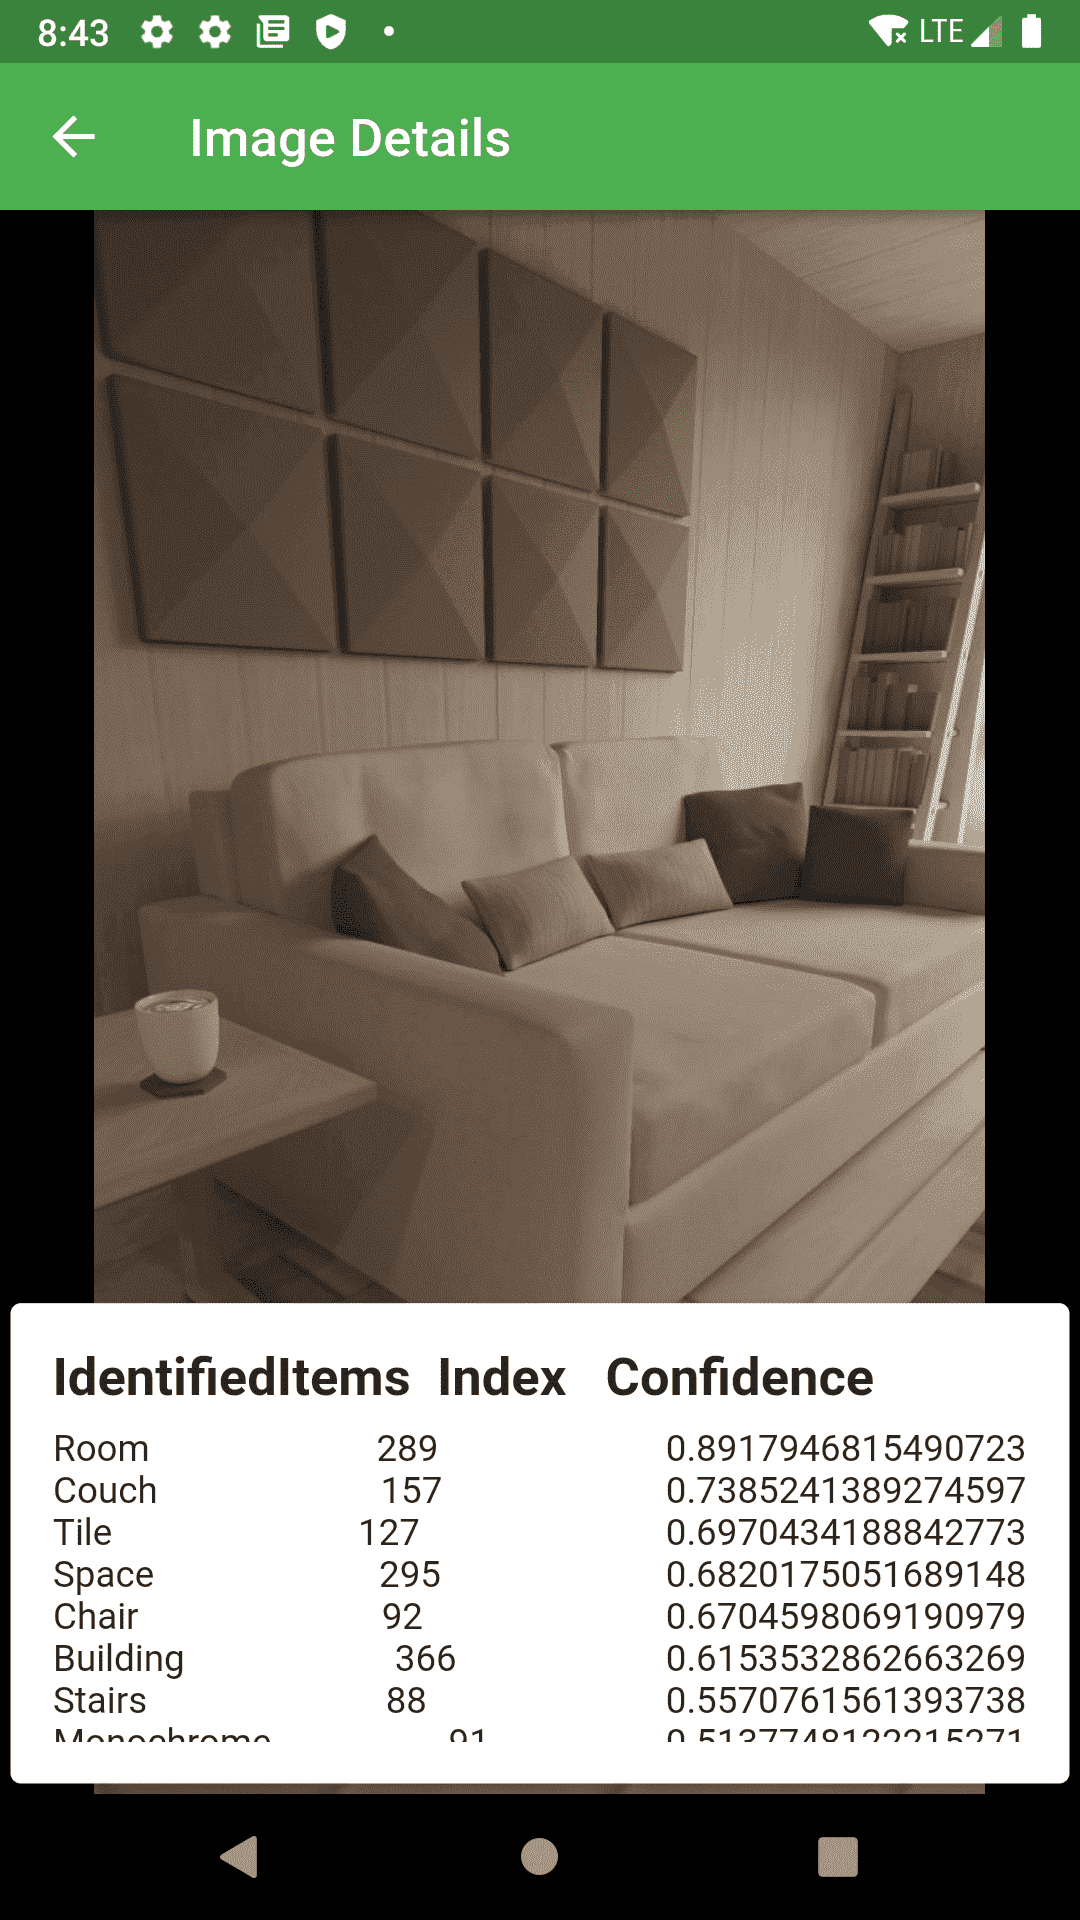
首先,让我们看看我们将在本教程中创建的应用程序 -
特征:
- 捕捉图像
- 预处理图像
- 识别带有标签、索引和置信度的项目。


安装依赖:
在应用程序的pubspec.yaml文件中包含google_ml_kit包,以便使用 Google 的 ML Kit 功能。
Dart
google_ml_kit: ^0.3.0Dart
camera: ^0.8.1Dart
late final CameraController _controller;

void _initializeCamera() async {
    final CameraController cameraController = CameraController(
      cameras[0],
      ResolutionPreset.high,
    );
    _controller = cameraController;

    _controller.initialize().then((_) {
      if (!mounted) {
        return;
      }
      setState(() {});
    });
  }
Dart
@override
void initState() {
  _initializeCamera();
  super.initState();
}
Dart
@override
void dispose() {
  _controller.dispose();
  super.dispose();
}
Dart
Future _takePicture() async {
    if (!_controller.value.isInitialized) {
      print("Controller is not initialized");
      return null;
    }

    String? imagePath;

    if (_controller.value.isTakingPicture) {
      print("Processing is progress ...");
      return null;
    }

    try {

      // Turning off the camera flash
      _controller.setFlashMode(FlashMode.off);

      // Returns the image in cross-platform file abstraction
      final XFile file = await _controller.takePicture();

      // Retrieving the path
      imagePath = file.path;
    } on CameraException catch (e) {
      print("Camera Exception: $e");
      return null;
    }

    return imagePath;
  }
Dart
import 'package:camera/camera.dart';
import 'package:flutter/material.dart';
import 'package:flutter_mlkit_vision/main.dart';

import 'detail_screen.dart';

class CameraScreen extends StatefulWidget {
  @override
  _CameraScreenState createState() => _CameraScreenState();
}

class _CameraScreenState extends State {
  late final CameraController _controller;

  // Initializes camera controller to preview on screen
  void _initializeCamera() async {
    final CameraController cameraController = CameraController(
      cameras[0],
      ResolutionPreset.high,
    );
    _controller = cameraController;

    _controller.initialize().then((_) {
      if (!mounted) {
        return;
      }
      setState(() {});
    });
  }

  // Takes picture with the selected device camera, and
  // returns the image path
  Future _takePicture() async {
    if (!_controller.value.isInitialized) {
      print("Controller is not initialized");
      return null;
    }

    String? imagePath;

    if (_controller.value.isTakingPicture) {
      print("Processing is progress ...");
      return null;
    }

    try {

      // Turning off the camera flash
      _controller.setFlashMode(FlashMode.off);

      // Returns the image in cross-platform file abstraction
      final XFile file = await _controller.takePicture();

      // Retrieving the path
      imagePath = file.path;
    } on CameraException catch (e) {
      print("Camera Exception: $e");
      return null;
    }

    return imagePath;
  }

  @override
  void initState() {
    _initializeCamera();
    super.initState();
  }

  @override
  void dispose() {

    // dispose the camera controller when navigated
    // to a different page
    _controller.dispose();
    super.dispose();
  }

  @override
  Widget build(BuildContext context) {
    return Scaffold(
      appBar: AppBar(
        title: Text('GeeksForGeeks'),
      ),
      body: _controller.value.isInitialized
          ? Stack(
              children: [
                CameraPreview(_controller),
                Padding(
                  padding: const EdgeInsets.all(20.0),
                  child: Container(
                    alignment: Alignment.bottomCenter,
                    child: ElevatedButton.icon(
                      icon: Icon(Icons.camera),
                      label: Text("Click"),
                      onPressed: () async {

                        // If the returned path is not null navigate
                        // to the DetailScreen
                        await _takePicture().then((String? path) {
                          if (path != null) {
                            Navigator.push(
                              context,
                              MaterialPageRoute(
                                builder: (context) => DetailScreen(
                                  imagePath: path,
                                ),
                              ),
                            );
                          } else {
                            print('Image path not found!');
                          }
                        });
                      },
                    ),
                  ),
                )
              ],
            )
          : Container(
              color: Colors.black,
              child: Center(
                child: CircularProgressIndicator(),
              ),
            ),
    );
  }
}
Dart
Future _getImageSize(File imageFile) async {
    final Completer completer = Completer();

    final Image image = Image.file(imageFile);
    image.image.resolve(const ImageConfiguration()).addListener(
      ImageStreamListener((ImageInfo info, bool _) {
        completer.complete(Size(
          info.image.width.toDouble(),
          info.image.height.toDouble(),
        ));
      }),
    );

    final Size imageSize = await completer.future;
    setState(() {
      _imageSize = imageSize;
    });
  }
Dart
final imageLabeler = GoogleMlKit.vision.imageLabeler();Dart
void _recognizeImage() async {
    _getImageSize(File(_imagePath));
    final inputImage = InputImage.fromFilePath(_imagePath);
    final List labels = await imageLabeler.processImage(inputImage);

    for (ImageLabel label in labels) {

      // retrieve label,index, and confidence from each label
      final String item = label.label;
      final int index = label.index;
      final double confidence = label.confidence;
      imagesData.add(item);
      indexData.add(index.toString());
      confidenceData.add(confidence.toString());
    }
  }
Dart
import 'dart:async';
import 'dart:io';
import 'package:flutter/material.dart';
import 'package:google_ml_kit/google_ml_kit.dart';

class DetailScreen extends StatefulWidget {
  final String imagePath;

  const DetailScreen({required this.imagePath});

  @override
  _DetailScreenState createState() => _DetailScreenState();
}

class _DetailScreenState extends State {
  late final String _imagePath;
  final imageLabeler = GoogleMlKit.vision.imageLabeler();
  Size? _imageSize;
  List imagesData = [];
  List indexData = [];
  List confidenceData = [];

  // Fetching the image size from the image file
  Future _getImageSize(File imageFile) async {
    final Completer completer = Completer();

    final Image image = Image.file(imageFile);
    image.image.resolve(const ImageConfiguration()).addListener(
      ImageStreamListener((ImageInfo info, bool _) {
        completer.complete(Size(
          info.image.width.toDouble(),
          info.image.height.toDouble(),
        ));
      }),
    );

    final Size imageSize = await completer.future;
    setState(() {
      _imageSize = imageSize;
    });
  }

  void _recognizeImage() async {
    _getImageSize(File(_imagePath));
    final inputImage = InputImage.fromFilePath(_imagePath);
    final List labels = await imageLabeler.processImage(inputImage);

    for (ImageLabel label in labels) {
      final String item = label.label;
      final int index = label.index;
      final double confidence = label.confidence;
      imagesData.add(item);
      indexData.add(index.toString());
      confidenceData.add(confidence.toString());
    }
  }

  @override
  void initState() {
    _imagePath = widget.imagePath;

    // Initializing the Image Labeler
    final imageLabeler = GoogleMlKit.vision.imageLabeler();
    _recognizeImage();
    super.initState();
  }

  @override
  void dispose() {

    // Disposing the imageLabeler when not used anymore
    imageLabeler.close();
    super.dispose();
  }

  @override
  Widget build(BuildContext context) {
    return Scaffold(
      appBar: AppBar(
        title: Text("Image Details"),
      ),
      body: _imageSize != null
          ? Stack(
              children: [
                Container(
                  width: double.maxFinite,
                  color: Colors.black,
                  child: AspectRatio(
                    aspectRatio: _imageSize!.aspectRatio,
                    child: Image.file(
                      File(_imagePath),
                    ),
                  ),
                ),
                Align(
                  alignment: Alignment.bottomCenter,
                  child: Card(
                    elevation: 8,
                    color: Colors.white,
                    child: Padding(
                      padding: const EdgeInsets.all(16.0),
                      child: Column(
                        mainAxisSize: MainAxisSize.min,
                        crossAxisAlignment: CrossAxisAlignment.start,
                        children: [
                          Padding(
                            padding: const EdgeInsets.only(bottom: 8.0),
                            child: Text(
                              "IdentifiedItems  Index   Confidence",
                              style: TextStyle(
                                fontSize: 20,
                                fontWeight: FontWeight.bold,
                              ),
                            ),
                          ),
                          Container(
                            height: 120,
                            child: SingleChildScrollView(
                              child: imagesData != null
                                  ? ListView.builder(
                                      shrinkWrap: true,
                                      physics: BouncingScrollPhysics(),
                                      itemCount: imagesData.length,
                                      itemBuilder: (context, index) {
                                        return Row(
                                          mainAxisAlignment:
                                              MainAxisAlignment.spaceBetween,
                                          children: [
                                            Text(imagesData[index]),
                                            Text(indexData[index]),
                                            Text(confidenceData[index])
                                          ],
                                        );
                                      })
                                  : Container(),
                            ),
                          ),
                        ],
                      ),
                    ),
                  ),
                ),
              ],
            )
          : Container(
              color: Colors.blue,
              child: Center(
                child: CircularProgressIndicator(),
              ),
            ),
    );
  }
}
Dart
import 'package:camera/camera.dart';
import 'package:flutter/material.dart';

import 'camera_screen.dart';

// Global variable for storing the list of cameras available
List cameras = [];

Future main() async {

  // Fetch the available cameras before initializing the app.
  try {
    WidgetsFlutterBinding.ensureInitialized();
    cameras = await availableCameras();
  } on CameraException catch (e) {
    debugPrint('CameraError: ${e.description}');
  }
  runApp(MyApp());
}

class MyApp extends StatelessWidget {
  @override
  Widget build(BuildContext context) {
    return MaterialApp(
      debugShowCheckedModeBanner: false,
      title: 'Flutter MLKit Vision',
      theme: ThemeData(
        primarySwatch: Colors.green,
      ),
      home: CameraScreen(),
    );
  }
}
要使用相机功能,我们首先需要创建一个将捕获图像的屏幕。要包含相机功能,我们需要使用Flutter的相机库。
Dart
camera: ^0.8.1
通过运行 pub get 来配置这两个库。
创建camera_screen。dart:
在 camera_screen 中导入相机库。 dart,并初始化 CameraController。我们还在查找可用的相机数量,并从选项中选择第一台相机来拍照。
Dart
late final CameraController _controller;

void _initializeCamera() async {
    final CameraController cameraController = CameraController(
      cameras[0],
      ResolutionPreset.high,
    );
    _controller = cameraController;

    _controller.initialize().then((_) {
      if (!mounted) {
        return;
      }
      setState(() {});
    });
  }
调用initState()中的方法,在应用启动时启动摄像头:
Dart
@override
void initState() {
  _initializeCamera();
  super.initState();
}
在移动到下一个屏幕之前,我们需要处理 _控制器以避免任何内存泄漏:
Dart
@override
void dispose() {
  _controller.dispose();
  super.dispose();
}
现在,要拍照,我们正在创建另一个函数_takePicture(),当单击按钮捕获图像时,将调用此函数。它将检查CameraController是否已初始化。它将返回图像在捕获后存储在设备中的ImagePath 。如果发生任何错误,它将抛出异常。捕获图像后,它会将我们重定向到另一个屏幕, detail_screen。dart因此,创建另一个文件detail_screen. dart以显示结果。
Dart
Future _takePicture() async {
    if (!_controller.value.isInitialized) {
      print("Controller is not initialized");
      return null;
    }

    String? imagePath;

    if (_controller.value.isTakingPicture) {
      print("Processing is progress ...");
      return null;
    }

    try {

      // Turning off the camera flash
      _controller.setFlashMode(FlashMode.off);

      // Returns the image in cross-platform file abstraction
      final XFile file = await _controller.takePicture();

      // Retrieving the path
      imagePath = file.path;
    } on CameraException catch (e) {
      print("Camera Exception: $e");
      return null;
    }

    return imagePath;
  }
camera_screen的完整代码。dart
Dart
import 'package:camera/camera.dart';
import 'package:flutter/material.dart';
import 'package:flutter_mlkit_vision/main.dart';

import 'detail_screen.dart';

class CameraScreen extends StatefulWidget {
  @override
  _CameraScreenState createState() => _CameraScreenState();
}

class _CameraScreenState extends State {
  late final CameraController _controller;

  // Initializes camera controller to preview on screen
  void _initializeCamera() async {
    final CameraController cameraController = CameraController(
      cameras[0],
      ResolutionPreset.high,
    );
    _controller = cameraController;

    _controller.initialize().then((_) {
      if (!mounted) {
        return;
      }
      setState(() {});
    });
  }

  // Takes picture with the selected device camera, and
  // returns the image path
  Future _takePicture() async {
    if (!_controller.value.isInitialized) {
      print("Controller is not initialized");
      return null;
    }

    String? imagePath;

    if (_controller.value.isTakingPicture) {
      print("Processing is progress ...");
      return null;
    }

    try {

      // Turning off the camera flash
      _controller.setFlashMode(FlashMode.off);

      // Returns the image in cross-platform file abstraction
      final XFile file = await _controller.takePicture();

      // Retrieving the path
      imagePath = file.path;
    } on CameraException catch (e) {
      print("Camera Exception: $e");
      return null;
    }

    return imagePath;
  }

  @override
  void initState() {
    _initializeCamera();
    super.initState();
  }

  @override
  void dispose() {

    // dispose the camera controller when navigated
    // to a different page
    _controller.dispose();
    super.dispose();
  }

  @override
  Widget build(BuildContext context) {
    return Scaffold(
      appBar: AppBar(
        title: Text('GeeksForGeeks'),
      ),
      body: _controller.value.isInitialized
          ? Stack(
              children: [
                CameraPreview(_controller),
                Padding(
                  padding: const EdgeInsets.all(20.0),
                  child: Container(
                    alignment: Alignment.bottomCenter,
                    child: ElevatedButton.icon(
                      icon: Icon(Icons.camera),
                      label: Text("Click"),
                      onPressed: () async {

                        // If the returned path is not null navigate
                        // to the DetailScreen
                        await _takePicture().then((String? path) {
                          if (path != null) {
                            Navigator.push(
                              context,
                              MaterialPageRoute(
                                builder: (context) => DetailScreen(
                                  imagePath: path,
                                ),
                              ),
                            );
                          } else {
                            print('Image path not found!');
                          }
                        });
                      },
                    ),
                  ),
                )
              ],
            )
          : Container(
              color: Colors.black,
              child: Center(
                child: CircularProgressIndicator(),
              ),
            ),
    );
  }
}
在detail_screen 上工作。dart:
首先,我们需要对图像进行处理,得到要在屏幕上显示的imageSize 。
Dart
Future _getImageSize(File imageFile) async {
    final Completer completer = Completer();

    final Image image = Image.file(imageFile);
    image.image.resolve(const ImageConfiguration()).addListener(
      ImageStreamListener((ImageInfo info, bool _) {
        completer.complete(Size(
          info.image.width.toDouble(),
          info.image.height.toDouble(),
        ));
      }),
    );

    final Size imageSize = await completer.future;
    setState(() {
      _imageSize = imageSize;
    });
  }
在类中从 GoogleMLKit 初始化 imageLabeler。
Dart
final imageLabeler = GoogleMlKit.vision.imageLabeler();
现在,我们将创建另一个函数_recognizeImage(),首先,我们将获取图像大小,然后获取图像文件。我们会将所有图像标签存储在 List
Dart
void _recognizeImage() async {
    _getImageSize(File(_imagePath));
    final inputImage = InputImage.fromFilePath(_imagePath);
    final List labels = await imageLabeler.processImage(inputImage);

    for (ImageLabel label in labels) {

      // retrieve label,index, and confidence from each label
      final String item = label.label;
      final int index = label.index;
      final double confidence = label.confidence;
      imagesData.add(item);
      indexData.add(index.toString());
      confidenceData.add(confidence.toString());
    }
  }
现在,是时候在屏幕上显示结果了。
detail_screen的完整代码。dart:
Dart
import 'dart:async';
import 'dart:io';
import 'package:flutter/material.dart';
import 'package:google_ml_kit/google_ml_kit.dart';

class DetailScreen extends StatefulWidget {
  final String imagePath;

  const DetailScreen({required this.imagePath});

  @override
  _DetailScreenState createState() => _DetailScreenState();
}

class _DetailScreenState extends State {
  late final String _imagePath;
  final imageLabeler = GoogleMlKit.vision.imageLabeler();
  Size? _imageSize;
  List imagesData = [];
  List indexData = [];
  List confidenceData = [];

  // Fetching the image size from the image file
  Future _getImageSize(File imageFile) async {
    final Completer completer = Completer();

    final Image image = Image.file(imageFile);
    image.image.resolve(const ImageConfiguration()).addListener(
      ImageStreamListener((ImageInfo info, bool _) {
        completer.complete(Size(
          info.image.width.toDouble(),
          info.image.height.toDouble(),
        ));
      }),
    );

    final Size imageSize = await completer.future;
    setState(() {
      _imageSize = imageSize;
    });
  }

  void _recognizeImage() async {
    _getImageSize(File(_imagePath));
    final inputImage = InputImage.fromFilePath(_imagePath);
    final List labels = await imageLabeler.processImage(inputImage);

    for (ImageLabel label in labels) {
      final String item = label.label;
      final int index = label.index;
      final double confidence = label.confidence;
      imagesData.add(item);
      indexData.add(index.toString());
      confidenceData.add(confidence.toString());
    }
  }

  @override
  void initState() {
    _imagePath = widget.imagePath;

    // Initializing the Image Labeler
    final imageLabeler = GoogleMlKit.vision.imageLabeler();
    _recognizeImage();
    super.initState();
  }

  @override
  void dispose() {

    // Disposing the imageLabeler when not used anymore
    imageLabeler.close();
    super.dispose();
  }

  @override
  Widget build(BuildContext context) {
    return Scaffold(
      appBar: AppBar(
        title: Text("Image Details"),
      ),
      body: _imageSize != null
          ? Stack(
              children: [
                Container(
                  width: double.maxFinite,
                  color: Colors.black,
                  child: AspectRatio(
                    aspectRatio: _imageSize!.aspectRatio,
                    child: Image.file(
                      File(_imagePath),
                    ),
                  ),
                ),
                Align(
                  alignment: Alignment.bottomCenter,
                  child: Card(
                    elevation: 8,
                    color: Colors.white,
                    child: Padding(
                      padding: const EdgeInsets.all(16.0),
                      child: Column(
                        mainAxisSize: MainAxisSize.min,
                        crossAxisAlignment: CrossAxisAlignment.start,
                        children: [
                          Padding(
                            padding: const EdgeInsets.only(bottom: 8.0),
                            child: Text(
                              "IdentifiedItems  Index   Confidence",
                              style: TextStyle(
                                fontSize: 20,
                                fontWeight: FontWeight.bold,
                              ),
                            ),
                          ),
                          Container(
                            height: 120,
                            child: SingleChildScrollView(
                              child: imagesData != null
                                  ? ListView.builder(
                                      shrinkWrap: true,
                                      physics: BouncingScrollPhysics(),
                                      itemCount: imagesData.length,
                                      itemBuilder: (context, index) {
                                        return Row(
                                          mainAxisAlignment:
                                              MainAxisAlignment.spaceBetween,
                                          children: [
                                            Text(imagesData[index]),
                                            Text(indexData[index]),
                                            Text(confidenceData[index])
                                          ],
                                        );
                                      })
                                  : Container(),
                            ),
                          ),
                        ],
                      ),
                    ),
                  ),
                ),
              ],
            )
          : Container(
              color: Colors.blue,
              child: Center(
                child: CircularProgressIndicator(),
              ),
            ),
    );
  }
}
现在,在main 中调用 CameraScreen。dart
Dart
import 'package:camera/camera.dart';
import 'package:flutter/material.dart';

import 'camera_screen.dart';

// Global variable for storing the list of cameras available
List cameras = [];

Future main() async {

  // Fetch the available cameras before initializing the app.
  try {
    WidgetsFlutterBinding.ensureInitialized();
    cameras = await availableCameras();
  } on CameraException catch (e) {
    debugPrint('CameraError: ${e.description}');
  }
  runApp(MyApp());
}

class MyApp extends StatelessWidget {
  @override
  Widget build(BuildContext context) {
    return MaterialApp(
      debugShowCheckedModeBanner: false,
      title: 'Flutter MLKit Vision',
      theme: ThemeData(
        primarySwatch: Colors.green,
      ),
      home: CameraScreen(),
    );
  }
}
输出: