- Docker-日志记录
- Laravel-错误和日志记录
- Laravel-错误和日志记录(1)
- Python|将日志记录添加到Python库
- Python|将日志记录添加到Python库(1)
- python多处理日志记录-任何(1)
- Symfony-日志记录(1)
- Symfony-日志记录
- Yii-属性
- Yii-属性(1)
- Yii-安装
- Yii-安装(1)
- Scrapy-日志记录
- Scrapy-日志记录(1)
- python多处理日志记录-任何代码示例
- CakePHP-日志记录
- CakePHP-日志记录(1)
- OrientDB-日志记录
- OrientDB-日志记录(1)
- Yii-排序(1)
- Yii-排序
- Phalcon日志记录
- Phalcon日志记录(1)
- Yii-测试
- Yii-模块
- Yii-模块(1)
- 日志库 C++ (1)
- python 日志记录级别 - Python (1)
- 批处理脚本-日志记录
📅 最后修改于: 2020-10-16 07:29:44 🧑 作者: Mango
Yii提供了一个高度可定制和可扩展的框架。借助此框架,您可以轻松记录各种类型的消息。
要记录消息,您应该调用以下方法之一-
-
Yii :: error() -记录致命错误消息。
-
Yii :: warning() -记录警告消息。
-
Yii :: info() -记录一条包含一些有用信息的消息。
-
Yii :: trace() -记录一条消息以跟踪一段代码的运行方式。
上述方法记录各种类别的日志消息。他们共享以下函数签名-
function ($message, $category = 'application')
其中-
-
$ message-要记录的日志消息
-
$ category-日志消息的类别
一种简单方便的命名方案是使用PHP __METHOD__魔术常数。例如-
Yii::info('this is a log message', __METHOD__);
日志目标是yii \ log \ Target类的实例。它按类别过滤所有日志消息,并将其导出到文件,数据库和/或电子邮件中。
步骤1-您也可以注册多个日志目标。
return [
   // the "log" component is loaded during bootstrapping time
   'bootstrap' => ['log'],
   'components' => [
      'log' => [
         'targets' => [
            [
               'class' => 'yii\log\DbTarget',
               'levels' => ['error', 'warning', 'trace', 'info'],
            ],
            [
               'class' => 'yii\log\EmailTarget',
               'levels' => ['error', 'warning'],
               'categories' => ['yii\db\*'],
               'message' => [
                  'from' => ['log@mydomain.com'],
                  'to' => ['admin@mydomain.com', 'developer@mydomain.com'],
                  'subject' => 'Application errors at mydomain.com',
               ],
            ],
         ],
      ],
   ],
];
在上面的代码中,注册了两个目标。第一个目标选择所有错误,警告,跟踪和信息消息,并将它们保存在数据库中。第二个目标将所有错误和警告消息发送到管理员电子邮件。
Yii提供以下内置日志目标-
-
yii \ log \ DbTarget-将日志消息存储在数据库中。
-
yii \ log \ FileTarget-将日志消息保存在文件中。
-
yii \ log \ EmailTarget-将日志消息发送到预定义的电子邮件地址。
-
yii \ log \ SyslogTarget-通过调用PHP函数syslog()将日志消息保存到syslog中。
默认情况下,日志消息的格式如下:
Timestamp [IP address][User ID][Session ID][Severity Level][Category] Message Text
步骤2-要自定义此格式,应配置yii \ log \ Target :: $ prefix属性。例如。
[
   'class' => 'yii\log\FileTarget',
   'prefix' => function ($message) {
      $user = Yii::$app->has('user', true) ? Yii::$app->get('user') :
      'undefined user';
      $userID = $user ? $user->getId(false) : 'anonym';
      return "[$userID]";
   }
]
上面的代码段将日志目标配置为以当前用户ID为所有日志消息添加前缀。
默认情况下,日志消息包含来自以下全局PHP变量的值:$ _GET,$ _ POST,$ _ SESSION,$ _ COOKIE,$ _ FILES和$ _SERVER。若要修改此行为,应使用要包含的变量名称配置yii \ log \ Target :: $ logVars属性。
所有日志消息均由logger对象维护在一个数组中。每次阵列累积一定数量的消息(默认值为1000)时,logger对象会将记录的消息刷新到日志目标。
步骤3-要自定义此数字,应调用flushInterval属性。
return [
   'bootstrap' => ['log'],
   'components' => [
      'log' => [
         'flushInterval' => 50, // default is 1000
         'targets' => [...],
      ],
   ],
];
即使记录器对象将日志消息刷新到日志目标,它们也不会立即导出。当日志目标累积一定数量的消息(默认为1000)时,将进行导出。
步骤4-要自定义此数字,应配置exportInterval属性。
[
   'class' => 'yii\log\FileTarget',
   'exportInterval' => 50, // default is 1000
]
步骤5-现在,以这种方式修改config / web.php文件。
 'basic',
      'basePath' => dirname(__DIR__),
      'bootstrap' => ['log'],
      'components' => [
         'request' => [
            // !!! insert a secret key in the following (if it is empty) - this
               //is required by cookie validation
            'cookieValidationKey' => 'ymoaYrebZHa8gURuolioHGlK8fLXCKjO',
         ],
         'cache' => [
            'class' => 'yii\caching\FileCache',
         ],
         'user' => [
            'identityClass' => 'app\models\User',
            'enableAutoLogin' => true,
         ],
         'errorHandler' => [
            'errorAction' => 'site/error',
         ],
         'mailer' => [
            'class' => 'yii\swiftmailer\Mailer',
            // send all mails to a file by default. You have to set
            // 'useFileTransport' to false and configure a transport
            // for the mailer to send real emails.
            'useFileTransport' => true,
         ],
         'log' => [
            'flushInterval' => 1,
            'traceLevel' => YII_DEBUG ? 3 : 0,
            'targets' => [
               [
                  'class' => 'yii\log\FileTarget',
                  'exportInterval' => 1,
                  'logVars' => []
               ],
            ],
         ],
         'db' => require(__DIR__ . '/db.php'),
      ],
      'modules' => [
         'hello' => [
            'class' => 'app\modules\hello\Hello',
         ],
      ],
      'params' => $params,
   ];
   if (YII_ENV_DEV) {
      // configuration adjustments for 'dev' environment
      $config['bootstrap'][] = 'debug';
      $config['modules']['debug'] = [
         'class' => 'yii\debug\Module',
      ];
      $config['bootstrap'][] = 'gii';
      $config['modules']['gii'] = [
         'class' => 'yii\gii\Module',
      ];
   }
   return $config;
?>
在上面的代码中,我们定义了日志应用程序组件,将flushInterval和exportInteval属性设置为1,以便所有日志消息立即出现在日志文件中。我们还省略了日志目标的级别属性。这意味着所有类别(错误,警告,信息,跟踪)的日志消息都将出现在日志文件中。
步骤6 -然后,创建在SiteController)称为actionLog(的函数。
public function actionLog() {
   Yii::trace('trace log message');
   Yii::info('info log message');
   Yii::warning('warning log message');
   Yii::error('error log message');
}
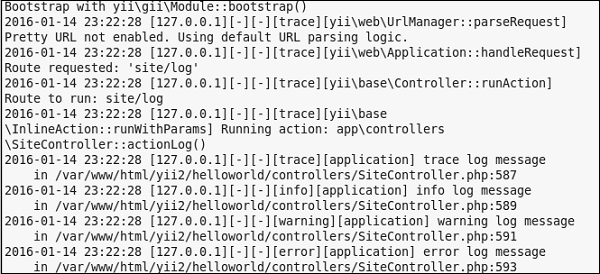
在上面的代码中,我们仅将四个不同类别的日志消息写入日志文件。
步骤7-在Web浏览器的地址栏中输入URL http:// localhost:8080 / index.php?r = site / log 。日志消息应出现在app.log文件中的app / runtime / logs目录下。