- Zend框架-安装(1)
- Zend框架-安装
- Zend框架教程
- Zend框架教程(1)
- Zend框架-简介(1)
- Zend框架-简介
- Zend框架-视图层(1)
- Zend框架-视图层
- 讨论Zend框架
- Zend框架-路由
- Zend框架-路由(1)
- Zend框架-身份验证
- Zend框架-控制器
- Zend框架-控制器(1)
- Zend框架-创建模块(1)
- Zend框架-创建模块
- Zend框架-概念(1)
- Zend框架-概念
- Zend框架-不同的数据库(1)
- Zend框架-不同的数据库
- Zend框架-文件上传(1)
- Zend框架-文件上传
- Zend框架-模型和数据库
- Zend框架-模型和数据库(1)
- Zend框架-错误处理
- Zend框架-错误处理(1)
- Zend框架-模块系统(1)
- Zend框架-模块系统
- Zend框架-单元测试(1)
📅 最后修改于: 2020-10-16 07:49:55 🧑 作者: Mango
在本章中,我们将学习如何在Zend Framework中创建一个完整的基于MVC的员工应用程序。请遵循以下步骤。
步骤1:Module.php
首先,我们应该在– myapp / module / Employee / src /目录中创建一个Employee模块,然后实现ConfigProviderInterface接口。
Module类的完整代码如下-
步骤2:composer.json
使用以下代码在composer.json中的autoload部分下配置Tutorial模块。
"autoload": {
   "psr-4": {
      "Application\\": "module/Application/src/",
      "Tutorial\\": "module/Tutorial/src/",
      "Employee\\": "module/Employee/src/"
   }
}
现在,使用composer update命令更新应用程序。
composer update
Composer命令将对应用程序进行必要的更改,并显示日志,如下面的命令提示符所示。
Loading composer repositories with package information
Updating dependencies (including require-dev)
   - Removing zendframework/zend-component-installer (0.3.0)
   - Installing zendframework/zend-component-installer (0.3.1)
   Downloading: 100%

   - Removing zendframework/zend-stdlib (3.0.1)
   - Installing zendframework/zend-stdlib (3.1.0)
   Loading from cache

   - Removing zendframework/zend-eventmanager (3.0.1)
   - Installing zendframework/zend-eventmanager (3.1.0)
   Downloading: 100%

   - Removing zendframework/zend-view (2.8.0)
   - Installing zendframework/zend-view (2.8.1)
   Loading from cache

   - Removing zendframework/zend-servicemanager (3.1.0)
   - Installing zendframework/zend-servicemanager (3.2.0)
   Downloading: 100%

   - Removing zendframework/zend-escaper (2.5.1)
   - Installing zendframework/zend-escaper (2.5.2)
   Loading from cache

   - Removing zendframework/zend-http (2.5.4)
   - Installing zendframework/zend-http (2.5.5)
   Loading from cache

   - Removing zendframework/zend-mvc (3.0.1)
   - Installing zendframework/zend-mvc (3.0.4)
   Downloading: 100%

   - Removing phpunit/phpunit (5.7.4)
   - Installing phpunit/phpunit (5.7.5)
   Downloading: 100%

Writing lock file
Generating autoload files
步骤3:Employee模块的module.config.php
使用以下代码在myapp / module / Employee / config下创建模块配置文件“ module.config.php”。
 [
      'factories' => [
         Controller\EmployeeController::class => InvokableFactory::class,
      ],
   ],
   'view_manager' => [
      'template_path_stack' => ['employee' => __DIR__ . '/../view',],
   ],
];
现在,在应用程序级别配置文件myapp / config / modules.config.php中配置Employee模块。
return ['Zend\Router', 'Zend\Validator', 'Application', 'Tutorial', 'Employee'];
步骤4:EmployeeController
通过扩展AbstractActionController来创建一个新的PHP类EmployeeController并将其放在myapp / module / Employee / src / Controller目录中。
完整的代码清单如下-
步骤5:路由器配置
让我们在Employee模块中添加一个细分路线。更新可在myapp / module / Employee / config中获得的员工模块配置文件module.config.php。
 [
      'factories' => [
         Controller\EmployeeController::class => InvokableFactory::class,
      ],
   ],
   'router' => [
      'routes' => [
         'employee' => [
            'type' => Segment::class,
            'options' => [
               'route' => '/employee[/:action[/:id]]',
               'constraints' => [
                  'action' => '[a-zA-Z][a-zA-Z0-9_-]*',
                  'id' => '[0-9]+',
               ],
               'defaults' => [
                  'controller' => Controller\EmployeeController::class,
                  'action' => 'index',
               ],
            ],
         ],
      ],
   ],
   'view_manager' => [
      'template_path_stack' => [
         'employee' => __DIR__ . '/../view',
      ],
   ],
];
我们已成功为Employee模块添加了路由。下一步是为Employee应用程序创建一个视图脚本。
步骤6:建立ViewModel
在myapp / module / Employee / view / employee / employee目录下创建一个名为“ index.phtml”的文件。
在文件中添加以下更改-
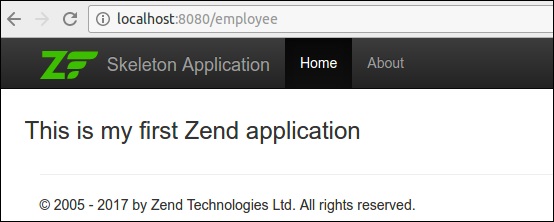
   This is my first Zend application

Move to “EmployeeController.php” file and edit the following changes,
最后,我们已经成功完成了Employee模块。我们可以使用以下网址访问它-http:// localhost:8080 / employee 。
结果
在下一步中,我们将在员工应用程序中执行添加,编辑和删除数据操作。要执行这些操作,我们首先应该创建一个数据库模型。在下一步中进行描述。
步骤7:建立模型
让我们在模块src目录中创建一个模型Employee。通常,模型分组在“模型”文件夹下(myapp / module / Employee / src / Model / Employee.php)
步骤8:MySQL表
使用以下命令在本地MYSQL服务器中创建一个名为tutorials的数据库-
create database tutorials;
让我们使用以下SQL命令在数据库中创建一个名为employee的表:
use tutorials;
CREATE TABLE employee (
   id int(11) NOT NULL auto_increment,
   emp_name varchar(100) NOT NULL,
   emp_job varchar(100) NOT NULL,
   PRIMARY KEY (id)
);
使用以下查询将数据插入到employee表中-
INSERT INTO employee (emp_name, emp_job) VALUES ('Adam',  'Tutor');
INSERT INTO employee (emp_name, emp_job) VALUES ('Bruce',  'Programmer');
INSERT INTO employee (emp_name, emp_job) VALUES ('David',  'Designer');
步骤9:更新数据库配置
使用必要的数据库驱动器信息更新全局配置文件myapp / config / autoload / global.php。
return [
   'db' => [
      'driver' => 'Pdo',
      'dsn' => 'mysql:dbname = tutorials;host=localhost',
      'driver_options' => [PDO::MYSQL_ATTR_INIT_COMMAND => 'SET NAMES \'UTF8\''],
   ],
];
现在,更新本地配置文件– myapp / config / autoload / local.php中的数据库凭据。这样,我们可以分离本地和实时数据库连接凭据。
 array('username' => '', 'password' => '',),
);
步骤10:实现exchangeArray
在Employee模型中实现exchangeArray函数。
id = (!empty($data['id'])) ? $data['id'] : null;
      $this->emp_name = (!empty($data['emp_name'])) ? $data['emp_name'] : null;
      $this->emp_job = (!empty($data['emp_job'])) ? $data['emp_job'] : null;
   }
}
步骤11:使用TableGateway来获取员工数据
在模型文件夹本身中创建类EmployeeTable。在以下代码块中定义。
tableGateway = $tableGateway;
   }
   public function fetchAll() {
      $resultSet = $this->tableGateway->select();
      return $resultSet;
   }
}
步骤12:配置EmployeeTable类
使用getServiceConfig()方法更新Module.php中的员工服务
 [
            Model\EmployeeTable::class => function (    $container) {
               $tableGateway = $container>get( Model\EmployeeTableGateway::class);
               $table = new Model\EmployeeTable($tableGateway);
               return $table;
            },
            Model\EmployeeTableGateway::class => function ($container) {
               $dbAdapter = $container->get(AdapterInterface::class);
               $resultSetPrototype = new ResultSet();
               $resultSetPrototype->setArrayObjectPrototype(new Model\Employee());
               return new TableGateway('employee', $dbAdapter, null, $resultSetPrototype);
            },
         ],
      ];
   }
}
步骤13:在Controller中添加员工服务
如下所示,在− myapp / module / config / module.config.php中更新Employee Module Configuration的Controller部分。
'controllers' => [
   'factories' => [
      Controller\EmployeeController::class => function($container) {
         return new Controller\EmployeeController(
            $container->get(Model\EmployeeTable::class)
         );
      },
   ],
]
步骤14:为EmployeeController添加构造函数
添加以EmployeeTable作为参数的构造函数,并编辑以下更改。
table = $table;
   }
   public function indexAction() {
      $view = new ViewModel([
         'data' => $this->table->fetchAll(),
      ]);
      return $view;
   }
}
步骤15:在视图脚本“ index.phtml”中显示员工信息
移动到文件-index.phtml并进行以下更改-
headTitle($title);
?>


      Employee Name
      Employee Job
      Edit/Delete operations


      escapeHtml($empdata->emp_name);?>
      escapeHtml($empdata->emp_job);?>

         Edit
         Delete
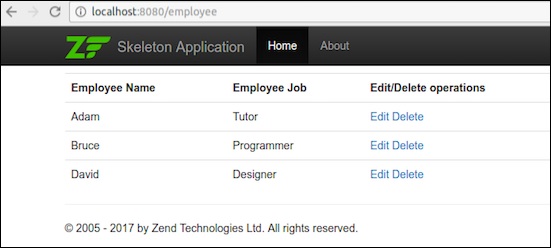
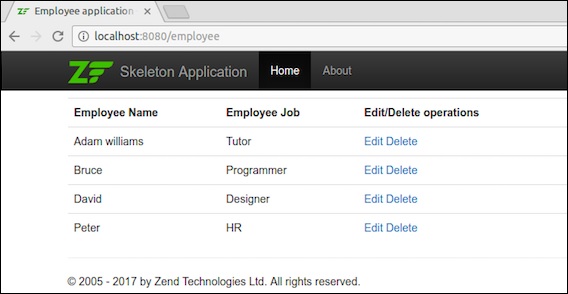
现在,我们已经成功创建了数据库模型,并且可以在应用程序中获取记录。
使用url- http:// localhost:8080 / employee请求应用程序。
结果
下一步说明有关员工模块中的插入,编辑和删除数据操作。
步骤16:创建员工表格
在myapp / module / Employee / src / Form目录中创建一个名为EmployeeForm.php的文件。在下面的代码块中对其进行了描述。
add(array(
         'name' => 'id',
         'type' => 'Hidden',
      ));
      $this->add(array(
         'name' => 'emp_name',
         'type' => 'Text',
         'options' => array(
            'label' => 'Name',
         ),
      ));
      $this->add(array(
         'name' => 'emp_job',
         'type' => 'Text',
         'options' => array(
            'label' => 'Job',
         ),
      ));
      $this->add(array(
         'name' => 'submit',
         'type' => 'Submit',
         'attributes' => array(
            'value' => 'Go',
            'id' => 'submitbutton',
         ),
      ));
   }
}
步骤17:更新员工模型
更新员工模型并实现InputFilterAwareInterface。移至目录myapp / module / Employee / src / Employee / Model并在Employee.phpfile中添加以下更改。
id = (isset($data['id'])) ? $data['id'] : null;
      $this->emp_name = (isset($data['emp_name'])) ? $data['emp_name'] : null;
      $this->emp_job = (isset($data['emp_job']))  ? $data['emp_job'] : null;
   }

   // Add content to these methods:
   public function setInputFilter(InputFilterInterface $inputFilter) {
      throw new \Exception("Not used");
   }
   public function getInputFilter() {
      if (!$this->inputFilter) {
         $inputFilter = new InputFilter();
         $inputFilter->add(array(
            'name' => 'id',
            'required' => true,
            'filters' => array(
               array('name' => 'Int'),
            ),
         ));
         $inputFilter->add(array(
            'name' => 'emp_name',
            'required' => true,
            'filters' => array(
               array('name' => 'StripTags'),
               array('name' => 'StringTrim'),
            ),
            'validators' => array(
               array('name' => 'StringLength',
                        'options' => array(
                           'encoding' => 'UTF-8',
                           'min' => 1,
                           'max' => 50,
                        ),
                    ),
                ),
            ));
         $inputFilter->add(array(
            'name' => 'emp_job',
            'required' => true,
            'filters' => array(
               array('name' => 'StripTags'),
               array('name' => 'StringTrim'),
            ),
            'validators' => array(
               array('name' => 'StringLength',
                  'options' => array(
                     'encoding' => 'UTF-8',
                     'min' => 1,
                     'max' => 50,
                  ),
                  ),
               ),
         ));
         $this->inputFilter = $inputFilter;
      }
      return $this->inputFilter;
   }
}
步骤18:在Employee Controller中添加addAction
在EmployeeController类中添加以下更改。
get('submit')->setValue('Add');
   $request = $this->getRequest();

   if ($request->isPost()) {
      $employee = new Employee();
      $form->setInputFilter($employee->getInputFilter());
      $form->setData($request->getPost());

      if ($form->isValid()) {
         $employee->exchangeArray($form->getData());
         $this->table->saveEmployee($employee);

         // Redirect to list of employees
         return $this->redirect()->toRoute('employee');
      }
   }
   return array('form' => $form);
}
步骤19:在EmployeeTable类中添加保存功能
在EmployeeTable类中添加以下两个函数– myapp / module / Employee / src / Model / EmployeeTable.php
public function getEmployee($id) {
   $id  = (int) $id;
   $rowset = $this->tableGateway->select(array('id' => $id));
   $row = $rowset->current();
   if (!$row) {
      throw new \Exception("Could not find row $id");
   }
   return $row;
}
public function saveEmployee(Employee $employee) {
   $data = array (
      'emp_name' => $employee->emp_name,
      'emp_job'  => $employee->emp_job,
   );
   $id = (int) $employee->id;
   if ($id == 0) {
      $this->tableGateway->insert($data);
   } else {
      if ($this->getEmployee($id)) {
         $this->tableGateway->update($data, array('id' => $id));
      } else {
         throw new \Exception('Employee id does not exist');
      }
   }
}
步骤20:为AddAction方法Add.phtml创建View脚本
在− myapp / module / view / employee / employee中的“ Add.phtml”文件中添加以下更改。
headTitle($title);
?>
escapeHtml($title); ?>

setAttribute('action', $this->url('employee', array('action' => 'add')));
   $form->prepare();
   echo $this->form()->openTag($form);
   echo $this->formHidden($form->get('id'));
   echo $this->formRow($form->get('emp_name'))."
";
   echo $this->formRow($form->get('emp_job'))."
";
   echo $this->formSubmit($form->get('submit'));
   echo $this->form()->closeTag();
Request the application using the url, http://localhost:8080/employee/add
结果
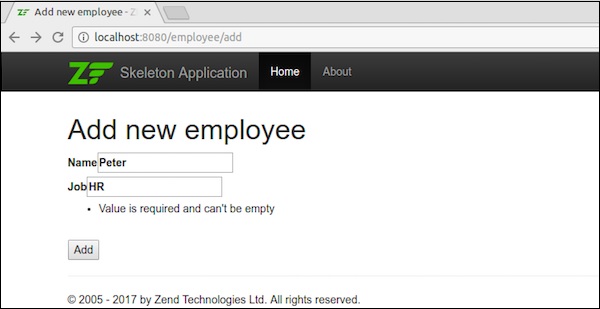
添加数据后,它将重定向到主页。
步骤21:编辑员工记录
让我们在Employee模块中执行编辑数据操作。在Employeecontroller.php中更新以下更改。
public function editAction() {
   $id = (int) $this->params()->fromRoute('id', 0);
   if (!$id) {
      return $this->redirect()->toRoute('employee', array(
         'action' => 'add'
      ));
   }
   try {
      $employee = $this->table->getEmployee($id);
   } catch (\Exception $ex) {
      return $this->redirect()->toRoute('employee', array(
         'action' => 'index'
      ));
   }
   $form = new EmployeeForm();
   $form->bind($employee);
   $form->get('submit')->setAttribute('value', 'Edit');
   $request = $this->getRequest();

   if ($request->isPost()) {
      $form->setInputFilter($employee->getInputFilter());
      $form->setData($request->getPost());
      if ($form->isValid()) {
         $this->table->saveEmployee($employee);

         // Redirect to list of employees
         return $this->redirect()->toRoute('employee');
      }
   }
   return array('id' => $id, 'form' => $form,);
}
在这里,我们查找匹配路线中的id ,然后加载员工详细信息以进行编辑操作。
步骤22:Employee.php
现在在“ Employee.php”文件中添加以下更改,该文件位于− myapp / module / Employee / src / Employee / Model /目录中。
public function getArrayCopy() {
   return get_object_vars($this);
}
在这里,Zend \ Stdlib \ Hydrator \ ArraySerializable期望在模型中找到两个方法: getArrayCopy()和exchangeArray() 。
其中,exchangeArray()用于迭代。此函数用于绑定employee表中的数据。
现在,我们需要为editAction()创建一个视图脚本。
步骤23:建立Edit.phtml
在模块/Employee/view/employee/employee/edit.phtml中创建视图脚本文件
headTitle($title);
?>
escapeHtml($title); ?>

form;
$form->setAttribute('action', $this->url(
   'employee',
   array('action' => 'edit', 'id' => $this->id,)
));
$form->prepare();
echo $this->form()->openTag($form);
echo $this->formHidden($form->get('id'));
echo $this->formRow($form->get('emp_name'))."
";
echo $this->formRow($form->get('emp_job'))."
";
echo $this->formSubmit($form->get('submit'));
echo $this->form()->closeTag();
以下屏幕快照显示了编辑员工详细信息。
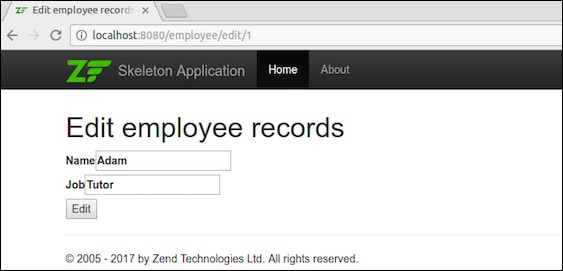
数据被编辑后,它将重定向到主页。
步骤24:添加deleteEmployee方法
在EmployeeTable类中添加deleteEmployee方法– myapp / module / Employee / src / Model / EmployeeTable.php
public function deleteEmployee($id) {
   $this->tableGateway->delete(['id' => (int) $id]);
}
步骤25:删除员工记录
现在让我们在Employee模块中执行删除数据操作。在EmployeeController类中添加以下方法deleteAction 。
public function deleteAction() {
   $id = (int) $this->params()->fromRoute('id', 0);
   if (!$id) {
      return $this->redirect()->toRoute('employee');
   }
   $request = $this->getRequest();
   if ($request->isPost()) {
      $del = $request->getPost('del', 'No');
      if ($del == 'Yes') {
         $id = (int) $request->getPost('id');
         $this->table->deleteEmployee($id);
      }
      return $this->redirect()->toRoute('employee');
   }
   return array(
      'id' => $id,
      'employee' => $this->table->getEmployee($id)
   );
}
在这里,deleteEmployee()方法通过其ID删除员工,并重定向到员工列表页面(主页)。
现在让我们为deleteAction()方法创建一个相应的视图脚本。
步骤26:创建一个视图脚本
在− myapp / module / Employee / view / employee / employee / delete.phtml中创建一个名为delete.phtml的文件,并在其中添加以下代码。
headTitle($title);
?>
escapeHtml($title); ?>

'escapeHtml($employee->emp_name); ?>' by
'escapeHtml($employee->emp_job); ?&'?
url('employee', array('action' => 'delete', 'id' => $this->id,));
?>
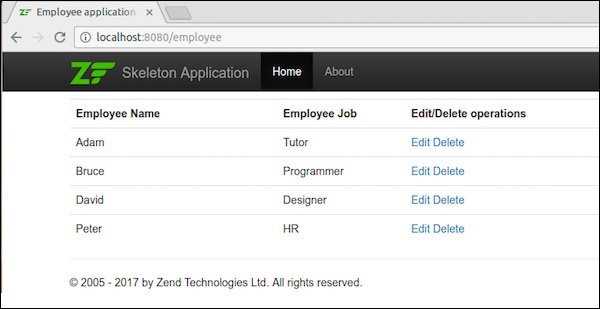
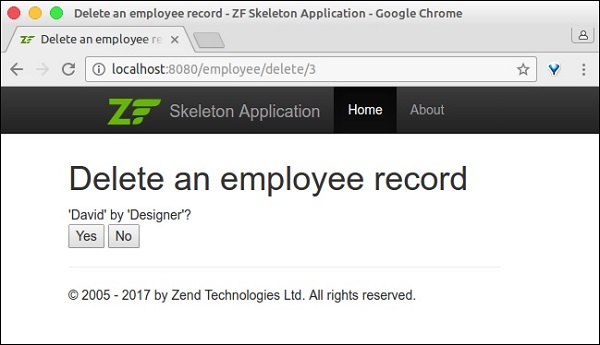
现在,使用主页中的编辑链接删除任何员工,结果将如以下屏幕快照所示。
结果
通过实现所有必需的功能,我们已经成功完成了Employee模块。
结论
在当前竞争激烈的环境中,Zend框架被开发人员放在首位。它以PHP语言为任何程序或任何类型的应用程序提供抽象。它是一个成熟的框架,并支持现代PHP语言功能。它有趣,专业,不断发展并与当前技术保持同步。