除了在Flutter构建 UI 之外,我们还可以将其与后端集成。大多数应用程序使用 API 来显示使用数据。我们将使用 HTTP 包,它提供了执行操作的高级方法。 REST API 使用简单的http调用来与 JSON 数据通信,因为:
- 它使用等待 & 异步功能。
- 它提供了各种方法。
- 它提供类和http来执行 Web 请求。
让我们看看如何使用 JSON 文件在flutter应用程序中获取、删除和更新数据。我们将制作单独的dart文件。 dart在以下步骤中更容易调试和更清晰的代码。
第 1 步:设置项目
安装 http 依赖项并将其添加到pubspec.yaml 文件中,以便在应用程序中使用 API。
dependencies:
  http:
第 2 步:创建请求
此基本请求使用 get 方法从指定的 URL 以 JSON 格式获取数据。每个请求都返回一个 Future
Future> fetchFruit() async {
final response = await http.get(url);
}
String url = "Your_URL";
第 3 步:创建类
创建一个水果类并保存为水果。dart如下图:
Dart
class Fruit {
  final int id;
  final String title;
  final String imgUrl;
  final int quantity;

  Fruit(
    this.id,
    this.title,
    this.imgUrl,
    this.quantity,
  );
  factory Fruit.fromMap(Map json) {
    return Fruit(json['id'], json['title'], json['imgUrl'], json['quantity']);
  }
  factory Fruit.fromJson(Map json) {
    return Fruit(json['id'], json['title'], json['imgUrl'], json['quantity']);
  }
}
Dart
import 'package:flutter/material.dart';
import 'fruit.dart';

class FruitItem extends StatelessWidget {
  FruitItem({this.item});

  final Fruit item;

  Widget build(BuildContext context) {
    return Container(
        padding: EdgeInsets.all(2),
        height: 140,
        child: Card(
          elevation: 5,
          child: Row(
              mainAxisAlignment: MainAxisAlignment.spaceEvenly,
              children: [
                Image.network(
                  this.item.imgUrl,
                  width: 200,
                ),
                Expanded(
                    child: Container(
                        padding: EdgeInsets.all(5),
                        child: Column(
                          mainAxisAlignment: MainAxisAlignment.spaceEvenly,
                          children: [
                            Text(this.item.title,
                                style: TextStyle(fontWeight: FontWeight.bold)),
                            Text("id:${this.item.id}"),
                            Text("quantity:${this.item.quantity}"),
                          ],
                        )))
              ]),
        ));
  }
}
Dart
import 'package:flutter/material.dart';
import 'fruit.dart';
import 'fruitItem.dart';

class FruitList extends StatelessWidget {
  final List items;

  FruitList({Key key, this.items});
  @override
  Widget build(BuildContext context) {
    return ListView.builder(
      itemCount: items.length,
      itemBuilder: (context, index) {
        return FruitItem(item: items[index]);
      },
    );
  }
}
Dart
import 'package:http/http.dart' as http;
import 'dart:convert';
import 'package:flutter/material.dart';
import 'fruit.dart';
import 'fruitItem.dart';
import 'fruitList.dart';

class MyHomePage extends StatelessWidget {
  final String title;
  final Future> products;

  MyHomePage({Key key, this.title, this.products}) : super(key: key);

  @override
  Widget build(BuildContext context)
  {
    return Scaffold(
        appBar: AppBar(
          backgroundColor: Color(0xFF4CAF50),
          title: Text("GeeksForGeeks"),
        ),
        body: Center(
          child: FutureBuilder>(
            future: products,
            builder: (context, snapshot) {
              if (snapshot.hasError) print(snapshot.error);
              return snapshot.hasData
                  ? FruitList(items: snapshot.data)
                  : Center(child: CircularProgressIndicator());
            },
          ),
        ));
  }
}
Dart
Future updateFruit(String title) async {
  final http.Response response = await http.put(
    'url/$id',
    headers: {
      'Content-Type': 'application/json; charset=UTF-8',
    },
    body: jsonEncode({
      'title': title,
    }),
  );

  if (response.statusCode == 200) {
    return Fruit.fromJson(json.decode(response.body));
  } else {
    throw Exception('Failed to update album.');
  }
}
Dart
Future deleteAlbum(int id) async {
  final http.Response response = await http.delete(
    'url/$id',
    headers: {
      'Content-Type': 'application/json; charset=UTF-8',
    },
  );

  if (response.statusCode == 200) {
    return Fruit.fromJson(json.decode(response.body));
  } else {
    throw Exception('Failed to delete album.');
  }
}
Dart
Future sendFruit(

String title, int id, String imgUrl, int quantity) async {
     final http.Response response = await http.post(
     'url',
    headers:  {
      'Content-Type': 'application/json; charset=UTF-8',
    },
    body: jsonEncode( {
      'title': title,
      'id': id.toString(),
      'imgUrl': imgUrl,
      'quantity': quantity.toString()
    }),
  );
  if (response.statusCode == 201) {
    return Fruit.fromJson(json.decode(response.body));
  } else {
    throw Exception('Failed to load album');
  }
}
第 4 步:创建 Class 对象
在fruitItem中创建FruitItem。dart
Dart
import 'package:flutter/material.dart';
import 'fruit.dart';

class FruitItem extends StatelessWidget {
  FruitItem({this.item});

  final Fruit item;

  Widget build(BuildContext context) {
    return Container(
        padding: EdgeInsets.all(2),
        height: 140,
        child: Card(
          elevation: 5,
          child: Row(
              mainAxisAlignment: MainAxisAlignment.spaceEvenly,
              children: [
                Image.network(
                  this.item.imgUrl,
                  width: 200,
                ),
                Expanded(
                    child: Container(
                        padding: EdgeInsets.all(5),
                        child: Column(
                          mainAxisAlignment: MainAxisAlignment.spaceEvenly,
                          children: [
                            Text(this.item.title,
                                style: TextStyle(fontWeight: FontWeight.bold)),
                            Text("id:${this.item.id}"),
                            Text("quantity:${this.item.quantity}"),
                          ],
                        )))
              ]),
        ));
  }
}
第 5 步:创建水果列表
在fruitList 中创建一个FruitList类。dart如下图:
Dart
import 'package:flutter/material.dart';
import 'fruit.dart';
import 'fruitItem.dart';

class FruitList extends StatelessWidget {
  final List items;

  FruitList({Key key, this.items});
  @override
  Widget build(BuildContext context) {
    return ListView.builder(
      itemCount: items.length,
      itemBuilder: (context, index) {
        return FruitItem(item: items[index]);
      },
    );
  }
}
第 6 步:显示响应
在屏幕上显示来自main的响应。 dart文件如下图所示:
Dart
import 'package:http/http.dart' as http;
import 'dart:convert';
import 'package:flutter/material.dart';
import 'fruit.dart';
import 'fruitItem.dart';
import 'fruitList.dart';

class MyHomePage extends StatelessWidget {
  final String title;
  final Future> products;

  MyHomePage({Key key, this.title, this.products}) : super(key: key);

  @override
  Widget build(BuildContext context)
  {
    return Scaffold(
        appBar: AppBar(
          backgroundColor: Color(0xFF4CAF50),
          title: Text("GeeksForGeeks"),
        ),
        body: Center(
          child: FutureBuilder>(
            future: products,
            builder: (context, snapshot) {
              if (snapshot.hasError) print(snapshot.error);
              return snapshot.hasData
                  ? FruitList(items: snapshot.data)
                  : Center(child: CircularProgressIndicator());
            },
          ),
        ));
  }
}
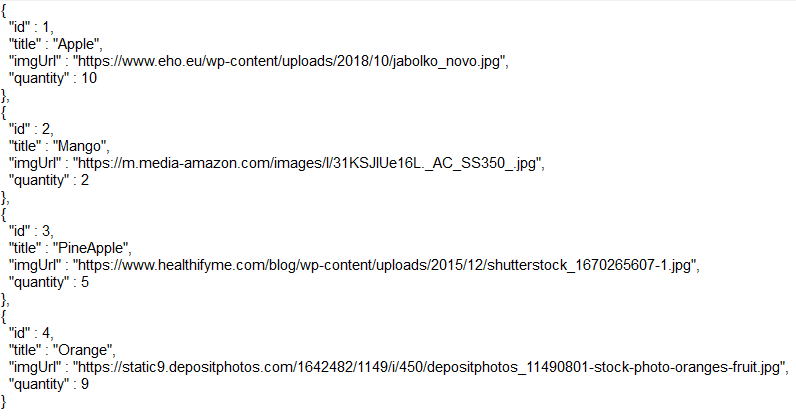
以下是运行应用程序时的JSON 数据:

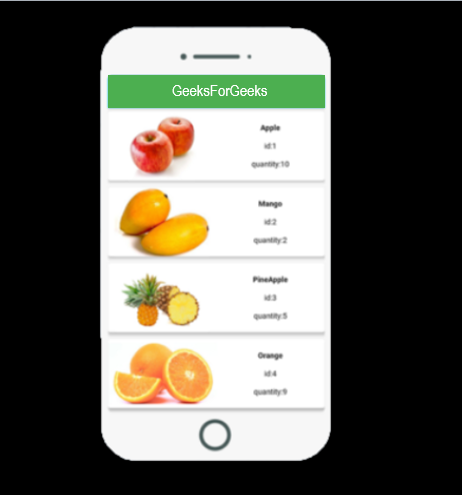
以下是解码 JSON 数据的Flutter应用程序主页的 UI 屏幕。
输出:

解释:
1. 该语句用于将包导入为http 。
import 'package:http/http.dart' as http;
2. 该语句用于转换 JSON 数据。
import 'dart:convert';
3. 以下语句用于处理错误代码。如果响应状态代码是 200,那么我们可以显示请求的数据,否则我们可以向用户显示错误消息。在这里,您可以使用任何接受 get() 请求并以 JSON 格式返回响应的 URL。
final response = await http.get('url');
 if (response.statusCode == 200) {
    //display UI}
    else {
   //Show Error Message
   }
}
4. 以下语句用于解码 JSON 数据并以用户友好的方式显示输出。这确保它只根据我们的要求接受和提取 JSON 数据。
List decodeFruit(String responseBody) {
 final parsed = json.decode(responseBody).cast>();
 return parsed.map((json) => Fruit.fromMap(json)).toList();
}
现在Rest API在flutter app中成功实现。如果您需要使用 JSON 文件在Flutter应用程序中更新、删除或发送数据,请按照与创建请求的步骤完全相同的步骤进行操作。
由于我们需要将noteID发送到 API,因此我们需要更新noteID并将其添加到我们使用put()、delete() 或 post() 方法中的“/$id”发送到 API 的路径中,因为我们需要分别指定要更新、删除或发送的笔记。我们还需要在更新、删除或发送笔记后重新获取笔记以显示它们。
1.更新数据
Dart
Future updateFruit(String title) async {
  final http.Response response = await http.put(
    'url/$id',
    headers: {
      'Content-Type': 'application/json; charset=UTF-8',
    },
    body: jsonEncode({
      'title': title,
    }),
  );

  if (response.statusCode == 200) {
    return Fruit.fromJson(json.decode(response.body));
  } else {
    throw Exception('Failed to update album.');
  }
}
2.删除数据
Dart
Future deleteAlbum(int id) async {
  final http.Response response = await http.delete(
    'url/$id',
    headers: {
      'Content-Type': 'application/json; charset=UTF-8',
    },
  );

  if (response.statusCode == 200) {
    return Fruit.fromJson(json.decode(response.body));
  } else {
    throw Exception('Failed to delete album.');
  }
}
3.发送数据
Dart
Future sendFruit(

String title, int id, String imgUrl, int quantity) async {
     final http.Response response = await http.post(
     'url',
    headers:  {
      'Content-Type': 'application/json; charset=UTF-8',
    },
    body: jsonEncode( {
      'title': title,
      'id': id.toString(),
      'imgUrl': imgUrl,
      'quantity': quantity.toString()
    }),
  );
  if (response.statusCode == 201) {
    return Fruit.fromJson(json.decode(response.body));
  } else {
    throw Exception('Failed to load album');
  }
}