- Spring Boot – 自动配置
- Spring Boot自动配置
- Spring Boot自动配置(1)
- Spring Boot – 自动配置(1)
- mysql spring boot配置——SQL(1)
- Spring Boot-云配置客户端(1)
- Spring Boot-云配置客户端
- mysql spring boot配置——SQL代码示例
- Spring Boot-管理服务器(1)
- Spring Boot-管理服务器
- 使用 Spring Boot 属性配置 MySQL - 无论代码示例
- spring boot bean 配置 - Java (1)
- 五服务器配置 (1)
- spring boot bean 配置 - Java 代码示例
- 代码服务器配置 (1)
- spring boot - CSS (1)
- Spring Boot属性
- Spring Boot属性(1)
- Spring 和 Spring Boot 的区别
- Spring 和 Spring Boot 的区别(1)
- 配置freemarker配置的spring boot依赖-Java(1)
- Spring Boot-Eureka服务器
- Spring Boot-Eureka服务器(1)
- spring boot - CSS 代码示例
- 配置freemarker配置的spring boot依赖-Java代码示例
- Spring Boot 使用配置文件配置环境特定配置的方法是什么? (1)
- hystrix 配置 spring boot - Java (1)
- Spring和Spring Boot之间的区别
- Spring和Spring Boot之间的区别(1)
📅 最后修改于: 2020-11-11 05:44:20 🧑 作者: Mango
Spring Cloud Configuration Server是一个集中式应用程序,用于管理所有与应用程序相关的配置属性。在本章中,您将详细了解如何创建Spring Cloud Configuration服务器。
创建Spring Cloud配置服务器
首先,从Spring Initializer页面下载Spring Boot项目,然后选择Spring Cloud Config Server依赖项。观察下面给出的截图-

现在,如下所示在构建配置文件中添加Spring Cloud Config服务器依赖项-
Maven用户可以将以下依赖项添加到pom.xml文件中。
   org.springframework.cloud
   spring-cloud-config-server
Gradle用户可以在build.gradle文件中添加以下依赖项。
compile('org.springframework.cloud:spring-cloud-config-server')
现在,在主Spring Boot应用程序类文件中添加@EnableConfigServer批注。 @EnableConfigServer批注使您的Spring Boot应用程序充当配置服务器。
下面给出了主要的Spring Boot应用程序类文件-
package com.tutorialspoint.configserver;

import org.springframework.boot.SpringApplication;
import org.springframework.boot.autoconfigure.SpringBootApplication;
import org.springframework.cloud.config.server.EnableConfigServer;

@SpringBootApplication
@EnableConfigServer
public class ConfigserverApplication {
   public static void main(String[] args) {
      SpringApplication.run(ConfigserverApplication.class, args);
   }
}
现在,将以下配置添加到属性文件,并将application.properties文件替换为bootstrap.properties文件。遵守下面给出的代码-
server.port = 8888
spring.cloud.config.server.native.searchLocations=file:///C:/configprop/
SPRING_PROFILES_ACTIVE=native
Configuration Server在Tomcat端口8888上运行,并且从本地搜索位置加载应用程序配置属性。
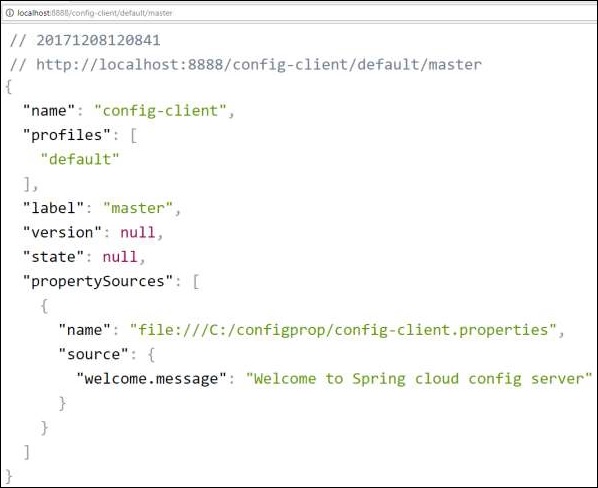
现在,在file:/// C:/ configprop /中,放置您的客户端应用程序-application.properties文件。例如,您的客户端应用程序名称为config-client ,然后将application.properties文件重命名为config-client.properties并将属性文件放置在路径file:/// C:/ configprop /上。
配置客户端属性文件的代码如下-
welcome.message = Welcome to Spring cloud config server
完整的构建配置文件在下面给出-
Maven用户可以使用下面给出的pom.xml-
   4.0.0
   com.tutorialspoint
   configserver
   0.0.1-SNAPSHOT
   jar

   configserver
   Demo project for Spring Boot

      org.springframework.boot
      spring-boot-starter-parent
      1.5.9.RELEASE


      UTF-8
      UTF-8
      1.8
      Edgware.RELEASE


         org.springframework.cloud
         spring-cloud-config-server


         org.springframework.boot
         spring-boot-starter-test
         test


            org.springframework.cloud
            spring-cloud-dependencies
            ${spring-cloud.version}
            pom
            import


            org.springframework.boot
            spring-boot-maven-plugin
Gradle用户可以使用下面给出的build.gradle文件-
import


buildscript {
   ext {
      springBootVersion = '1.5.9.RELEASE'
   }
   repositories {
      mavenCentral()
   }
   dependencies {
      classpath("org.springframework.boot:spring-boot-gradle-plugin:${springBootVersion}")
   }
}
apply plugin: 'java'
apply plugin: 'eclipse'
apply plugin: 'org.springframework.boot'

group = 'com.tutorialspoint'
version = '0.0.1-SNAPSHOT'
sourceCompatibility = 1.8

repositories {
   mavenCentral()
}
ext {
   springCloudVersion = 'Edgware.RELEASE'
}
dependencies {
   compile('org.springframework.cloud:spring-cloud-config-server')
   testCompile('org.springframework.boot:spring-boot-starter-test')
}
dependencyManagement {
   imports {
      mavenBom "org.springframework.cloud:spring-cloud-dependencies:${springCloudVersion}"
   }
}
现在,创建一个可执行的JAR文件,并使用以下Maven或Gradle命令运行Spring Boot应用程序-
对于Maven,请使用下面给出的命令-
mvn clean install
在“ BUILD SUCCESS”之后,您可以在目标目录下找到JAR文件。
对于Gradle,请使用下面给出的命令-
gradle clean build
在“ BUILD SUCCESSFUL”之后,您可以在build / libs目录下找到JAR文件。
使用以下命令运行JAR文件-
java –jar
现在,该应用程序已在Tomcat端口8888上启动,如下所示-

现在,在Web浏览器上访问URL http:// localhost:8888 / config-client / default / master ,您可以看到config-client应用程序配置属性,如下所示。