- Django默认CRUD(1)
- Django默认CRUD
- CRUD JAVA (1)
- CRUD JAVA 代码示例
- Laravel Crud
- Laravel Crud(1)
- 平均堆栈中的 crud 应用程序 (1)
- 在 crud php 中删除(1)
- 数组上的 JS CRUD - Javascript (1)
- 在 crud php 代码示例中删除
- 平均堆栈中的 crud 应用程序 - 无论代码示例
- 创建新的 django 应用程序 - Python (1)
- 如何在 Django 中创建应用程序?(1)
- 如何在 Django 中创建应用程序?
- 数组上的 JS CRUD - Javascript 代码示例
- crud 应用程序 YII 中的下拉菜单 - PHP (1)
- crud 应用程序 YII 中的下拉菜单 - PHP 代码示例
- 将导航栏添加到 React Redux CRUD 应用程序 - Javascript (1)
- 创建新的 django 应用程序 - Python 代码示例
- Servlet中的CRUD(1)
- Servlet中的CRUD
- Servlet – CRUD
- Servlet – CRUD(1)
- 将导航栏添加到 React Redux CRUD 应用程序 - Javascript 代码示例
- 导入引导到 React Redux CRUD 应用程序 - Javascript (1)
- MySQL 中的 CRUD 操作(1)
- MySQL 中的 CRUD 操作
- JSP中的CRUD
- JSP中的CRUD(1)
📅 最后修改于: 2020-12-31 00:55:34 🧑 作者: Mango
Django CRUD(创建读取更新删除)示例
要创建执行CRUD操作的Django应用程序,请执行以下步骤。
1.创建一个项目
$ django-admin startproject crudexample

2.创建一个应用
$ python3 manage.py startapp employee

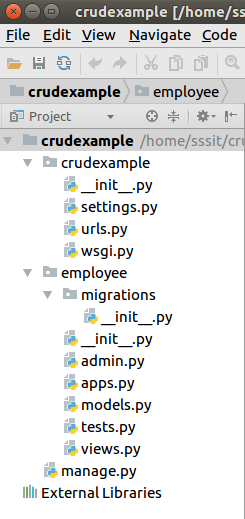
3.项目结构
最初,我们的项目如下所示:
4.数据库设置
在mysql中创建数据库djangodb ,并配置到django项目的settings.py文件中。参见示例。
// settings.py
DATABASES = {
    'default': {
        'ENGINE': 'django.db.backends.mysql',
        'NAME': 'djangodb',
        'USER':'root',
        'PASSWORD':'mysql',
        'HOST':'localhost',
        'PORT':'3306'
    }
}
5.建立模型
将以下代码放入models.py文件中。
// models.py
from django.db import models
class Employee(models.Model):
    eid = models.CharField(max_length=20)
    ename = models.CharField(max_length=100)
    eemail = models.EmailField()
    econtact = models.CharField(max_length=15)
    class Meta:
        db_table = "employee"
6.创建一个ModelForm
//forms.py
from django import forms
from employee.models import Employee
class EmployeeForm(forms.ModelForm):
    class Meta:
        model = Employee
        fields = "__all__"
7.创建视图功能
// views.py
from django.shortcuts import render, redirect
from employee.forms import EmployeeForm
from employee.models import Employee
# Create your views here.
def emp(request):
    if request.method == "POST":
        form = EmployeeForm(request.POST)
        if form.is_valid():
            try:
                form.save()
                return redirect('/show')
            except:
                pass
    else:
        form = EmployeeForm()
    return render(request,'index.html',{'form':form})
def show(request):
    employees = Employee.objects.all()
    return render(request,"show.html",{'employees':employees})
def edit(request, id):
    employee = Employee.objects.get(id=id)
    return render(request,'edit.html', {'employee':employee})
def update(request, id):
    employee = Employee.objects.get(id=id)
    form = EmployeeForm(request.POST, instance = employee)
    if form.is_valid():
        form.save()
        return redirect("/show")
    return render(request, 'edit.html', {'employee': employee})
def destroy(request, id):
    employee = Employee.objects.get(id=id)
    employee.delete()
    return redirect("/show")
8.提供路由
提供URL模式以使用视图函数进行映射。
// urls.py
from django.contrib import admin
from django.urls import path
from employee import views
urlpatterns = [
    path('admin/', admin.site.urls),
    path('emp', views.emp),
    path('show',views.show),
    path('edit/', views.edit),
    path('update/', views.update),
    path('delete/', views.destroy),
]
9.组织模板
在员工应用程序内创建一个模板文件夹,并在目录内创建三个(索引,编辑,显示)html文件。每个代码如下。
// index.html
Index
{% load staticfiles %}
// show.html
    Employee Records
     {% load staticfiles %}


        Employee ID
        Employee Name
        Employee Email
        Employee Contact
        Actions


{% for employee in employees %}

        {{ employee.eid }}
        {{ employee.ename }}
        {{ employee.eemail }}
        {{ employee.econtact }}

            Edit
            Delete


{% endfor %}


Add New Record
// edit.html
Index
{% load staticfiles %}
10.静态文件处理
在员工应用中创建一个static / css文件夹,然后在其中放置一个CSS。单击此处下载css文件。
11.项目结构
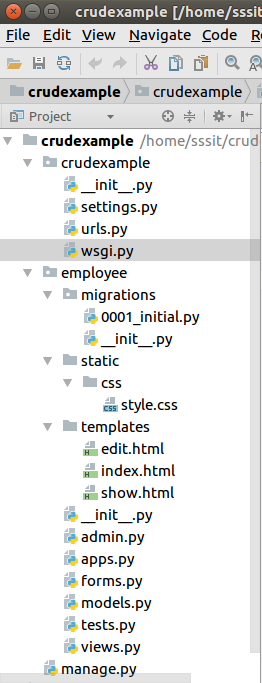
12.创建迁移
使用以下命令为创建的模型雇员创建迁移。
$ python3 manage.py makemigrations

迁移后,再执行一条命令以反映向数据库的迁移。但在此之前,请在settings.py文件的INSTALLED_APPS中提及应用程序(员工)的名称。
// settings.py
INSTALLED_APPS = [
    'django.contrib.admin',
    'django.contrib.auth',
    'django.contrib.contenttypes',
    'django.contrib.sessions',
    'django.contrib.messages',
    'django.contrib.staticfiles',
    'employee'
]
运行命令以迁移迁移。
$ python3 manage.py migrate
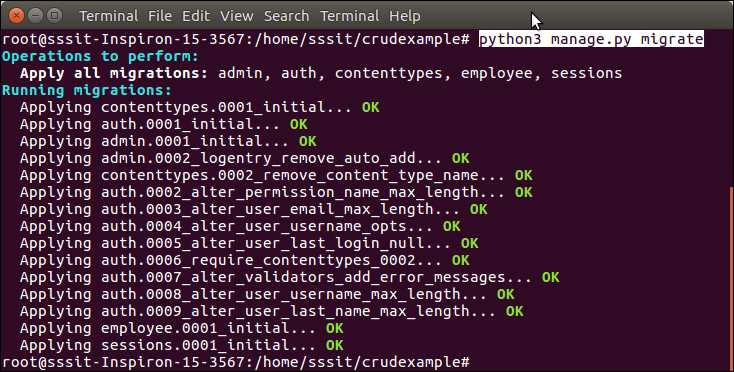
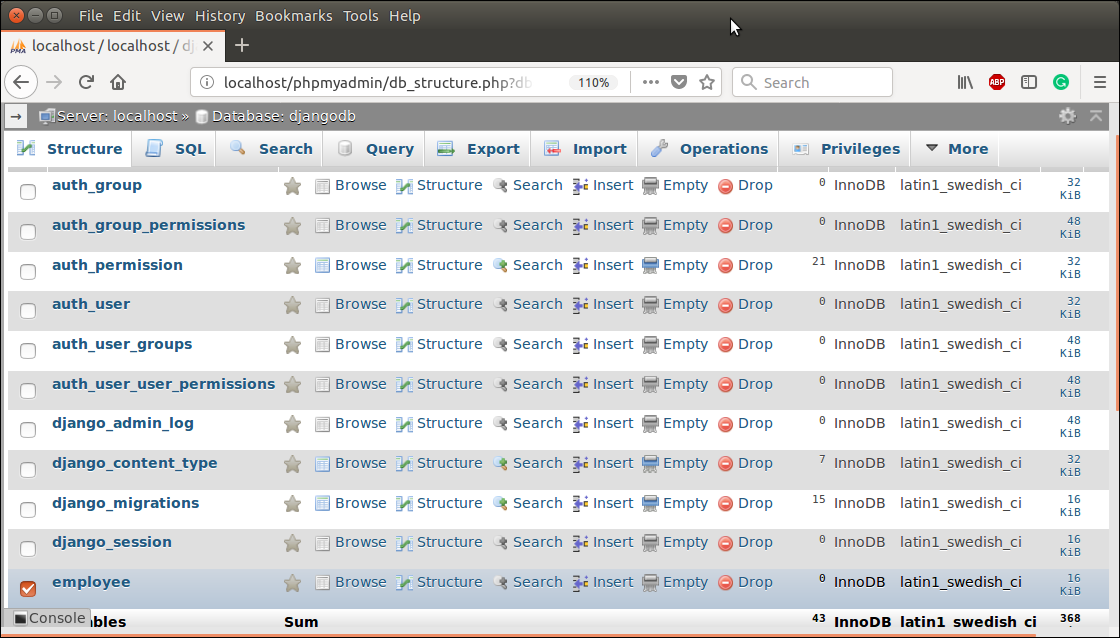
现在,我们的应用程序已成功连接并在数据库中创建了表。它创建了10个用于处理项目(会话,身份验证等)的默认表,以及我们创建的模型的一个表。
请参阅在migrate命令之后创建的表的列表。
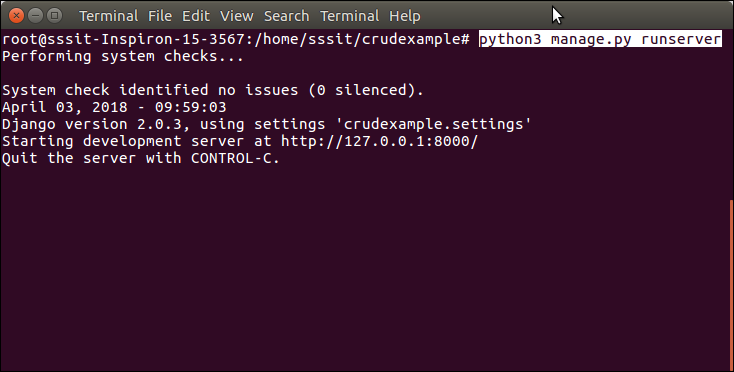
运行服务器
要运行服务器,请使用以下命令。
$ python3 manage.py runserver
访问浏览器
通过输入localhost:8000 / show来访问该应用程序,它将显示所有可用的员工记录。
最初,没有记录。因此,它没有显示记录消息。
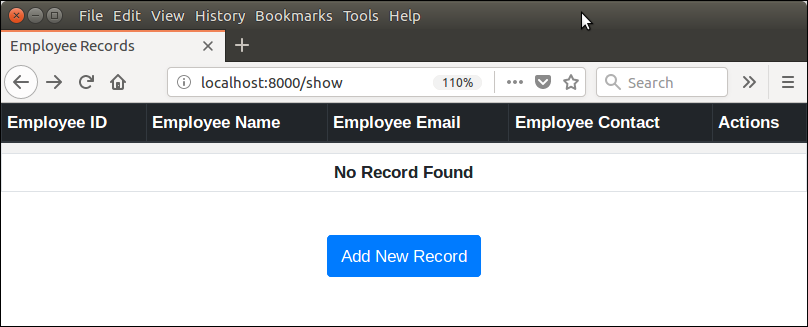
添加记录
单击添加新记录按钮,然后填写详细信息。参见示例。
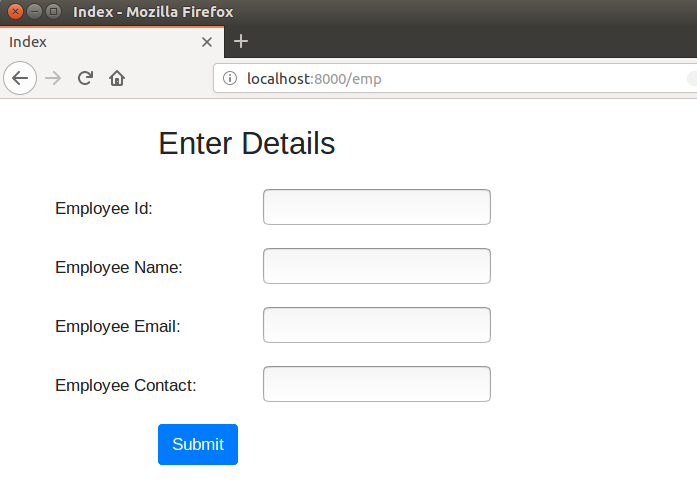
填写细节。

提交记录,并看到提交后显示已保存的记录。
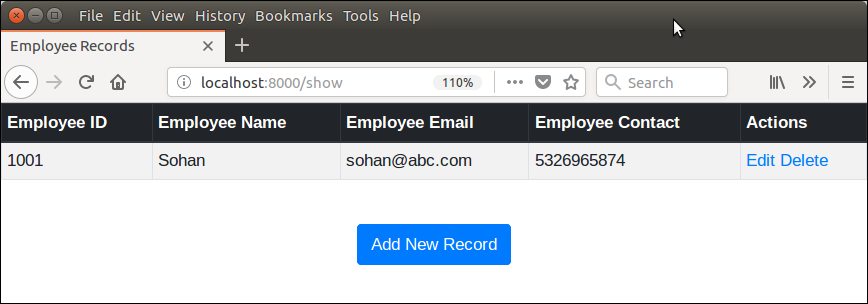
本节还允许,更新和删除操作列中的记录。
保存几条记录后,现在我们有了以下记录。

更新记录
通过单击“编辑”按钮来更新Mohan的记录。它将在编辑模式下显示Mohan的记录。
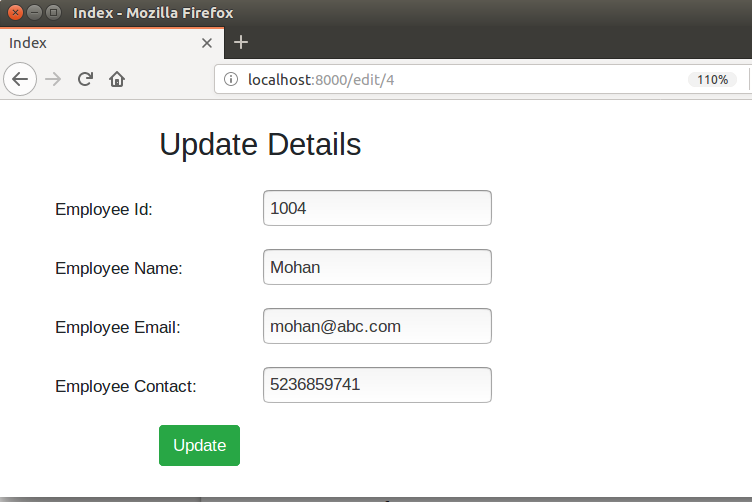
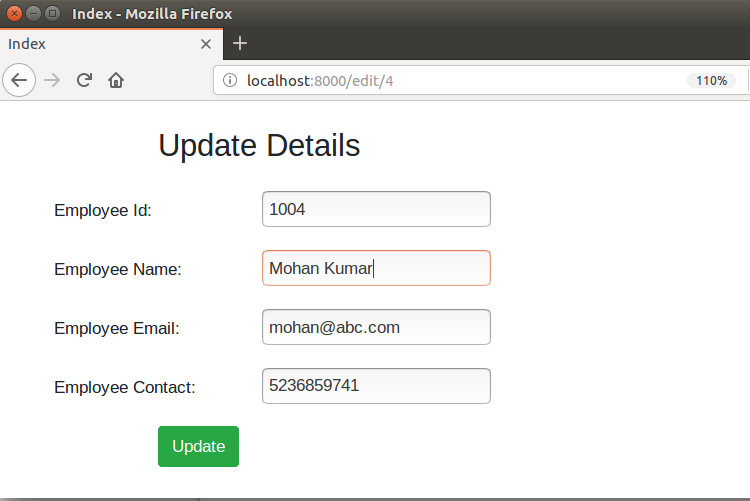
让我们,假如我的更新磨憨到莫汉·库马尔然后点击更新按钮。它立即更新记录。参见示例。
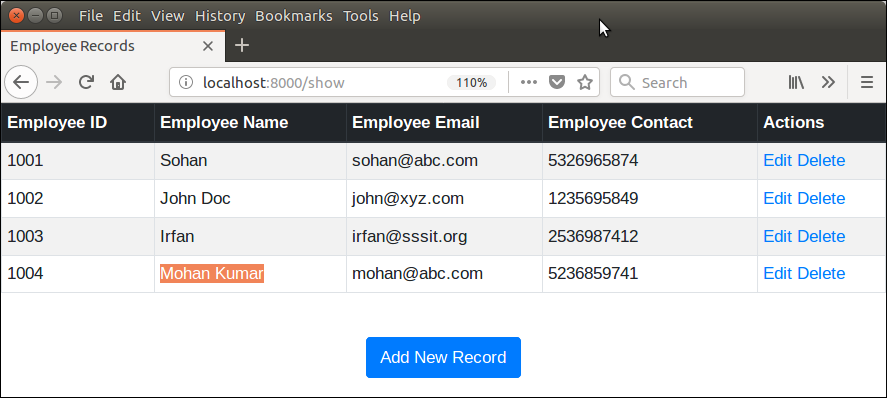
单击更新按钮,它将重定向到下一页。查看名称已更新。
同样,我们也可以通过单击删除链接来删除记录。
删除记录
假设我要删除Sohan ,可以通过单击删除按钮轻松完成。参见示例。
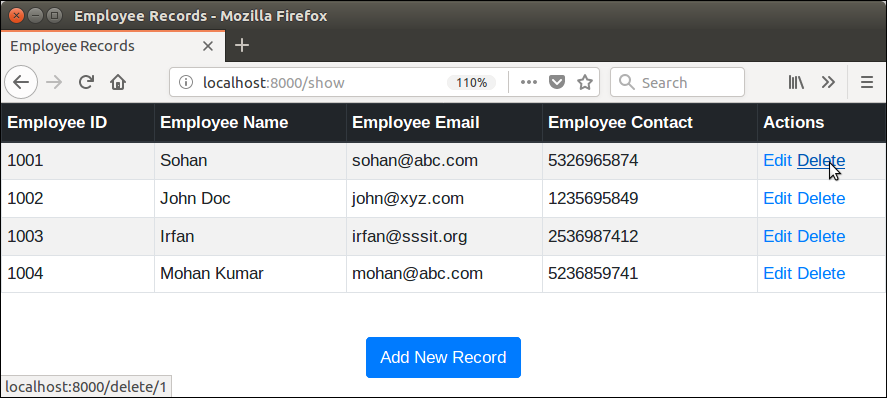
删除后,我们留下了以下记录。
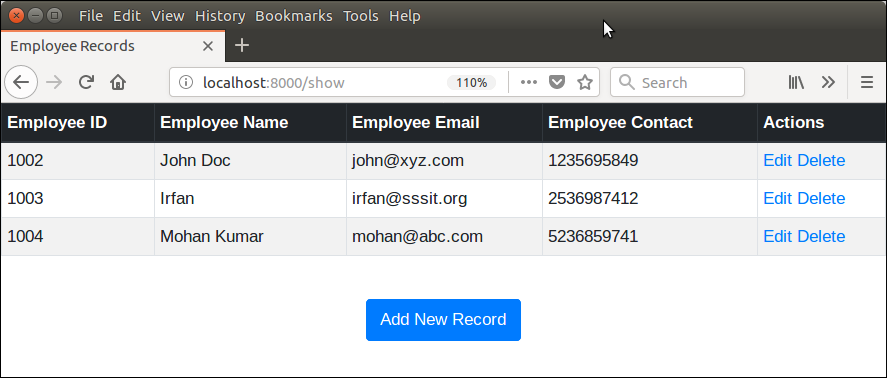
好了,我们已经使用Django成功创建了CRUD应用程序。
这个完整的项目可以在这里下载。