- android studio json 解析器 - Java (1)
- android studio json 解析器 - Java 代码示例
- 解析器
- 解析器(1)
- Android-XML解析器
- Android-XML解析器(1)
- 实现 JSON 解析器的Java程序
- CC++ 中的 HTML 解析器(1)
- C/C++ 中的 HTML 解析器
- c++ 属性解析器 - C++ (1)
- JSON 到 Ruby 哈希解析器 - Javascript (1)
- JSON 到 Ruby 哈希解析器 - Javascript 代码示例
- html 解析器 javascript (1)
- c++ 属性解析器 - C++ 代码示例
- html 解析器 javascript 代码示例
- 文件解析器 java 代码示例
- 配置解析器 (1)
- 配置解析器 #5 (1)
- 配置解析器 #4 (1)
- XML-解析器(1)
- XML解析器(1)
- XML-解析器
- XML解析器
- 角度解析器 - Javascript (1)
- JavaSAX 解析器和 DOM 解析器的区别(1)
- JavaSAX 解析器和 DOM 解析器的区别
- PHP-DOM解析器示例
- PHP-DOM解析器示例(1)
- 角度解析器 - Javascript 代码示例
📅 最后修改于: 2021-01-05 05:19:11 🧑 作者: Mango
JSON代表JavaScript Object Notation,它是一种独立的数据交换格式,是XML的最佳替代方案。本章介绍如何解析JSON文件并从中提取必要的信息。
Android提供了四个不同的类来处理JSON数据。这些类是JSONArray,JSONObject,JSONStringer和JSONTokenizer。
第一步是识别JSON数据中您感兴趣的字段。例如。在下面给出的JSON中,我们只想获取温度。
{
   "sys":
   {
      "country":"GB",
      "sunrise":1381107633,
      "sunset":1381149604
   },
   "weather":[
      {
         "id":711,
         "main":"Smoke",
         "description":"smoke",
         "icon":"50n"
      }
   ],

  "main":
   {
      "temp":304.15,
      "pressure":1009,
   }
}
JSON-元素
JSON文件包含许多组件。这是定义JSON文件的组件及其描述的表-
| Sr.No | Component & description |
|---|---|
| 1 |
Array([) In a JSON file , square bracket ([) represents a JSON array |
| 2 |
Objects({) In a JSON file, curly bracket ({) represents a JSON object |
| 3 |
Key A JSON object contains a key that is just a string. Pairs of key/value make up a JSON object |
| 4 |
Value Each key has a value that could be string , integer or double e.t.c |
JSON-解析
为了解析JSON对象,我们将创建一个JSONObject类的对象,并为其指定一个包含JSON数据的字符串。它的语法是-
String in;
JSONObject reader = new JSONObject(in);
最后一步是解析JSON。 JSON文件由具有不同键/值对等的不同对象组成,因此JSONObject具有用于解析JSON文件的每个组件的单独函数。其语法如下-
JSONObject sys  = reader.getJSONObject("sys");
country = sys.getString("country");

JSONObject main  = reader.getJSONObject("main");
temperature = main.getString("temp");
方法getJSONObject返回JSON对象。方法getString返回指定键的字符串值。
除了这些方法之外,此类还提供了其他方法来更好地解析JSON文件。这些方法在下面列出-
| Sr.No | Method & description |
|---|---|
| 1 |
get(String name) This method just Returns the value but in the form of Object type |
| 2 |
getBoolean(String name) This method returns the boolean value specified by the key |
| 3 |
getDouble(String name) This method returns the double value specified by the key |
| 4 |
getInt(String name)
This method returns the integer value specified by the key |
| 5 |
getLong(String name) This method returns the long value specified by the key |
| 6 |
length() This method returns the number of name/value mappings in this object.. |
| 7 |
names() This method returns an array containing the string names in this object. |
例
要试验此示例,可以在实际设备或仿真器中运行它。
| Steps | Description |
|---|---|
| 1 | You will use Android studio to create an Android application. |
| 2 | Modify src/MainActivity.java file to add necessary code. |
| 3 | Modify the res/layout/activity_main to add respective XML components |
| 4 | Modify the res/values/string.xml to add necessary string components |
| 5 | Run the application and choose a running android device and install the application on it and verify the results |
以下是修改后的主要活动文件src / MainActivity.java的内容。
package com.example.tutorialspoint7.myapplication;

import android.os.AsyncTask;
import android.os.Bundle;
import android.support.v7.app.AppCompatActivity;
import android.util.Log;
import android.widget.ListAdapter;
import android.widget.ListView;
import android.widget.SimpleAdapter;
import android.widget.Toast;

import org.json.JSONArray;
import org.json.JSONException;
import org.json.JSONObject;

import java.util.ArrayList;
import java.util.HashMap;

public class MainActivity extends AppCompatActivity {

   private String TAG = MainActivity.class.getSimpleName();
   private ListView lv;

   ArrayList> contactList;

   @Override
   protected void onCreate(Bundle savedInstanceState) {
      super.onCreate(savedInstanceState);
      setContentView(R.layout.activity_main);

      contactList = new ArrayList<>();
      lv = (ListView) findViewById(R.id.list);

      new GetContacts().execute();
   }

   private class GetContacts extends AsyncTask {
      @Override
      protected void onPreExecute() {
         super.onPreExecute();
         Toast.makeText(MainActivity.this,"Json Data is
            downloading",Toast.LENGTH_LONG).show();

      }

      @Override
      protected Void doInBackground(Void... arg0) {
         HttpHandler sh = new HttpHandler();
         // Making a request to url and getting response
         String url = "http://api.androidhive.info/contacts/";
         String jsonStr = sh.makeServiceCall(url);

         Log.e(TAG, "Response from url: " + jsonStr);
         if (jsonStr != null) {
            try {
               JSONObject jsonObj = new JSONObject(jsonStr);

               // Getting JSON Array node
               JSONArray contacts = jsonObj.getJSONArray("contacts");

               // looping through All Contacts
               for (int i = 0; i < contacts.length(); i++) {
                  JSONObject c = contacts.getJSONObject(i);
                  String id = c.getString("id");
                  String name = c.getString("name");
                  String email = c.getString("email");
                  String address = c.getString("address");
                  String gender = c.getString("gender");

                  // Phone node is JSON Object
                  JSONObject phone = c.getJSONObject("phone");
                  String mobile = phone.getString("mobile");
                  String home = phone.getString("home");
                  String office = phone.getString("office");

                  // tmp hash map for single contact
                  HashMap contact = new HashMap<>();

                  // adding each child node to HashMap key => value
                  contact.put("id", id);
                  contact.put("name", name);
                  contact.put("email", email);
                  contact.put("mobile", mobile);

                  // adding contact to contact list
                  contactList.add(contact);
               }
            } catch (final JSONException e) {
               Log.e(TAG, "Json parsing error: " + e.getMessage());
               runOnUiThread(new Runnable() {
                  @Override
                  public void run() {
                     Toast.makeText(getApplicationContext(),
                     "Json parsing error: " + e.getMessage(),
                        Toast.LENGTH_LONG).show();
                  }
               });

            }

         } else {
            Log.e(TAG, "Couldn't get json from server.");
            runOnUiThread(new Runnable() {
               @Override
               public void run() {
                  Toast.makeText(getApplicationContext(),
                     "Couldn't get json from server. Check LogCat for possible errors!",
                     Toast.LENGTH_LONG).show();
               }
            });
         }

         return null;
      }

      @Override
      protected void onPostExecute(Void result) {
         super.onPostExecute(result);
         ListAdapter adapter = new SimpleAdapter(MainActivity.this, contactList,
            R.layout.list_item, new String[]{ "email","mobile"},
               new int[]{R.id.email, R.id.mobile});
         lv.setAdapter(adapter);
      }
   }
}
以下是xml HttpHandler.java的修改后的内容。
package com.example.tutorialspoint7.myapplication;

import android.util.Log;

import java.io.BufferedInputStream;
import java.io.BufferedReader;
import java.io.IOException;
import java.io.InputStream;
import java.io.InputStreamReader;
import java.net.HttpURLConnection;
import java.net.MalformedURLException;
import java.net.ProtocolException;
import java.net.URL;

public class HttpHandler {

   private static final String TAG = HttpHandler.class.getSimpleName();

   public HttpHandler() {
   }

   public String makeServiceCall(String reqUrl) {
      String response = null;
      try {
         URL url = new URL(reqUrl);
         HttpURLConnection conn = (HttpURLConnection) url.openConnection();
         conn.setRequestMethod("GET");
         // read the response
         InputStream in = new BufferedInputStream(conn.getInputStream());
         response = convertStreamToString(in);
      } catch (MalformedURLException e) {
         Log.e(TAG, "MalformedURLException: " + e.getMessage());
      } catch (ProtocolException e) {
         Log.e(TAG, "ProtocolException: " + e.getMessage());
      } catch (IOException e) {
         Log.e(TAG, "IOException: " + e.getMessage());
      } catch (Exception e) {
         Log.e(TAG, "Exception: " + e.getMessage());
      }
      return response;
   }

   private String convertStreamToString(InputStream is) {
      BufferedReader reader = new BufferedReader(new InputStreamReader(is));
      StringBuilder sb = new StringBuilder();

      String line;
      try {
         while ((line = reader.readLine()) != null) {
            sb.append(line).append('\n');
         }
      } catch (IOException e) {
         e.printStackTrace();
      } finally {
         try {
            is.close();
         } catch (IOException e) {
            e.printStackTrace();
         }
      }

      return sb.toString();
   }
}
以下是xml res / layout / activity_main.xml的修改内容。
以下是xml res / layout / list_item.xml的修改内容。
以下是AndroidManifest.xml文件的内容。
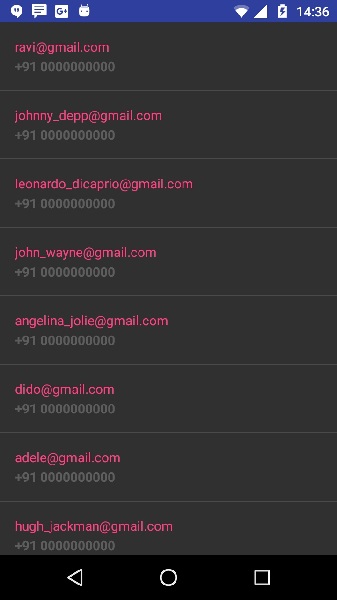
让我们尝试运行刚刚修改的应用程序。我假设您在进行环境设置时已创建了AVD 。要从Android Studio运行该应用,请打开您项目的活动文件之一,然后点击运行 工具栏中的图标。 Android studio将应用安装在您的AVD上并启动它,如果设置和应用程序一切正常,它将显示在“模拟器”窗口下方-

上面的示例显示了来自字符串json的数据,该数据包含雇主详细信息以及工资信息。