- PHP和MySQL(1)
- PHP和MySQL
- php mysql - PHP (1)
- php mysql - PHP 代码示例
- php mysql 日期 - PHP (1)
- php mysql 错误 - PHP (1)
- PHP | MySQL(创建表)
- PHP | MySQL(创建表)(1)
- mysql (1)
- 而mysql(1)
- 月mysql(1)
- 有在 mysql 中(1)
- MYSQL (1)
- php mysql 连接 - PHP (1)
- php mysql 日期 - PHP 代码示例
- php mysql 错误 - PHP 代码示例
- php 读取 mysql - PHP (1)
- php mysql 连接 - PHP 代码示例
- Android 5(1)
- android (1)
- Android 5
- php 读取 mysql - PHP 代码示例
- 将PHP连接到 MySQL(1)
- 将PHP连接到 MySQL
- PHP的MySQL连接(1)
- PHP的MySQL连接
- php mysql datetime - PHP (1)
- php 将数组插入 mysql - PHP (1)
- php 将数组插入 mysql 表 - PHP (1)
📅 最后修改于: 2021-01-05 05:26:25 🧑 作者: Mango
在本章中,我们将解释如何将PHP和MYSQL与您的android应用程序集成。如果您有网络服务器,并且想在Android应用程序上访问其数据,这将非常有用。
MYSQL用作Web服务器上的数据库,PHP用于从数据库中获取数据。我们的应用程序将使用必要的参数与PHP页面进行通信,PHP将联系MYSQL数据库并获取结果并将结果返回给我们。
PHP-MYSQL
创建数据库
使用此简单脚本可以轻松创建MYSQL数据库。 CREATE DATABASE语句创建数据库。
创建表
创建数据库后,就该在数据库中创建一些表了。 CREATE TABLE语句创建数据库。
在表格中插入值
创建数据库和表时。现在是时候在表中插入一些数据了。 Insert Into语句创建数据库。
PHP-GET和POST方法
创建记录后,PHP还可用于从mysql数据库中获取记录。为了获取记录,必须将一些有关要获取的记录的信息传递到PHP页面。
第一种传递信息的方法是通过使用$ _GET命令的GET方法。变量在url中传递,并获取记录。其语法如下-
第二种方法是使用POST方法。上面脚本中的唯一更改是将$ _GET替换为$ _POST 。在Post方法中,变量不通过URL传递。
Android-连接MYSQL
通过Get方法连接
有两种方法可以通过PHP页面连接到MYSQL。第一个称为Get方法。我们将使用HttpGet和HttpClient类进行连接。他们的语法如下-
URL url = new URL(link);
HttpClient client = new DefaultHttpClient();
HttpGet request = new HttpGet();
request.setURI(new URI(link));
之后,您需要调用HttpClient类的execute方法并将其接收到HttpResponse对象中。之后,您需要打开流以接收数据。
HttpResponse response = client.execute(request);
BufferedReader in = new BufferedReader
(new InputStreamReader(response.getEntity().getContent()));
通过邮政方式连接
在Post方法中,将使用URLEncoder , URLConnection类。 urlencoder将对传递变量的信息进行编码。它的语法在下面给出-
URL url = new URL(link);
String data  = URLEncoder.encode("username", "UTF-8")
+ "=" + URLEncoder.encode(username, "UTF-8");
data += "&" + URLEncoder.encode("password", "UTF-8")
+ "=" + URLEncoder.encode(password, "UTF-8");
URLConnection conn = url.openConnection();
您需要做的最后一件事是将这些数据写入链接。写入后,您需要打开流以接收响应的数据。
OutputStreamWriter wr = new OutputStreamWriter(conn.getOutputStream());
wr.write( data );
BufferedReader reader = new BufferedReader(new
InputStreamReader(conn.getInputStream()));
例
以下示例是通过PHP页面将android应用程序与MYSQL数据库连接的完整示例。它创建一个基本的应用程序,允许您使用GET和POST方法登录。
PHP-MYSQL部分
在此示例中,已经在000webhost.com上创建了一个名为temp的数据库。在该数据库中,已创建一个名为table1的表。该表具有三个字段。 (用户名,密码,角色)。该表只有一个记录(“ admin”,“ admin”,“ administrator”)。
下面给出了php页面,该页面通过post方法获取参数。
Android零件
要尝试使用此示例,您需要在连接wifi互联网的实际设备上运行此示例。
| Steps | Description |
|---|---|
| 1 | You will use Android studio IDE to create an Android application and name it as PHPMYSQL under a package com.example.phpmysql. |
| 2 | Modify src/MainActivity.java file to add Activity code. |
| 3 | Create src/SiginActivity.java file to add PHPMYSQL code. |
| 4 | Modify layout XML file res/layout/activity_main.xml add any GUI component if required. |
| 5 | Modify res/values/string.xml file and add necessary string components. |
| 6 | Modify AndroidManifest.xml to add necessary permissions. |
| 7 | Run the application and choose a running android device and install the application on it and verify the results. |
这是src / com.example.phpmysql / MainActivity.java的内容。
package com.example.phpmysql;

import android.app.Activity;
import android.os.Bundle;
import android.view.View;
import android.widget.EditText;
import android.widget.TextView;

public class MainActivity extends Activity {

   private EditText usernameField,passwordField;
   private TextView status,role,method;

   @Override
   protected void onCreate(Bundle savedInstanceState) {
      super.onCreate(savedInstanceState);
      setContentView(R.layout.activity_main);

      usernameField = (EditText)findViewById(R.id.editText1);
      passwordField = (EditText)findViewById(R.id.editText2);

      status = (TextView)findViewById(R.id.textView6);
      role = (TextView)findViewById(R.id.textView7);
      method = (TextView)findViewById(R.id.textView9);
   }


   public void login(View view){
      String username = usernameField.getText().toString();
      String password = passwordField.getText().toString();
      method.setText("Get Method");
      new SigninActivity(this,status,role,0).execute(username,password);

   }

   public void loginPost(View view){
      String username = usernameField.getText().toString();
      String password = passwordField.getText().toString();
      method.setText("Post Method");
      new SigninActivity(this,status,role,1).execute(username,password);
   }
}
这是src / com.example.phpmysql / SigninActivity.java的内容。
package com.example.phpmysql;

import java.io.BufferedReader;
import java.io.InputStreamReader;
import java.io.OutputStreamWriter;
import java.net.URI;
import java.net.URL;
import java.net.URLConnection;
import java.net.URLEncoder;

import org.apache.http.HttpResponse;
import org.apache.http.client.HttpClient;
import org.apache.http.client.methods.HttpGet;
import org.apache.http.impl.client.DefaultHttpClient;

import android.content.Context;
import android.os.AsyncTask;
import android.widget.TextView;

public class SigninActivity  extends AsyncTask{
   private TextView statusField,roleField;
   private Context context;
   private int byGetOrPost = 0;

   //flag 0 means get and 1 means post.(By default it is get.)
   public SigninActivity(Context context,TextView statusField,TextView roleField,int flag) {
      this.context = context;
      this.statusField = statusField;
      this.roleField = roleField;
      byGetOrPost = flag;
   }

   protected void onPreExecute(){
   }

   @Override
   protected String doInBackground(String... arg0) {
      if(byGetOrPost == 0){ //means by Get Method

         try{
            String username = (String)arg0[0];
            String password = (String)arg0[1];
            String link = "http://myphpmysqlweb.hostei.com/login.php?username="+username+"& password="+password;

            URL url = new URL(link);
            HttpClient client = new DefaultHttpClient();
            HttpGet request = new HttpGet();
            request.setURI(new URI(link));
            HttpResponse response = client.execute(request);
            BufferedReader in = new BufferedReader(new
               InputStreamReader(response.getEntity().getContent()));

            StringBuffer sb = new StringBuffer("");
            String line="";

            while ((line = in.readLine()) != null) {
               sb.append(line);
               break;
            }

            in.close();
            return sb.toString();
         } catch(Exception e){
            return new String("Exception: " + e.getMessage());
         }
      } else{
         try{
            String username = (String)arg0[0];
            String password = (String)arg0[1];

            String link="http://myphpmysqlweb.hostei.com/loginpost.php";
            String data  = URLEncoder.encode("username", "UTF-8") + "=" +
               URLEncoder.encode(username, "UTF-8");
            data += "&" + URLEncoder.encode("password", "UTF-8") + "=" +
               URLEncoder.encode(password, "UTF-8");

            URL url = new URL(link);
            URLConnection conn = url.openConnection();

            conn.setDoOutput(true);
            OutputStreamWriter wr = new OutputStreamWriter(conn.getOutputStream());

            wr.write( data );
            wr.flush();

            BufferedReader reader = new BufferedReader(new
               InputStreamReader(conn.getInputStream()));

            StringBuilder sb = new StringBuilder();
            String line = null;

            // Read Server Response
            while((line = reader.readLine()) != null) {
               sb.append(line);
               break;
            }

            return sb.toString();
         } catch(Exception e){
            return new String("Exception: " + e.getMessage());
         }
      }
   }

   @Override
   protected void onPostExecute(String result){
      this.statusField.setText("Login Successful");
      this.roleField.setText(result);
   }
}
将以下内容添加到build.gradle并重建整个项目。
android {
   useLibrary 'org.apache.http.legacy'
}
这是activity_main.xml的内容。
这是Strings.xml的内容。
   PHPMYSQL
   Settings
   Hello world!
   Username
   Password
   Login - Get
   Login - Post
   Login Application
   Login Status
   Login Role
   Not login
   Not assigned
   Login Method
   Choose Method
这是AndroidManifest.xml的内容。
让我们尝试运行您的PHPMYSQL应用程序。我假设您已将实际的Android Mobile设备与计算机连接。要从Android Studio运行该应用,请打开您项目的活动文件之一,然后点击运行 工具栏中的图标。在启动应用程序之前,Android Studio将显示以下窗口,以选择要在其中运行Android应用程序的选项。
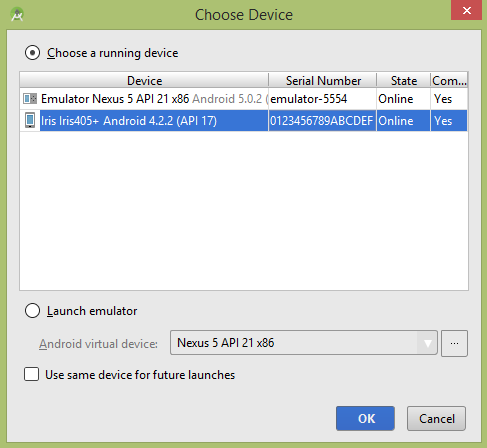
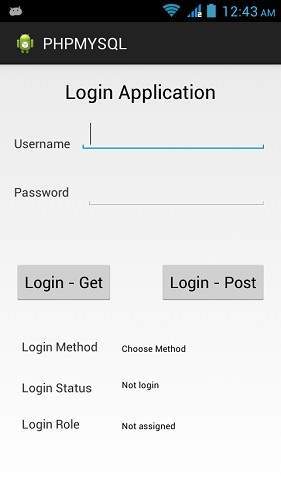
选择您的移动设备作为选项,然后检查将显示以下屏幕的移动设备-
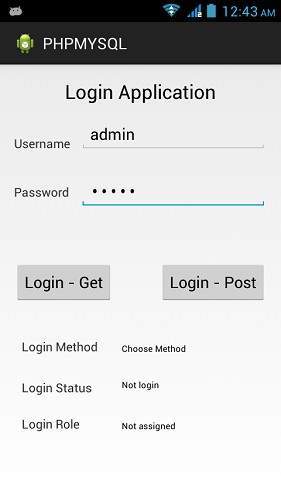
现在,只需输入您的用户名和密码。就我而言,我正在输入admin作为用户名和密码。如图所示-
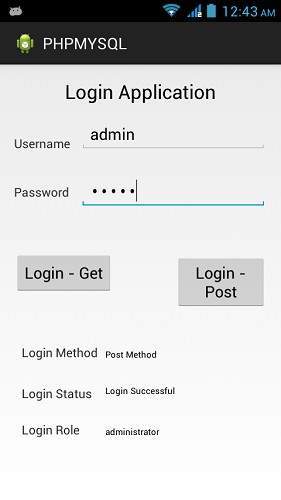
现在按下获取按钮,等待几秒钟,响应将被下载并显示给您。在这种情况下,响应是在admin作为用户名和密码的情况下获取的ROLE,如下图所示-

现在再次按POST按钮,将出现相同的结果。如下图所示-