Flutter - 可拖动的可滚动表
在本教程中,我们将学习什么是 DraggableScrollableSheet 小部件以及如何在Flutter实现它。
目录
- 什么是Flutter
- DraggableScrollableSheet
- 项目设置
- 项目代码
Flutter:
Flutter是由 Google 创建的开源 UI 软件开发工具包,我们可以使用它开发适用于 Android、IOS、桌面和 Web 的应用程序,并使用单个代码库。
可拖动滚动表:
DraggableScrollableSheet是Flutter中的一个小部件,它通过调整可滚动对象的大小来响应拖动手势。
项目设置:
在本教程中,我们将制作一个Animal Details 应用程序,其中主屏幕将是一个动物列表,我们将创建一个DraggableScrollableSheet小部件来显示动物的特征。该应用程序将专注于 DraggableScrollableSheet 小部件。
让我们开始创建一个新项目。在首选目录中的命令提示符/终端上输入以下命令,或者您也可以使用现有项目。
flutter create draggable_scrollable_sheet_tutorial
本教程不需要任何额外的包。
代码
起始代码在这里并且在主要。dart文件。
Dart
import 'dart:math';
import 'dart:ui';

import 'package:flutter/material.dart';

void main() {
  runApp(MyApp());
}

class MyApp extends StatelessWidget {

  // This widget is the root of your application.
  @override
  Widget build(BuildContext context) {
    return MaterialApp(
      title: 'Flutter Demo',
      theme: ThemeData(
        primarySwatch: Colors.green,
      ),
      home: HomePage(),
    );
  }
}

class HomePage extends StatefulWidget {
  const HomePage({Key? key}) : super(key: key);

  @override
  _HomePageState createState() => _HomePageState();
}

class _HomePageState extends State {
  @override
  Widget build(BuildContext context) {
    return Scaffold(
      appBar: AppBar(
        title: Text('GeeksForGeeks'),
      ),
      body: Container(),
      ),
    );
  }
}
Dart
Container(
  child: Stack(
    children: [],
  ),
),
Dart
Widget animalsList() {
  return ListView(
    children: [],
  );
}
Dart
Widget animalListTile(int index, String animalName) {
  return ListTile(
    onTap: () {
      print(index);
    },
    title: Text(animalName),
  );
}
Dart
Widget bottomDetailsSheet() {
  return DraggableScrollableSheet(
    initialChildSize: ,
    minChildSize: ,
    maxChildSize: ,
    builder: (BuildContext context, ScrollController scrollController) {
      return Container();
    },
  );
}
Dart
initialChildSize: .2,
minChildSize: .1,
maxChildSize: .6,
Dart
List animalNames = ['Elephant', 'Tiger', 'Kangaroo'];
List animalFamily = ['Elephantidae', 'Panthera', 'Macropodidae'];
List animalLifeSpan = ['60-70', '8-10', '15-20'];
List animalWeight = ['2700-6000', '90-310', '47-66'];
int selectedTile = 0;
Dart
Widget bottomDetailsSheet() {
  return DraggableScrollableSheet(
    initialChildSize: .2,
    minChildSize: .1,
    maxChildSize: .6,
    builder: (BuildContext context, ScrollController scrollController) {
      return Container(
        color: Colors.lightGreen[100],
        child: ListView(
          controller: scrollController,
          children: [
            ListTile(
              title: Text(
                "NAME",
              ),
              subtitle: Text(
                animalNames[selectedTile],
              ),
            ),
            ListTile(
              title: Text(
                "FAMILY",
              ),
              subtitle: Text(
                animalFamily[selectedTile],
              ),
            ),
            ListTile(
              title: Text(
                "LIFESPAN",
              ),
              subtitle: Text(
                animalLifeSpan[selectedTile],
              ),
            ),
            ListTile(
              title: Text(
                "WEIGHT",
              ),
              subtitle: Text(
                animalWeight[selectedTile],
              ),
            ),
          ],
        ),
      );
    },
  );
}
Dart
Widget animalsList() {
  return ListView(
    children: [
      animalListTile(0, animalNames[0]),
      animalListTile(1, animalNames[1]),
      animalListTile(2, animalNames[2]),
    ],
  );
}

Widget animalListTile(int index, String animalName) {
  return ListTile(
    onTap: () {
      print(index);
    },
    title: Text(animalName),
  );
}
Dart
Widget animalListTile(int index, String animalName) {
  return Padding(
    padding: EdgeInsets.all(8.0),
    child: ListTile(
      onTap: () {
        setState(() {
          selectedTile = index;
        });
      },
      title: Text(
        animalName,
        style: TextStyle(
          color: Colors.brown,
          fontSize: 24.0,
          fontWeight: FontWeight.w600,
        ),
      ),
      tileColor: Colors.lightGreen[300],
      selected: index == selectedTile,
      selectedTileColor: Colors.lightGreen[600],
    ),
  );
}
Dart
Stack(
  children: [
    animalsList(),
    bottomDetailsSheet(),
  ],
),
Dart
import 'package:flutter/material.dart';

void main() {
  runApp(MyApp());
}

class MyApp extends StatelessWidget {
  // This widget is the root of your application.
  @override
  Widget build(BuildContext context) {
    return MaterialApp(
      title: 'DraggableScrollableSheet GFG',
      theme: ThemeData(
        primarySwatch: Colors.green,
      ),
      home: HomePage(),
    );
  }
}

class HomePage extends StatefulWidget {
  const HomePage({Key? key}) : super(key: key);

  @override
  _HomePageState createState() => _HomePageState();
}

class _HomePageState extends State {
  List animalNames = ['Elephant', 'Tiger', 'Kangaroo'];
  List animalFamily = ['Elephantidae', 'Panthera', 'Macropodidae'];
  List animalLifeSpan = ['60-70', '8-10', '15-20'];
  List animalWeight = ['2700-6000', '90-310', '47-66'];
  int selectedTile = 0;
  @override
  Widget build(BuildContext context) {
    return Scaffold(
      appBar: AppBar(
        title: Text('GeeksForGeeks'),
      ),
      body: Container(
        child: Stack(
          children: [
            animalsList(),
            bottomDetailsSheet(),
          ],
        ),
      ),
    );
  }

  Widget animalsList() {
    return ListView(
      children: [
        animalListTile(0, animalNames[0]),
        animalListTile(1, animalNames[1]),
        animalListTile(2, animalNames[2]),
      ],
    );
  }

  Widget animalListTile(int index, String animalName) {
    return Padding(
      padding: EdgeInsets.all(8.0),
      child: ListTile(
        onTap: () {
          setState(() {
            selectedTile = index;
          });
        },
        title: Text(
          animalName,
          style: TextStyle(
            color: Colors.brown,
            fontSize: 24.0,
            fontWeight: FontWeight.w600,
          ),
        ),
        tileColor: Colors.lightGreen[300],
        selected: index == selectedTile,
        selectedTileColor: Colors.lightGreen[600],
      ),
    );
  }

  Widget bottomDetailsSheet() {
    return DraggableScrollableSheet(
      initialChildSize: .2,
      minChildSize: .1,
      maxChildSize: .6,
      builder: (BuildContext context, ScrollController scrollController) {
        return Container(
          color: Colors.lightGreen[100],
          child: ListView(
            controller: scrollController,
            children: [
              ListTile(
                title: Text(
                  "NAME",
                ),
                subtitle: Text(
                  animalNames[selectedTile],
                ),
              ),
              ListTile(
                title: Text(
                  "FAMILY",
                ),
                subtitle: Text(
                  animalFamily[selectedTile],
                ),
              ),
              ListTile(
                title: Text(
                  "LIFESPAN",
                ),
                subtitle: Text(
                  animalLifeSpan[selectedTile],
                ),
              ),
              ListTile(
                title: Text(
                  "WEIGHT",
                ),
                subtitle: Text(
                  animalWeight[selectedTile],
                ),
              ),
            ],
          ),
        );
      },
    );
  }
} 我们将使用Stack Widget 在后台显示主屏幕,在前面显示可拖动的 Sheet 小部件。
因此,使用Stack作为Container的孩子。
Dart
Container(
  child: Stack(
    children: [],
  ),
),
所以让我们用一些动物名称创建一个单独的ListView小部件。我们将其命名为animalList 。
Dart
Widget animalsList() {
  return ListView(
    children: [],
  );
}
现在我们将创建一些带有动物名称的ListTiles 。但在这里我们将创建一个单独的ListTile小部件,我们将其命名为animalListTile 。我们将这样做以简化我们的代码。
Dart
Widget animalListTile(int index, String animalName) {
  return ListTile(
    onTap: () {
      print(index);
    },
    title: Text(animalName),
  );
}
这里我们使用参数,第一个是ListTile的索引,第二个是AnimalName 。我们正在使用索引来更新 DraggableScrollableSheet。该animalName是动物的名字。
现在让我们创建我们的 DraggableScrollableSheet。创建一个单独的小部件并将其命名为bottomDetailsSheet 。
Dart
Widget bottomDetailsSheet() {
  return DraggableScrollableSheet(
    initialChildSize: ,
    minChildSize: ,
    maxChildSize: ,
    builder: (BuildContext context, ScrollController scrollController) {
      return Container();
    },
  );
}
现在我们有了这么多新参数。让我们一一了解它们。
- initialChildSize :此字段指定要出现在屏幕的一部分上的底部可拖动工作表的初始大小,并采用双精度值。其默认值为 0.5。其值范围为 0 – 1.0。
- minChildSize:此字段指定 DraggableScrollableSheet 小部件的最小尺寸,即当任何用户向下滚动以关闭小部件时,将出现最小高度。其默认值为 0.25,范围为 0 – 1.0。它还指定要占用的屏幕部分。
- maxChildSize :此字段指定 DraggableScrollableSheet 小部件的最大尺寸,即当任何用户向上滚动以打开小部件时,将出现最大高度。其默认值为 1.0,范围为 0 – 1.0。它还指定要占用的屏幕部分。
- builder:这个函数返回一个小部件。在这里,我们将使用 ListView 并显示点击的动物的详细信息。默认情况下,我们将显示第一个动物的详细信息。
- 展开:此字段指定小部件是否应展开以填充其父级中的可用空间。默认值是true。我们没有指定,因为我们希望它是真的。
让我们指定前三个字段。
Dart
initialChildSize: .2,
minChildSize: .1,
maxChildSize: .6,
让我们为我们的应用程序创建变量。你可以从下面复制。所有变量都是不言自明的。
Dart
List animalNames = ['Elephant', 'Tiger', 'Kangaroo'];
List animalFamily = ['Elephantidae', 'Panthera', 'Macropodidae'];
List animalLifeSpan = ['60-70', '8-10', '15-20'];
List animalWeight = ['2700-6000', '90-310', '47-66'];
int selectedTile = 0;
现在让我们设计构建器函数。设计是您自己的选择,因此您可以通过复制我的设计或您自己的设计来继续。这是DraggableScrollableSheet的完整设计。
Dart
Widget bottomDetailsSheet() {
  return DraggableScrollableSheet(
    initialChildSize: .2,
    minChildSize: .1,
    maxChildSize: .6,
    builder: (BuildContext context, ScrollController scrollController) {
      return Container(
        color: Colors.lightGreen[100],
        child: ListView(
          controller: scrollController,
          children: [
            ListTile(
              title: Text(
                "NAME",
              ),
              subtitle: Text(
                animalNames[selectedTile],
              ),
            ),
            ListTile(
              title: Text(
                "FAMILY",
              ),
              subtitle: Text(
                animalFamily[selectedTile],
              ),
            ),
            ListTile(
              title: Text(
                "LIFESPAN",
              ),
              subtitle: Text(
                animalLifeSpan[selectedTile],
              ),
            ),
            ListTile(
              title: Text(
                "WEIGHT",
              ),
              subtitle: Text(
                animalWeight[selectedTile],
              ),
            ),
          ],
        ),
      );
    },
  );
}
在这里,我们使用ScrollController scrollController使我们的列表可滚动。
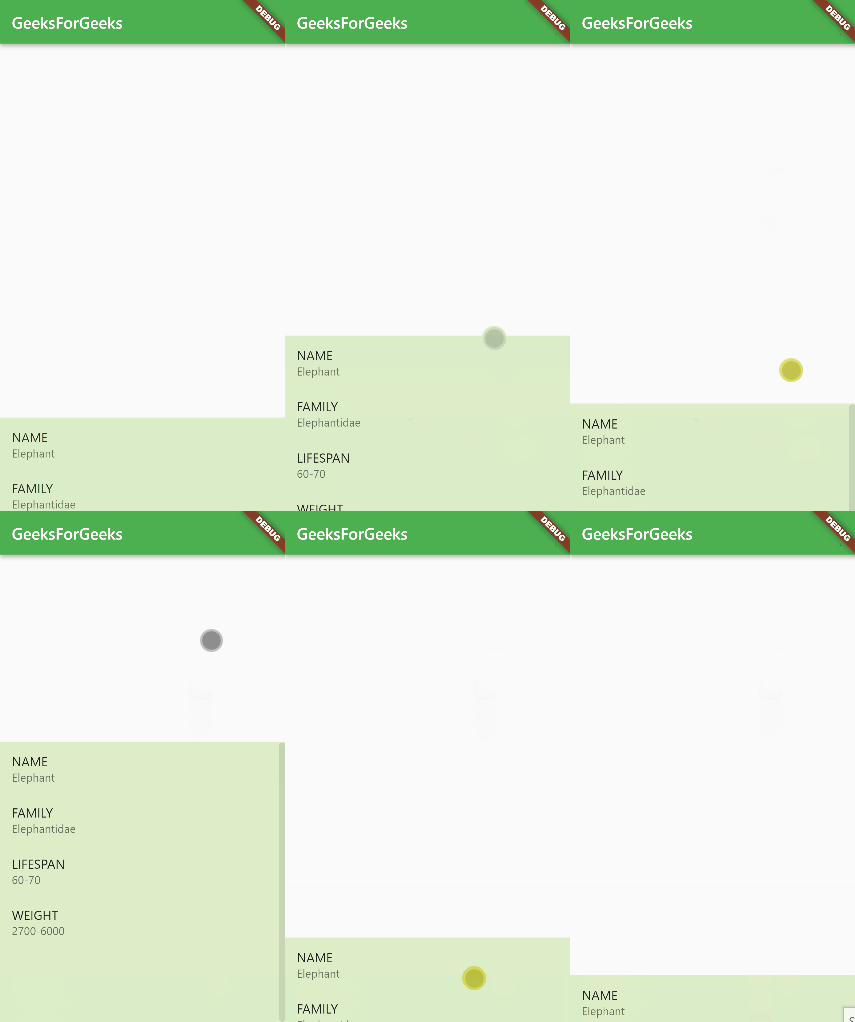
如果您运行该应用程序,您将看到如下内容。

DraggableScrollableSheet
现在是使用animalList小部件的时候了。我们已经创建了我们的小部件。添加animalListTile 小部件作为animalList 的子项。
Dart
Widget animalsList() {
  return ListView(
    children: [
      animalListTile(0, animalNames[0]),
      animalListTile(1, animalNames[1]),
      animalListTile(2, animalNames[2]),
    ],
  );
}

Widget animalListTile(int index, String animalName) {
  return ListTile(
    onTap: () {
      print(index);
    },
    title: Text(animalName),
  );
}
在这里,我们将更改selectedTile值,而不是打印索引。但是我们还需要设计活动列表磁贴,以便我们可以区分哪个是活动的。此外,我们将调整animalListTile 的设计。所以这是最终的设计。
Dart
Widget animalListTile(int index, String animalName) {
  return Padding(
    padding: EdgeInsets.all(8.0),
    child: ListTile(
      onTap: () {
        setState(() {
          selectedTile = index;
        });
      },
      title: Text(
        animalName,
        style: TextStyle(
          color: Colors.brown,
          fontSize: 24.0,
          fontWeight: FontWeight.w600,
        ),
      ),
      tileColor: Colors.lightGreen[300],
      selected: index == selectedTile,
      selectedTileColor: Colors.lightGreen[600],
    ),
  );
}
所以我们的应用程序几乎准备好了。在 Stack 小部件的子项中添加animalList 。
Dart
Stack(
  children: [
    animalsList(),
    bottomDetailsSheet(),
  ],
),
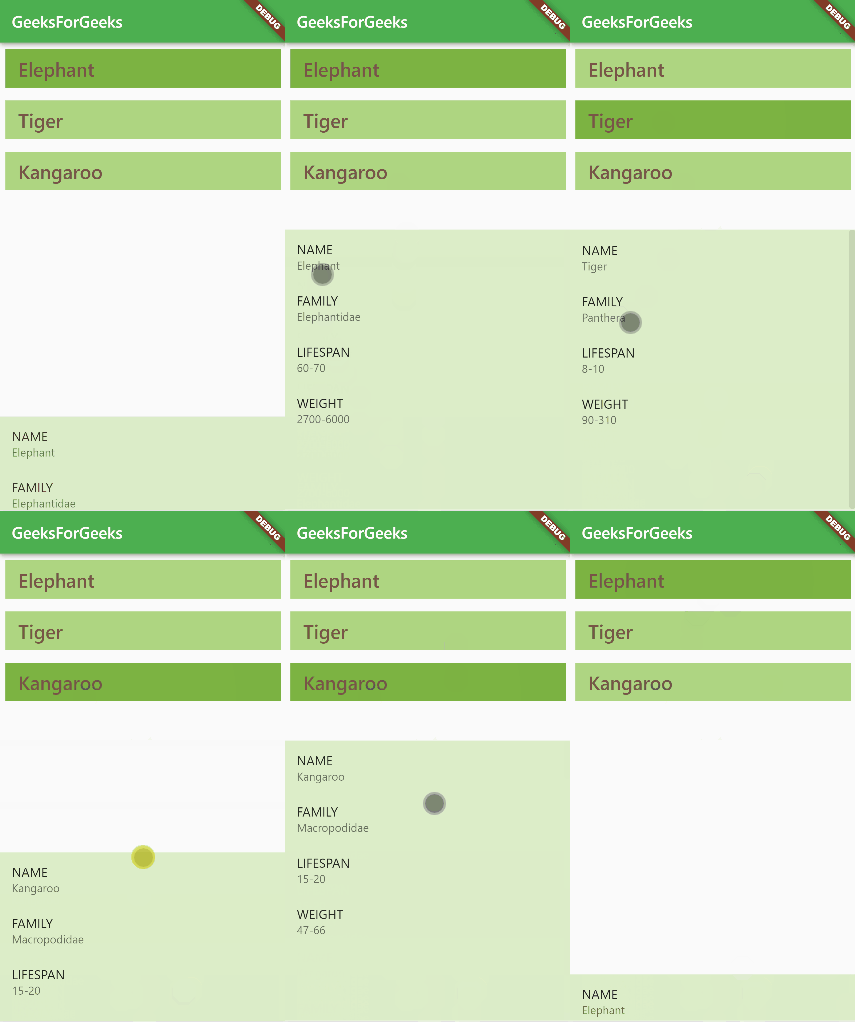
现在运行应用程序。

完整的 DraggableScrollableSheet 应用程序
我们已经成功创建了我们的应用程序。如果您有任何问题,请在下方评论。这里还有完整的代码。
Dart
import 'package:flutter/material.dart';

void main() {
  runApp(MyApp());
}

class MyApp extends StatelessWidget {
  // This widget is the root of your application.
  @override
  Widget build(BuildContext context) {
    return MaterialApp(
      title: 'DraggableScrollableSheet GFG',
      theme: ThemeData(
        primarySwatch: Colors.green,
      ),
      home: HomePage(),
    );
  }
}

class HomePage extends StatefulWidget {
  const HomePage({Key? key}) : super(key: key);

  @override
  _HomePageState createState() => _HomePageState();
}

class _HomePageState extends State {
  List animalNames = ['Elephant', 'Tiger', 'Kangaroo'];
  List animalFamily = ['Elephantidae', 'Panthera', 'Macropodidae'];
  List animalLifeSpan = ['60-70', '8-10', '15-20'];
  List animalWeight = ['2700-6000', '90-310', '47-66'];
  int selectedTile = 0;
  @override
  Widget build(BuildContext context) {
    return Scaffold(
      appBar: AppBar(
        title: Text('GeeksForGeeks'),
      ),
      body: Container(
        child: Stack(
          children: [
            animalsList(),
            bottomDetailsSheet(),
          ],
        ),
      ),
    );
  }

  Widget animalsList() {
    return ListView(
      children: [
        animalListTile(0, animalNames[0]),
        animalListTile(1, animalNames[1]),
        animalListTile(2, animalNames[2]),
      ],
    );
  }

  Widget animalListTile(int index, String animalName) {
    return Padding(
      padding: EdgeInsets.all(8.0),
      child: ListTile(
        onTap: () {
          setState(() {
            selectedTile = index;
          });
        },
        title: Text(
          animalName,
          style: TextStyle(
            color: Colors.brown,
            fontSize: 24.0,
            fontWeight: FontWeight.w600,
          ),
        ),
        tileColor: Colors.lightGreen[300],
        selected: index == selectedTile,
        selectedTileColor: Colors.lightGreen[600],
      ),
    );
  }

  Widget bottomDetailsSheet() {
    return DraggableScrollableSheet(
      initialChildSize: .2,
      minChildSize: .1,
      maxChildSize: .6,
      builder: (BuildContext context, ScrollController scrollController) {
        return Container(
          color: Colors.lightGreen[100],
          child: ListView(
            controller: scrollController,
            children: [
              ListTile(
                title: Text(
                  "NAME",
                ),
                subtitle: Text(
                  animalNames[selectedTile],
                ),
              ),
              ListTile(
                title: Text(
                  "FAMILY",
                ),
                subtitle: Text(
                  animalFamily[selectedTile],
                ),
              ),
              ListTile(
                title: Text(
                  "LIFESPAN",
                ),
                subtitle: Text(
                  animalLifeSpan[selectedTile],
                ),
              ),
              ListTile(
                title: Text(
                  "WEIGHT",
                ),
                subtitle: Text(
                  animalWeight[selectedTile],
                ),
              ),
            ],
          ),
        );
      },
    );
  }
}
希望你喜欢这个教程。谢谢你。