音频文件是一种广泛的信息传输方式。因此,让我们看看如何将音频文件(.wav文件)分解为较小的块,并识别其中的内容并将其存储到文本文件中。要了解有关音频文件及其格式的更多信息,请参阅Audio_formats。
需要分解音频文件吗?
当我们对音频文件进行任何处理时,会花费很多时间。在这里,处理可能意味着任何事情。例如,我们可能想增加或减少音频的频率,或者如本文所述,识别音频文件中的内容。通过将其分解为小的音频文件(称为块),我们可以确保处理快速进行。
所需的安装:
pip3 install pydub
pip3 install audioread
pip3 install SpeechRecognition
该程序主要有两个步骤。
步骤#1:处理将音频文件切成一定间隔的小块。切片可以重叠或不重叠进行。重叠意味着下一个创建的块将从一个恒定的时间向后开始,因此在切片期间,如果有任何音频/单词被剪切,则可以通过此重叠来覆盖它。例如,如果音频文件为22秒,并且重叠为1.5秒,则这些块的计时将为:
chunk1 : 0 - 5 seconds
  chunk2 : 3.5 - 8.5 seconds
  chunk3 : 7 - 12 seconds
  chunk4 : 10.5 - 15.5 seconds
  chunk5 : 14 - 19.5 seconds
  chunk6 : 18 - 22 seconds
通过将重叠设置为0,我们可以忽略此重叠。
步骤2:处理切片的音频文件以执行用户所需的任何操作。在这里,出于演示目的,这些块已通过Google语音识别模块传递,并且文本已写入单独的文件中。要了解如何使用Google语音识别模块来识别来自麦克风的音频,请参阅此内容。在本文中,我们将使用切片的音频文件来识别内容。
步骤#2在步骤#1内部循环执行。一旦将音频文件切成块,就可以识别出块。此过程一直持续到音频文件结束。
例子:
输入: Geek.wav输出:运行代码的cmd屏幕截图: 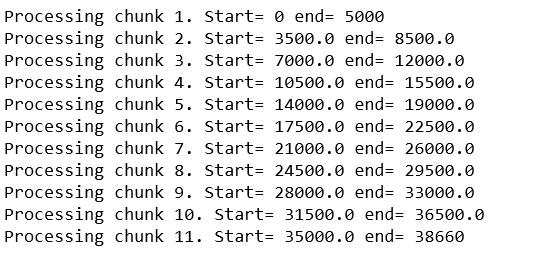 文本文件:已识别
下面是实现:
# Import necessary libraries
from pydub import AudioSegment
import speech_recognition as sr

# Input audio file to be sliced
audio = AudioSegment.from_wav("1.wav")

'''
Step #1 - Slicing the audio file into smaller chunks.
'''
# Length of the audiofile in milliseconds
n = len(audio)

# Variable to count the number of sliced chunks
counter = 1

# Text file to write the recognized audio
fh = open("recognized.txt", "w+")

# Interval length at which to slice the audio file.
# If length is 22 seconds, and interval is 5 seconds,
# The chunks created will be:
# chunk1 : 0 - 5 seconds
# chunk2 : 5 - 10 seconds
# chunk3 : 10 - 15 seconds
# chunk4 : 15 - 20 seconds
# chunk5 : 20 - 22 seconds
interval = 5 * 1000

# Length of audio to overlap.
# If length is 22 seconds, and interval is 5 seconds,
# With overlap as 1.5 seconds,
# The chunks created will be:
# chunk1 : 0 - 5 seconds
# chunk2 : 3.5 - 8.5 seconds
# chunk3 : 7 - 12 seconds
# chunk4 : 10.5 - 15.5 seconds
# chunk5 : 14 - 19.5 seconds
# chunk6 : 18 - 22 seconds
overlap = 1.5 * 1000

# Initialize start and end seconds to 0
start = 0
end = 0

# Flag to keep track of end of file.
# When audio reaches its end, flag is set to 1 and we break
flag = 0

# Iterate from 0 to end of the file,
# with increment = interval
for i in range(0, 2 * n, interval):

    # During first iteration,
    # start is 0, end is the interval
    if i == 0:
        start = 0
        end = interval

    # All other iterations,
    # start is the previous end - overlap
    # end becomes end + interval
    else:
        start = end - overlap
        end = start + interval

    # When end becomes greater than the file length,
    # end is set to the file length
    # flag is set to 1 to indicate break.
    if end >= n:
        end = n
        flag = 1

    # Storing audio file from the defined start to end
    chunk = audio[start:end]

    # Filename / Path to store the sliced audio
    filename = 'chunk'+str(counter)+'.wav'

    # Store the sliced audio file to the defined path
    chunk.export(filename, format ="wav")
    # Print information about the current chunk
    print("Processing chunk "+str(counter)+". Start = "
                        +str(start)+" end = "+str(end))

    # Increment counter for the next chunk
    counter = counter + 1

    # Slicing of the audio file is done.
    # Skip the below steps if there is some other usage
    # for the sliced audio files.


'''
Step #2 - Recognizing the chunk and writing to a file.
'''

    # Here, Google Speech Recognition is used
    # to take each chunk and recognize the text in it.

    # Specify the audio file to recognize

    AUDIO_FILE = filename

    # Initialize the recognizer
    r = sr.Recognizer()

    # Traverse the audio file and listen to the audio
    with sr.AudioFile(AUDIO_FILE) as source:
        audio_listened = r.listen(source)

    # Try to recognize the listened audio
    # And catch expections.
    try:
        rec = r.recognize_google(audio_listened)

        # If recognized, write into the file.
        fh.write(rec+" ")

    # If google could not understand the audio
    except sr.UnknownValueError:
        print("Could not understand audio")

    # If the results cannot be requested from Google.
    # Probably an internet connection error.
    except sr.RequestError as e:
        print("Could not request results.")

    # Check for flag.
    # If flag is 1, end of the whole audio reached.
    # Close the file and break.
    if flag == 1:
        fh.close()
        break
输出:
–txt.txt – 
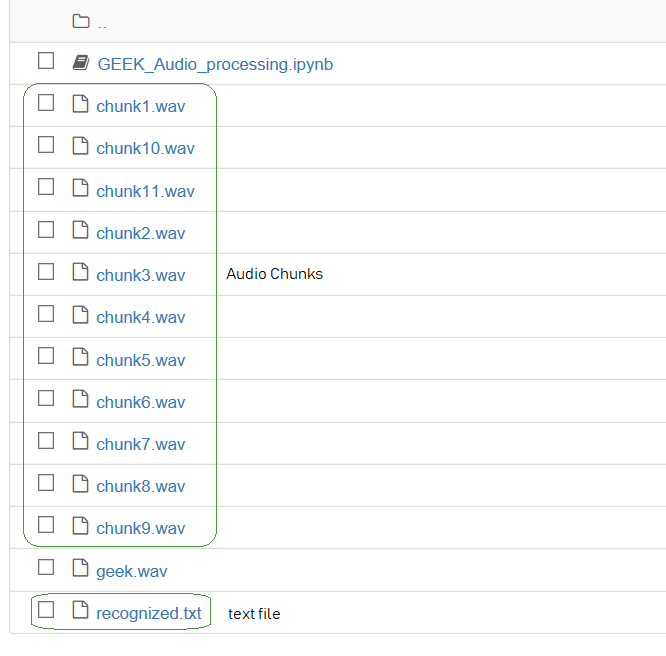
正如我们在上面的屏幕截图中所看到的,所有这些块都存储在本地系统中。现在,我们已经成功地对音频文件进行了切片,并从中识别出了块中的内容。
这种方法的优点:
- 间隔可以设置为任意长度,具体取决于我们需要的块数。
- 重叠可确保即使在间隔结束时准确说出任何单词也不会丢失任何数据。
- 这些块可以全部存储在不同的音频文件中,并在以后需要时使用。
- 可以对音频文件执行的任何处理也可以在这些块中完成,因为它们只是音频文件。
此方法的缺点:
- 使用Google语音识别需要有效的互联网连接。
- 重叠后,应进行一些文本处理以删除识别出的重复单词。
- Google语音识别的准确性取决于许多因素,例如背景噪音,说话者的口音等。