本文旨在学习如何使用Tensorflow的对象检测API构建对象检测器。
要求 :
- Python编程
- 机器学习基础
- 神经网络基础(非强制性)
- 热衷于建立一个酷项目(强制性):p
即使您没有前三个要点,也欢迎您来冒险。不用担心迷路,我会在整个旅程中正确地指导您!
什么是物体检测?
对象检测是在图像或视频中查找诸如面孔,建筑物和自行车之类的真实对象实例的过程。对象检测算法通常使用提取的特征和学习算法来识别对象类别的实例。它通常用于图像检索,安全性,监视和高级驾驶员辅助系统(自动驾驶汽车)等应用中。我个人曾经使用对象检测来构建基于图像的搜索引擎的原型。
什么是Tensorflow的对象检测API?
Tensorflow是Google Brain创建的开源深度学习框架。 Tensorflow的对象检测API是一个功能强大的工具,它使每个人都可以创建自己的功能强大的图像分类器。使用Tensorflow的对象检测API不需要任何编码或编程知识。但是要了解它的工作原理,了解Python编程和机器学习基础将有所帮助。
在开始Adventure之前,让我们确保在您的系统中安装了Python 3
有关安装Python和pip的信息,请访问此站点
第一件事第一!确保在您的系统中安装了以下软件包。这些对于您的冒险至关重要。
pip install protobuf
       pip install pillow
       pip install lxml
       pip install Cython
       pip install jupyter
       pip install matplotlib
       pip install pandas
       pip install opencv-python
       pip install tensorflow
为了开始冒险,我们必须获得车辆并对其进行必要的配置。
Tensorflow的对象检测API
- 我们可以从github获得Tensorflow的对象检测API
- 访问提供的链接:在此处下载
下载models文件夹后,将其解压缩到项目目录中。我们可以在其中找到object_detection目录
models-master/research/ - 创建一个PYTHONPATH变量:
必须创建一个指向\ models,\ models \ research和\ models \ research \ slim目录的PYTHONPATH变量。从任何目录以以下方式发出命令。就我而言set PYTHONPATH=F:\Programming\geeksforgeeks_project\models-master;F:\Programming\geeksforgeeks_project\models-master\research;F:\Programming\geeksforgeeks_project\models-master\research\slim编译protobuf文件并运行setup.py:
需要编译Protobuf文件,TensorFlow使用该文件来配置模型和训练参数。
首先要编译protoc文件,我们需要获取protobuf编译器。您可以在这里下载。对于Windows OS和其他操作系统,请下载protoc-3.8-win64.zip文件,并下载相关的zip文件。将bin文件夹提取到研究目录。
复制以下给定的代码,并将其另存为您的研究目录中的use_protobuf.py 。import os import sys args = sys.argv directory = args[1] protoc_path = args[2] for file in os.listdir(directory): if file.endswith(".proto"): os.system(protoc_path+" "+directory+"/"+file+" --python_out=.")转到命令提示符中的研究目录,并使用以下命令。
python use_protobuf.py .\object_detection\protos\ .\bin\protoc这将编译所有protobuf文件,并根据\ object_detection \ protos文件夹中的每个name.proto文件创建一个name_pb2.py文件。
最后,从models-master \ research目录运行以下命令:python setup.py build python setup.py install这样就完成了安装,并安装了一个名为object-detection的软件包。
- 测试API:
要测试对象检测api,请转到object_detection目录并输入以下命令:jupyter notebook object_detection_tutorial.ipynb这将在浏览器中打开jupyter笔记本。
注意:如果在笔记本的第一个单元格中有一行sys.path.append(“ ..”) ,请删除该行。运行笔记本的所有单元格,并检查是否获得类似于下图的输出:
这样,我们就成功配置了车辆。
让我们开始我们的旅程!
为了到达目的地,我们需要越过6个检查站:
- 准备数据集
- 标记数据集
- 生成培训记录
- 配置培训
- 训练模型
- 导出推理图
计划要使用分类器检测哪些对象。
- 检查点1:准备数据集:
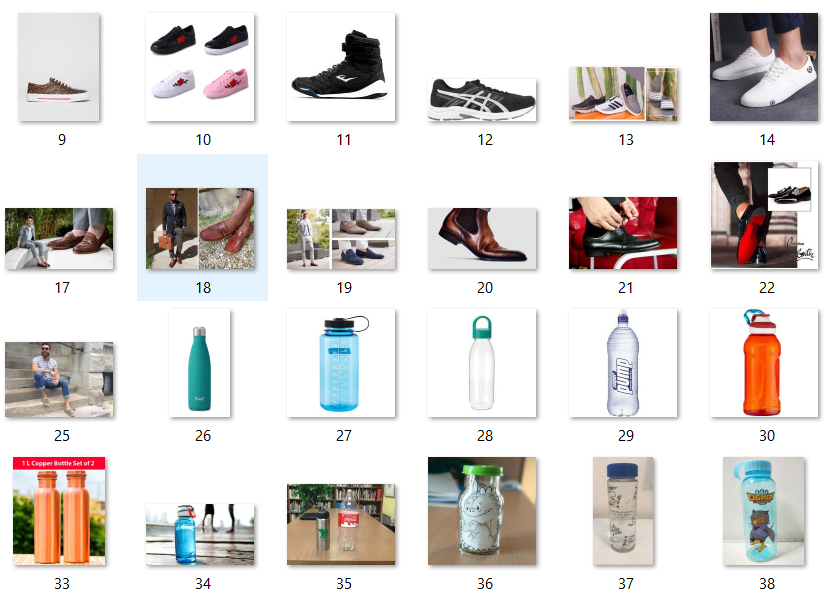
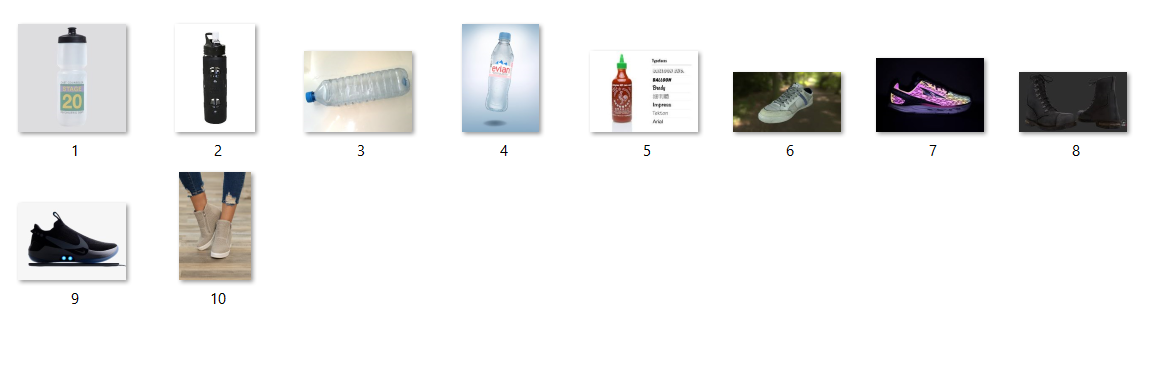
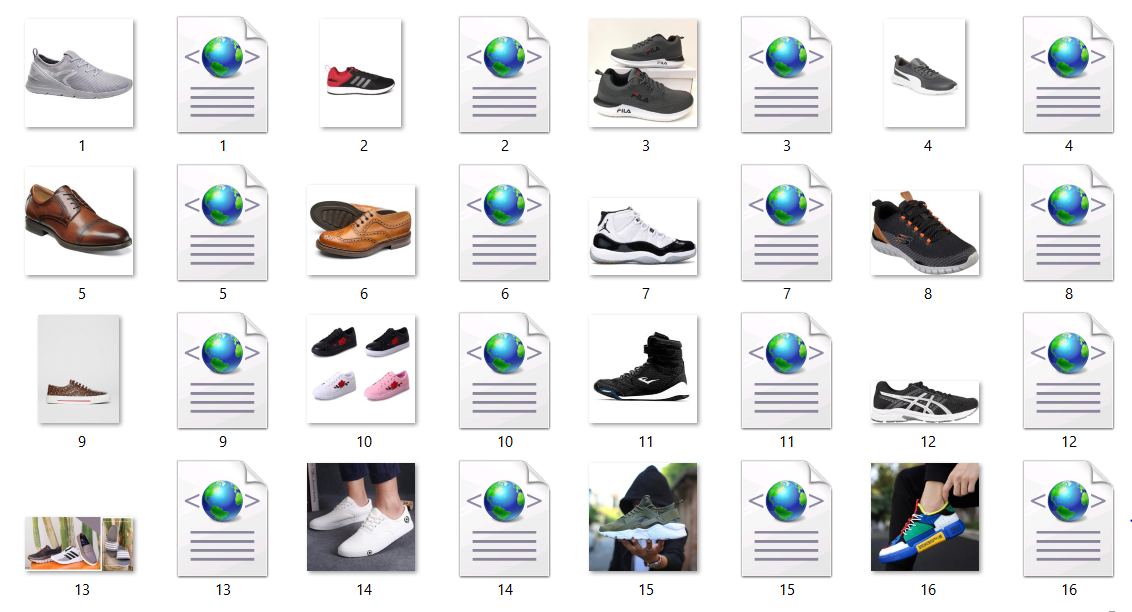
在这次冒险中,我将建立一个检测鞋子和水瓶的分类器。请记住,数据集是构建分类器中最重要的事情。这将是分类器完成对象检测的基础。收集由对象组成的尽可能多不同的图像。在研究目录中创建一个名为images的目录。将80%的图像存储在train目录中,并将20%的图像存储在images目录中的test目录中。我已经在火车目录中收集了50张图像,在测试目录中收集了10张图像。图像数量越多,分类器的精度就越高。
火车目录中的图片
测试目录中的图像
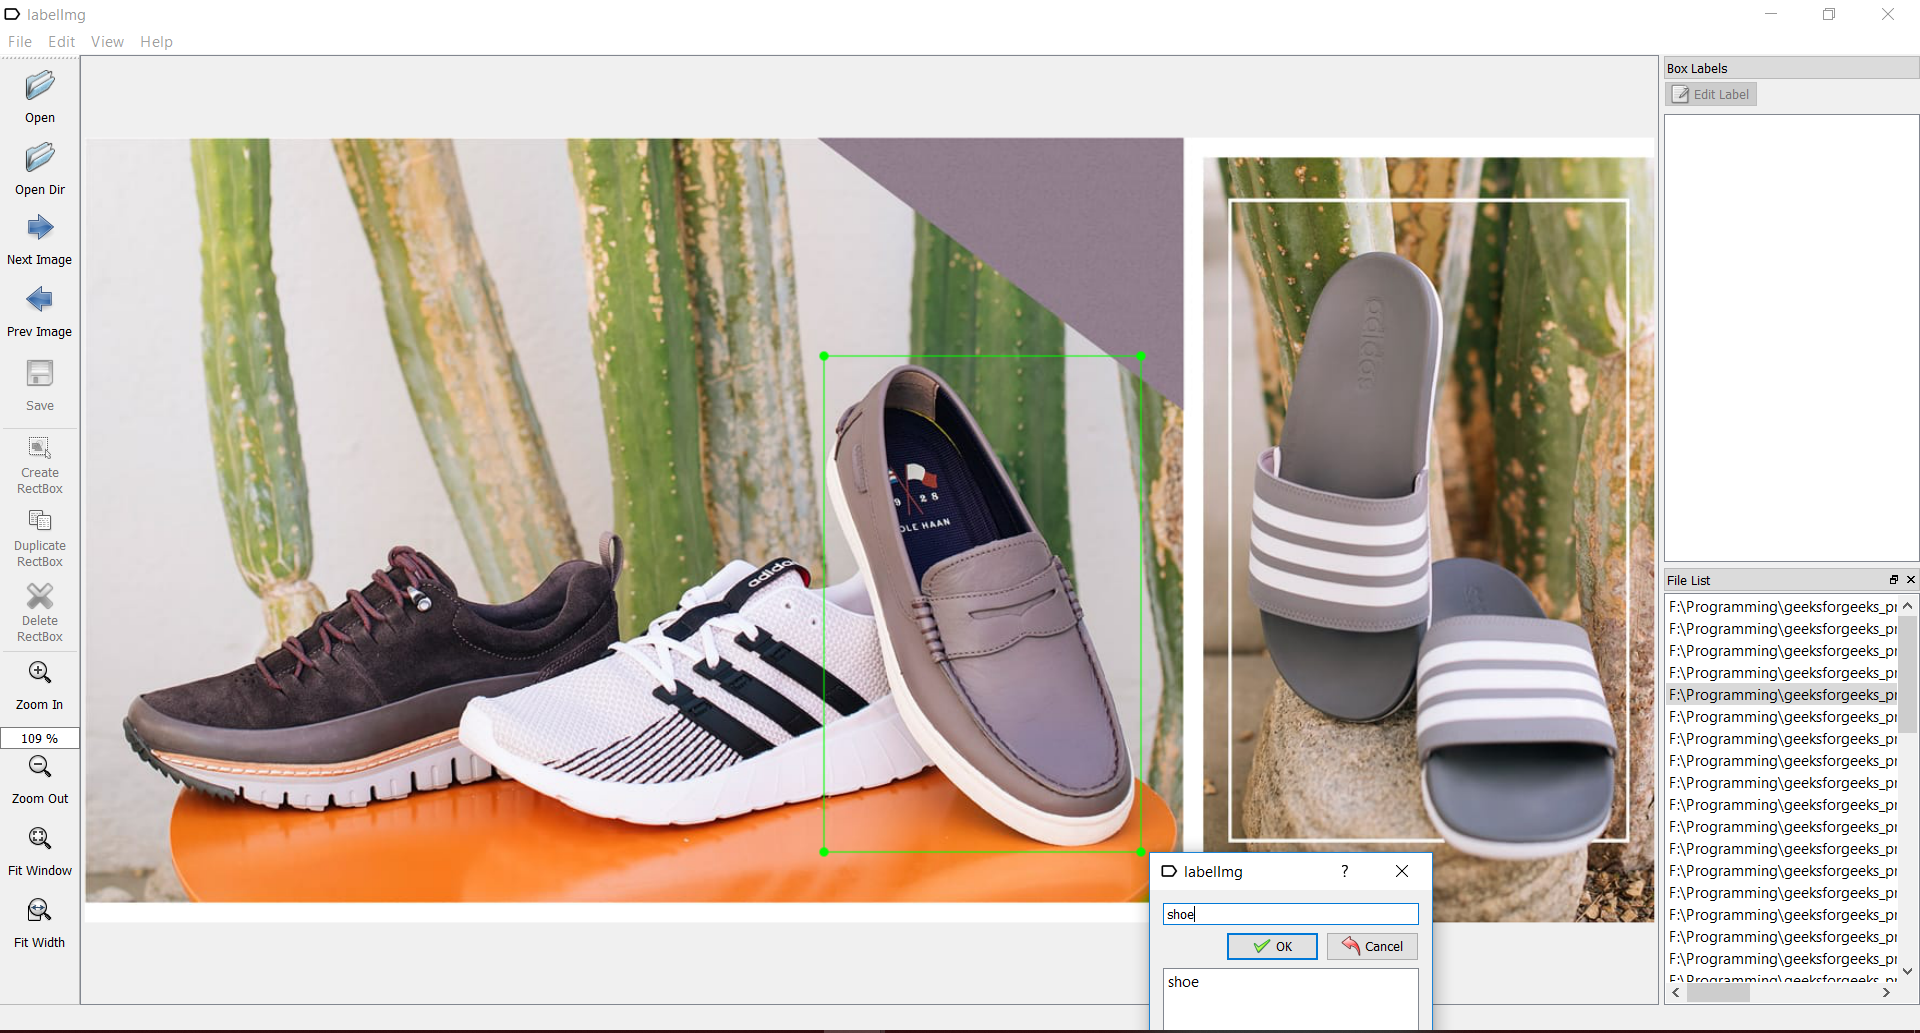
- 检查点2:标记数据集:
为了越过这个检查点,我们需要有一个名为labelimg的工具。您可以从以下网址获取:labelimg下载打开labelimg应用程序,并开始在存在对象的图像上绘制矩形框。并用适当的名称标记它们,如图所示:
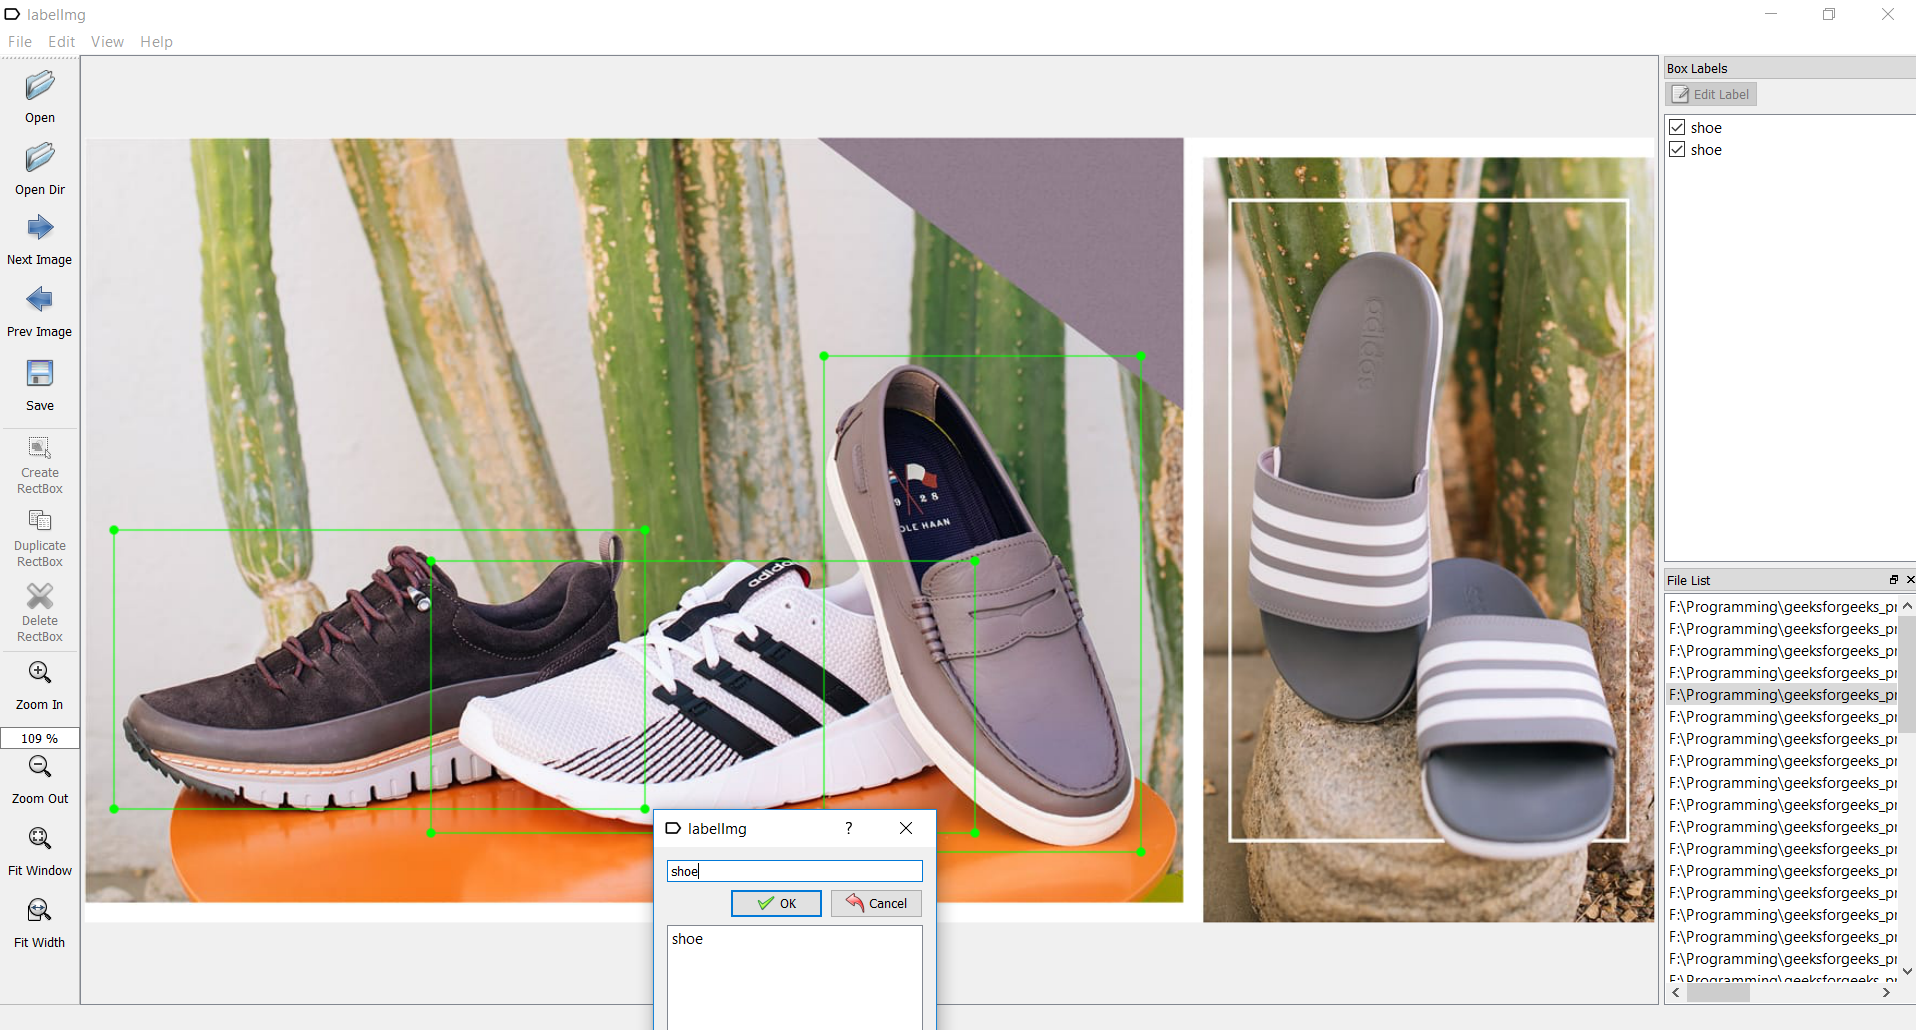
标记后保存每个图像,以生成带有相应图像名称的xml文件,如下图所示。
- 检查点3:生成培训记录:
为了越过这个检查点,我们需要创建TFRecords,这些TFRecords可以用作训练对象检测器的输入数据。为了创建TFRecords,我们将使用Dat Tran的Racoon Detector中的两个脚本。即xml_to_csv.py和generate_tfrecord.py文件。下载它们并将其保存在object_detection文件夹中。用以下代码替换xml_to_csv.py的main()方法:
def main():
    for folder in ['train', 'test']:
        image_path = os.path.join(os.getcwd(), ('images/' + folder))
        xml_df = xml_to_csv(image_path)
        xml_df.to_csv(('images/'+folder+'_labels.csv'), index=None)
        print('Successfully converted xml to csv.')
并且,在return语句之前,在xml_to_csv()方法中添加以下代码行,如下图所示。
names=[]
    for i in xml_df['filename']:
        names.append(i+'.jpg')
    xml_df['filename']=names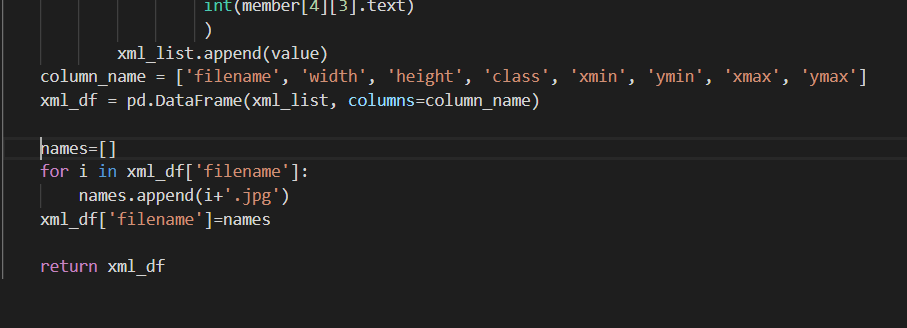
首先,通过在object_detection目录中使用以下命令运行xml_to_csv.py文件,将所有XML文件转换为CSV文件:python xml_to_csv.py这将在images文件夹中创建test.csv和train.csv文件。
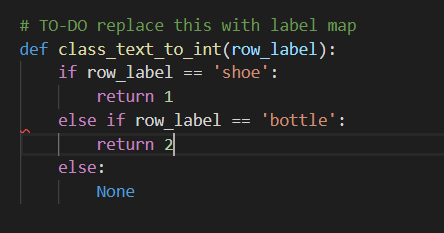
接下来,在文本编辑器中打开generate_tfrecord.py文件,然后编辑方法class_text_to_int() ,该方法可在第30行找到,如下图所示。
然后,通过从\ object_detection文件夹发出以下命令来生成TFRecord文件:
python generate_tfrecord.py --csv_input=images\train_labels.csv --image_dir=images\train --output_path=train.record
python generate_tfrecord.py --csv_input=images\test_labels.csv --image_dir=images\test --output_path=test.record
这将在object_detection目录中创建test.record和train.record文件。
- 检查点4:配置培训:
为了越过这个检查点,我们首先需要创建一个标签图。
在object_detection目录中创建一个名为training的新目录。
使用文本编辑器创建一个新文件,并将其另存为training目录中的labelmap.pbtxt 。标签图通过定义班级名称到班级ID号的映射来告诉培训人员每个对象是什么。
现在,以以下格式在labelmap.pbtxt文件中添加内容,以为您的分类器创建一个labelmap。item { id: 1 name: 'shoe' } item { id: 2 name: 'bottle' }标签映射ID编号应与generate_tfrecord.py文件中定义的编号相同。
现在让我们开始配置培训!
我们需要一个模型,即算法来训练我们的分类器。在这个项目中,我们将使用faster_rcnn_inception模型。 Tensorflow的对象检测API带有大量模型。导航到object_detection \ samples \ configs 。
在此位置,您可以找到许多API提供的所有模型的配置文件。您可以使用此链接下载模型。下载文件fast_rcnn_inception_v2_coco 。下载完成后,将文件夹faster_rcnn_inception_v2_coco_2018_01_28解压缩到object_detection目录。为了了解模型的工作原理,请参阅本文。当我们在此项目中使用faster_rcnn_inception_v2_coco模型时,请从object_detection \ samples \ configs复制faster_rcnn_inception_v2_coco.config文件并将其粘贴到之前创建的训练目录中。
使用文本编辑器打开配置文件,并对faster_rcnn_inception_v2_pets.config文件进行以下更改。
注意:必须使用单个正斜杠(非反斜杠)输入路径,否则在尝试训练模型时,TensorFlow将给出文件路径错误!此外,路径必须用双引号(“)而不是单引号(’)。- 第10行:将num_classes值设置为分类器正在分类的对象数。就我而言,在我对鞋子和瓶子进行分类时,将是num_classes:2。
- 在第107行中:将model.ckpt文件的绝对路径提供给file_tuning_checkpoint参数。 model.ckpt文件位于位置object_detection / faster_rcnn_inception_v2_coco_2018_01_28中。就我而言
fine_tune_checkpoint:“ F:/Programming/geeksforgeeks_project/models-master/research/object_detection/faster_rcnn_inception_v2_coco_2018_01_28/model.ckpt”
- train_input_reader部分:您可以在第120行找到此部分。在此部分,将input_path参数设置为您的train.record文件。就我而言
输入路径:“ F:/Programming/geeksforgeeks_project/models-master/research/object_detection/train.record”。将label_map_path参数设置为labelmap.pbtxt文件。以我为例:
label_map_path:“ F:/Programming/geeksforgeeks_project/models-master/research/object_detection/training/labelmap.pbtxt” - eval config部分:您可以在第128行中找到此部分。set num_examples参数设置为测试目录中存在的图像数。就我而言
num_examples:10 - eval_input_reader部分:您可以在第134行找到此部分。与train_input_reader部分类似,将路径设置为test.record和labelmap.pbtxt文件。就我而言
input_path:“ F:/Programming/geeksforgeeks_project/models-master/research/object_detection/train.record”label_map_path:“ F:/Programming/geeksforgeeks_project/models-master/research/object_detection/training/labelmap.pbtxt”
这样就完成了所有配置,我们将到达最后一个检查点。
- 检查要点5:训练模型:
终于到了训练我们的模型的时候了。您可以在object_detection / legacy /位置找到名为train.py的文件。复制train.py文件并将其粘贴到object_detection目录中。
导航到object_detection目录并运行以下命令以开始训练您的模型!python train.py --logtostderr --train_dir=training/ --pipeline_config_path=training/faster_rcnn_inception_v2_coco.config在训练开始之前,大约需要1分钟来初始化设置。培训开始时,看起来像:
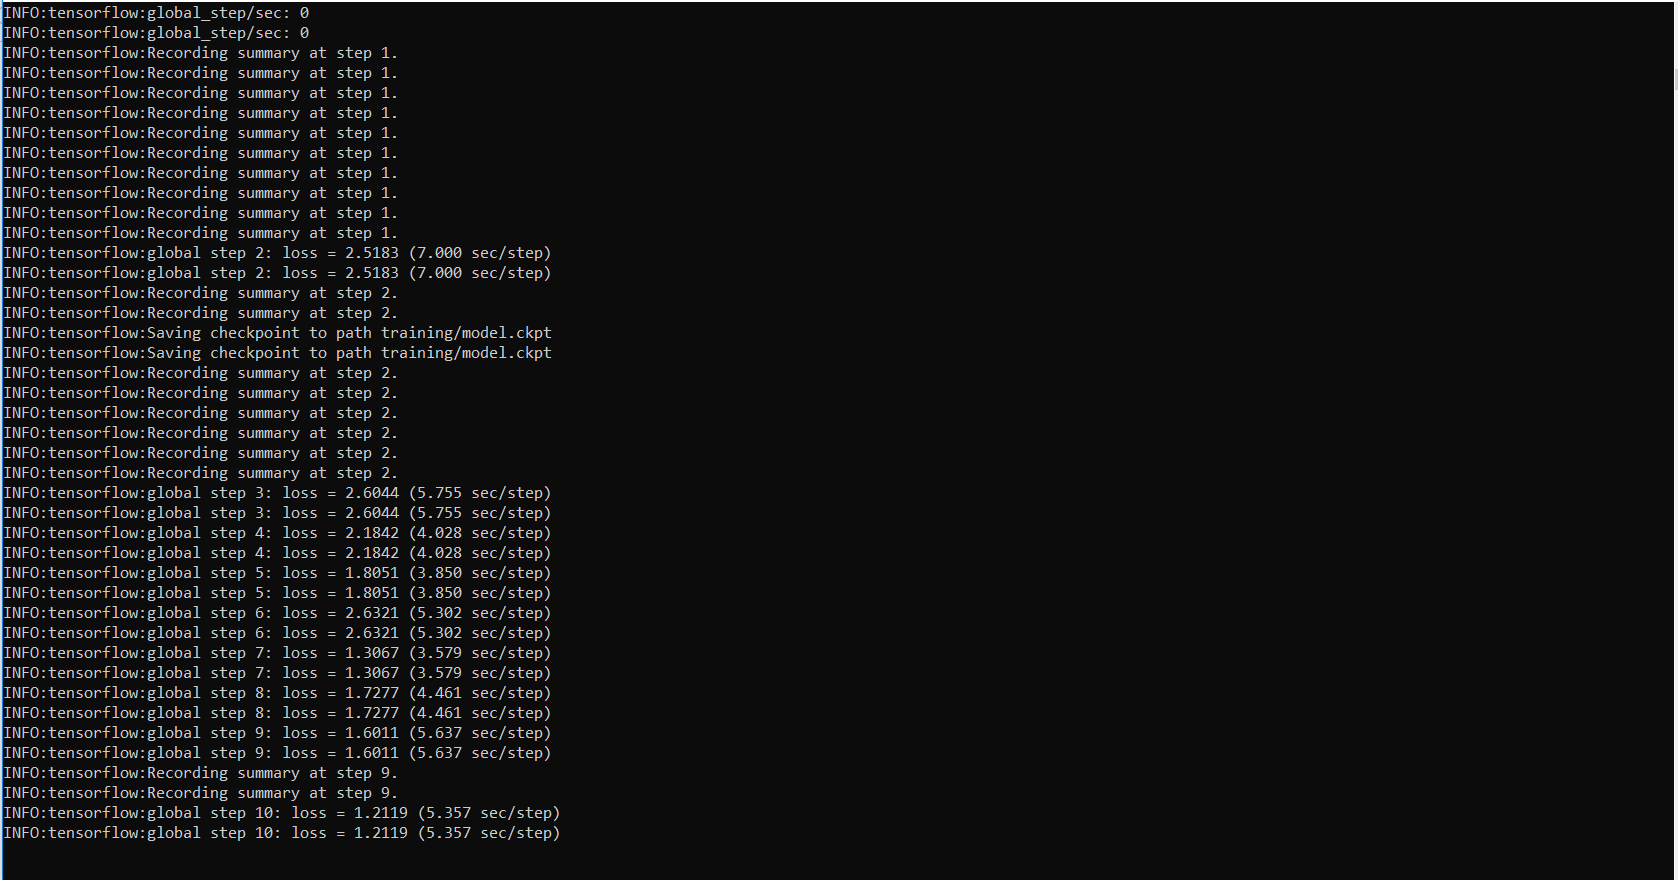
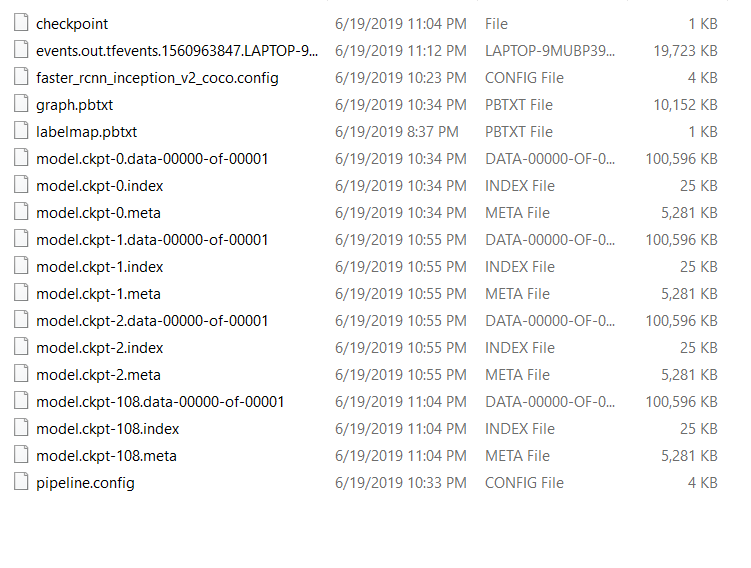
Tensorflow每5分钟创建一个检查点并进行存储。您可以看到所有检查点都保存在培训目录中。
您可以使用TensorBoard查看培训工作的进度。为此,请打开一个新的命令提示符并导航到object_detection目录,然后发出以下命令:tensorboard --logdir=trainingTensorboard看起来像:
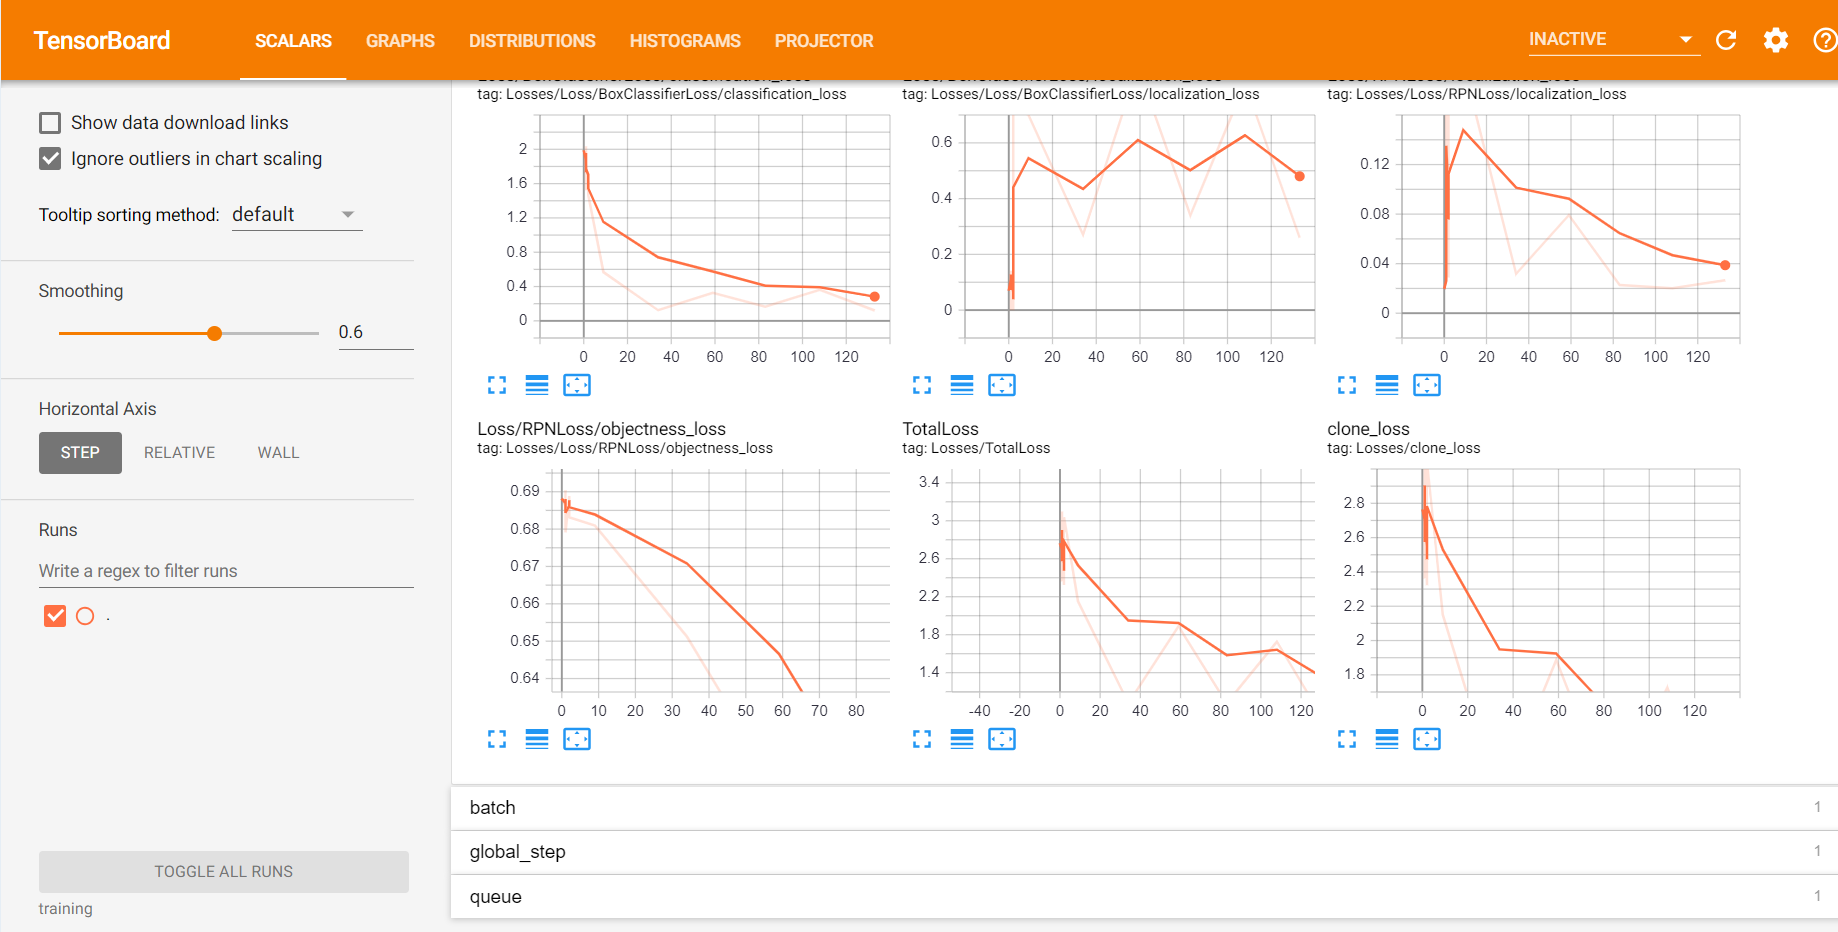
继续训练过程,直到损失小于或等于0.1。
- 检查点6:导出推理图:
这是要到达目的地的最后一个检查站。
现在我们有了训练有素的模型,我们需要生成一个推理图,该推理图可用于运行模型。为此,我们需要首先找出保存的最高步骤编号。为此,我们需要导航到训练目录并查找具有最大索引的model.ckpt文件。然后,我们可以通过在命令行中键入以下命令来创建推理图。
python export_inference_graph.py --input_type image_tensor --pipeline_config_path training/faster_rcnn_inception_v2_coco.config --trained_checkpoint_prefix training/model.ckpt-XXXX --output_directory inference_graphXXXX应该由最高检查点编号填充。
这将在\ object_detection \ inference_graph文件夹中创建Frozen_inference_graph.pb文件。 .pb文件包含对象检测分类器。
至此,我们完成了分类器的构建。完成冒险所剩下的就是使用我们的模型来检测物体。
使用以下代码在object_detection目录中创建一个Python文件:
# Write Python3 code here
import os
import cv2
import numpy as np
import tensorflow as tf
import sys

# This is needed since the notebook is stored in the object_detection folder.
sys.path.append("..")

# Import utilites
from utils import label_map_util
from utils import visualization_utils as vis_util

# Name of the directory containing the object detection module we're using
MODEL_NAME = 'inference_graph' # The path to the directory where frozen_inference_graph is stored.
IMAGE_NAME = '11man.jpg'  # The path to the image in which the object has to be detected.

# Grab path to current working directory
CWD_PATH = os.getcwd()

# Path to frozen detection graph .pb file, which contains the model that is used
# for object detection.
PATH_TO_CKPT = os.path.join(CWD_PATH, MODEL_NAME, 'frozen_inference_graph.pb')

# Path to label map file
PATH_TO_LABELS = os.path.join(CWD_PATH, 'training', 'labelmap.pbtxt')

# Path to image
PATH_TO_IMAGE = os.path.join(CWD_PATH, IMAGE_NAME)

# Number of classes the object detector can identify
NUM_CLASSES = 2

# Load the label map.
# Label maps map indices to category names, so that when our convolution
# network predicts `5`, we know that this corresponds to `king`.
# Here we use internal utility functions, but anything that returns a
# dictionary mapping integers to appropriate string labels would be fine
label_map = label_map_util.load_labelmap(PATH_TO_LABELS)
categories = label_map_util.convert_label_map_to_categories(
        label_map, max_num_classes = NUM_CLASSES, use_display_name = True)
category_index = label_map_util.create_category_index(categories)

# Load the Tensorflow model into memory.
detection_graph = tf.Graph()
with detection_graph.as_default():
    od_graph_def = tf.GraphDef()
    with tf.gfile.GFile(PATH_TO_CKPT, 'rb') as fid:
        serialized_graph = fid.read()
        od_graph_def.ParseFromString(serialized_graph)
        tf.import_graph_def(od_graph_def, name ='')

    sess = tf.Session(graph = detection_graph)

# Define input and output tensors (i.e. data) for the object detection classifier

# Input tensor is the image
image_tensor = detection_graph.get_tensor_by_name('image_tensor:0')

# Output tensors are the detection boxes, scores, and classes
# Each box represents a part of the image where a particular object was detected
detection_boxes = detection_graph.get_tensor_by_name('detection_boxes:0')

# Each score represents level of confidence for each of the objects.
# The score is shown on the result image, together with the class label.
detection_scores = detection_graph.get_tensor_by_name('detection_scores:0')
detection_classes = detection_graph.get_tensor_by_name('detection_classes:0')

# Number of objects detected
num_detections = detection_graph.get_tensor_by_name('num_detections:0')

# Load image using OpenCV and
# expand image dimensions to have shape: [1, None, None, 3]
# i.e. a single-column array, where each item in the column has the pixel RGB value
image = cv2.imread(PATH_TO_IMAGE)
image_expanded = np.expand_dims(image, axis = 0)

# Perform the actual detection by running the model with the image as input
(boxes, scores, classes, num) = sess.run(
    [detection_boxes, detection_scores, detection_classes, num_detections],
    feed_dict ={image_tensor: image_expanded})

# Draw the results of the detection (aka 'visualize the results')

vis_util.visualize_boxes_and_labels_on_image_array(
    image,
    np.squeeze(boxes),
    np.squeeze(classes).astype(np.int32),
    np.squeeze(scores),
    category_index,
    use_normalized_coordinates = True,
    line_thickness = 8,
    min_score_thresh = 0.60)

# All the results have been drawn on the image. Now display the image.
cv2.imshow('Object detector', image)

# Press any key to close the image
cv2.waitKey(0)

# Clean up
cv2.destroyAllWindows()
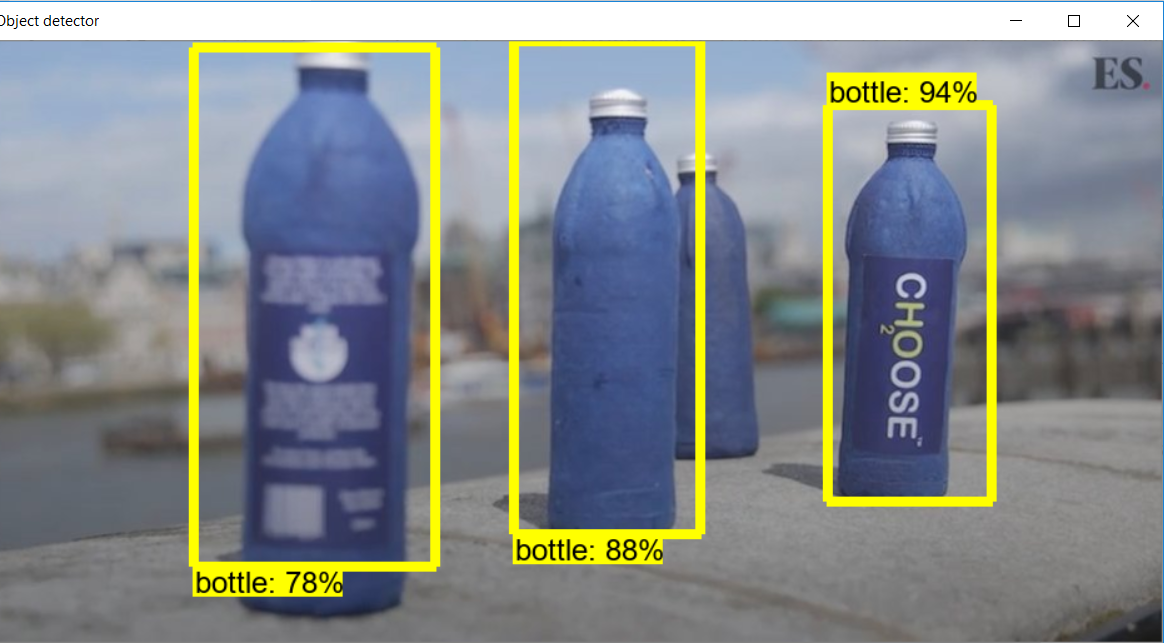
在第17行中给出要在其中检测到对象的图像的路径。
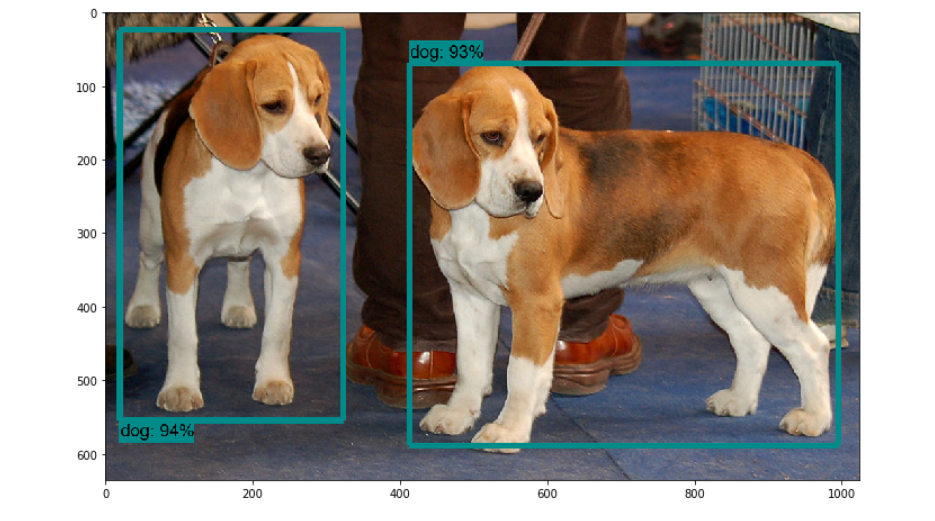
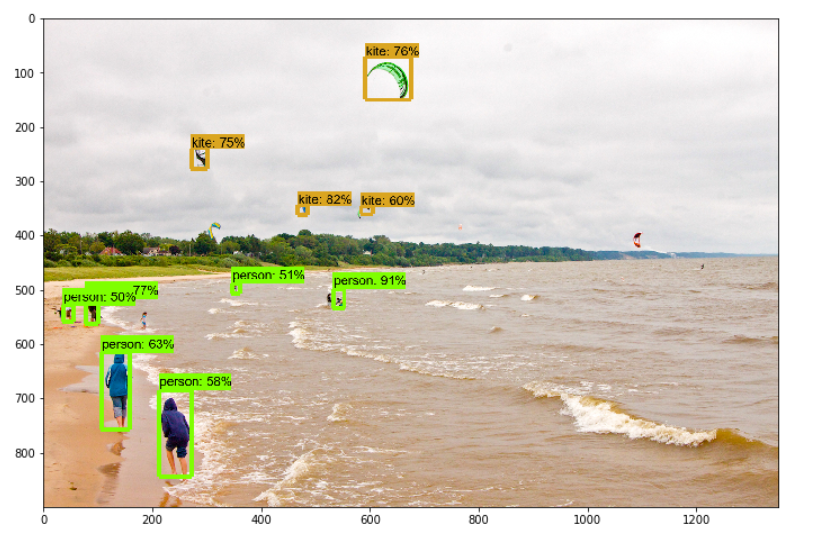
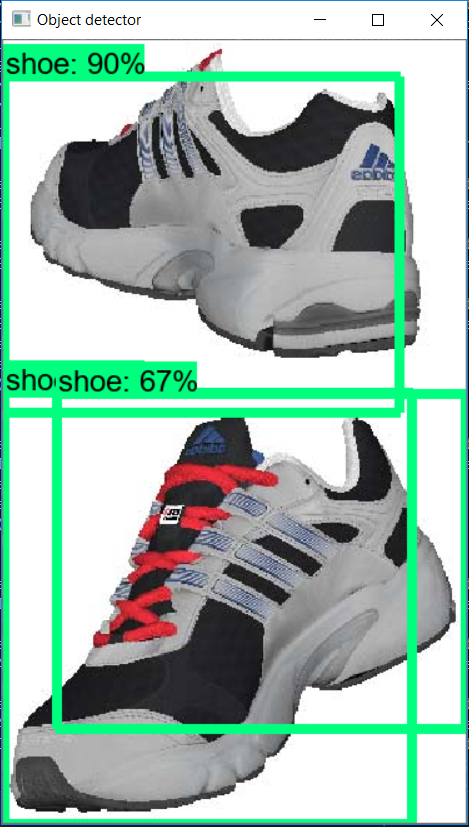
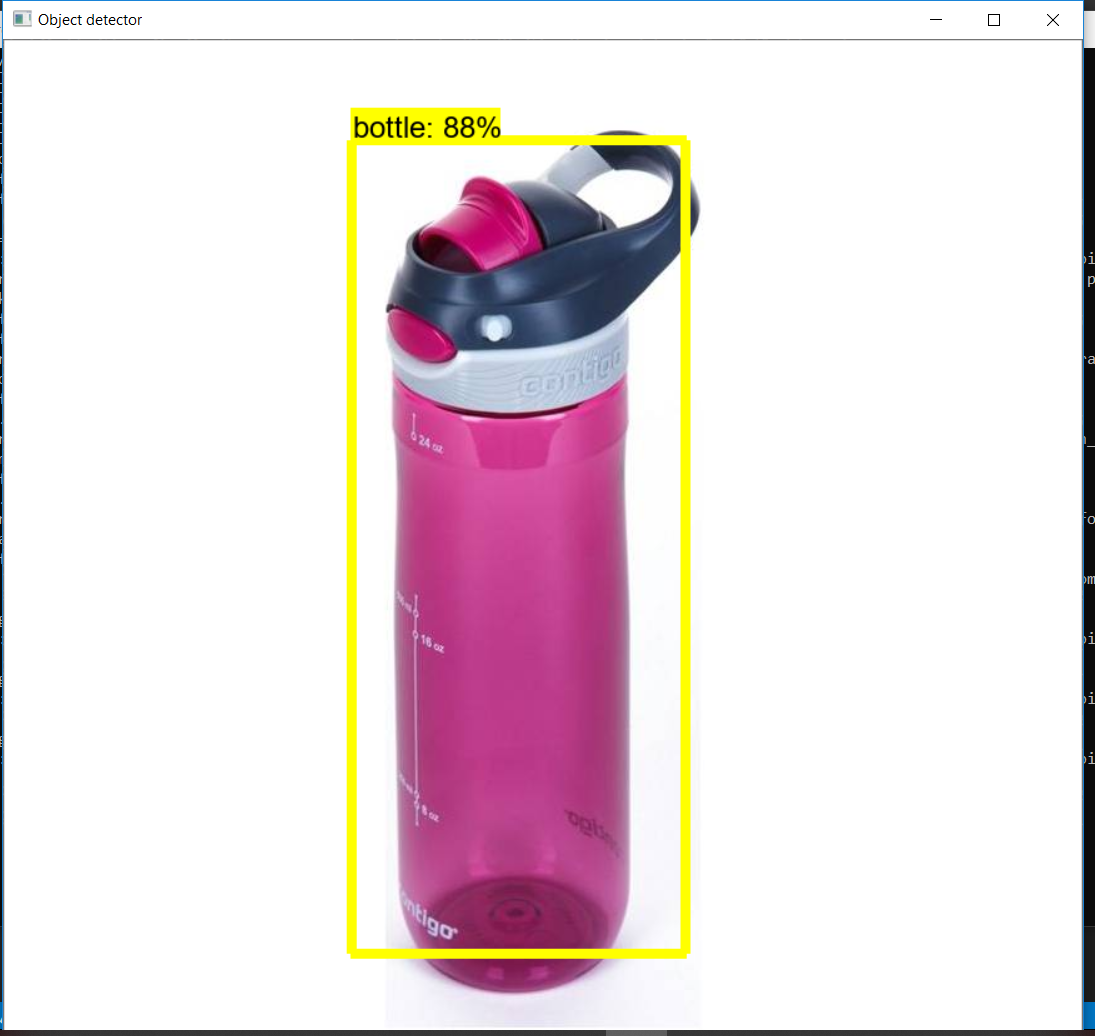
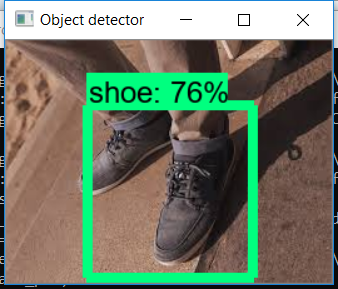
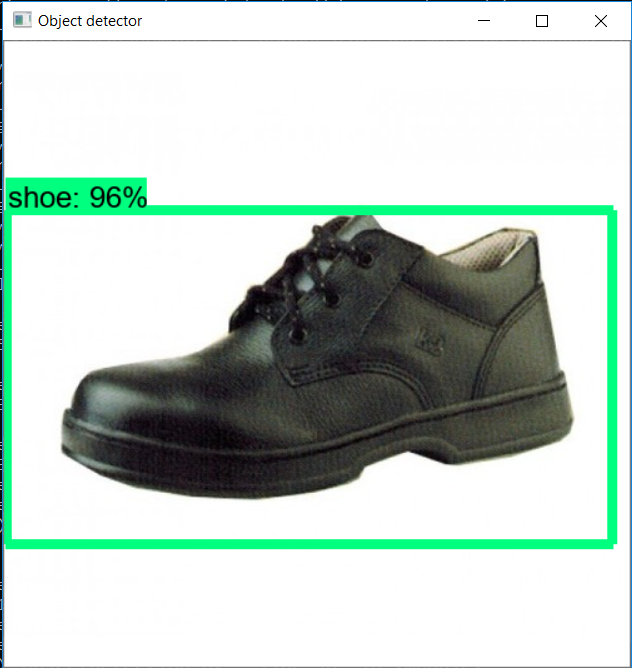
以下是我的模型的一些结果。
所以终于我们的模型准备好了。此模型也已用于构建基于图像的搜索引擎,该引擎通过检测图像中的对象来使用图像输入进行搜索。