使用 ReactJS 创建二维码生成器应用
简介:在本文中,我们将制作一个简单的二维码生成器应用程序。二维码是在智能手机上可读的二维条码。允许在双条码条中编码超过 4000 个字符。二维码可用于向用户显示文本、打开 URL、在地址簿中保持联系或写消息。
先决条件:该项目的先决条件是:
- 反应
- 功能组件
- 反应钩子
- Javascript ES6
方法:我们的应用程序包含两个部分。在一节中,我们将获取用户输入,例如要编码的文本、二维码的大小、二维码的背景颜色,并将所有这些存储在状态变量中。之后,我们将构建所需的 API字符串以获取 QR 码图像。在另一部分,我们将显示所需的二维码
创建一个 React 应用程序:
第 1 步:通过在终端中键入以下命令来创建一个反应应用程序。
npx create-react-app qrcode-gen第 2 步:现在,通过运行以下命令转到项目文件夹,即 qrcode.gen。
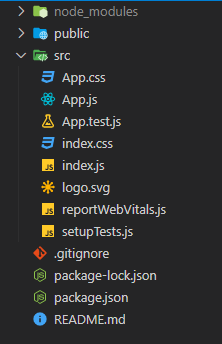
cd qrcode-gen项目结构:它将如下所示。
示例:这里 App.js 是我们应用程序中唯一包含所有逻辑的默认组件。我们将使用名为“create-qr-code”的免费开源(无需身份验证)API 来获取所需的二维码图像。我们还将有一个按钮来下载二维码图像。
现在在App.js文件中写下以下代码。
Javascript
import { useEffect, useState } from 'react';
import './App.css';
function App() {
const [temp, setTemp] = useState("");
const [word, setWord] = useState("");
const [size, setSize] = useState(400);
const [bgColor, setBgColor] = useState("ffffff");
const [qrCode, setQrCode] = useState("");
// Changing the URL only when the user
// changes the input
useEffect(() => {
setQrCode
(`http://api.qrserver.com/v1/create-qr-code/?data=${word}!&size=${size}x${size}&bgcolor=${bgColor}`);
}, [word, size, bgColor]);
// Updating the input word when user
// click on the generate button
function handleClick() {
setWord(temp);
}
return (
);
}
export default App;CSS
@import url('http://fonts.cdnfonts.com/css/lilly');
.App{
  display: flex;
  flex-direction: column;
  justify-content: center;
  align-items: center;
  gap: 50px;
  padding-top: 30px;
}
h1{
  font-family: 'Lilly', sans-serif;
  font-size: 50px;
}
.gen input{
  height: 35px;
  width: 250px;
  font-size: 20px;
  padding-left: 5px;
}
button{
  position: relative;
  height: 38px;
  width: 100px;
  top: -2px;
  font-size: 18px;
  border: none;
  color: whitesmoke;
  background-color: forestgreen;
  box-shadow: 2px 2px 5px rgb(74, 182, 74);
  cursor: pointer;
}
button:active{
  box-shadow: none;
}
.extra{
  padding-top: 20px;
  display: flex;
  justify-content: space-around;
  gap: 10px;
}
.output-box{
  display: flex;
  flex-direction: column;
  align-items: center;
  gap: 40px;
}现在,让我们编辑名为App.css的文件来设计我们的应用程序。
CSS
@import url('http://fonts.cdnfonts.com/css/lilly');
.App{
  display: flex;
  flex-direction: column;
  justify-content: center;
  align-items: center;
  gap: 50px;
  padding-top: 30px;
}
h1{
  font-family: 'Lilly', sans-serif;
  font-size: 50px;
}
.gen input{
  height: 35px;
  width: 250px;
  font-size: 20px;
  padding-left: 5px;
}
button{
  position: relative;
  height: 38px;
  width: 100px;
  top: -2px;
  font-size: 18px;
  border: none;
  color: whitesmoke;
  background-color: forestgreen;
  box-shadow: 2px 2px 5px rgb(74, 182, 74);
  cursor: pointer;
}
button:active{
  box-shadow: none;
}
.extra{
  padding-top: 20px;
  display: flex;
  justify-content: space-around;
  gap: 10px;
}
.output-box{
  display: flex;
  flex-direction: column;
  align-items: center;
  gap: 40px;
}
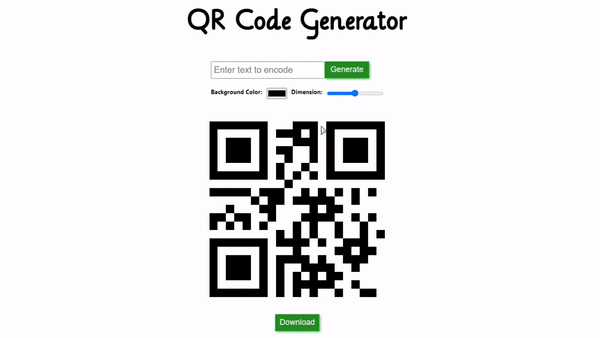
运行应用程序的步骤:从项目的根目录使用以下命令运行应用程序:
npm start输出:现在打开浏览器并转到http://localhost:3000/ ,您将看到以下输出: