使用 PyCairo 创建 SVG 图像
在本文中,我们将看到如何在Python中使用PyCairo创建 SVG 文件。
SVG : SVG 文件是使用二维图形矢量格式的图形文件,该格式使用基于 XML 的文本格式定义图像。作为在 Web 上显示矢量图形的标准格式,开发了 SVG 文件。
PyCairo:它 是一个Python模块,为cairo图形库提供绑定。该库用于在Python中创建 SVG,即矢量文件。为了安装pycairo模块,我们将使用下面给出的命令
安装:
pip install pycairo
打开 SVG 文件:打开 SVG 文件以查看它(只读)的最简单快捷的方法是使用现代网络浏览器,如 Chrome、Firefox、Edge 或 Internet Explorer——几乎所有这些都应该提供某种渲染支持SVG 格式。
循序渐进的方法:
1、导入cairo模块。
2. 创建一个 SVG 表面并为其添加上下文。
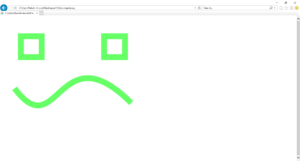
3.为了创建一个小脸,添加两个矩形作为眼睛。
4. 为微笑添加一条曲线。
5. 设置上下文的颜色和宽度。
以下是基于上述方法的完整程序:
Python3
# importing pycairo
import cairo

# creating a SVG surface
# here geek is file name & 700, 700 is dimension
with cairo.SVGSurface("geek.svg", 700, 700) as surface:

    # creating a cairo context object
    context = cairo.Context(surface)

    # creating a rectangle(square) for left eye
    context.rectangle(100, 100, 100, 100)

    # creating a rectangle(square) for right eye
    context.rectangle(500, 100, 100, 100)

    # creating position for the curves
    x, y, x1, y1 = 0.1, 0.5, 0.4, 0.9
    x2, y2, x3, y3 = 0.4, 0.1, 0.9, 0.6

    # setting scale of the context
    context.scale(700, 700)

    # setting line width of the context
    context.set_line_width(0.04)

    # move the context to x,y position
    context.move_to(x, y)

    # draw the curve for smile
    context.curve_to(x1, y1, x2, y2, x3, y3)

    # setting color of the context
    context.set_source_rgba(0.4, 1, 0.4, 1)

    # stroke out the color and width property
    context.stroke()


# printing message when file is saved
print("File Saved")
输出: