使用 MongoDB 创建时事通讯采购数据
有许多新闻发布网站可用,例如 ndtv.com。在本文中,让我们看看如何通过抓取功能从 ndtv.com 获取数据的非常有用和有趣的功能,即从 ndtv.com 提取内容并将它们存储到 MongoDB 中。 MongoDB 是一个 NoSQL 文档模型数据库。
使用Mongoose、Node JS、Cheerio,抓取 NDTV 新闻网站并将数据加载到 Mongo DB 数据库中。这是一个使用 MongoDB、 Mongoose、Node.js、Express.js、Handlebars.js、HTML 和 CSS 构建的全栈 JavaScript 应用程序。它会抓取 [NDTV](https://ndtv.com/) 主页并存储文章标题和链接。
模块安装:使用以下命令安装所需的模块。
npm install body-parser
npm install cheerio
npm install express
npm install express-handlebars
npm install mongoose
npm install request项目结构:它看起来像这样。

执行:
文件名:server.js:这是启动应用程序运行所需的重要文件。要调用 ndtv 站点,抓取数据并将其存储在 MongoDB 数据库中。
Javascript
// First specifying the required dependencies
// Express is a minimal and flexible Node.js
// web application framework that provides a
// robust set of features for web and mobile
// applications
var express = require("express");

// To communicate with mongodb, we require "mongoose"
var mongoose = require("mongoose");

// As we need to call ndtv website and access
// the urls, we require "request"
var request = require("request");

// Cheerio parses markup and provides an
// API for traversing/manipulating the
// resulting data structure
var cheerio = require("cheerio");

// Node.js body parsing middleware.
// Parse incoming request bodies in a
// middleware before your handlers,
// available under the req.body property.
var bodyParser = require("body-parser");
var exphbs = require("express-handlebars");

// We can explicitly set the port number
// provided no other instances running
// on that port
var PORT = process.env.PORT || 3000;

// Initialize Express
var app = express();

// Use body-parser for handling form submissions
app.use(bodyParser.urlencoded({
    extended: false
}));

// We are getting the output in the
// form of application/json
app.use(bodyParser.json({
    type: "application/json"
}));

// Serve the public directory
app.use(express.static("public"));

// Use promises with Mongo and connect to
// the database
// Let us have our mongodb database name
// to be ndtvnews By using Promise,
// Mongoose async operations, like .save()
// and queries, return thenables.
mongoose.Promise = Promise;
var MONGODB_URI = process.env.MONGODB_URI
        || "mongodb://localhost/ndtvnews";

mongoose.connect(MONGODB_URI);

// Use handlebars
app.engine("handlebars", exphbs({
    defaultLayout: "main"
}));

app.set("view engine", "handlebars");

// Hook mongojs configuration to the db variable
var db = require("./models");

// We need to filter out NdtvArticles from
// the database that are not saved
// It will be called on startup of url
app.get("/", function (req, res) {

    db.Article.find({
        saved: false
    },
        function (error, dbArticle) {
            if (error) {
                console.log(error);
            } else {

                // We are passing the contents
                // to index.handlebars
                res.render("index", {
                    articles: dbArticle
                });
            }
        })
})

// Use cheerio to scrape stories from NDTV
// and store them
// We need to do this on one time basis each day
app.get("/scrape", function (req, res) {
    request("https://ndtv.com/", function (error, response, html) {

        // Load the html body from request into cheerio
        var $ = cheerio.load(html);

        // By inspecting the web page we know how to get the
        // title i.e. headlines of news.
        // From view page source also we can able to get it.
        // It differs in each web page
        $("h2").each(function (i, element) {

            // The trim() removes whitespace because the
            // items return \n and \t before and after the text
            var title = $(element).find("a").text().trim();
            console.log("title", title);
            var link = $(element).find("a").attr("href");
            console.log("link", link);

            // If these are present in the scraped data,
            // create an article in the database collection
            if (title && link) {
                db.Article.create({
                    title: title,
                    link: link
                },
                    function (err, inserted) {
                        if (err) {

                            // Log the error if one is
                            // encountered during the query
                            console.log(err);
                        } else {

                            // Otherwise, log the inserted data
                            console.log(inserted);
                        }
                    });

                // If there are 10 articles, then
                // return callback to the frontend
                console.log(i);
                if (i === 10) {
                    return res.sendStatus(200);
                }
            }
        });
    });
});

// Route for retrieving all the saved articles.
// User has the option to save the article.
// Once it is saved, "saved" column in the
// collection is set to true.
// Below routine helps to find the articles
// that are saved
app.get("/saved", function (req, res) {
    db.Article.find({
        saved: true
    })
        .then(function (dbArticle) {

            // If successful, then render with
            // the handlebars saved page
            // this time saved.handlebars is
            // called and that page is rendered
            res.render("saved", {
                articles: dbArticle
            })
        })
        .catch(function (err) {

            // If an error occurs, send the
            // error back to the client
            res.json(err);
        })
});

// Route for setting an article to saved
// In order to save an article, this routine is used.
// _id column in collection is unique and it will
// determine the uniqueness of the news
app.put("/saved/:id", function (req, res) {
    db.Article.findByIdAndUpdate(
        req.params.id, {
        $set: req.body
    }, {
        new: true
    })
        .then(function (dbArticle) {

            // This time saved.handlebars is
            // called and that page is rendered
            res.render("saved", {
                articles: dbArticle
            })
        })
        .catch(function (err) {
            res.json(err);
        });
});

// Route for saving a new note to the db and
// associating it with an article
app.post("/submit/:id", function (req, res) {
    db.Note.create(req.body)
        .then(function (dbNote) {
            var articleIdFromString =
                mongoose.Types.ObjectId(req.params.id)

            return db.Article.findByIdAndUpdate(
                articleIdFromString, {
                $push: {
                    notes: dbNote._id
                }
            })
        })
        .then(function (dbArticle) {
            res.json(dbNote);
        })
        .catch(function (err) {

            // If an error occurs, send it
            // back to the client
            res.json(err);
        });
});

// Route to find a note by ID
app.get("/notes/article/:id", function (req, res) {
    db.Article.findOne({ "_id": req.params.id })
        .populate("notes")
        .exec(function (error, data) {
            if (error) {
                console.log(error);
            } else {
                res.json(data);
            }
        });
});


app.get("/notes/:id", function (req, res) {
    db.Note.findOneAndRemove({ _id: req.params.id },
        function (error, data) {
            if (error) {
                console.log(error);
            }
            res.json(data);
    });
});

// Listen for the routes
app.listen(PORT, function () {
    console.log("App is running");
});运行应用程序的步骤:使用以下命令运行server.js文件。
node server.js输出:我们将在终端屏幕上看到以下输出。
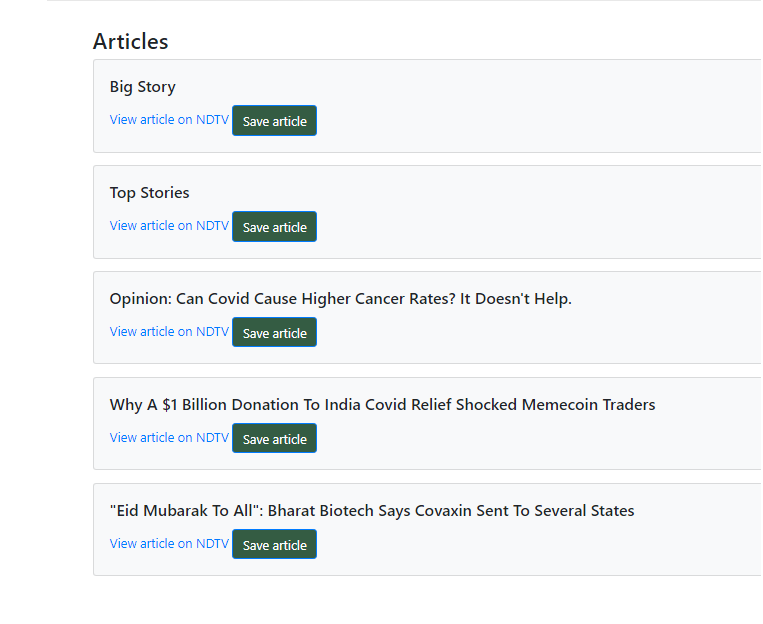
App is running现在打开任何浏览器并转到http://localhost:3000/ ,我们将得到一个类似的页面,如下所示。

要从 ndtv.com 获取新闻,我们需要点击Get New Articles 。这将在内部调用我们的/scrape路径。完成此调用后,在 MongoDB 中,在 ndtvnews 数据库下,名为 collection 的文章将填充数据,如下所示:
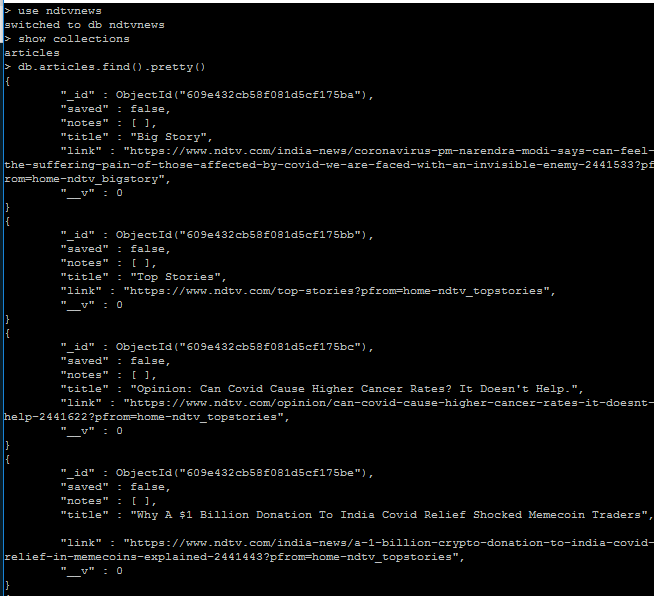
文章集
在这里,最初保存的属性将为 false, id是在 MongoDB 中自动创建的,这是集合中文档的唯一标识。此属性仅有助于查看文档、保存文档等。
提取的文章以这种格式显示
单击在NDTV 上查看文章时,它将导航到相应的文章。这只是因为文章集合中存在id属性而成为可能。因此,当我们在 NDTV 上单击查看文章时,由于它是一个超链接,因此直接在内部拾取该文档_id值并显示该链接。单击保存文章时, _Id值将是该文章的标识部分。
工作:视频中解释了项目的整个工作模型:
结论:抓取任何新闻网站并单独显示标题内容以及随后的链接都更加容易和简单,我们可以轻松保存文章并查看保存的文章。
参考: https://github.com/raj123raj/NdtvNewsScraperUsingMongoDB