使用 Flask 部署机器学习模型
机器学习是一个广泛用于预测的过程。可用于预测的各种库中提供了 N 种算法。在本文中,我们将使用不同的机器学习算法和分类器构建历史数据的预测模型,绘制结果并计算模型在测试数据上的准确性。
在大型数据集上使用各种算法构建/训练模型是数据的一部分。但是在不同的应用程序中使用这些模型是在现实世界中部署机器学习的第二部分。
为了使用它来预测新数据,我们必须将它部署在互联网上,以便外部世界可以使用它。在本文中,我们将讨论我们如何训练机器学习模型,使用 Flask 在其上创建 Web 应用程序。
我们必须安装许多将在此模型中使用的必需库。使用 pip 命令安装所有库。
pip install pandas
pip install numpy
pip install sklearn
决策树 -
决策树是一种众所周知的监督机器学习算法,因为它易于使用、弹性和灵活。我已经在 UCI 机器学习存储库的成人数据集上实现了该算法。
获取数据——
您可以从此链接获取数据集。
获取数据集并不是结束。我们必须预处理数据,这意味着我们需要清理数据集。数据集的清理包括不同类型的过程,例如删除缺失值、填充 NA 值等。
Python3
# importing the dataset
import pandas
import numpy
from sklearn import preprocessing

df = pandas.read_csv('adult.csv')
df.head()
Python3
df = df.drop(['fnlwgt', 'educational-num'], axis = 1)

col_names = df.columns

for c in col_names:
    df = df.replace("?", numpy.NaN)
df = df.apply(lambda x:x.fillna(x.value_counts().index[0]))
Python3
df.replace(['Divorced', 'Married-AF-spouse',
              'Married-civ-spouse', 'Married-spouse-absent',
              'Never-married', 'Separated', 'Widowed'],
             ['divorced', 'married', 'married', 'married',
              'not married', 'not married', 'not married'], inplace = True)

category_col =['workclass', 'race', 'education', 'marital-status', 'occupation',
               'relationship', 'gender', 'native-country', 'income']
labelEncoder = preprocessing.LabelEncoder()

mapping_dict ={}
for col in category_col:
    df[col] = labelEncoder.fit_transform(df[col])

    le_name_mapping = dict(zip(labelEncoder.classes_,
                        labelEncoder.transform(labelEncoder.classes_)))

    mapping_dict[col]= le_name_mapping
print(mapping_dict)
Python3
from sklearn.model_selection import train_test_split
from sklearn.tree import DecisionTreeClassifier
from sklearn.metrics import accuracy_score

X = df.values[:, 0:12]
Y = df.values[:, 12]
Python3
X_train, X_test, y_train, y_test = train_test_split(
           X, Y, test_size = 0.3, random_state = 100)

dt_clf_gini = DecisionTreeClassifier(criterion = "gini",
                                     random_state = 100,
                                     max_depth = 5,
                                     min_samples_leaf = 5)

dt_clf_gini.fit(X_train, y_train)
y_pred_gini = dt_clf_gini.predict(X_test)

print ("Decision Tree using Gini Index\nAccuracy is ",
             accuracy_score(y_test, y_pred_gini)*100 )
HTML
Income Prediction Form
Python3
# prediction function
def ValuePredictor(to_predict_list):
    to_predict = np.array(to_predict_list).reshape(1, 12)
    loaded_model = pickle.load(open("model.pkl", "rb"))
    result = loaded_model.predict(to_predict)
    return result[0]

@app.route('/result', methods = ['POST'])
def result():
    if request.method == 'POST':
        to_predict_list = request.form.to_dict()
        to_predict_list = list(to_predict_list.values())
        to_predict_list = list(map(int, to_predict_list))
        result = ValuePredictor(to_predict_list)
        if int(result)== 1:
            prediction ='Income more than 50K'
        else:
            prediction ='Income less that 50K'
        return render_template("result.html", prediction = prediction)
HTML
{{ prediction }}
输出 :

预处理数据集 -
它由 14 个属性和一个类别标签组成,说明个人的年收入是少于还是多于 50K。这些属性的范围从人的年龄、工人阶级标签到关系状态和人所属的种族。可以在此处找到有关所有属性的信息。
首先,我们从数据中找到并删除任何缺失值。我们已经用该列中的众数替换了缺失值。还有许多其他方法可以替换缺失值,但对于这种类型的数据集,它似乎是最优化的。
Python3
df = df.drop(['fnlwgt', 'educational-num'], axis = 1)

col_names = df.columns

for c in col_names:
    df = df.replace("?", numpy.NaN)
df = df.apply(lambda x:x.fillna(x.value_counts().index[0]))
机器学习算法无法处理分类数据值。它只能处理数值。
为了将数据拟合到预测模型中,我们需要将分类值转换为数值。在此之前,我们将评估是否需要对分类列进行任何转换。
离散化——这是使分类数据更加整洁和有意义的常用方法。我们在 marital_status 列上应用了离散化,将它们缩小到仅适用于已婚或未婚的值。稍后,我们将在剩余的数据列中应用标签编码器。此外,还有两个冗余列 {'education', 'educational-num'},因此,我们删除了其中之一。
Python3
df.replace(['Divorced', 'Married-AF-spouse',
              'Married-civ-spouse', 'Married-spouse-absent',
              'Never-married', 'Separated', 'Widowed'],
             ['divorced', 'married', 'married', 'married',
              'not married', 'not married', 'not married'], inplace = True)

category_col =['workclass', 'race', 'education', 'marital-status', 'occupation',
               'relationship', 'gender', 'native-country', 'income']
labelEncoder = preprocessing.LabelEncoder()

mapping_dict ={}
for col in category_col:
    df[col] = labelEncoder.fit_transform(df[col])

    le_name_mapping = dict(zip(labelEncoder.classes_,
                        labelEncoder.transform(labelEncoder.classes_)))

    mapping_dict[col]= le_name_mapping
print(mapping_dict)
输出 :
{‘workclass’: {‘ ?’: 0, ‘ Federal-gov’: 1, ‘ Local-gov’: 2, ‘ Never-worked’: 3, ‘ Private’: 4, ‘ Self-emp-inc’: 5, ‘ Self-emp-not-inc’: 6, ‘ State-gov’: 7, ‘ Without-pay’: 8}, ‘race’: {‘ Amer-Indian-Eskimo’: 0, ‘ Asian-Pac-Islander’: 1, ‘ Black’: 2, ‘ Other’: 3, ‘ White’: 4}, ‘education’: {‘ 10th’: 0, ‘ 11th’: 1, ‘ 12th’: 2, ‘ 1st-4th’: 3, ‘ 5th-6th’: 4, ‘ 7th-8th’: 5, ‘ 9th’: 6, ‘ Assoc-acdm’: 7, ‘ Assoc-voc’: 8, ‘ Bachelors’: 9, ‘ Doctorate’: 10, ‘ HS-grad’: 11, ‘ Masters’: 12, ‘ Preschool’: 13, ‘ Prof-school’: 14, ‘ Some-college’: 15}, ‘marital-status’: {‘ Divorced’: 0, ‘ Married-AF-spouse’: 1, ‘ Married-civ-spouse’: 2, ‘ Married-spouse-absent’: 3, ‘ Never-married’: 4, ‘ Separated’: 5, ‘ Widowed’: 6}, ‘occupation’: {‘ ?’: 0, ‘ Adm-clerical’: 1, ‘ Armed-Forces’: 2, ‘ Craft-repair’: 3, ‘ Exec-managerial’: 4, ‘ Farming-fishing’: 5, ‘ Handlers-cleaners’: 6, ‘ Machine-op-inspect’: 7, ‘ Other-service’: 8, ‘ Priv-house-serv’: 9, ‘ Prof-specialty’: 10, ‘ Protective-serv’: 11, ‘ Sales’: 12, ‘ Tech-support’: 13, ‘ Transport-moving’: 14}, ‘relationship’: {‘ Husband’: 0, ‘ Not-in-family’: 1, ‘ Other-relative’: 2, ‘ Own-child’: 3, ‘ Unmarried’: 4, ‘ Wife’: 5}, ‘gender’: {‘ Female’: 0, ‘ Male’: 1}, ‘native-country’: {‘ ?’: 0, ‘ Cambodia’: 1, ‘ Canada’: 2, ‘ China’: 3, ‘ Columbia’: 4, ‘ Cuba’: 5, ‘ Dominican-Republic’: 6, ‘ Ecuador’: 7, ‘ El-Salvador’: 8, ‘ England’: 9, ‘ France’: 10, ‘ Germany’: 11, ‘ Greece’: 12, ‘ Guatemala’: 13, ‘ Haiti’: 14, ‘ Holand-Netherlands’: 15, ‘ Honduras’: 16, ‘ Hong’: 17, ‘ Hungary’: 18, ‘ India’: 19, ‘ Iran’: 20, ‘ Ireland’: 21, ‘ Italy’: 22, ‘ Jamaica’: 23, ‘ Japan’: 24, ‘ Laos’: 25, ‘ Mexico’: 26, ‘ Nicaragua’: 27, ‘ Outlying-US(Guam-USVI-etc)’: 28, ‘ Peru’: 29, ‘ Philippines’: 30, ‘ Poland’: 31, ‘ Portugal’: 32, ‘ Puerto-Rico’: 33, ‘ Scotland’: 34, ‘ South’: 35, ‘ Taiwan’: 36, ‘ Thailand’: 37, ‘ Trinadad&Tobago’: 38, ‘ United-States’: 39, ‘ Vietnam’: 40, ‘ Yugos lavia’: 41}, ‘income’: {‘ 50K’: 1}}
拟合模型 -
在对数据进行预处理之后,数据就可以将其提供给机器学习算法。然后,我们对数据进行切片,将标签与属性分开。现在,我们将数据集分成两半,一用于训练,另一半用于测试。这是使用 sklearn 的 train_test_split()函数实现的。
Python3
from sklearn.model_selection import train_test_split
from sklearn.tree import DecisionTreeClassifier
from sklearn.metrics import accuracy_score

X = df.values[:, 0:12]
Y = df.values[:, 12]
我们在这里使用决策树分类器作为预测模型。我们提供数据的训练部分来训练模型。
训练完成后,我们通过向模型提供测试部分数据来测试模型的准确性。
有了这个,我们达到了大约 84% 的准确率。现在为了使用这个模型和新的未知数据,我们需要保存模型以便我们以后可以预测值。为此,我们在Python中使用pickle ,它是一种强大的算法,用于序列化和反序列化Python对象结构。
Python3
X_train, X_test, y_train, y_test = train_test_split(
           X, Y, test_size = 0.3, random_state = 100)

dt_clf_gini = DecisionTreeClassifier(criterion = "gini",
                                     random_state = 100,
                                     max_depth = 5,
                                     min_samples_leaf = 5)

dt_clf_gini.fit(X_train, y_train)
y_pred_gini = dt_clf_gini.predict(X_test)

print ("Decision Tree using Gini Index\nAccuracy is ",
             accuracy_score(y_test, y_pred_gini)*100 )
输出 :
Decision Tree using Gini Index
Accuracy is  83.13031016480704
现在,烧瓶——
Flask 是一个基于 Python 的微框架,用于开发小型网站。 Flask 很容易使用Python制作 Restful API。到目前为止,我们已经开发了一个模型,即model.pkl,它可以根据数据的各种属性来预测数据的类别。类标签是Salary >=50K 或 <50K 。
现在我们将设计一个Web应用程序,用户将输入所有属性值,数据将被赋予模型,基于对模型的训练,模型将预测其详细信息的人的薪水应该是多少被喂饱了。
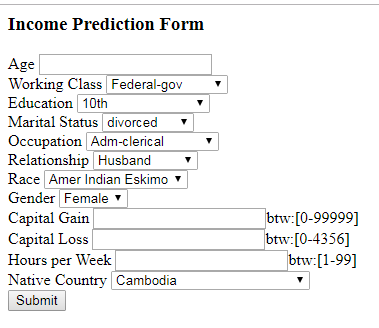
HTML 表单 –
为了预测各种属性的收入,我们首先需要收集数据(新的属性值),然后使用我们上面建立的决策树模型来预测收入是否超过 50K 或更少。因此,为了收集数据,我们创建了 html 表单,其中包含从每个属性中选择的所有不同选项。在这里,我们只使用 html 创建了一个简单的表单。如果您想让表单更具交互性,您也可以这样做。
HTML
Income Prediction Form
输出 :
笔记:
为了正确预测数据,每个标签的对应值应该与每个所选输入的值相匹配。例如 - 在属性关系中有 6 个分类值。这些被转换为像这样的数字 {'丈夫': 0, '非家庭成员': 1, '其他亲戚': 2, '自己的孩子': 3, '未婚': 4, '妻子': 5}。因此,我们需要将相同的值放入 html 表单。
Python3
# prediction function
def ValuePredictor(to_predict_list):
    to_predict = np.array(to_predict_list).reshape(1, 12)
    loaded_model = pickle.load(open("model.pkl", "rb"))
    result = loaded_model.predict(to_predict)
    return result[0]

@app.route('/result', methods = ['POST'])
def result():
    if request.method == 'POST':
        to_predict_list = request.form.to_dict()
        to_predict_list = list(to_predict_list.values())
        to_predict_list = list(map(int, to_predict_list))
        result = ValuePredictor(to_predict_list)
        if int(result)== 1:
            prediction ='Income more than 50K'
        else:
            prediction ='Income less that 50K'
        return render_template("result.html", prediction = prediction)
从表单发布数据后,应将数据提供给模型。
烧瓶脚本 -
在开始编码部分之前,我们需要下载flask和其他一些库。在这里,我们利用了虚拟环境,所有库都在其中进行管理,使开发和部署工作变得更容易。
这是使用虚拟环境运行代码的代码。
mkdir income-prediction
cd income-prediction
python3 -m venv venv
source venv/bin/activate现在让我们安装 Flask。
pip install flask让我们创建文件夹模板。在您的应用程序中,您将使用模板来呈现将显示在用户浏览器中的 HTML。此文件夹包含我们的 html 表单文件 index.html。
mkdir templates在项目文件夹中创建 script.py 文件并复制以下代码。
这里我们导入库,然后使用 app=Flask(__name__) 创建一个 flask 的实例。 @app.route('/') 用于告诉flask 哪个url 应该触发函数index() 并且在函数index 中我们使用render_template('index.html') 在浏览器中显示脚本index.html。
让我们运行应用程序。
export FLASK_APP=script.py   #this line will work in linux
set FLASK_APP=script.py      # this it the code  for windows.
run flask
这应该运行应用程序并启动一个简单的服务器。打开http://127.0.0.1:5000/查看html表单。
预测收入价值——
当有人提交表单时,网页应该显示收入的预测值。为此,我们需要之前在同一个项目文件夹中创建的模型文件 (model.pkl)。
这里,表单提交后,表单值以字典的形式存储在变量to_predict_list中。我们将其转换为字典值的列表,并将其作为参数传递给 ValuePredictor()函数。在这个函数中,我们加载 model.pkl 文件并预测新值并返回结果。
然后将该结果/预测(收入大于或小于 50k)作为参数传递给要显示的 html 页面的模板引擎。
创建以下 result.html 文件并将其添加到模板文件夹。
HTML
{{ prediction }}
输出:

再次运行应用程序,它应该在提交表单后预测收入,并将在结果页面上显示输出。