安卓 |如何将数据从一个活动发送到第二个活动
先决条件:
- 面向初学者的 Android 应用开发基础知识
- 安装和设置 Android Studio 指南
- 安卓 |从第一个 app/android 项目开始
- 安卓 |运行您的第一个 Android 应用程序
本文旨在讲述和展示如何“使用 Intent 将数据从一个活动发送到第二个活动”。在这个示例中,我们有两个活动, activity_first是源活动, activity_second是目标活动。我们可以使用 putExtra() 方法从一个活动发送数据,并使用 getStringExtra() 方法从第二个活动获取数据。
例子:

在本示例中,使用一个 EditText 来输入文本。单击“发送”按钮时,此文本将发送到第二个活动。为此,Intent 将启动并运行以下方法:
- putExtra()方法用于发送数据,键值对中的数据键是变量名,值可以是 Int、String、Float 等。
- getStringExtra()方法用于获取通过上述方法发送的数据(键)。根据 value 的数据类型,还有其他方法,如getIntExtra()、getFloatExtra()
如何创建一个Android App在两个Activity之间发送和接收数据
第 1 步:首先创建一个新的 Android 应用程序。这将创建一个 XML 文件和一个Java文件。请参阅先决条件以了解有关此步骤的更多信息。

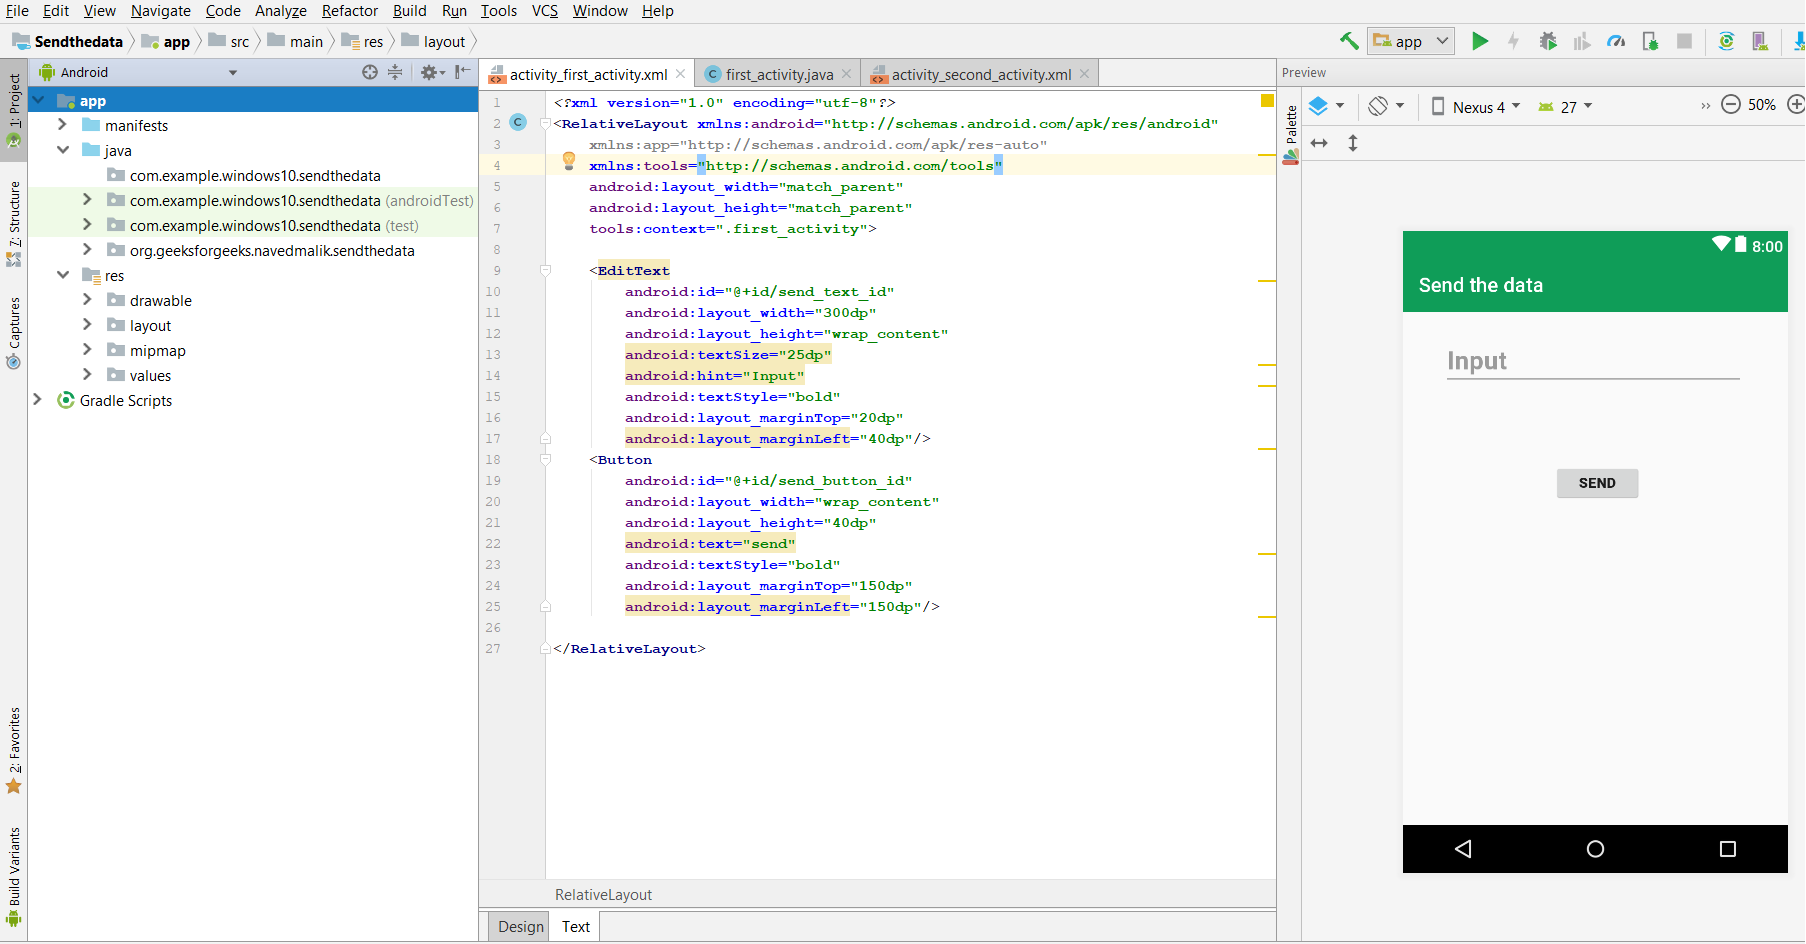
第 2 步:打开“activity_first_activity.xml”文件并在相对布局中添加以下小部件:
- 用于输入消息的EditText
- 发送数据的按钮
此外,将ID与其他属性一起分配给每个组件,如图像和下面的代码所示。为组件分配的 ID 有助于在Java文件中轻松找到和使用该组件。
句法:
android:id="@+id/id_name"这里给定的ID如下:
- 发送按钮:send_button_id
- 输入EditText:send_text_id
这将制作应用程序的 UI。

第 3 步:现在,在 UI 之后,此步骤将创建应用程序的后端。为此,打开“first_activity. Java”文件并使用 findViewById() 方法实例化 XML 文件中的组件(EditText,发送按钮)。此方法借助分配的 ID 将创建的对象绑定到 UI 组件。
一般语法:
ComponentType object = (ComponentType)findViewById(R.id.IdOfTheComponent);
使用的组件的语法:
Button send_button= (Button)findViewById(R.id.send_button_id);
send_text = (EditText) findViewById(R.id.send_text_id);
第 4 步:此步骤涉及设置发送和接收数据的操作。这些操作如下:
1.首先在发送按钮上添加监听器,该按钮将发送数据。这是按如下方式完成的:
send_button.setOnClickListener(new View.OnClickListener() {}
单击此按钮后将执行以下操作。
2. 现在创建 String 类型的变量来存储用户输入的 EditText 的值。获取值并将其转换为字符串。这是按如下方式完成的:
String str = send_text.getText().toString();
3. 现在创建 Intent 对象 First_activity。 Java类到 Second_activity 类。这是按如下方式完成的:
Intent intent = new Intent(getApplicationContext(), Second_activity.class);
其中 getApplicationContext() 将获取当前活动。
4.将putExtra方法中的值放入键值对中,然后启动活动。这是按如下方式完成的:
intent.putExtra(“message_key”, str);
startActivity(intent);
其中“str”是字符串值,键是“message_key”,此键将用于获取 str 值
第 5 步:现在我们必须创建一个 Second_Activity 来接收数据。
创建第二个活动的步骤如下:
android project > File > new > Activity > Empty Activity

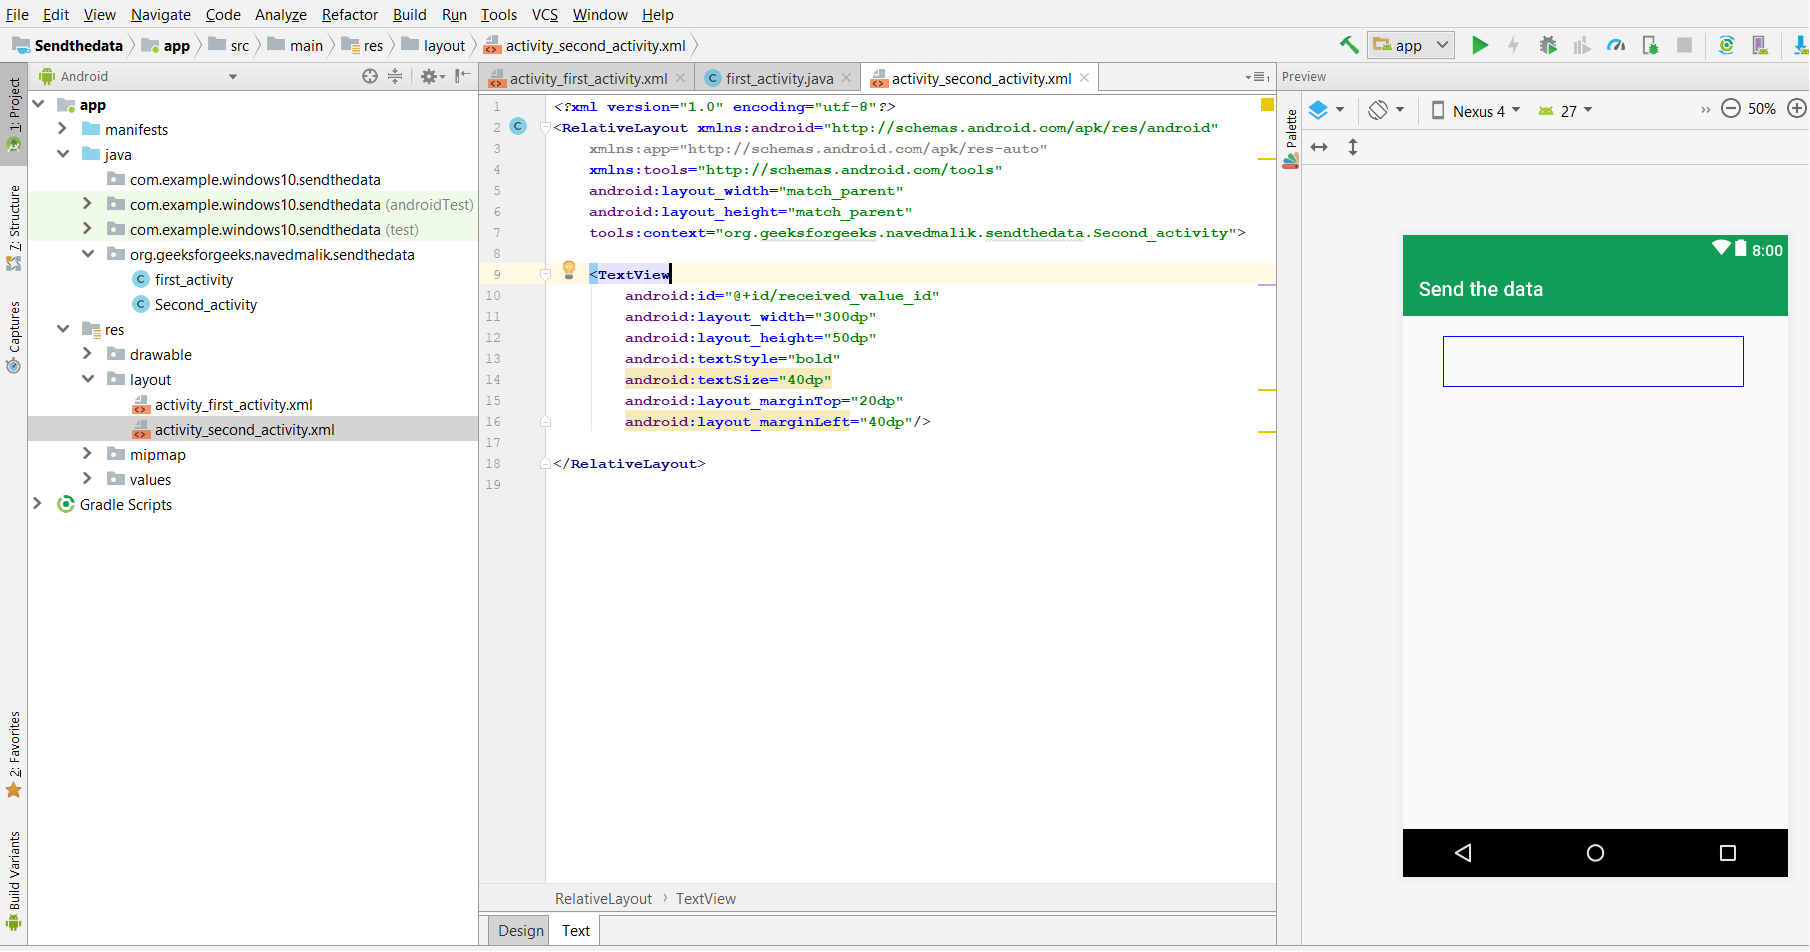
第 6 步:现在打开您的第二个 xml 文件。
添加 TextView 以显示接收消息。将 ID 分配给 Textview。第二个活动如下图所示:

第 7 步:现在,打开您的第二个活动Java文件并执行以下操作。
1、定义TextView变量,使用findViewById()获取TextView如上图。
receiver_msg = (TextView) findViewById(R.id.received_value_id);
2. 现在在 second_activity。 Java文件创建 getTntent 对象,通过 getStringExtra 方法使用message_key接收 String 类型变量中的值。
Intent intent = getIntent();
String str = intent.getStringExtra(“message_key”);
3.第二个activity xml文件的TextView对象中设置的接收值
receiver_msg.setText(str);
第 8 步:现在运行应用程序,操作如下:
- 当应用程序打开时,它会显示一个“输入”EditText。输入发送的值。
- 单击发送按钮,然后消息将显示在第二个屏幕上。
以下是应用程序的完整代码。
文件名:activity_first_activity.xml
XML
Java
package org.geeksforgeeks.navedmalik.sendthedata;

import android.content.Intent;
import android.support.v7.app.AppCompatActivity;
import android.os.Bundle;
import android.view.View;
import android.widget.Button;
import android.widget.EditText;

public class first_activity extends AppCompatActivity {

    // define the variable
    Button send_button;
    EditText send_text;
    @Override
    protected void onCreate(Bundle savedInstanceState)
    {
        super.onCreate(savedInstanceState);
        setContentView(R.layout.activity_first_activity);
        send_button = (Button)findViewById(R.id.send_button_id);
        send_text = (EditText)findViewById(R.id.send_text_id);

        // add the OnClickListener in sender button
        // after clicked this button following Instruction will run
        send_button.setOnClickListener(new View.OnClickListener() {
            @Override
            public void onClick(View v)
            {

                // get the value which input by user in EditText
                // and convert it to string
                String str = send_text.getText().toString();

                // Create the Intent object of this class Context() to Second_activity class
                Intent intent = new Intent(getApplicationContext(), Second_activity.class);

                // now by putExtra method put the value in key, value pair
                // key is message_key by this key we will receive the value, and put the string

                intent.putExtra("message_key", str);

                // start the Intent
                startActivity(intent);
            }
        });
    }
}
XML
Java
package org.geeksforgeeks.navedmalik.sendthedata;

import android.content.Intent;
import android.support.v7.app.AppCompatActivity;
import android.os.Bundle;
import android.widget.TextView;

public class Second_activity extends AppCompatActivity {

    TextView receiver_msg;
    @Override
    protected void onCreate(Bundle savedInstanceState)
    {
        super.onCreate(savedInstanceState);
        setContentView(R.layout.activity_second_activity);

        receiver_msg = (TextView)findViewById(R.id.received_value_id);

        // create the get Intent object
        Intent intent = getIntent();

        // receive the value by getStringExtra() method
        // and key must be same which is send by first activity
        String str = intent.getStringExtra("message_key");

        // display the string into textView
        receiver_msg.setText(str);
    }
}
文件名:First_Activity。Java
Java
package org.geeksforgeeks.navedmalik.sendthedata;

import android.content.Intent;
import android.support.v7.app.AppCompatActivity;
import android.os.Bundle;
import android.view.View;
import android.widget.Button;
import android.widget.EditText;

public class first_activity extends AppCompatActivity {

    // define the variable
    Button send_button;
    EditText send_text;
    @Override
    protected void onCreate(Bundle savedInstanceState)
    {
        super.onCreate(savedInstanceState);
        setContentView(R.layout.activity_first_activity);
        send_button = (Button)findViewById(R.id.send_button_id);
        send_text = (EditText)findViewById(R.id.send_text_id);

        // add the OnClickListener in sender button
        // after clicked this button following Instruction will run
        send_button.setOnClickListener(new View.OnClickListener() {
            @Override
            public void onClick(View v)
            {

                // get the value which input by user in EditText
                // and convert it to string
                String str = send_text.getText().toString();

                // Create the Intent object of this class Context() to Second_activity class
                Intent intent = new Intent(getApplicationContext(), Second_activity.class);

                // now by putExtra method put the value in key, value pair
                // key is message_key by this key we will receive the value, and put the string

                intent.putExtra("message_key", str);

                // start the Intent
                startActivity(intent);
            }
        });
    }
}
文件名:activity_second_activity.xml
XML
文件名:Second_Activity。Java
Java
package org.geeksforgeeks.navedmalik.sendthedata;

import android.content.Intent;
import android.support.v7.app.AppCompatActivity;
import android.os.Bundle;
import android.widget.TextView;

public class Second_activity extends AppCompatActivity {

    TextView receiver_msg;
    @Override
    protected void onCreate(Bundle savedInstanceState)
    {
        super.onCreate(savedInstanceState);
        setContentView(R.layout.activity_second_activity);

        receiver_msg = (TextView)findViewById(R.id.received_value_id);

        // create the get Intent object
        Intent intent = getIntent();

        // receive the value by getStringExtra() method
        // and key must be same which is send by first activity
        String str = intent.getStringExtra("message_key");

        // display the string into textView
        receiver_msg.setText(str);
    }
}
输出:
