使用 Flask 和 Azure 认知服务构建文本翻译器 Web 应用程序
我们将创建一个网站,使用人工智能 (AI) 将文本翻译成多种语言。我们将在前端使用 Flask 框架,在后端使用 Azure 认知服务(AI 服务的集合)。
要开始使用Python编写 Flask 应用程序,我们需要设置我们的开发环境,这需要安装几个项目。
第一步:创建项目目录
我们可以使用以下命令之一从命令或终端窗口创建项目目录:
对于 Windows:
md FlaskAiApp
cd FlaskAiApp
对于 mac 或 linux :
mkdir FlaskAiApp
cd FlaskAiApp注意:保持整个模块的命令或终端窗口打开。
第 2 步:创建Python虚拟环境
Python 的虚拟环境并不一定像听起来那么复杂。与其创建虚拟机或容器,不如创建一个虚拟环境,该环境是一个文件夹,其中包含我们运行应用程序所需的所有库,包括Python运行时本身。通过使用虚拟环境,我们使我们的应用程序模块化,使我们能够将它们彼此分开并避免版本控制问题。使用Python,您应该始终使用虚拟环境作为最佳实践。在命令或终端窗口中编写以下命令。
对于 Windows:
# Create the environment
python -m venv venv

# Activate the environment
.\\venv\\scripts\\activate
对于 macOS 和 Linux:
# Create the environment
python3 -m venv venv

# Activate the environment
source ./venv/bin/activate
第 3 步:安装 Flask 和其他库
创建并激活我们的虚拟环境后,现在可以安装我们网站所需的库 Flask。我们将按照创建requirements.txt文件的通用约定安装Flask。 requirements.txt文件本身并不特殊;它是一个文本文件,我们在其中列出了应用程序所需的库。但该约定通常由开发人员使用,从而可以更轻松地管理依赖多个库的应用程序。
在Visual Studio Code 中打开项目目录并创建requirements.txt文件并添加以下文本:
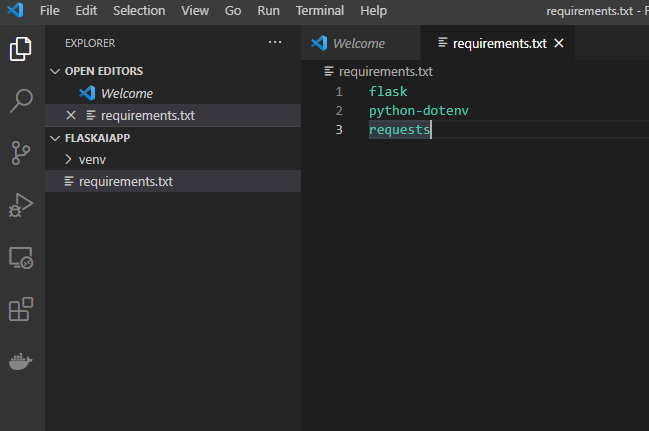
返回命令提示符或终端窗口并通过使用 pip 运行以下命令来执行安装:-
pip install -r requirements.txt第 4 步:创建 app.py
通常,一个名为 app.py 的文件是 Flask 应用程序的入口点。在项目目录中创建一个文件名app.py。
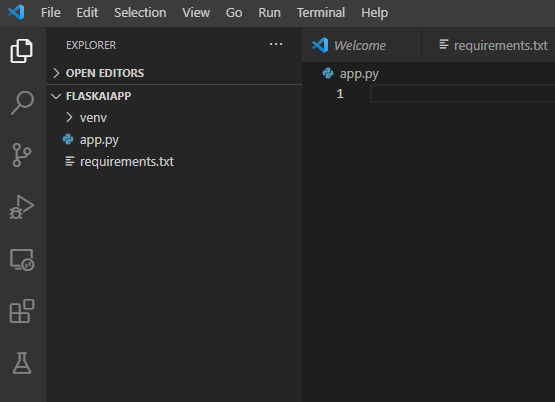
创建app.py文件后,添加以下代码:
Python3
from flask import Flask, render_template

app = Flask(__name__)
Python3
@app.route('/', methods=['GET'])
def index():
    return render_template('index.html')
HTML
Text Translator
Test Translation service
Enter the text you wish to translate, choose the language, and click Translate button
Python3
# Importing the required libraries
import requests
import os
import uuid
import json
from dotenv import load_dotenv
load_dotenv()
Python3
# code
@app.route('/', methods=['POST'])
def index_post():

    # Read the values from the form
    original_text = request.form['text']
    target_language = request.form['language']

    # Load the values from .env
    key = os.environ['KEY']
    endpoint = os.environ['ENDPOINT']
    location = os.environ['LOCATION']

    # Indicate that we want to translate and the API
    # version (3.0) and the target language
    path = '/translate?api-version=3.0'

    # Add the target language parameter
    target_language_parameter = '&to=' + target_language

    # Create the full URL
    constructed_url = endpoint + path + target_language_parameter

    # Set up the header information, which includes our
    # subscription key
    headers = {
        'Ocp-Apim-Subscription-Key': key,
        'Ocp-Apim-Subscription-Region': location,
        'Content-type': 'application/json',
        'X-ClientTraceId': str(uuid.uuid4())
    }

    # Create the body of the request with the text to be
    # translated
    body = [{'text': original_text}]

    # Make the call using post
    translator_request = requests.post(
        constructed_url, headers=headers, json=body)

    # Retrieve the JSON response
    translator_response = translator_request.json()

    # Retrieve the translation
    translated_text = translator_response[0]['translations'][0]['text']

    # Call render template, passing the translated text,
    # original text, and target language to the template
    return render_template(
        'results.html',
        translated_text=translated_text,
        original_text=original_text,
        target_language=target_language
    )
HTML
Result
Results
Original text: {{ original_text }}
Translated text: {{ translated_text }}
Target language code: {{ target_language }}
导入声明包含对 Flask 的引用,它是任何 Flask 程序的核心。稍后,如果我们想返回我们的 HTML,我们可以使用渲染模板。
我们将使用一条路线 - '/'。此路由通常称为默认路由或索引路由,因为当用户除了域名或服务器之外没有其他东西时会使用它。现在让我们使用以下代码添加路由方法。
蟒蛇3
@app.route('/', methods=['GET'])
def index():
    return render_template('index.html')
通过使用@app.route,我们指明了我们想要创建的路由。路径是'/',这是默认路由。我们指出这将用于GET 。如果收到 / 的 GET 请求,Flask 将自动调用该函数。在索引正文中,我们表明我们将把名为 index.html 的 HTML 模板返回给用户。
第 5 步:创建 HTML 模板
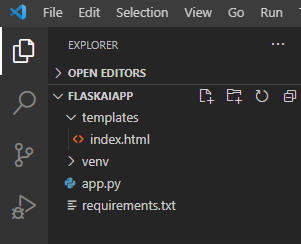
让我们创建 Jinja(Flask 的模板引擎)。首先,创建文件夹名称模板并在模板文件夹中创建index.html文件。添加以下代码:
HTML
Text Translator
Test Translation service
Enter the text you wish to translate, choose the language, and click Translate button
第 6 步:测试应用程序
在 Visual Studio Code 中打开终端并运行以下命令:
对于 Windows:
set FLASK_ENV=development对于 macOS/Linux:
export FLASK_ENV=development运行应用程序:
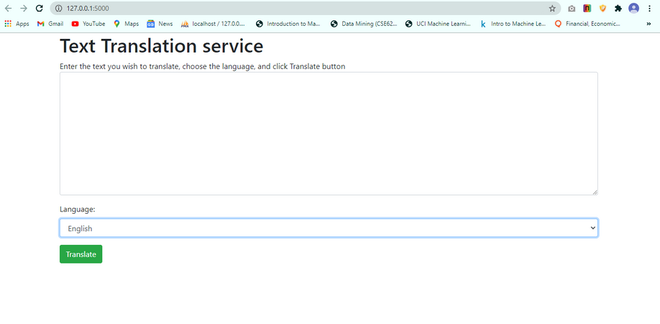
flask run通过导航到 http://localhost:5000 在浏览器中打开应用程序。将显示 index.html。
步骤 7:使用 Azure 认知服务创建后端
Azure 提供认知服务,其中包括计算机视觉服务、语音到文本以及文本到语音和文本翻译服务。您可以通过软件开发工具包 (SDK) 或通过与调用任何其他 HTTP 端点相同的方式调用它们来访问这些服务中的任何一个。你需要一个 Azure 帐户才能使用认知服务。我们需要一个密钥来调用翻译服务(或任何其他认知服务)。只要我们可以访问该服务,就会使用此密钥。密钥与密码相同。
现在让我们使用 Azure 门户创建翻译服务密钥并将其存储到我们应用程序的 .env 文件中。
1. 浏览到Azure 门户。
2. 选择创建资源。

3. 在搜索框中输入Translator 。
4. 选择创建。
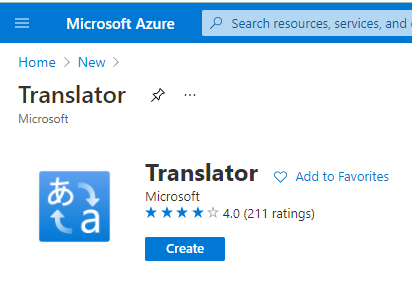
5. 完成给定的表格:
- 订阅:您的订阅
- 资源组:
- 选择新建
- 名称: AIFlask
- 资源组区域:选择您附近的区域
- 资源区域:选择与上面相同的区域
- 名称:唯一值,例如 ai-yourname
- 定价层:免费 F0
6. 选择查看+创建。
7. 选择创建。
8. 选择转到资源。
9.在RESOURCE MANAGEMENT下选择左侧的Keys和Endpoint
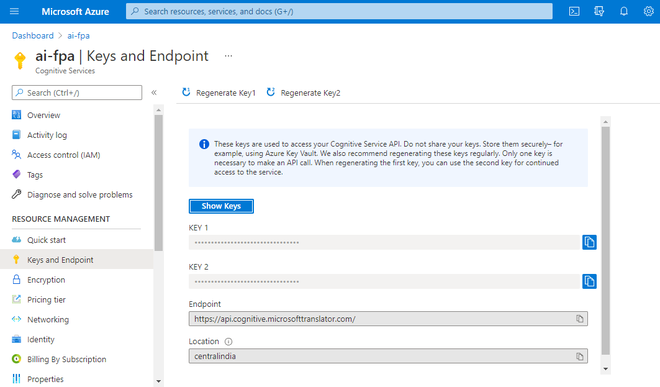
10. 在我们的应用程序中创建.env文件来存储密钥。
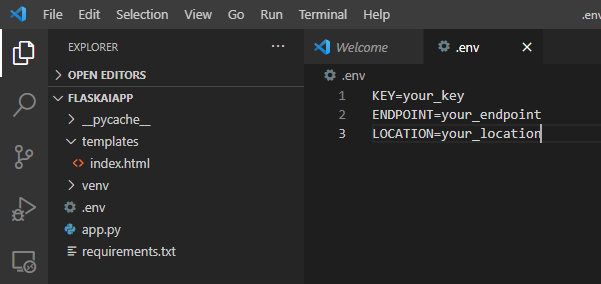
替换.env文件中的占位符。
- your_key 与您在上面复制的密钥
- your_endpoint 与 Azure 中的端点
- your_location 与 Azure 中的位置
第 8 步:调用翻译服务
在app.py文件的顶部插入以下代码:-
蟒蛇3
# Importing the required libraries
import requests
import os
import uuid
import json
from dotenv import load_dotenv
load_dotenv()
现在添加代码以创建用于在app.py底部翻译文本的路由和逻辑:-
蟒蛇3
# code
@app.route('/', methods=['POST'])
def index_post():

    # Read the values from the form
    original_text = request.form['text']
    target_language = request.form['language']

    # Load the values from .env
    key = os.environ['KEY']
    endpoint = os.environ['ENDPOINT']
    location = os.environ['LOCATION']

    # Indicate that we want to translate and the API
    # version (3.0) and the target language
    path = '/translate?api-version=3.0'

    # Add the target language parameter
    target_language_parameter = '&to=' + target_language

    # Create the full URL
    constructed_url = endpoint + path + target_language_parameter

    # Set up the header information, which includes our
    # subscription key
    headers = {
        'Ocp-Apim-Subscription-Key': key,
        'Ocp-Apim-Subscription-Region': location,
        'Content-type': 'application/json',
        'X-ClientTraceId': str(uuid.uuid4())
    }

    # Create the body of the request with the text to be
    # translated
    body = [{'text': original_text}]

    # Make the call using post
    translator_request = requests.post(
        constructed_url, headers=headers, json=body)

    # Retrieve the JSON response
    translator_response = translator_request.json()

    # Retrieve the translation
    translated_text = translator_response[0]['translations'][0]['text']

    # Call render template, passing the translated text,
    # original text, and target language to the template
    return render_template(
        'results.html',
        translated_text=translated_text,
        original_text=original_text,
        target_language=target_language
    )
第 9 步:- 创建模板以显示结果
让我们在模板文件夹中创建文件名results.html并添加以下 HTML 代码:-
HTML
Result
Results
Original text: {{ original_text }}
Translated text: {{ translated_text }}
Target language code: {{ target_language }}
第 10 步:让我们测试我们的文本翻译服务应用程序
在终端中执行命令flask run以重新启动服务并浏览到 http://localhost:5000 以测试您的应用程序。
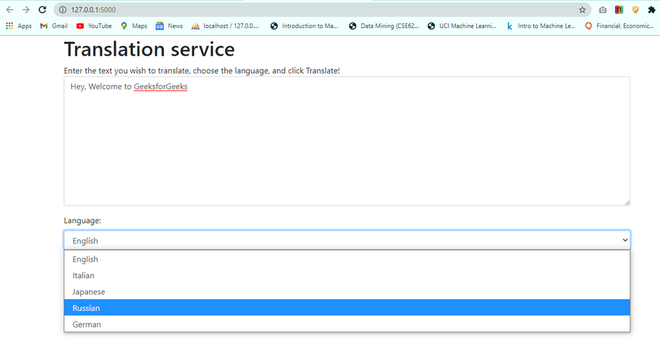
结果:
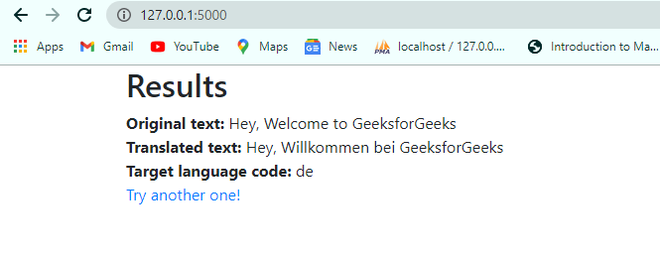
我们成功地使用Python、Flask 和 Azure 认知服务创建了一个 AI 应用程序,将文本翻译成不同的语言。