在 ReactJS 中设计一个 Markdown 笔记应用程序
在本文中,我们将学习如何在React中设计一个Markdown笔记应用程序,它可以帮助人们快速记下笔记并下载渲染输出。使用 Markdown 可以减少在格式化文本上花费的时间,因此只需使用 Markdown 语法即可创建富文本内容。
我们将使用 React 库来快速创建用户界面,因为它将根据需要处理 DOM 的更新。我们将使用 Bootstrap CSS 来设计应用程序并使其用户友好。我们还将使用 Blob 将内容保存到我们的设备。
我们将按照以下步骤创建我们的应用程序:
第 1 步:创建项目
我们将首先使用create-react-app工具创建一个新的 React 项目。您可以使用以下命令创建具有所需名称的命令。请确保系统上安装了Node和npm 。
npx create-react-app react-md-note-app项目结构:然后我们将删除所有不需要的文件。删除文件后的文件结构如下:
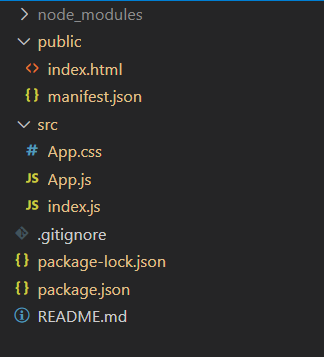
项目目录
第 2 步:安装必要的模块
我们首先将 Bootstrap CDN 添加到 index.html 页面。 CDN 链接可以在这里找到,它们可以直接添加到索引页面的头部。
我们还需要两个npm 包,一个是markdown-it包,它负责解析 Markdown 内容并为我们提供 HTML 呈现的输出。我们可以简单地使用这个 HTML 来显示我们的输出。另一个模块是文件保护程序包,它简化了将给定 blob 保存到系统的任务。以下命令用于安装这两个包:
npm install markdown-it file-saver第 3 步:使用 Bootstrap 创建简单的用户界面
我们将使用Bootstrap Grid系统创建布局,以确保我们的应用程序具有移动响应性并且看起来不错,而无需编写大量 CSS。
申请可分为3个部分;允许用户在 Markdown 中输入注释的 Markdown 编辑器,显示渲染 HTML 的输出区域,以及包含文件名输入字段和用于保存内容的按钮的文件保存选项。每个部分都使用 Bootstrap 的Card组件进行嵌套,并将相关组件添加到输入元素中。
我们还需要一些可以导入到 App.js 文件中的 CSS 规则。我们可以创建一个名为 App.css 的新文件并编写如下规则:
应用程序.css:
CSS
body {
  background-color: yellow;
}
.markdown-editor, .rendered-output {
  height: 100%;
  width: 100%;
  padding: 10px;
}
.markdown-textarea, .rendered-html-output {
  height: 60vh;
  width: 100%;
  overflow: auto;
}
Javascript
import { useState } from 'react';
// Import the required modules
import MarkdownIt from 'markdown-it';
import FileSaver from 'file-saver';
import './App.css';
function App() {
// Create the states that will be used
// through the application
// This state will be used for the Markdown text
let [markdownText, setMarkDownText] = useState("");
// This state will be used for the rendered HTML
let [renderedHTML, setRenderedHTML] = useState("");
// This state will be used for the filename while saving
let [fileName, setFileName] = useState("untitled-note");
// Create a function that will be invoked
// whenever the user modifies the content
// in the textarea
function handleTextInput(e) {
// Change the text of the markdown side
setMarkDownText(e.target.value);
// Initialize a MarkdownIt instance
let md = new MarkdownIt();
// Render out the markdown to HTML using
// the render() method
let renderedHTML = md.render(e.target.value);
// Change the markdown's side to the rendered HTML
setRenderedHTML(renderedHTML);
}
// Create a function download the rendered HTML
function saveHTML() {
// Create a new Blob of the type 'text/html'
// using the rendered HTML content
let blobFile = new Blob([renderedHTML], {
type: "text/html"
});
// Save the file using the given file name
FileSaver.saveAs(blobFile, fileName);
}
// Create a function download the Markdown text
function saveMarkdown() {
// Create a new Blob of the type 'text'
// using the markdown content
let blobFile = new Blob([markdownText], {
type: "text"
});
// Save the file using the given file name
FileSaver.saveAs(blobFile, fileName);
}
return (
React Markdown Notes
{/* Card for the markdown editor */}
Markdown
{/* Textarea for the markdown editor */}
{/* Card for the markdown editor */}
Output
{/* Textarea for the markdown editor */}
{/* Card for the save files option */}
Save Content
setFileName(fname.target.value)}
/>
{/* Buttons for saving the text */}
)
}
export default App;第 4 步:创建将用于管理状态的挂钩
我们将使用 React 的useState方法创建 3 个钩子,用于管理应用程序 3 个部分的状态。每个钩子都返回变量本身及其初始状态以及可用于设置该变量状态的函数。当组件的状态发生变化时,React 会自动重新渲染组件。
这将允许我们简单地使用相应的函数和变量来处理每个组件的状态。
第 5 步:在应用程序中使用状态变量
我们现在将在我们之前创建的 3 个组件中使用这些变量。
markdownText变量用于我们将在其中编写降价文本的文本区域。我们将在textarea的value属性中使用它。使用setMarkdownText 函数我们可以在这里更改文本的值,它将通过这个value属性显示。
renderHTML变量用于 div 元素,该元素将显示 Markdown 的渲染输出。由于MarkdownIt模块将从 markdown 返回 HTML,因此我们需要直接设置该元素的内部 HTML。这将需要使用元素的dangerouslySetInnerHTML属性并传递带有_html 键的对象。
注意:这是 React 中的一项功能,它不鼓励直接修改 HTML 以防止网页上的跨站点脚本 (XSS) 攻击的做法。建议在直接使用任何用户输入的 HTML 内容之前对其进行清理。
最后, fileName变量用于文件保护程序选项中,以便用于输入要保存的内容的文件名。我们还将onChange事件处理程序绑定到setFileName ,以便用户输入的任何值都会更新到变量中。我们可以通过访问事件目标并获取 value 属性来做到这一点。
第 6 步:创建我们之前定义的函数
handleTextInput()函数:此函数将获取在降价编辑器中输入的文本,并使用 MarkdownIt 呈现所需的 HTML。
我们将首先通过获取目标的值来获取输入的文本。然后我们初始化 MarkdownIt 的一个新实例并使用它的 render 方法。然后,我们将使用setMarkdownHTML函数在输出区域中设置它,我们最终的 HTML 将在其中显示。此函数将在降价编辑器的onChange属性中使用。
saveHTML() 和 saveMarkdown() 函数:这些函数将使用给定的文件名将内容保存到我们的系统。在这两个函数中,我们将创建一个包含要保存的内容的Blob对象。我们可以使用renderHTML和markdownText变量来获取应用程序的当前文本内容。
接下来指定 blob 的类型。我们可以将text/html用于呈现的输出,以便将其保存为 HTML 文件,并且只有文本用于降价文本。
我们现在将使用FileSaver模块的saveAs()方法将文件保存到系统中。此方法使用两个参数,第一个是必须保存的 blob 对象,第二个是应该用于保存文件的文件名。我们可以通过使用fileName变量来获取文件名,并传递我们之前创建的 blob 对象。
我们可以将这些函数与我们创建的两个按钮各自的onClick事件处理程序绑定。单击按钮将在浏览器上打开具有给定文件名的另存为对话框,用户可以根据需要选择保存文件。
应用程序.js:
Javascript
import { useState } from 'react';
// Import the required modules
import MarkdownIt from 'markdown-it';
import FileSaver from 'file-saver';
import './App.css';
function App() {
// Create the states that will be used
// through the application
// This state will be used for the Markdown text
let [markdownText, setMarkDownText] = useState("");
// This state will be used for the rendered HTML
let [renderedHTML, setRenderedHTML] = useState("");
// This state will be used for the filename while saving
let [fileName, setFileName] = useState("untitled-note");
// Create a function that will be invoked
// whenever the user modifies the content
// in the textarea
function handleTextInput(e) {
// Change the text of the markdown side
setMarkDownText(e.target.value);
// Initialize a MarkdownIt instance
let md = new MarkdownIt();
// Render out the markdown to HTML using
// the render() method
let renderedHTML = md.render(e.target.value);
// Change the markdown's side to the rendered HTML
setRenderedHTML(renderedHTML);
}
// Create a function download the rendered HTML
function saveHTML() {
// Create a new Blob of the type 'text/html'
// using the rendered HTML content
let blobFile = new Blob([renderedHTML], {
type: "text/html"
});
// Save the file using the given file name
FileSaver.saveAs(blobFile, fileName);
}
// Create a function download the Markdown text
function saveMarkdown() {
// Create a new Blob of the type 'text'
// using the markdown content
let blobFile = new Blob([markdownText], {
type: "text"
});
// Save the file using the given file name
FileSaver.saveAs(blobFile, fileName);
}
return (
React Markdown Notes
{/* Card for the markdown editor */}
Markdown
{/* Textarea for the markdown editor */}
{/* Card for the markdown editor */}
Output
{/* Textarea for the markdown editor */}
{/* Card for the save files option */}
Save Content
setFileName(fname.target.value)}
/>
{/* Buttons for saving the text */}
)
}
export default App;
第 6 步:运行和构建应用程序
我们可以使用以下命令运行此应用程序。这将启动 React 的开发服务器,可用于调试我们的应用程序。
npm run start我们还可以构建这个应用程序,以便它可以托管在任何支持静态文件托管的平台上。我们可以使用以下命令来构建我们的应用程序来运行项目:
npm run build输出:

源代码: https://github.com/sayantanm19/react-markdown-notes-gfg