使用 React.js 的材质 UI 列表
列表是一组连续的文本或图像。它们由包含主要操作和补充操作的项目组成,这些操作由图标和文本表示。 React 的 Material UI 为我们提供了这个组件,并且非常容易集成。我们可以使用以下方法在 ReactJS 中使用 List 组件。
在本文中,我们将实现 Material UI 的 List 组件。我们将创建一个列表,其中包含一些 Geeks For Geeks 课程。我们向该列表添加更多功能,例如打开和关闭特定子列表。
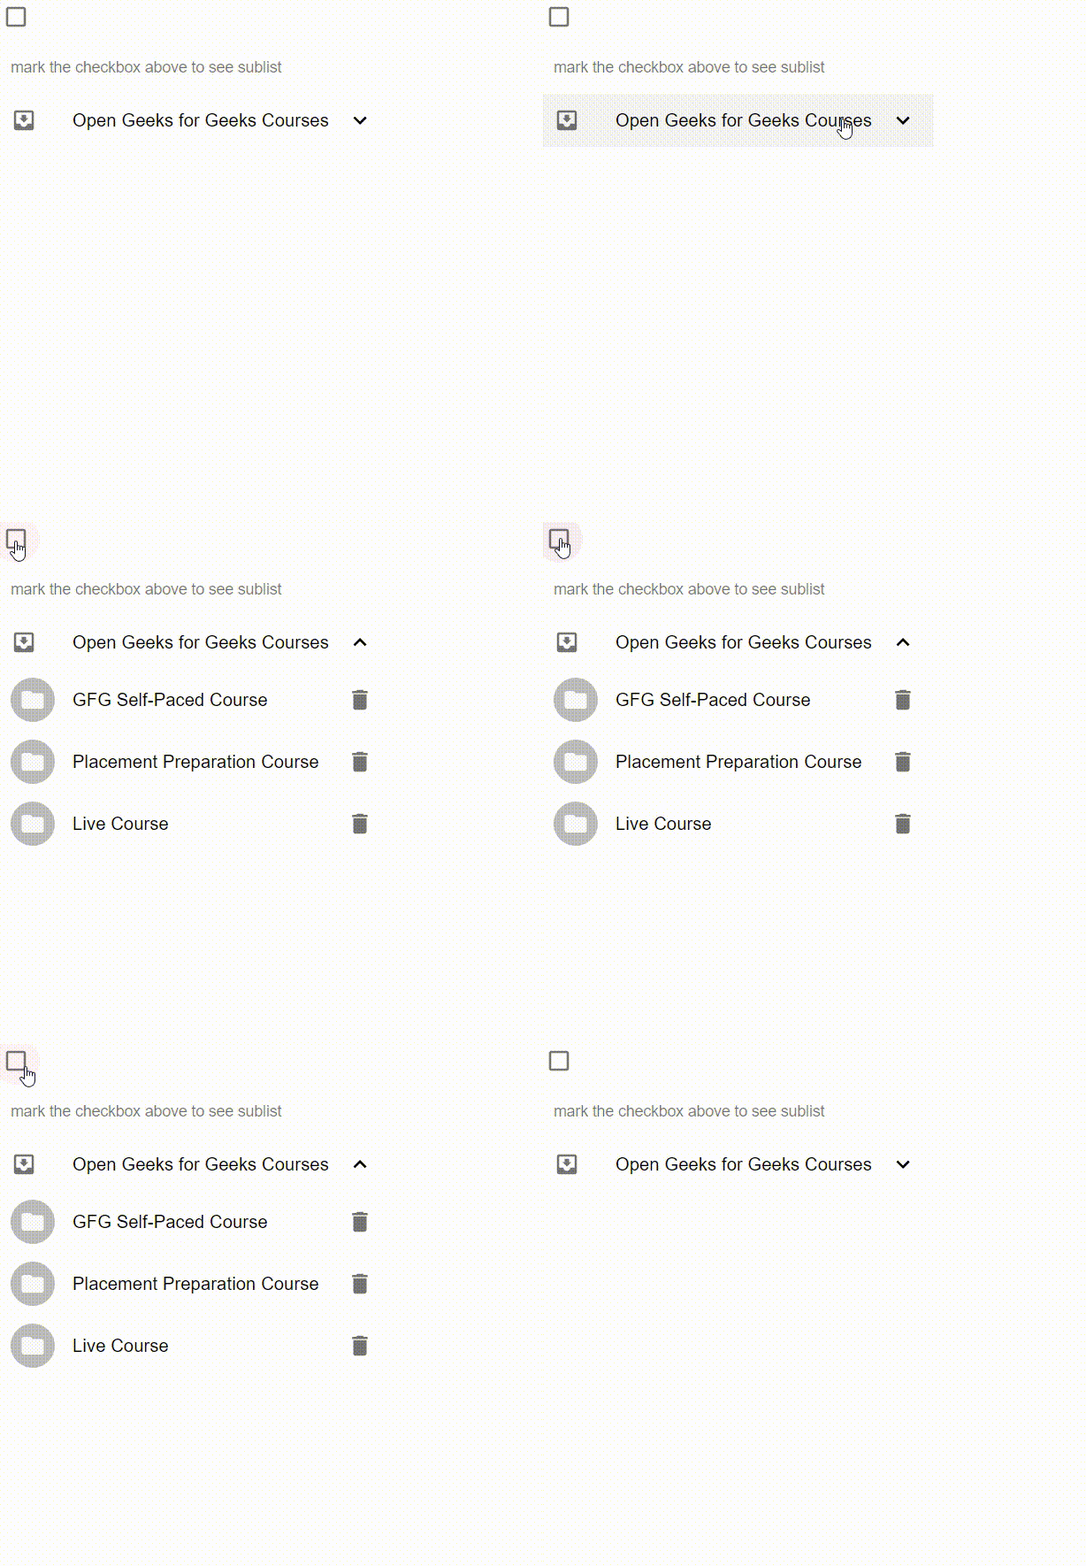
方法:首先,我们将使用一些安装创建一个基本的 React 应用程序。我们将使用 Material-UI 使我们的新列表组件重用具有一些样式的内置列表组件。我们将创建一个列表,其中包含一些 Geeks For Geeks 课程。该列表将能够通过列表标题打开和关闭。此外,我们将添加一个复选框来显示列表的子项。单击复选框后,GFG 课程详细信息的子列表也将相应显示。我们将使用 Material UI 中的 List、Collapse 和 Checkbox 组件。我们将在实现它时了解更多信息,现在让我们开始创建我们的列表。
创建 React 应用程序并安装模块:
第 1 步:使用以下命令创建一个 React 应用程序:
npx create-react-app foldername第 2 步:创建项目文件夹(即文件夹名称)后,使用以下命令移动到该文件夹:
cd foldername第 3 步:创建 React.js 应用程序后,使用以下命令安装 material-UI 模块。
npm install @material-ui/core
npm install @mui/icons-material
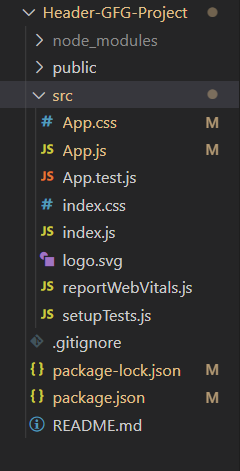
npm install @mui/material项目结构:现在在名为“src”的文件夹中创建一个新文件 Header.js。我们的标头组件将驻留在此文件中。现在新的项目结构将如下所示:

初始项目结构
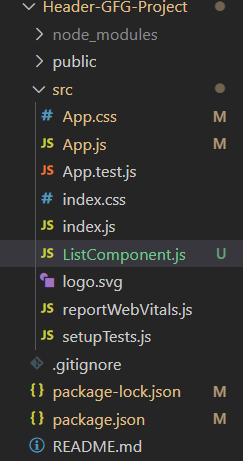
更改项目结构:在您的项目目录中,在 src 文件夹中创建一个名为 ListComponent.js 的文件。现在您的新项目结构将如下所示:

修改项目结构
第 4 步:创建我们将用于显示列表的组件ListComponent.js 。我们可以通过添加列表项来扩展列表。为了在列表项的名称之后添加图标,我们使用了 ListItemIcon 组件并为我们使用 ListItemText 的列表项命名。为了打开和关闭子列表,我们使用了 Collapse 组件。 IconButton 只是图标,但具有按钮的附加效果。 ListItemText 有两个与显示文本相关的字段,即主要和次要字段。 Primary 显示主要文本,即在我们的示例 GFG 课程名称中。次要内容是要显示的次要内容,例如有关列表项的附加信息,此处为 GFG 课程列表详细信息。
ListComponent.js
import React from "react";
import { makeStyles } from "@material-ui/core/styles";
// Importing material UI components
import List from "@material-ui/core/List";
import ListSubheader from "@material-ui/core/ListSubheader";
import ListItem from "@material-ui/core/ListItem";
import ListItemIcon from "@material-ui/core/ListItemIcon";
import ListItemSecondaryAction from "@material-ui/core/ListItemSecondaryAction";
import ListItemAvatar from "@material-ui/core/ListItemAvatar";
import ListItemText from "@material-ui/core/ListItemText";
import Grid from "@material-ui/core/Grid";
import IconButton from "@material-ui/core/IconButton";
import Avatar from "@material-ui/core/Avatar";
import Collapse from "@material-ui/core/Collapse";
import Checkbox from "@material-ui/core/Checkbox";
// Importing material UI icons
import InboxIcon from "@material-ui/icons/MoveToInbox";
import ExpandLess from "@material-ui/icons/ExpandLess";
import ExpandMore from "@material-ui/icons/ExpandMore";
import FolderIcon from "@material-ui/icons/Folder";
import DeleteIcon from "@material-ui/icons/Delete";
const useStyles = makeStyles((theme) => ({
root: {
width: "100%",
maxWidth: 360,
backgroundColor: theme.palette.background.paper,
},
nested: {
paddingLeft: theme.spacing(4),
},
demo: {
backgroundColor: theme.palette.background.paper,
},
}));
export default function ListComponent() {
const classes = useStyles();
const [open, setOpen] = React.useState(true);
const [secondary, setSecondary] = React.useState(false);
const handleClick = () => {
setOpen(!open);
};
return (
{/* If checkbox is ticked then secondary text will be shown otherwise not */}
setSecondary(event.target.checked)}
/>
mark the checkbox above to see sublist
}
className={classes.root}
>
{/*List item are wrapped inside List */}
{/* Single list item */}
{/*Inside the IconButton, we can render various icons*/}
);
}App.js
import React from "react";
import ListComponent from "./ListComponent";
function App() {
return (
{/* Use the newly created ListComponent component
in this main App component */}
步骤 5:创建 ListComponent 组件后,我们将其导入App.js并在 App.js 中进行如下更改。
应用程序.js
import React from "react";
import ListComponent from "./ListComponent";
function App() {
return (
{/* Use the newly created ListComponent component
in this main App component */}
运行应用程序的步骤:从项目的根目录使用以下命令运行应用程序。
npm start输出:现在打开浏览器并访问 http://localhost:3000/,您将看到以下输出。

列表显示输出
参考:https://mui.com/components/lists/