
Flutter和区块链
本教程将带您完成构建您的第一个移动 dapp – Hello World Dapp 的过程!
本教程适用于具有以太坊和智能合约基础知识、对Flutter框架有一定了解但对移动 dapp 不熟悉的人。
在本教程中,我们将介绍:
- 设置开发环境
- 创建松露项目
- 编写你的第一个智能合约
- 编译和迁移智能合约
- 测试智能合约
- 与Flutter 的合约链接
- 创建一个 UI 来与智能合约交互
- 与完整的 Dapp 交互
设置开发环境
Truffle 是以太坊最受欢迎的开发框架,其使命是让您的生活更轻松。但是在我们安装 truffle 之前,请确保安装 node 。
一旦我们安装了节点,我们只需要一个命令来安装 Truffle:
npm install -g truffle我们还将使用 Ganache,这是一个用于以太坊开发的个人区块链,可用于部署智能合约、开发应用程序和运行测试。您可以通过导航到 http://truffleframework.com/ganache 并单击“下载”按钮来下载 Ganache。
创建松露项目
- 在你喜欢的 IDE 中创建一个基本的Flutter项目
- 通过运行在flutter项目目录中初始化 Truffle
truffle init目录结构
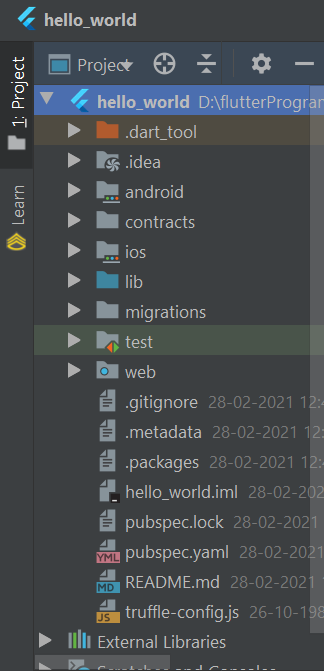
- 合同/ :包含可靠性合同文件。
- migrations/ :包含迁移脚本文件(Truffle 使用迁移系统来处理合约部署)。
- test/ :包含测试脚本文件。
- truffle-config.js :包含松露部署配置信息。
编写你的第一个智能合约
智能合约实际上充当了我们 Dapp 的后端逻辑和存储。
- 在contract/目录中创建一个名为HelloWorld.sol的新文件。
- 将以下内容添加到文件中:
Solidity
pragma solidity ^0.5.9;

contract HelloWorld {

}
Solidity
string public yourName ;Solidity
constructor() public {
        yourName = "Unknown" ;
}
Solidity
function setName(string memory nm) public{
        yourName = nm ;
}
Javascript
const HelloWorld = artifacts.require("HelloWorld");

module.exports = function (deployer) {
  deployer.deploy(HelloWorld);
};
Javascript
module.exports = {
  networks: {
     development: {
      host: "127.0.0.1",     // Localhost (default: none)
      port: 7545,            // Standard Ethereum port (default: none)
      network_id: "*",       // Any network (default: none)
     },
  },
    contracts_build_directory: "./src/artifacts/",

  // Configure your compilers
  compilers: {
    solc: {

       // See the solidity docs for advice
       // about optimization and evmVersion
        optimizer: {
          enabled: false,
          runs: 200
        },
        evmVersion: "byzantium"
    }
  }
};
Javascript
const HelloWorld = artifacts.require("HelloWorld") ;

contract("HelloWorld" , () => {
    it("Hello World Testing" , async () => {
       const helloWorld = await HelloWorld.deployed() ;
       await helloWorld.setName("User Name") ;
       const result = await helloWorld.yourName() ;
       assert(result === "User Name") ;
    });
});
Dart
import 'package:flutter/material.dart';

class ContractLinking extends ChangeNotifier {

}
Dart
final String _rpcUrl = "http://10.0.2.2:7545";
final String _wsUrl = "ws://10.0.2.2:7545/";
final String _privateKey = "Enter Private Key";
Dart
Web3Client _client;
bool isLoading = true;

String _abiCode;
EthereumAddress _contractAddress;

Credentials _credentials;

DeployedContract _contract;
ContractFunction _yourName;
ContractFunction _setName;

String deployedName;
Dart
ContractLinking() {
    initialSetup();
  }

  initialSetup() async {

    // establish a connection to the ethereum rpc node. The socketConnector
    // property allows more efficient event streams over websocket instead of
    // http-polls. However, the socketConnector property is experimental.
    _client = Web3Client(_rpcUrl, Client(), socketConnector: () {
      return IOWebSocketChannel.connect(_wsUrl).cast();
    });

    await getAbi();
    await getCredentials();
    await getDeployedContract();
  }

  Future getAbi() async {

    // Reading the contract abi
    String abiStringFile =
        await rootBundle.loadString("src/artifacts/HelloWorld.json");
    var jsonAbi = jsonDecode(abiStringFile);
    _abiCode = jsonEncode(jsonAbi["abi"]);

    _contractAddress =
        EthereumAddress.fromHex(jsonAbi["networks"]["5777"]["address"]);
  }

  Future getCredentials() async {
    _credentials = await _client.credentialsFromPrivateKey(_privateKey);
  }

  Future getDeployedContract() async {

    // Telling Web3dart where our contract is declared.
    _contract = DeployedContract(
        ContractAbi.fromJson(_abiCode, "HelloWorld"), _contractAddress);

    // Extracting the functions, declared in contract.
    _yourName = _contract.function("yourName");
    _setName = _contract.function("setName");
    getName();
  }

  getName() async {

    // Getting the current name declared in the smart contract.
    var currentName = await _client
        .call(contract: _contract, function: _yourName, params: []);
    deployedName = currentName[0];
    isLoading = false;
    notifyListeners();
  }

  setName(String nameToSet) async {

    // Setting the name to nameToSet(name defined by user)
    isLoading = true;
    notifyListeners();
    await _client.sendTransaction(
        _credentials,
        Transaction.callContract(
            contract: _contract, function: _setName, parameters: [nameToSet]));
    getName();
  }
Dart
import 'package:flutter/material.dart';
import 'package:hello_world/contract_linking.dart';
import 'package:provider/provider.dart';

class HelloUI extends StatelessWidget {
  @override
  Widget build(BuildContext context) {

    // Getting the value and object or contract_linking
    var contractLink = Provider.of(context);

    TextEditingController yourNameController = TextEditingController();

    return Scaffold(
      appBar: AppBar(
        title: Text("Hello World !"),
        centerTitle: true,
      ),
      body: Container(
        padding: EdgeInsets.symmetric(horizontal: 20),
        child: Center(
          child: contractLink.isLoading
              ? CircularProgressIndicator()
              : SingleChildScrollView(
            child: Form(
              child: Column(
                children: [
                  Row(
                    mainAxisAlignment: MainAxisAlignment.center,
                    children: [
                      Text(
                        "Hello ",
                        style: TextStyle(
                            fontWeight: FontWeight.bold, fontSize: 52),
                      ),
                      Text(
                        contractLink.deployedName,
                        style: TextStyle(
                            fontWeight: FontWeight.bold,
                            fontSize: 52,
                            color: Colors.tealAccent),
                      ),
                    ],
                  ),
                  Padding(
                    padding: EdgeInsets.only(top: 29),
                    child: TextFormField(
                      controller: yourNameController,
                      decoration: InputDecoration(
                          border: OutlineInputBorder(),
                          labelText: "Your Name",
                          hintText: "What is your name ?",
                          icon: Icon(Icons.drive_file_rename_outline)),
                    ),
                  ),
                  Padding(
                    padding: EdgeInsets.only(top: 30),
                    child: ElevatedButton(
                      child: Text(
                        'Set Name',
                        style: TextStyle(fontSize: 30),
                      ),
                      style: ElevatedButton.styleFrom(
                        primary: Colors.green,
                      ),
                      onPressed: () {
                        contractLink.setName(yourNameController.text);
                        yourNameController.clear();
                      },
                    ),
                  )
                ],
              ),
            ),
          ),
        ),
      ),
    );
  }
}
Dart
import 'package:flutter/material.dart';
import 'package:hello_world/contract_linking.dart';
import 'package:hello_world/helloUI.dart';
import 'package:provider/provider.dart';

void main() {
  runApp(MyApp());
}

class MyApp extends StatelessWidget {
  @override
  Widget build(BuildContext context) {

    // Inserting Provider as a parent of HelloUI()
    return ChangeNotifierProvider(
      create: (_) => ContractLinking(),
      child: MaterialApp(
        title: "Hello World",
        theme: ThemeData(
            brightness: Brightness.dark,
            primaryColor: Colors.cyan[400],
            accentColor: Colors.deepOrange[200]),
        home: HelloUI(),
      ),
    );
  }
} - 合同顶部注明了所需的Solidity最低版本: pragma solidity ^0.5.9; .
- 语句以分号结束。
变量设置
- 在contract HelloWorld之后的下一行添加以下变量{
坚固性
string public yourName ;
我们刚刚定义了一个字符串类型的变量yourName ,而且yourName是一个公共修饰符,这意味着我们可以从智能合约外部访问它。
构造函数
- 在字符串 public yourName之后的下一行添加以下构造函数;
坚固性
constructor() public {
        yourName = "Unknown" ;
}
Solidity 中的构造函数仅在创建合约时执行一次,并用于初始化合约状态。这里我们只是将变量yourName的初始值设置为“Unknown”。
函数
- 在我们上面设置的构造函数声明之后,将以下函数添加到智能合约中。
坚固性
function setName(string memory nm) public{
        yourName = nm ;
}
- 在上面的函数,我们将接收一个nm (字符串)并将yourName变量设置为它。
- 内存是数据位置。
编译和迁移
汇编
- 在终端中,确保您位于包含flutter和 truffle 项目的目录的根目录中,运行以下命令:
truffle compile您应该会看到类似于以下内容的输出:
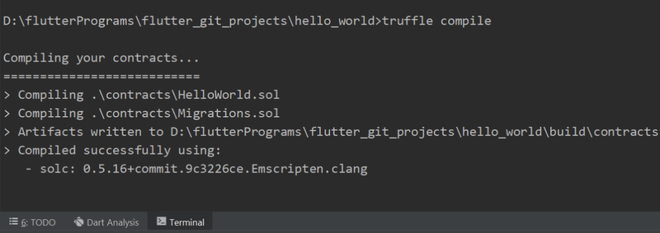
松露编译
移民
您会在migrations/目录中看到一个 JavaScript 文件: 1_initial_migration.js 。这处理部署Migrations.sol合约以观察后续的智能合约迁移,并确保我们将来不会重复迁移未更改的合约。
让我们创建自己的迁移脚本:
- 在migrations/目录中创建一个名为2_deploy_contracts.js的新文件。
- 将以下内容添加到2_deploy_contracts.js文件中:
Javascript
const HelloWorld = artifacts.require("HelloWorld");

module.exports = function (deployer) {
  deployer.deploy(HelloWorld);
};
- 在我们将合约迁移到区块链之前,我们需要运行一个区块链。在本文中,我们将使用Ganache ,这是一个用于以太坊开发的个人区块链,可用于部署合约、开发应用程序和运行测试。如果您还没有,请下载Ganache并双击该图标以启动该应用程序。这将生成在端口 7545 上本地运行的区块链。
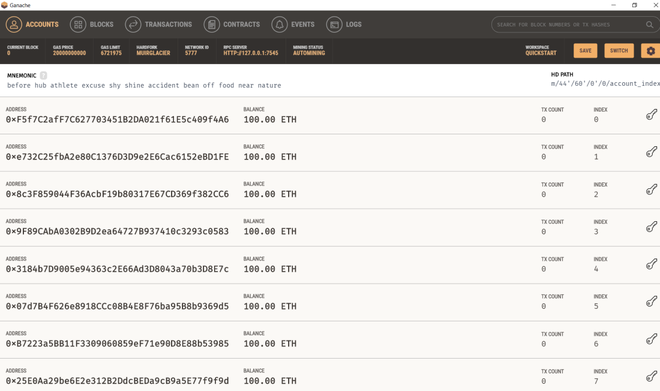
伽纳彻
- 将以下内容添加到truffle-config.js文件中:
Javascript
module.exports = {
  networks: {
     development: {
      host: "127.0.0.1",     // Localhost (default: none)
      port: 7545,            // Standard Ethereum port (default: none)
      network_id: "*",       // Any network (default: none)
     },
  },
    contracts_build_directory: "./src/artifacts/",

  // Configure your compilers
  compilers: {
    solc: {

       // See the solidity docs for advice
       // about optimization and evmVersion
        optimizer: {
          enabled: false,
          runs: 200
        },
        evmVersion: "byzantium"
    }
  }
};
- 将合约迁移到区块链,运行:
truffle migrate您应该会看到类似于以下内容的输出:
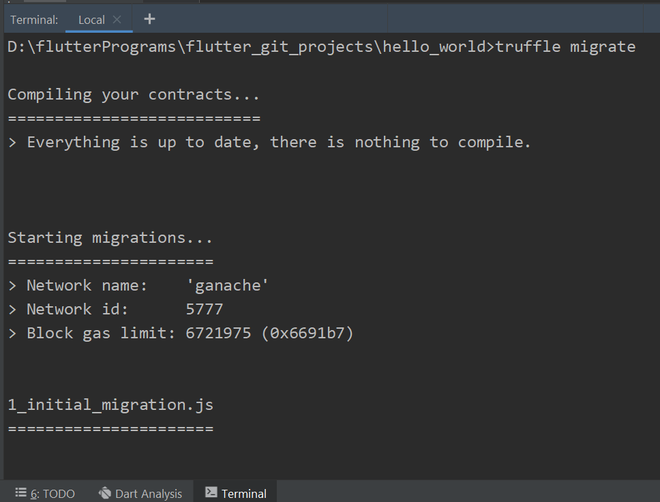
松露迁移
- 看看 Ganache,第一个账户原本有 100 个以太币,现在由于迁移的交易成本而降低了。
测试智能合约
在 Truffle 中,我们可以使用 JavaScript 或 Solidity 编写测试,在本文中,我们将使用 Chai 和 Mocha 库在 Javascript 中编写测试。
- 在test/目录中创建一个名为helloWorld.js的新文件。
- 将以下内容添加到helloWorld.js文件中:
Javascript
const HelloWorld = artifacts.require("HelloWorld") ;

contract("HelloWorld" , () => {
    it("Hello World Testing" , async () => {
       const helloWorld = await HelloWorld.deployed() ;
       await helloWorld.setName("User Name") ;
       const result = await helloWorld.yourName() ;
       assert(result === "User Name") ;
    });
});
- HelloWorld :我们要测试的智能合约,我们通过使用artifacts.require导入我们的HelloWorld合约来开始我们的测试。
- 要测试setName函数,请记住它接受名称(字符串)作为参数。
- 此外,我们合约中的yourName变量使用了public修饰符,我们可以将其用作外部函数的 getter。
- Truffle 导入 Chai,因此我们可以使用 assert函数。我们传递实际值和期望值,要检查名称是否正确设置, assert(result === “User Name”) ; .
运行测试
- 运行测试如下:
truffle test- 如果所有测试都通过,您将看到类似于以下内容的控制台输出:
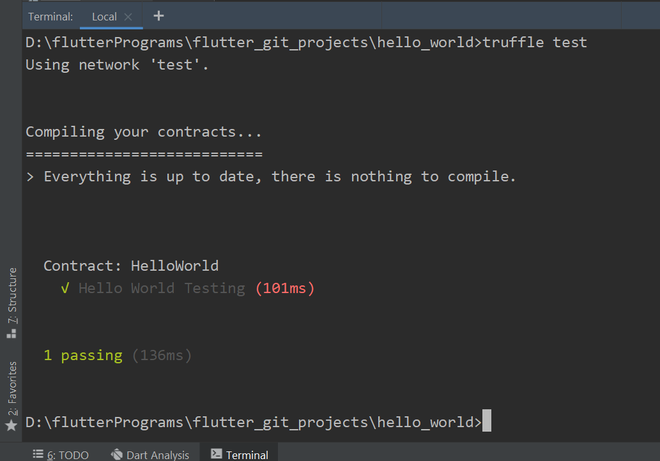
松露测试
与Flutter 的合约链接
- 在pubspec.yaml文件中导入以下包:
provider: ^4.3.3
web3dart: ^1.2.3
http: ^0.12.2
web_socket_channel: ^1.2.0- 另外,添加资产src/artifacts/HelloWorld.json 到pubspec.yaml文件,该文件在我们迁移合约时由truffle -config.js 生成。
assets:
- src/artifacts/HelloWorld.json- 创建一个名为contract_linking的新文件。 dart在lib/目录中。
- 将以下内容添加到文件中:
Dart
import 'package:flutter/material.dart';

class ContractLinking extends ChangeNotifier {

}
- 只是一个简单的类,带有用于状态管理的ChangeNotifier 。
变量
- 在class ContractLinking extends ChangeNotifier {之后的下一行添加以下变量。
Dart
final String _rpcUrl = "http://10.0.2.2:7545";
final String _wsUrl = "ws://10.0.2.2:7545/";
final String _privateKey = "Enter Private Key";
库web3dart不会将签名的交易发送给矿工本身。相反,它依赖于 RPC 客户端来做到这一点。对于 WebSocket URL,只需修改 RPC URL。您可以从 ganache 获取 RPC URL:

Ganache – RPC 网址
- 从 ganache 获取私钥:
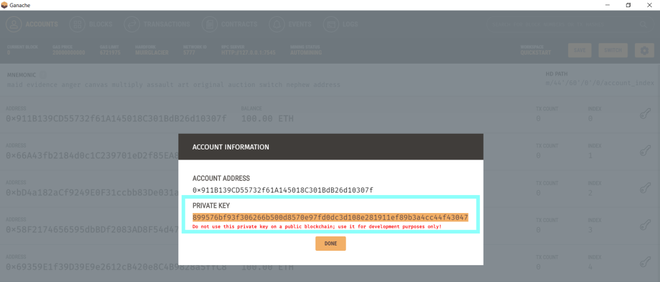
Ganache – 私钥
- 在下面声明以下变量:
Dart
Web3Client _client;
bool isLoading = true;

String _abiCode;
EthereumAddress _contractAddress;

Credentials _credentials;

DeployedContract _contract;
ContractFunction _yourName;
ContractFunction _setName;

String deployedName;
- _client变量将用于在 WebSocket 的帮助下建立到以太坊 rpc 节点的连接。
- isLoading变量将用于检查合约的状态。
- _abiCode变量将用于读取合约 abi。
- _contractAddress变量将用于存储已部署智能合约的合约地址。
- _credentials变量将存储智能合约部署者的凭据。
- _contract变量将用于告诉 Web3dart 我们的合约在哪里声明。
- _yourName和_setName变量将用于存储在我们的 HelloWorld.sol 智能合约中声明的函数。
- deployName将保存智能合约中的名称。
功能
- 声明上述变量后,在其下声明以下函数:
Dart
ContractLinking() {
    initialSetup();
  }

  initialSetup() async {

    // establish a connection to the ethereum rpc node. The socketConnector
    // property allows more efficient event streams over websocket instead of
    // http-polls. However, the socketConnector property is experimental.
    _client = Web3Client(_rpcUrl, Client(), socketConnector: () {
      return IOWebSocketChannel.connect(_wsUrl).cast();
    });

    await getAbi();
    await getCredentials();
    await getDeployedContract();
  }

  Future getAbi() async {

    // Reading the contract abi
    String abiStringFile =
        await rootBundle.loadString("src/artifacts/HelloWorld.json");
    var jsonAbi = jsonDecode(abiStringFile);
    _abiCode = jsonEncode(jsonAbi["abi"]);

    _contractAddress =
        EthereumAddress.fromHex(jsonAbi["networks"]["5777"]["address"]);
  }

  Future getCredentials() async {
    _credentials = await _client.credentialsFromPrivateKey(_privateKey);
  }

  Future getDeployedContract() async {

    // Telling Web3dart where our contract is declared.
    _contract = DeployedContract(
        ContractAbi.fromJson(_abiCode, "HelloWorld"), _contractAddress);

    // Extracting the functions, declared in contract.
    _yourName = _contract.function("yourName");
    _setName = _contract.function("setName");
    getName();
  }

  getName() async {

    // Getting the current name declared in the smart contract.
    var currentName = await _client
        .call(contract: _contract, function: _yourName, params: []);
    deployedName = currentName[0];
    isLoading = false;
    notifyListeners();
  }

  setName(String nameToSet) async {

    // Setting the name to nameToSet(name defined by user)
    isLoading = true;
    notifyListeners();
    await _client.sendTransaction(
        _credentials,
        Transaction.callContract(
            contract: _contract, function: _setName, parameters: [nameToSet]));
    getName();
  }
创建一个 UI 来与智能合约交互
- 创建一个名为helloUI的新文件。 dart在lib/目录中。
- 将以下内容添加到文件中:
Dart
import 'package:flutter/material.dart';
import 'package:hello_world/contract_linking.dart';
import 'package:provider/provider.dart';

class HelloUI extends StatelessWidget {
  @override
  Widget build(BuildContext context) {

    // Getting the value and object or contract_linking
    var contractLink = Provider.of(context);

    TextEditingController yourNameController = TextEditingController();

    return Scaffold(
      appBar: AppBar(
        title: Text("Hello World !"),
        centerTitle: true,
      ),
      body: Container(
        padding: EdgeInsets.symmetric(horizontal: 20),
        child: Center(
          child: contractLink.isLoading
              ? CircularProgressIndicator()
              : SingleChildScrollView(
            child: Form(
              child: Column(
                children: [
                  Row(
                    mainAxisAlignment: MainAxisAlignment.center,
                    children: [
                      Text(
                        "Hello ",
                        style: TextStyle(
                            fontWeight: FontWeight.bold, fontSize: 52),
                      ),
                      Text(
                        contractLink.deployedName,
                        style: TextStyle(
                            fontWeight: FontWeight.bold,
                            fontSize: 52,
                            color: Colors.tealAccent),
                      ),
                    ],
                  ),
                  Padding(
                    padding: EdgeInsets.only(top: 29),
                    child: TextFormField(
                      controller: yourNameController,
                      decoration: InputDecoration(
                          border: OutlineInputBorder(),
                          labelText: "Your Name",
                          hintText: "What is your name ?",
                          icon: Icon(Icons.drive_file_rename_outline)),
                    ),
                  ),
                  Padding(
                    padding: EdgeInsets.only(top: 30),
                    child: ElevatedButton(
                      child: Text(
                        'Set Name',
                        style: TextStyle(fontSize: 30),
                      ),
                      style: ElevatedButton.styleFrom(
                        primary: Colors.green,
                      ),
                      onPressed: () {
                        contractLink.setName(yourNameController.text);
                        yourNameController.clear();
                      },
                    ),
                  )
                ],
              ),
            ),
          ),
        ),
      ),
    );
  }
}
- 更新主.dart为:
Dart
import 'package:flutter/material.dart';
import 'package:hello_world/contract_linking.dart';
import 'package:hello_world/helloUI.dart';
import 'package:provider/provider.dart';

void main() {
  runApp(MyApp());
}

class MyApp extends StatelessWidget {
  @override
  Widget build(BuildContext context) {

    // Inserting Provider as a parent of HelloUI()
    return ChangeNotifierProvider(
      create: (_) => ContractLinking(),
      child: MaterialApp(
        title: "Hello World",
        theme: ThemeData(
            brightness: Brightness.dark,
            primaryColor: Colors.cyan[400],
            accentColor: Colors.deepOrange[200]),
        home: HelloUI(),
      ),
    );
  }
}
与完整的 Dapp 交互
- 现在我们准备好使用我们的 dapp 了!
- 只需运行Flutter项目。

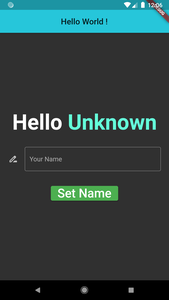
你好世界 Dapp
正如您所看到的 Hello Unknown ,在 UI 中实际上来自智能合约变量yourName 。
当您在TextFormField 中输入您的姓名并按下 `Set Name` ElevatedButton 时,它会从contract_linking调用setName函数。 dart将直接调用我们的智能合约 (HelloWorld.sol) 的setName函数。
Hello World Dapp |

Hello World Dapp |

Hello World Dapp |
恭喜!您在成为成熟的移动 dapp 开发者方面迈出了一大步。对于本地开发,您拥有开始制作更高级 dapp 所需的所有工具。
如果您卡在某个地方,请查看 GitHub 存储库以获取完整代码。