本文是使用Python编程语言对TensorFlow库进行简要介绍。
介绍
TensorFlow是一个开源软件库。 TensorFlow最初是由谷歌机器智能研究组织内谷歌大脑团队的研究人员和工程师开发的,目的是进行机器学习和深度神经网络研究,但该系统的通用性足以适用于各种其他领域,如好!
让我们首先尝试理解TensorFlow这个词的实际含义!
TensorFlow基本上是一个使用数据流图进行数值计算的软件库,其中:
- 图中的节点代表数学运算。
- 图中的边表示在它们之间传送的多维数据阵列(称为张量)。 (请注意,张量是 TensorFlow 中数据的中心单位)。
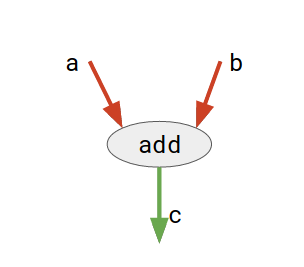
考虑下图:

这里, add是一个节点,表示加法操作。 a和b是输入张量, c是结果张量。
这种灵活的架构允许您使用单个 API 将计算部署到台式机、服务器或移动设备中的一个或多个 CPU 或 GPU!
TensorFlow API
TensorFlow提供了多种 API(应用程序编程接口)。这些可以分为两大类:
- 低级API:
- 完整的编程控制
- 推荐给机器学习研究人员
- 提供对模型的精细控制
- TensorFlow Core是TensorFlow的低级 API。
- 高级API:
- 建立在TensorFlow Core之上
- 比TensorFlow Core更容易学习和使用
- 使不同用户之间的重复性任务更轻松、更一致
- tf.contrib.learn是一个高级 API 的例子。
在本文中,我们首先讨论TensorFlow Core的基础知识,然后探索更高级别的 API, tf.contrib.learn 。
TensorFlow 核心
1. 安装 TensorFlow
此处提供了易于遵循的TensorFlow安装指南:
安装 TensorFlow。
安装后,您可以通过在Python解释器中运行此命令来确保安装成功:
import tensorflow as tf2. 计算图
任何TensorFlow Core程序都可以分为两个独立的部分:
- 构建计算图。计算图只不过是排列成节点图的一系列 TensorFlow 操作。
- 运行计算图。要实际评估节点,我们必须在会话中运行计算图。一个会话封装了 TensorFlow 运行时的控制和状态。
现在,让我们编写我们的第一个TensorFlow程序来理解上述概念:
# importing tensorflow
import tensorflow as tf

# creating nodes in computation graph
node1 = tf.constant(3, dtype=tf.int32)
node2 = tf.constant(5, dtype=tf.int32)
node3 = tf.add(node1, node2)

# create tensorflow session object
sess = tf.Session()

# evaluating node3 and printing the result
print("Sum of node1 and node2 is:",sess.run(node3))

# closing the session
sess.close()
输出:
Sum of node1 and node2 is: 8
让我们试着理解上面的代码:
- 第 1 步:创建计算图
通过创建计算图,我们的意思是定义节点。 Tensorflow 为各种任务提供了不同类型的节点。每个节点将零个或多个张量作为输入,并产生一个张量作为输出。- 在上面的程序中,节点node1和node2是tf.constant类型。常量节点不接受输入,它输出一个内部存储的值。请注意,我们还可以使用dtype参数指定输出张量的数据类型。
node1 = tf.constant(3, dtype=tf.int32) node2 = tf.constant(5, dtype=tf.int32) - node3是tf.add类型。它以两个张量作为输入,并将它们的和作为输出张量返回。
node3 = tf.add(node1, node2)
- 在上面的程序中,节点node1和node2是tf.constant类型。常量节点不接受输入,它输出一个内部存储的值。请注意,我们还可以使用dtype参数指定输出张量的数据类型。
- 第 2 步:运行计算图
为了运行计算图,我们需要创建一个会话。要创建会话,我们只需执行以下操作:sess = tf.Session()现在,我们可以调用 session 对象的run方法在任何节点上执行计算:
print("Sum of node1 and node2 is:",sess.run(node3))在这里, node3被评估,它进一步调用node1和node2 。最后,我们使用以下命令关闭会话:
sess.close()
注意:另一种(更好的)处理会话的方法是像这样使用with 块:
with tf.Session() as sess:
    print("Sum of node1 and node2 is:",sess.run(node3))
这种方法的好处是您不需要明确关闭会话,因为一旦控制超出with块的范围,它就会自动关闭。
3. 变量
TensorFlow 也有变量节点,可以保存变量数据。它们主要用于保存和更新训练模型的参数。
变量是包含张量的内存缓冲区。它们必须显式初始化,并且可以在训练期间和之后保存到磁盘。您可以稍后恢复保存的值以练习或分析模型。
常量和变量之间需要注意的一个重要区别是:
A constant’s value is stored in the graph and its value is replicated wherever the graph is loaded. A variable is stored separately, and may live on a parameter server.
下面给出了一个使用Variable的例子:
# importing tensorflow
import tensorflow as tf

# creating nodes in computation graph
node = tf.Variable(tf.zeros([2,2]))

# running computation graph
with tf.Session() as sess:

    # initialize all global variables
    sess.run(tf.global_variables_initializer())

    # evaluating node
    print("Tensor value before addition:\n",sess.run(node))

    # elementwise addition to tensor
    node = node.assign(node + tf.ones([2,2]))

    # evaluate node again
    print("Tensor value after addition:\n", sess.run(node))
输出:
Tensor value before addition:
 [[ 0.  0.]
 [ 0.  0.]]
Tensor value after addition:
 [[ 1.  1.]
 [ 1.  1.]]
在上面的程序中:
- 我们定义一个Variable类型的节点并为其分配一些初始值。
node = tf.Variable(tf.zeros([2,2])) - 要在当前会话的范围内初始化变量节点,我们执行以下操作:
sess.run(tf.global_variables_initializer()) - 要为变量节点分配一个新值,我们可以使用这样的分配方法:
node = node.assign(node + tf.ones([2,2]))
4. 占位符
图形可以参数化以接受外部输入,称为占位符。占位符是稍后提供值的承诺。
在评估涉及占位符节点的图时,将feed_dict参数传递给会话的run方法以指定为这些占位符提供具体值的张量。
考虑下面给出的例子:
# importing tensorflow
import tensorflow as tf

# creating nodes in computation graph
a = tf.placeholder(tf.int32, shape=(3,1))
b = tf.placeholder(tf.int32, shape=(1,3))
c = tf.matmul(a,b)

# running computation graph
with tf.Session() as sess:
    print(sess.run(c, feed_dict={a:[[3],[2],[1]], b:[[1,2,3]]}))
输出:
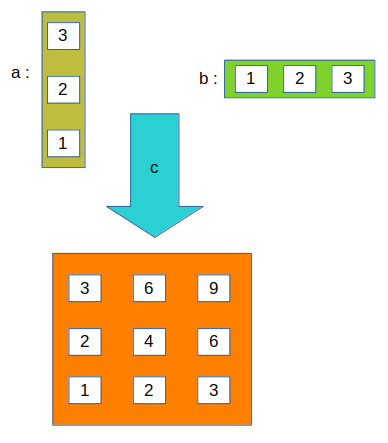
[[3 6 9]
 [2 4 6]
 [1 2 3]]
让我们试着理解上面的程序:
- 我们像这样定义占位符节点a和b :
a = tf.placeholder(tf.int32, shape=(3,1))
b = tf.placeholder(tf.int32, shape=(1,3))
第一个参数是张量的数据类型,可选参数之一是张量的形状。
- 我们定义了另一个节点c来执行矩阵乘法运算 ( matmul )。我们将两个占位符节点作为参数传递。
c = tf.matmul(a,b) - 最后,当我们运行会议上,我们通过在sess.run的feed_dict参数的占位符节点的值:
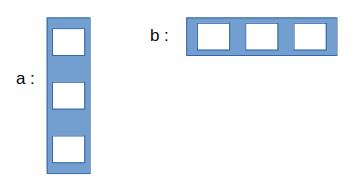
print(sess.run(c, feed_dict={a:[[3],[2],[1]], b:[[1,2,3]]}))考虑下面显示的图表以清除概念:
- 最初:

- sess.run 后:

5. 一个例子:线性回归模型
下面给出了使用 TensorFlow Core API 的线性回归模型的实现。
# importing the dependencies
import tensorflow as tf
import numpy as np
import matplotlib.pyplot as plt

# Model Parameters
learning_rate = 0.01
training_epochs = 2000
display_step = 200

# Training Data
train_X = np.asarray([3.3,4.4,5.5,6.71,6.93,4.168,9.779,6.182,7.59,2.167,
                         7.042,10.791,5.313,7.997,5.654,9.27,3.1])
train_y = np.asarray([1.7,2.76,2.09,3.19,1.694,1.573,3.366,2.596,2.53,1.221,
                         2.827,3.465,1.65,2.904,2.42,2.94,1.3])
n_samples = train_X.shape[0]

# Test Data
test_X = np.asarray([6.83, 4.668, 8.9, 7.91, 5.7, 8.7, 3.1, 2.1])
test_y = np.asarray([1.84, 2.273, 3.2, 2.831, 2.92, 3.24, 1.35, 1.03])

# Set placeholders for feature and target vectors
X = tf.placeholder(tf.float32)
y = tf.placeholder(tf.float32)

# Set model weights and bias
W = tf.Variable(np.random.randn(), name="weight")
b = tf.Variable(np.random.randn(), name="bias")

# Construct a linear model
linear_model = W*X + b

# Mean squared error
cost = tf.reduce_sum(tf.square(linear_model - y)) / (2*n_samples)

# Gradient descent
optimizer = tf.train.GradientDescentOptimizer(learning_rate).minimize(cost)

# Initializing the variables
init = tf.global_variables_initializer()

# Launch the graph
with tf.Session() as sess:
    # Load initialized variables in current session
    sess.run(init)

    # Fit all training data
    for epoch in range(training_epochs):

        # perform gradient descent step
        sess.run(optimizer, feed_dict={X: train_X, y: train_y})

        # Display logs per epoch step
        if (epoch+1) % display_step == 0:
            c = sess.run(cost, feed_dict={X: train_X, y: train_y})
            print("Epoch:{0:6} \t Cost:{1:10.4} \t W:{2:6.4} \t b:{3:6.4}".
                  format(epoch+1, c, sess.run(W), sess.run(b)))

    # Print final parameter values
    print("Optimization Finished!")
    training_cost = sess.run(cost, feed_dict={X: train_X, y: train_y})
    print("Final training cost:", training_cost, "W:", sess.run(W), "b:",
          sess.run(b), '\n')

    # Graphic display
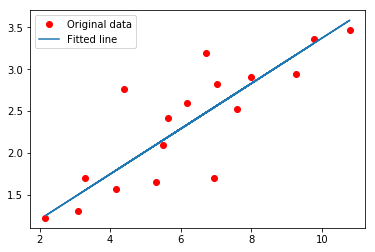
    plt.plot(train_X, train_y, 'ro', label='Original data')
    plt.plot(train_X, sess.run(W) * train_X + sess.run(b), label='Fitted line')
    plt.legend()
    plt.show()

    # Testing the model
    testing_cost = sess.run(tf.reduce_sum(tf.square(linear_model - y)) / (2 * test_X.shape[0]),
                            feed_dict={X: test_X, y: test_y})

    print("Final testing cost:", testing_cost)
    print("Absolute mean square loss difference:", abs(training_cost - testing_cost))

    # Display fitted line on test data
    plt.plot(test_X, test_y, 'bo', label='Testing data')
    plt.plot(train_X, sess.run(W) * train_X + sess.run(b), label='Fitted line')
    plt.legend()
    plt.show()
Epoch: 200 Cost: 0.1715 W: 0.426 b:-0.4371 Epoch: 400 Cost: 0.1351 W:0.3884 b:-0.1706 Epoch: 600 Cost: 0.1127 W:0.3589 b.0408.08.08.08.03 Epoch: 1000 Cost: 0.09047 W:0.3176 b:0.3311 Epoch: 1200 Cost: 0.08526 W:0.3034 b:0.4319 Epoch: 1400 Cost: 0.08205 W:0.29005 W:0.29050.103 Epoch:0.0605:103 1800 Cost: 0.07887 W:0.2766 b:0.6218 Epoch: 2000 Cost: 0.07812 W:0.2712 b: 0.66 优化完成!最终训练成本:0.0781221 W:0.271219 b:0.65996  最终测试成本:0.0756337 绝对均方损失差:0.00248838
让我们试着理解上面的代码。
- 首先,我们定义了一些用于训练模型的参数,例如:
learning_rate = 0.01 training_epochs = 2000 display_step = 200 - 然后我们为特征和目标向量定义占位符节点。
X = tf.placeholder(tf.float32) y = tf.placeholder(tf.float32) - 然后,我们为权重和偏差定义变量节点。
W = tf.Variable(np.random.randn(), name="weight") b = tf.Variable(np.random.randn(), name="bias") - linear_model是一个操作节点,用于计算线性回归模型的假设。
linear_model = W*X + b - 每次梯度下降的损失(或成本)计算为均方误差,其节点定义为:
cost = tf.reduce_sum(tf.square(linear_model - y)) / (2*n_samples) - 最后,我们有实现梯度下降算法的优化器节点。
optimizer = tf.train.GradientDescentOptimizer(learning_rate).minimize(cost) - 现在,通过应用梯度下降算法将训练数据拟合到线性模型中。该任务重复training_epochs次。在每个 epoch 中,我们执行这样的梯度下降步骤:
sess.run(optimizer, feed_dict={X: train_X, y: train_y}) - 在每个display_step时期之后,我们打印使用以下方法找到的当前损失值:
c = sess.run(cost, feed_dict={X: train_X, y: train_y}) - 该模型在测试数据上进行评估, testing_cost使用以下方法计算:
testing_cost = sess.run(tf.reduce_sum(tf.square(linear_model - y)) / (2 * test_X.shape[0]),
                          feed_dict={X: test_X, y: test_y})
tf.contrib.learn
tf.contrib.learn是一个高级 TensorFlow 库,它简化了机器学习的机制,包括以下内容:
- 运行训练循环
- 运行评估循环
- 管理数据集
- 管理喂养
让我们尝试使用tf.contrib.learn在上面使用的相同数据上查看线性回归的实现。
# importing the dependencies
import tensorflow as tf
import numpy as np

# declaring list of features
features = [tf.contrib.layers.real_valued_column("X")]

# creating a linear regression estimator
estimator = tf.contrib.learn.LinearRegressor(feature_columns=features)

# training and test data
train_X = np.asarray([3.3,4.4,5.5,6.71,6.93,4.168,9.779,6.182,7.59,2.167,
                         7.042,10.791,5.313,7.997,5.654,9.27,3.1])
train_y = np.asarray([1.7,2.76,2.09,3.19,1.694,1.573,3.366,2.596,2.53,1.221,
                         2.827,3.465,1.65,2.904,2.42,2.94,1.3])
test_X = np.asarray([6.83, 4.668, 8.9, 7.91, 5.7, 8.7, 3.1, 2.1])
test_y = np.asarray([1.84, 2.273, 3.2, 2.831, 2.92, 3.24, 1.35, 1.03])

# function to feed dict of numpy arrays into the model for training
input_fn = tf.contrib.learn.io.numpy_input_fn({"X":train_X}, train_y,
                                              batch_size=4, num_epochs=2000)

# function to feed dict of numpy arrays into the model for testing
test_input_fn = tf.contrib.learn.io.numpy_input_fn({"X":test_X}, test_y)

# fit training data into estimator
estimator.fit(input_fn=input_fn)

# print value of weight and bias
W = estimator.get_variable_value('linear/X/weight')[0][0]
b = estimator.get_variable_value('linear/bias_weight')[0]
print("W:", W, "\tb:", b)

# evaluating the final loss
train_loss = estimator.evaluate(input_fn=input_fn)['loss']
test_loss = estimator.evaluate(input_fn=test_input_fn)['loss']
print("Final training loss:", train_loss)
print("Final testing loss:", test_loss)
W: 0.252928     b: 0.802972
Final training loss: 0.153998
Final testing loss: 0.0777036
让我们试着理解上面的代码。
- 使用列表声明特征矩阵的形状和类型。列表的每个元素定义了列的结构。在上面的例子中,我们只有 1 个存储真实值的特征,并被命名为X 。
features = [tf.contrib.layers.real_valued_column("X")] - 然后,我们需要一个估计器。估计器只不过是具有许多有用方法和参数的预定义模型。在上面的示例中,我们使用线性回归模型估计器。
estimator = tf.contrib.learn.LinearRegressor(feature_columns=features) - 出于训练目的,我们需要使用一个输入函数,该函数负责在训练时向估计器提供数据。它将特征列值作为字典。可以指定许多其他参数,如批量大小、时期数等。
input_fn = tf.contrib.learn.io.numpy_input_fn({"X":train_X}, train_y, batch_size=4, num_epochs=2000) - 为了将训练数据拟合到 estimator,我们只需使用 estimator 的fit方法,其中输入函数作为参数传递。
estimator.fit(input_fn=input_fn) - 训练完成后,我们可以使用estimator 的 get_variable_value方法获取不同变量的值。您可以使用get_variable_names方法获取所有变量的列表。
W = estimator.get_variable_value('linear/X/weight')[0][0] b = estimator.get_variable_value('linear/bias_weight')[0] - 均方误差/损失可以计算为:
train_loss = estimator.evaluate(input_fn=input_fn)['loss']
test_loss = estimator.evaluate(input_fn=test_input_fn)['loss']
这篇TensorFlow 简介文章到此结束!
从这里,您可以尝试探索本教程:MNIST For ML Beginners。