在现实世界中,集合根据定义是一组具有相似属性和属性的文章。由于Java是一种面向对象的语言,因此它模仿了现实世界。在Java, Collection是一组组合成一个单元的多个对象。 Java Collections 是一个非常广泛的主题,作为初学者在学习它时可能很难掌握自己的方法。在这里,我们拥有您在开始使用Java集合时需要了解的一切。

什么是集合框架?
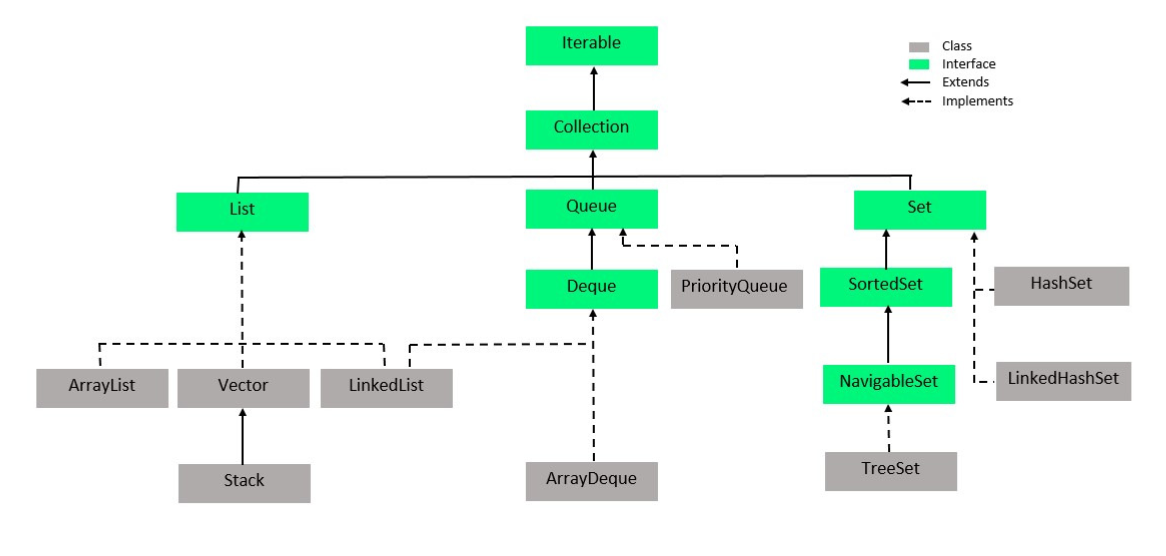
我们有我们的对象集合,现在我们需要一种有组织的方式来使用这些集合,因此我们需要一个框架。 Java Collection Framework 首先在 JDK 1.2( Java Development Kit 1.2)中引入,是一种由接口和类组成的体系结构。简单来说,它就像一个组件的骨架结构,随时可以用于各种编程需求。它还提供不同的数据操作,如搜索、排序、插入、删除和操作。集合框架的所有类和接口都捆绑在Java.util 包中。
集合框架层次结构
类与接口
|
Class |
Interface |
|---|---|
| A class is a user-defined prototype for building objects in Java. | An interface is a user-defined blueprint that describes the structure of every class that implements it. |
| It is used to define objects. | It cannot be used to define objects. |
| A class can have access modifiers public and default. | An Interface can have access modifiers public and default. |
| Classes can be concrete or abstract. | All interfaces are abstract. |
| A class consists of constructors, methods and attributes. The methods are defined in a class. | An interface consists attributes and methods. The methods are not defined in an interface, it only contains their signature. |
现在我们已经了解了Java集合是由什么组成的基本概念,我们将详细了解它的每个组件。它们的属性是什么?最常用的集合的几个例子是什么?
1. 可迭代
Iterable 接口是整个集合层次结构的根,这意味着每个类和接口都实现了它。迭代器的主要函数是允许用户遍历所有集合类对象,就好像它们是简单的数据项序列。
2. 收藏
Collection 接口扩展了 Iterable 接口。它具有使用框架中所有其他集合来添加、删除和操作数据所需的基本方法。因为它是一个接口,所以它只有一个方法签名(即
3. 列表
List 接口从 Collection 接口扩展而来。列表中的元素像序列一样排序。用户可以使用索引号来访问列表中的特定元素,也就是说,用户可以完全控制将哪个元素插入到列表中。
3. a) ArrayList
ArrayList 类实现了 List 接口。这个类的对象是动态数组。 ArrayList 本质上是 List 的可调整大小的实现。它实现了所有 List 方法并允许所有元素甚至空元素。 ArrayList 对象有一个容量,它最初等于大小,但随着新元素的添加而动态增加。 ArrayList 是不同步的,这意味着多个线程可以同时访问它们。线程是可以在操作系统中处理的顺序流控制单元。
句法:
ArrayList arrayListName = new ArrayList();
例子:现在我们举一个例子,对一个 ArrayList 进行一些基本的操作。这里我们实例化了一个名为 intArr 的 ArrayList。我们使用 add() 方法将整数添加到 intArr。用于声明 intArr 的 Integer 类是该基本数据类型 int 的包装类。包装类是从 Object 类扩展而来的,使用它们是为了使基本数据类型与其他类兼容。接下来,我们在控制台上打印 ArrayList。我们使用 remove() 方法从指定的索引中删除元素。我们检查一个元素,这里是 25,是否存在于 intArr 中并打印相应的消息。然后我们使用 get() 方法检索索引 1 处的元素。正如您可以观察到当使用 remove() 方法删除元素时,其余元素按顺序移动。
Java
// An example for ArrayList
// All of the classes and
// interfaces of the collection
// framework are bundled into
// the java.util package
import java.util.*;

public class BasicArrayList {

    // main method
    public static void main(String[] args) {

        // Instantiate an ArrayList Object
        // Integer is a wrapper class for
        // the basic datatype int
        ArrayList intArr = new ArrayList();

        // Add elements using add() method
        intArr.add(10);
        intArr.add(12);
        intArr.add(25);
        intArr.add(19);
        intArr.add(11);
        intArr.add(3);

        // Print the ArrayList on the console
        System.out.println(intArr);

        // Remove elements at index 1 and 4
        intArr.remove(1);
        intArr.remove(4);

        // Print the ArrayList on the console
        System.out.println(intArr);

        // Check if intArr contains the element 25
        if(intArr.contains(25))
        {
            System.out.println("The ArrayList contains 25");
        }
        else
        {
            System.out.println("No such element exists");
        }

        // Use get method to get the element at index 1
        int elementAt1 = intArr.get(1);
        System.out.println("The Element at index 1 now is " + elementAt1);

    }

}
Java
// An example for Vector
import java.util.*;

public class VectorExample {

    public static void main(String[] args) {

        // Instantiate Vector object
        Vector intVector = new Vector();

        // Print the initial size of the Vector
        System.out.println("The initial size of the Vector = " + intVector.size());
        System.out.println();

        // Add elements using add method
        intVector.add(11);
        intVector.add(18);
        intVector.add(1);
        intVector.add(87);
        intVector.add(19);
        intVector.add(11);

        // Print the Vector on the console
        System.out.println("The Vector intVector : ");
        System.out.println(intVector);
        System.out.println("Size of intVector : " + intVector.size());

        System.out.println();

        // Remove the element at index 2
        intVector.remove(2);

        // Print the vector again on the console
        System.out.println("The Vector intVector after removing element at 2 : ");
        System.out.println(intVector);

        System.out.println();

        // Clear all elements of the Vector and
        // Print the Vector on the console
        intVector.clear();
        System.out.println("The Vector intVector after using clear : ");
        System.out.println(intVector);

    }

}
Java
// An example to show workings of a Stack
import java.util.*;

public class StackExample {

    public static void main(String[] args) {

        // Instantiate a Stack named strStack
        Stack strStack = new Stack();

        // Add elements using the push() method
        strStack.push("Stack");
        strStack.push("a");
        strStack.push("is");
        strStack.push("This");

        // The size() method gives the
        // number of elements in the Stack
        System.out.println("The size of the Stack is : " + strStack.size());

        // The search() method is
        // used to search an element
        // it returns the position of
        // the element
        int position = strStack.search("a");
        System.out.println("\nThe string 'a' is at position " + position);

        System.out.println("\nThe elements of the stack are : ");
        String temp;
        int num = strStack.size();

        for(int i = 1; i <= num; i++)
        {
            // peek() returns the topmost element
            temp = strStack.peek();
            System.out.print(temp + " ");

            // pop() removes the topmost element
            strStack.pop();

        }

    }

}
Java
// An example for the LinkedList
import java.util.*;

public class LinkedListExample {

    public static void main(String[] args) {

        // Instantiate LinkedList named strLinkedList
        LinkedList strLinkedList = new LinkedList();

        // Add elements to the LinkedList using add()
        strLinkedList.add("This");
        strLinkedList.add("is");
        strLinkedList.add("a");
        strLinkedList.add("LinkedList");

        // The elements are retrieved using the get() method
        System.out.println("The contents of strLinkedList : ");
        for(int i = 0; i < strLinkedList.size(); i++)
        {
            System.out.print(strLinkedList.get(i) + " ");
        }

        // The elements are removed using remove()
        strLinkedList.remove(0);
        strLinkedList.remove(1);

        System.out.println("\n\nThe contents of strLinkedList after remove operation : ");
        for(int i = 0; i < strLinkedList.size(); i++)
        {
            System.out.print(strLinkedList.get(i) + " ");
        }

    }

}
Java
// An example for PriorityQueue
import java.util.*;

public class PriorityQueueExample {

    public static void main(String[] args) {

        // Instantiate PriorityQueue object named intPriorityQueue
        PriorityQueue intPriorityQueue = new PriorityQueue();

        // Add elements using add()
        intPriorityQueue.add(17);
        intPriorityQueue.add(20);
        intPriorityQueue.add(1);
        intPriorityQueue.add(13);
        intPriorityQueue.add(87);

        // Print the contents of PriorityQueue
        System.out.println("The contents of intPriorityQueue : ");
        System.out.println(intPriorityQueue);

        // The peek() method is used to retrieve
          // the head of the PriorityQueue
        System.out.println("\nThe head of the PriorityQueue : " + intPriorityQueue.peek());

        // The remove() method is used
        // to remove a single instance
        // of the specified object
        intPriorityQueue.remove(17);

        // Print the contents of PriorityQueue
        System.out.println("\nThe contents of intPriorityQueue after removing 17 : ");
        System.out.println(intPriorityQueue);

        // The poll() method is used
        // to retrieve and remove the
        // element at the head of the PriorityQueue
        Integer head = intPriorityQueue.poll();
        System.out.println("\nThe head of the PriorityQueue was : " + head);

        // Print the contents of PriorityQueue
        System.out.println("\nThe contents of intPriorityQueue after poll : ");
        System.out.println(intPriorityQueue);
    }

}
Java
// An example for HashSet and LinkedHashSet
import java.util.*;

public class HashSetAndLinkedHashSet {

    public static void main(String[] args) {

        /*-----------HashSet-------------*/

        // Instantiate a HashSet object named strHashSet
        HashSet strHashSet = new HashSet();

        // Add elements using add()
        strHashSet.add("This");
        strHashSet.add("is");
        strHashSet.add("a");
        strHashSet.add("HashSet");

        // Create an Iterator to traverse through the HashSet
        Iterator hsIterator = strHashSet.iterator();

        // Print all the elements of the HashSet
        System.out.println("Contents of HashSet : ");
        while(hsIterator.hasNext())
        {
            System.out.print(hsIterator.next() + " ");
        }

        /*---------LinkedHashSet----------*/

        // Instantiate an object of LinkedHashSet named strLinkedHashSet
        // Pass the name of the HashSet created earlier to copy all of the contents
        // of the HashSet to the LinkedHashSet using a constructor
        LinkedHashSet strLinkedHashSet = new LinkedHashSet(strHashSet);

        // Create an Iterator to traverse through the LinkedHashSet
        Iterator lhsIterator = strLinkedHashSet.iterator();

        // Print all the elements of the LinkedHashSet
        System.out.println("\n\nContents of LinkedHashSet : ");
        while(lhsIterator.hasNext())
        {
            System.out.print(lhsIterator.next() + " ");
        }

    }

}
Java
// An example for TreeSet
import java.util.*;

public class TreeSetExample {

    public static void main(String[] args) {

        // Instantiate an object of TreeSet named intTreeSet
        TreeSet intTreeSet = new TreeSet();

        // Add elements using add()
        intTreeSet.add(18);
        intTreeSet.add(13);
        intTreeSet.add(29);
        intTreeSet.add(56);
        intTreeSet.add(73);

        // Try to add a duplicate
        // Observe output as it will not be added
        intTreeSet.add(18);

        // Print the TreeSet on the console
        System.out.println("The contents of intTreeSet : ");
        System.out.println(intTreeSet);

        // Remove 18 using remove()
        if(intTreeSet.remove(18))
        {
            System.out.println("\nElement 18 has been removed");
        }
        else
        {
            System.out.println("\nNo such element exists");
        }

        // Try to remove a non-existent element
        if(intTreeSet.remove(12))
        {
            System.out.println("\nElement 18 has been removed");
        }
        else
        {
            System.out.println("\nNo such element exists");
        }

        System.out.println();

        // Print the TreeSet on the console
        System.out.println("The contents of intTreeSet : ");
        System.out.println(intTreeSet);

    }

}
Java
// An example for HashMap,
// Hashtable and LinkedHashMap
import java.util.*;

public class MapImplementaionExample {

    public static void main(String[] args) {

        /*--------------HashMap---------------*/

        // Instantiate an object of HashMap named hashMap
        HashMap hashMap = new HashMap();

        // Add elements using put()
        hashMap.put(1, "This");
        hashMap.put(2, "is");
        hashMap.put(3, "HashMap");

        // Print the HashMap contents on the console
        System.out.println("Contents of hashMap : ");
        System.out.print(hashMap.entrySet());

        // Add a duplicate key
        hashMap.put(3, "Duplicate");

        // Add a duplicate value
        hashMap.put(4, "This");

        // Print the HashMap contents on the console
        System.out.println("\nContents of hashMap after adding duplicate : ");
        System.out.print(hashMap.entrySet());

        /*--------------Hashtable----------------*/

        // Instantiate an object of Hashtable named hashTable
        Hashtable hashTable = new Hashtable();

        // Add elements using put()
        hashTable.put(11, "This");
        hashTable.put(12, "is");
        hashTable.put(13, "Hashtable");

        // Print the Hashtable contents on the console
        System.out.println("\n\nContents of hashTable : ");
        System.out.print(hashTable.entrySet());

        // Add a duplicate key
        hashTable.put(11, "Duplicate");

        // Add a duplicate value
        hashTable.put(14, "is");

        // Print the Hashtable contents on the console
        System.out.println("\nContents of hashTable after adding duplicate : ");
        System.out.print(hashTable.entrySet());

        /*---------------LinkedHashMap---------------*/

        // Instantiate an object of LinkedHashMap named linkedHashMape
        LinkedHashMap linkedHashMap = new LinkedHashMap();

        // Add elements using put()
        linkedHashMap.put(21, "This");
        linkedHashMap.put(22, "is");
        linkedHashMap.put(23, "LinkedHashMap");

        // Print the LinkedHashMap contents on the console
        System.out.println("\n\nContents of linkedHashMap : ");
        System.out.print(linkedHashMap.entrySet());

        // Add a duplicate key
        linkedHashMap.put(22, "Duplicate");

        // Add a duplicate value
        linkedHashMap.put(24, "This");

        // Print the LinkedHashMap contents on the console
        System.out.println("\nContents of linkedHashMap after adding duplicate : ");
        System.out.print(linkedHashMap.entrySet());
    }

}
Java
// An example of TreeMap
import java.util.*;

public class TreeMapExample {

    public static void main(String[] args) {

        // Instantiate an object of TreeMap named treeMap
        TreeMap treeMap = new TreeMap();

        // Add elements using put()
        treeMap.put(1, "This");
        treeMap.put(2, "is");
        treeMap.put(3, "TreeMap");

        // Print the contents of treeMap on the console
        System.out.println("The contents of treeMap : ");
        System.out.println(treeMap);

        // Add a duplicate key
        treeMap.put(1, "Duplicate");

        // Add a duplicate value
        treeMap.put(4, "is");

        // Print the contents of treeMap on the console
        System.out.println("\nThe contents of treeMap after adding duplicates : ");
        System.out.println(treeMap);

    }

} [10, 12, 25, 19, 11, 3]
[10, 25, 19, 11]
The ArrayList contains 25
The Element at index 1 now is 25
3. b) 向量
vector 类实现了 List 迭代器。 Vector 实例是一个动态数组,其中的元素可以通过索引进行访问。 Vector 和 ArrayList 之间的区别在于 Vector 是同步的。
句法:
Vector vectorName = new Vector();
让我们通过一个例子更好地理解 Vector,在下面给出的代码中,我们声明了一个名为 intVector 的 Vector,我们使用 add() 向 Vector 添加元素。 size() 方法给出存储在 Vector 中的当前元素数。 remove() 方法用于删除指定索引处的元素。
Java
// An example for Vector
import java.util.*;

public class VectorExample {

    public static void main(String[] args) {

        // Instantiate Vector object
        Vector intVector = new Vector();

        // Print the initial size of the Vector
        System.out.println("The initial size of the Vector = " + intVector.size());
        System.out.println();

        // Add elements using add method
        intVector.add(11);
        intVector.add(18);
        intVector.add(1);
        intVector.add(87);
        intVector.add(19);
        intVector.add(11);

        // Print the Vector on the console
        System.out.println("The Vector intVector : ");
        System.out.println(intVector);
        System.out.println("Size of intVector : " + intVector.size());

        System.out.println();

        // Remove the element at index 2
        intVector.remove(2);

        // Print the vector again on the console
        System.out.println("The Vector intVector after removing element at 2 : ");
        System.out.println(intVector);

        System.out.println();

        // Clear all elements of the Vector and
        // Print the Vector on the console
        intVector.clear();
        System.out.println("The Vector intVector after using clear : ");
        System.out.println(intVector);

    }

}
The initial size of the Vector = 0

The Vector intVector :
[11, 18, 1, 87, 19, 11]
Size of intVector : 6

The Vector intVector after removing element at 2 :
[11, 18, 87, 19, 11]

The Vector intVector after using clear :
[]
3. b) i) 堆栈
stack 类从 Vector 类扩展而来。 Stack 是后进先出 (LIFO) 结构。你可以把它想象成桌子上的一堆书,最先保存的书必须最后取出,最后放在书堆上的书必须先取出。堆栈类的基本方法是push、pop、peek、empty 和search。
句法:
Stack stackName = new Stack();
示例:让我们通过一个示例更好地理解 Stack。在下面给出的代码中,我们首先实例化一个名为 strStack 的 Stack,它的元素是 String 类型的。使用 push() 方法添加元素。 size() 方法返回堆栈中存在的元素数。 search() 方法用于搜索堆栈中的元素。如果找到,则返回元素的从 1 开始的位置,否则返回 -1 以指示堆栈中不存在此类元素。
Java
// An example to show workings of a Stack
import java.util.*;

public class StackExample {

    public static void main(String[] args) {

        // Instantiate a Stack named strStack
        Stack strStack = new Stack();

        // Add elements using the push() method
        strStack.push("Stack");
        strStack.push("a");
        strStack.push("is");
        strStack.push("This");

        // The size() method gives the
        // number of elements in the Stack
        System.out.println("The size of the Stack is : " + strStack.size());

        // The search() method is
        // used to search an element
        // it returns the position of
        // the element
        int position = strStack.search("a");
        System.out.println("\nThe string 'a' is at position " + position);

        System.out.println("\nThe elements of the stack are : ");
        String temp;
        int num = strStack.size();

        for(int i = 1; i <= num; i++)
        {
            // peek() returns the topmost element
            temp = strStack.peek();
            System.out.print(temp + " ");

            // pop() removes the topmost element
            strStack.pop();

        }

    }

}
The size of the Stack is : 4

The string 'a' is at position 3

The elements of the stack are :
This is a Stack
3. c) 链表
LinkedList 类实现了 List 接口和 Deque 接口。 LinkedList 是链表数据结构的类实现,其中每个元素都有一个指向形成链接的下一个元素的指针。由于每个元素都有下一个元素的地址,因此称为节点的链表元素可以存储在内存中的非连续位置。
句法:
LinkedList linkedListName = new LinkedList();
让我们举个例子来理解 LinkedList。在下面给出的代码中,我们实例化了一个名为 strLinkedList 的 LinkedList。 add() 方法用于添加元素, remove() 方法用于删除元素。元素的检索是使用 get() 方法完成的。
Java
// An example for the LinkedList
import java.util.*;

public class LinkedListExample {

    public static void main(String[] args) {

        // Instantiate LinkedList named strLinkedList
        LinkedList strLinkedList = new LinkedList();

        // Add elements to the LinkedList using add()
        strLinkedList.add("This");
        strLinkedList.add("is");
        strLinkedList.add("a");
        strLinkedList.add("LinkedList");

        // The elements are retrieved using the get() method
        System.out.println("The contents of strLinkedList : ");
        for(int i = 0; i < strLinkedList.size(); i++)
        {
            System.out.print(strLinkedList.get(i) + " ");
        }

        // The elements are removed using remove()
        strLinkedList.remove(0);
        strLinkedList.remove(1);

        System.out.println("\n\nThe contents of strLinkedList after remove operation : ");
        for(int i = 0; i < strLinkedList.size(); i++)
        {
            System.out.print(strLinkedList.get(i) + " ");
        }

    }

}
The contents of strLinkedList :
This is a LinkedList

The contents of strLinkedList after remove operation :
is LinkedList
4. 排队
Queue 接口扩展了 Collection 接口。 Queue是队列数据结构的接口实现。由于Java中的 Queue 是一个接口,因此它没有定义方法,只有它们的签名。队列通常是先进先出 (FIFO) 结构,但 PriorityQueue 并非如此。您可以将其想象为柜台前排着长队,先进入的人先获得服务,先离开。
4. a) PriorityQueue
PriorityQueue 类实现了 Queue 接口。 PriorityQueue 的元素要么按自然顺序排列,要么按照 Comparator 指定的顺序排列,这取决于所使用的构造函数。 PriorityQueue 是无界的,但有一个容量来决定存储元素的数组的大小。初始容量等于数组的大小,但随着新元素的添加,它会动态扩展。
句法:
PriorityQueue priorityQueueName = new PriorityQueue();
让我们通过一个例子更好地理解 PriorityQueue。在下面给出的代码中,我们实例化了一个名为 intPriorityQueue 的 PriorityQueue 对象,因为在构造函数中没有指定 Comparator,这个 PriorityQueue 的元素将自然排序。 add() 方法用于添加元素, remove() 用于删除指定元素的单个实例。 peek() 方法是从 Queue 接口实现的,它返回 PriorityQueue 头部的元素。然而, poll() 方法会移除 PriorityQueue 头部的元素并返回它。
Java
// An example for PriorityQueue
import java.util.*;

public class PriorityQueueExample {

    public static void main(String[] args) {

        // Instantiate PriorityQueue object named intPriorityQueue
        PriorityQueue intPriorityQueue = new PriorityQueue();

        // Add elements using add()
        intPriorityQueue.add(17);
        intPriorityQueue.add(20);
        intPriorityQueue.add(1);
        intPriorityQueue.add(13);
        intPriorityQueue.add(87);

        // Print the contents of PriorityQueue
        System.out.println("The contents of intPriorityQueue : ");
        System.out.println(intPriorityQueue);

        // The peek() method is used to retrieve
          // the head of the PriorityQueue
        System.out.println("\nThe head of the PriorityQueue : " + intPriorityQueue.peek());

        // The remove() method is used
        // to remove a single instance
        // of the specified object
        intPriorityQueue.remove(17);

        // Print the contents of PriorityQueue
        System.out.println("\nThe contents of intPriorityQueue after removing 17 : ");
        System.out.println(intPriorityQueue);

        // The poll() method is used
        // to retrieve and remove the
        // element at the head of the PriorityQueue
        Integer head = intPriorityQueue.poll();
        System.out.println("\nThe head of the PriorityQueue was : " + head);

        // Print the contents of PriorityQueue
        System.out.println("\nThe contents of intPriorityQueue after poll : ");
        System.out.println(intPriorityQueue);
    }

}
The contents of intPriorityQueue :
[1, 13, 17, 20, 87]

The head of the PriorityQueue : 1

The contents of intPriorityQueue after removing 17 :
[1, 13, 87, 20]

The head of the PriorityQueue was : 1

The contents of intPriorityQueue after poll :
[13, 20, 87]
5. 德克
Deque 接口扩展了 Queue 接口。 Deque 是双端队列数据结构的一种实现,它是一种线性结构,可以在队列的两端进行插入和删除操作。 Deque 接口支持有容量限制的双端队列,也支持没有固定限制的双端队列。 Deque 可以用作后进先出 (LIFO) 以及先进先出 (FIFO) 结构。
5. a) ArrayDeque
ArrayDeque 类实现了 Deque 接口。 ArrayDeque 是 Deque 的一个可调整大小的实现,它没有固定的容量,而是根据需要增加。 ArrayDeque 可以用作堆栈,并且与 Stack 类相比速度更快。 ArrayDeque 不是线程安全的,它不允许不同线程并发访问。
句法:
ArrayDeque arrayDequeName = new ArrayDeque();
6.设置
Set 接口扩展了 Collection 接口。集合是一种对集合的数学定义进行建模的结构。它是一个对象的集合,不允许重复的对象。 Set 最多允许一个空元素。
6. a) 哈希集
HashSet 类实现了 Set 接口。在 HashSet 中,元素的顺序可能与插入的顺序不同。当一个元素被添加到 HashSet 中时,会计算一个 HashCode 并将该元素添加到适当的桶中(桶是任何 Hash 结构中的一个槽)。一个好的 HashSet 算法会均匀分布元素,从而使结构的时间性能保持不变。恒定时间性能意味着插入、删除和搜索等基本操作需要恒定时间。
6. b) LinkedHashSet
LinkedHashSet 实现了 Set 接口。 LinkedHashSet 与 HashSet 非常相似,不同之处在于该结构用于存储元素的每个桶都是一个双向链表。与 HashSet 相比,LinkedHashSet 排序更好,无需任何额外费用。
让我们通过一个例子来理解 HashSet 和 LinkedHashSet。在下面给出的代码中,我们实例化了一个名为 strHashSet 的 HashSet,使用 add() 方法向 HashSet 添加元素。 hasNext() 方法和 next() 方法是 Iterable 接口的方法,用于检查是否存在下一个元素并分别检索任何 Collection 中的下一个元素。使用 LinkedHashSet 的构造函数,将 HashSet 的所有元素添加到其中。创建一个迭代器以遍历它并使用它在控制台上打印元素。
Java
// An example for HashSet and LinkedHashSet
import java.util.*;

public class HashSetAndLinkedHashSet {

    public static void main(String[] args) {

        /*-----------HashSet-------------*/

        // Instantiate a HashSet object named strHashSet
        HashSet strHashSet = new HashSet();

        // Add elements using add()
        strHashSet.add("This");
        strHashSet.add("is");
        strHashSet.add("a");
        strHashSet.add("HashSet");

        // Create an Iterator to traverse through the HashSet
        Iterator hsIterator = strHashSet.iterator();

        // Print all the elements of the HashSet
        System.out.println("Contents of HashSet : ");
        while(hsIterator.hasNext())
        {
            System.out.print(hsIterator.next() + " ");
        }

        /*---------LinkedHashSet----------*/

        // Instantiate an object of LinkedHashSet named strLinkedHashSet
        // Pass the name of the HashSet created earlier to copy all of the contents
        // of the HashSet to the LinkedHashSet using a constructor
        LinkedHashSet strLinkedHashSet = new LinkedHashSet(strHashSet);

        // Create an Iterator to traverse through the LinkedHashSet
        Iterator lhsIterator = strLinkedHashSet.iterator();

        // Print all the elements of the LinkedHashSet
        System.out.println("\n\nContents of LinkedHashSet : ");
        while(lhsIterator.hasNext())
        {
            System.out.print(lhsIterator.next() + " ");
        }

    }

}
Contents of HashSet :
a This is HashSet

Contents of LinkedHashSet :
a This is HashSet
7. 排序集
SortedSet 接口扩展了 Set 接口。 SortedSet 提供元素的完整排序。默认排序是按自然顺序,否则按构造时指定的 Comparator 排序。遍历通常是按元素的升序进行的。
8. 导航集
NavigableSet 接口扩展自 SortedSet 接口。除了 SortedSet 的方法之外,NavigableSet 还具有提供最接近匹配的导航方法,例如地板、天花板、更低和更高。 NavigableSet 可以按升序和降序遍历。尽管它允许空元素实现,但不鼓励这样做,因为这些实现可能会产生模棱两可的结果。
8. a) 树集
TreeSet 类实现了 Navigable 接口。顾名思义,TreeSet 使用树结构来存储元素,并使用集合对元素进行排序。排序要么是自然排序,要么是由构造时指定的 Comparator 排序。 TreeSet 是非同步的,也就是说如果多个线程要同时访问它,我们需要外部同步它。
句法:
TreeSet treeSetName = new TreeSet();
让我们举个例子来更好地理解 TreeSet。在下面给出的代码中,我们实例化了一个名为 intTreeSet 的对象。正如您可以观察到的 TreeSet 中的顺序是自然顺序,不允许重复元素。 add() 方法用于添加元素, remove() 方法用于删除元素。
Java
// An example for TreeSet
import java.util.*;

public class TreeSetExample {

    public static void main(String[] args) {

        // Instantiate an object of TreeSet named intTreeSet
        TreeSet intTreeSet = new TreeSet();

        // Add elements using add()
        intTreeSet.add(18);
        intTreeSet.add(13);
        intTreeSet.add(29);
        intTreeSet.add(56);
        intTreeSet.add(73);

        // Try to add a duplicate
        // Observe output as it will not be added
        intTreeSet.add(18);

        // Print the TreeSet on the console
        System.out.println("The contents of intTreeSet : ");
        System.out.println(intTreeSet);

        // Remove 18 using remove()
        if(intTreeSet.remove(18))
        {
            System.out.println("\nElement 18 has been removed");
        }
        else
        {
            System.out.println("\nNo such element exists");
        }

        // Try to remove a non-existent element
        if(intTreeSet.remove(12))
        {
            System.out.println("\nElement 18 has been removed");
        }
        else
        {
            System.out.println("\nNo such element exists");
        }

        System.out.println();

        // Print the TreeSet on the console
        System.out.println("The contents of intTreeSet : ");
        System.out.println(intTreeSet);

    }

}
The contents of intTreeSet :
[13, 18, 29, 56, 73]

Element 18 has been removed

No such element exists

The contents of intTreeSet :
[13, 29, 56, 73]
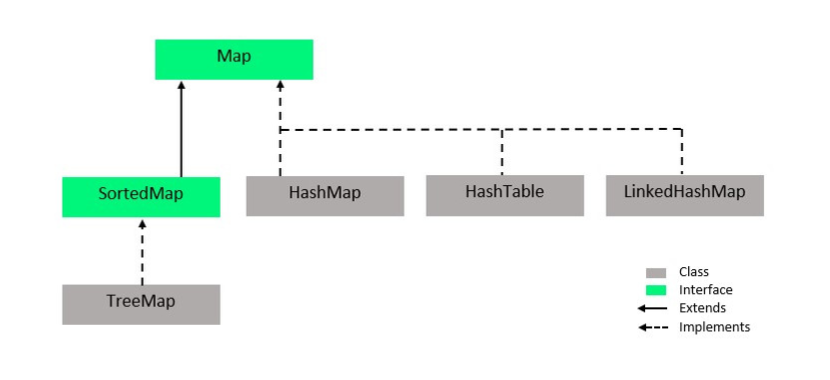
9. 地图
Map 接口是一种将键映射到每个值的结构。 Map 不允许重复元素,因为一个键不能有多个映射。 Map 具有三个不同的视图,键的 Set 视图、键值映射的 Set 视图和值的 Collection 视图。 Map接口的方法如下,每个实现Map的类都必须提供这些方法的定义。
9. a) HashMap
HashMap 类实现了 Map 接口。对于 HashMap 中的每个条目,都会计算一个 hashCode,并将该条目插入到存储桶中,并将 hashCode 值作为其索引。每个条目都是一个键值对。 HashMap 中的一个桶可能包含多个条目。一个好的 HashMap 算法会尝试均匀分布 HashMap 中的元素。 HashMap 对于基本的检索、插入、删除和操作操作具有恒定的时间性能。影响 HashMap 性能的两个最重要的因素是初始容量和负载因子。桶的数量是容量,何时增加容量的度量是负载因子。与 HashTable 相比,HashMap 更快。
句法:
HashMap hashMapName = new HashMap();
9. b) 哈希表
Hashtable 类实现了 Map 接口。 Hashtable 具有键值对作为其元素。为了有效实现哈希表,键必须是唯一的。 Hashtable 与 Hashtable 非常相似,但 Hashtable 是同步的。一个好的 Hashtable 算法会尝试均匀分布 Hashtable 中的元素。 Hashtable 对于基本的检索、插入、删除和操作操作具有恒定的时间性能。影响 Hashtable 性能的两个最重要的因素是初始容量和负载因子。桶的数量是容量,何时增加容量的度量是负载因子。
句法:
HashTable hashTableName = new HashTable();
9. c) LinkedHashMap
LinkedHashMap 类实现了 Map 接口。 LinkedHashMap 是映射的哈希映射链表实现。 LinkedHashMap 中的每个条目都有一个双向链表贯穿其中。这个链表定义了迭代顺序,即插入到 LinkedHashMap 中的键的顺序。与 Map 的所有实现一样,LinkedHashMap 的元素是键值对。
句法:
LinkedHashMap linkedHashMapName = new LinkedHashMap();
让我们举一个例子来理解所有的 Map 实现。在下面给出的代码中,我们使用 put() 方法向所有 HashMap、Hashtable 和 LinkedHashMap 添加元素。由于 put() 是 Map 接口的一个方法,因此由所有这三个类实现。正如您可以观察到的 Hashtable 的插入顺序与内部顺序不同,因此它是不确定的。当我们尝试插入重复键时,旧值在所有三个中都被替换。当我们尝试使用不同的键插入重复值时,它会被添加为新条目。基本上这是为了描述我们可以有重复的值但不能有重复的键。
Java
// An example for HashMap,
// Hashtable and LinkedHashMap
import java.util.*;

public class MapImplementaionExample {

    public static void main(String[] args) {

        /*--------------HashMap---------------*/

        // Instantiate an object of HashMap named hashMap
        HashMap hashMap = new HashMap();

        // Add elements using put()
        hashMap.put(1, "This");
        hashMap.put(2, "is");
        hashMap.put(3, "HashMap");

        // Print the HashMap contents on the console
        System.out.println("Contents of hashMap : ");
        System.out.print(hashMap.entrySet());

        // Add a duplicate key
        hashMap.put(3, "Duplicate");

        // Add a duplicate value
        hashMap.put(4, "This");

        // Print the HashMap contents on the console
        System.out.println("\nContents of hashMap after adding duplicate : ");
        System.out.print(hashMap.entrySet());

        /*--------------Hashtable----------------*/

        // Instantiate an object of Hashtable named hashTable
        Hashtable hashTable = new Hashtable();

        // Add elements using put()
        hashTable.put(11, "This");
        hashTable.put(12, "is");
        hashTable.put(13, "Hashtable");

        // Print the Hashtable contents on the console
        System.out.println("\n\nContents of hashTable : ");
        System.out.print(hashTable.entrySet());

        // Add a duplicate key
        hashTable.put(11, "Duplicate");

        // Add a duplicate value
        hashTable.put(14, "is");

        // Print the Hashtable contents on the console
        System.out.println("\nContents of hashTable after adding duplicate : ");
        System.out.print(hashTable.entrySet());

        /*---------------LinkedHashMap---------------*/

        // Instantiate an object of LinkedHashMap named linkedHashMape
        LinkedHashMap linkedHashMap = new LinkedHashMap();

        // Add elements using put()
        linkedHashMap.put(21, "This");
        linkedHashMap.put(22, "is");
        linkedHashMap.put(23, "LinkedHashMap");

        // Print the LinkedHashMap contents on the console
        System.out.println("\n\nContents of linkedHashMap : ");
        System.out.print(linkedHashMap.entrySet());

        // Add a duplicate key
        linkedHashMap.put(22, "Duplicate");

        // Add a duplicate value
        linkedHashMap.put(24, "This");

        // Print the LinkedHashMap contents on the console
        System.out.println("\nContents of linkedHashMap after adding duplicate : ");
        System.out.print(linkedHashMap.entrySet());
    }

}
Contents of hashMap :
[1=This, 2=is, 3=HashMap]
Contents of hashMap after adding duplicate :
[1=This, 2=is, 3=Duplicate, 4=This]

Contents of hashTable :
[13=Hashtable, 12=is, 11=This]
Contents of hashTable after adding duplicate :
[14=is, 13=Hashtable, 12=is, 11=Duplicate]

Contents of linkedHashMap :
[21=This, 22=is, 23=LinkedHashMap]
Contents of linkedHashMap after adding duplicate :
[21=This, 22=Duplicate, 23=LinkedHashMap, 24=This]
10. SortedMap
SortedMap 接口扩展了 Map 接口,增加了对键的总顺序的规定。键要么按自然顺序排序,要么按构造时指定的 Comparator 排序,具体取决于使用的构造函数。所有的键都必须具有可比性。
10. a) 树状图
TreeMap 类实现了 SortedMap 接口。 TreeMap 类使用红黑树结构进行存储,使用映射对元素进行排序。每个元素都是一个键值对。此实现为基本操作提供了有保证的 log(n) 时间成本。
句法:
TreeMap treeMapName = new TreeMap();
让我们通过一个例子来了解 TreeMap 的基础知识。在下面给出的代码中,我们实例化了一个名为 treeMap 的 TreeMap 对象的对象。使用 put() 方法添加元素。当我们尝试添加具有不同值的重复键时,旧实例将替换为与该键关联的新值。但是当我们尝试使用新键添加重复值时,它被视为不同的条目。
Java
// An example of TreeMap
import java.util.*;

public class TreeMapExample {

    public static void main(String[] args) {

        // Instantiate an object of TreeMap named treeMap
        TreeMap treeMap = new TreeMap();

        // Add elements using put()
        treeMap.put(1, "This");
        treeMap.put(2, "is");
        treeMap.put(3, "TreeMap");

        // Print the contents of treeMap on the console
        System.out.println("The contents of treeMap : ");
        System.out.println(treeMap);

        // Add a duplicate key
        treeMap.put(1, "Duplicate");

        // Add a duplicate value
        treeMap.put(4, "is");

        // Print the contents of treeMap on the console
        System.out.println("\nThe contents of treeMap after adding duplicates : ");
        System.out.println(treeMap);

    }

}
The contents of treeMap :
{1=This, 2=is, 3=TreeMap}

The contents of treeMap after adding duplicates :
{1=Duplicate, 2=is, 3=TreeMap, 4=is}
GeeksforGeeks 还准备了Java基础和Java集合课程,以深入教授Java概念。本课程将帮助您使用 Collections Framework 的内置类和函数,以便轻松高效地实现一些复杂的数据结构并对其执行操作。看看这个课程:
