使用 React.js 和 Node.js 构建在线代码编译器
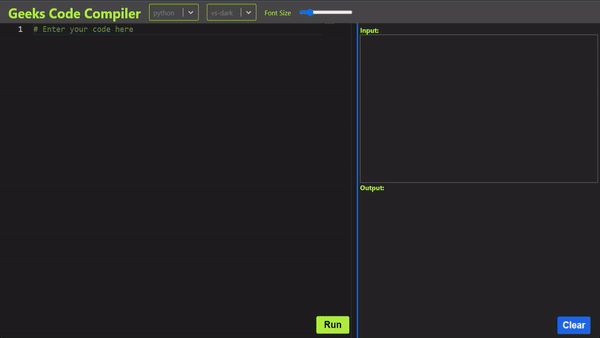
在本文中,我们将学习如何使用 React.js 作为前端和 Express.js 作为后端来构建在线代码编译器。用户将能够编写具有适当语法高亮显示的 C、C++、 Python和Java代码,以及在线编译和执行。构建在线编译器的主要目的是方便任何用户,使任何语言的程序都可以在不下载任何 IDE(集成开发环境)或编译器的情况下编译和运行。
先决条件:该项目的先决条件是:
- HTML、CSS 和 JavaScript 的基本知识
- React.js 基础知识
- API、Express.js、Node.js的基础知识
方法:在构建整个应用程序之前,让我们将应用程序分成两部分。第一部分是关于使用 React.js 构建前端,第二部分是使用 Express.js 构建后端。在前端,我们有三个部分,一个文本编辑器、一个输入框和一个输出框。在后端,我们创建一个 API 并实现逻辑来编译前端提供的源代码。
让我们先开始构建前端。
创建一个 React 应用程序:
第 1 步:通过在终端中键入以下命令来创建一个 React 应用程序:
npx create-react-app code-compiler第2步:现在,通过运行以下命令进入项目文件夹,即代码编译器:
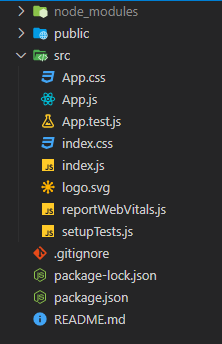
cd code-compiler项目结构:它看起来像这样:
第 3 步:让我们构建文本编辑器,用户将在其中编写代码。为此,我们将使用 Monaco Editor,它正是 Microsoft VS Code IDE 使用的代码编辑器。因此,我们将为此目的使用一个名为“@monaco-editor/react”的 npm 包。安装一些 npm 包:
npm install @monaco-editor/reactnpm install axiosnpm install react-select第 4 步:在 App.js 文件中,我们将导入文本编辑器并创建输入部分和输出部分。此外,我们将实现两个按钮,一个名为“运行”,另一个名为“清除”。每当用户单击“运行”按钮时,它将调用一个 API,该 API 将编译我们的源代码并在输出屏幕上显示结果。单击清除按钮将用于清除输出屏幕。
文件名:App.js
Javascript
import { useState } from 'react';
import './App.css';
import Editor from "@monaco-editor/react";
import Navbar from './Components/Navbar';
import Axios from 'axios';
import spinner from './spinner.svg';
function App() {
// State variable to set users source code
const [userCode, setUserCode] = useState(``);
// State variable to set editors default language
const [userLang, setUserLang] = useState("python");
// State variable to set editors default theme
const [userTheme, setUserTheme] = useState("vs-dark");
// State variable to set editors default font size
const [fontSize, setFontSize] = useState(20);
// State variable to set users input
const [userInput, setUserInput] = useState("");
// State variable to set users output
const [userOutput, setUserOutput] = useState("");
// Loading state variable to show spinner
// while fetching data
const [loading, setLoading] = useState(false);
const options = {
fontSize: fontSize
}
// Function to call the compile endpoint
function compile() {
setLoading(true);
if (userCode === ``) {
return
}
// Post request to compile endpoint
Axios.post(`http://localhost:8000/compile`, {
code: userCode,
language: userLang,
input: userInput }).then((res) => {
setUserOutput(res.data.output);
}).then(() => {
setLoading(false);
})
}
// Function to clear the output screen
function clearOutput() {
setUserOutput("");
}
return (
{ setUserCode(value) }}
/>
Input:
Output:
{loading ? (
 ) : (
) : (
{userOutput}
)}
);
}
export default App;CSS
.App{
  max-height: 100vh;
  width: 100%;
  overflow-y: hidden;
  background-color: #474747;
}
.main{
  display: flex;
  height: calc(100vh - 50px);
}
.left-container{
  position: relative;
  flex: 60%;
  height: calc(100vh - 50px);
}
.right-container{
  flex: 40%;
  height: calc(100vh - 50px);
  display: flex;
  flex-direction: column;
  background-color: #242424;
  border-left: 3px solid #1f65e6;
  padding: 5px;
}
.input-box{
  flex: 50%;
}
.input-box textarea{
  font-size: 16px;
}
.spinner-box{
  flex: 50%;
  background-color: #242424;
  overflow-y: auto;
  display: flex;
  justify-content: center;
  align-items: center;
}
.spinner-box img{
  width: 200px;
}
.output-box{
  flex: 50%;
  background-color: #242424;
  overflow-y: auto;
  color: white;
  position: relative;
}
.clear-btn{
  position: absolute;
  bottom: 14px;
  right: 18px;
  width: 80px;
  height: 40px;
  font-size: 22px;
  font-weight: bold;
  color: white;
  background-color: #1f65e6;
  border: none;
  border-radius: 4px;
  transition: 0.3s;
  cursor: pointer;
}
.output-box pre{
  font-size: 15px;
  white-space: pre-wrap;
}
h4{
  color: #afec3f;
}
#code-inp{
  box-sizing: border-box;
  width: 100%;
  height: 100%;
  resize: none;
  background-color: #242424;
  color: whitesmoke;
  padding: 5px;
}
#code-inp:focus{
  outline: none;
}
.run-btn{
  position: absolute;
  bottom: 10px;
  right: 18px;
  width: 80px;
  height: 40px;
  font-size: 22px;
  font-weight: bold;
  background-color: #afec3f;
  border: none;
  border-radius: 4px;
  transition: 0.3s;
  cursor: pointer;
}
.run-btn:active{
  background-color: #6e9427;
}
Javascript
import React from 'react';
import Select from 'react-select';
import '../Styles/Navbar.css';
const Navbar = ({userLang, setUserLang, userTheme,
setUserTheme, fontSize, setFontSize}) => {
const languages = [
{ value: "c", label: "C" },
{ value: "cpp", label: "C++" },
{ value: "python", label: "Python" },
{ value: "java", label: "Java" },
];
const themes = [
{ value: "vs-dark", label: "Dark" },
{ value: "light", label: "Light" },
]
return (
Geeks Code Compiler
)
}
export default NavbarCSS
.navbar{
    display: flex;
    align-items: center;
    padding-left: 20px;
    height: 50px;
    text-align: center;
    color: #afec3f;
    background-color: #474747;
    gap: 20px;
}
#no{
    height: 36px;
    width: 80px;
    font-size: 16px;
    color: rgb(185, 185, 185);
    border: 1px solid #afec3f;
    border-radius: 4px;
    background-color: #474747;
}
#no:focus{
    outline: none;
}
.css-2b097c-container{
    width: 120px;
    color: black;
    background-color: #474747;
}
.css-yk16xz-control{
    background-color: #474747 !important;
    border-color: #afec3f !important;
}
Javascript
const express = require("express");
const cors = require("cors");
const Axios = require("axios");
const app = express();
const PORT = 8000;

app.use(cors());
app.use(express.json());

app.post("/compile", (req, res) => {
    //getting the required data from the request
    let code = req.body.code;
    let language = req.body.language;
    let input = req.body.input;

    if (language === "python") {
        language="py"
    }

    let data = ({
        "code": code,
        "language": language,
        "input": input
    });
    let config = {
        method: 'post',
        url: 'https://codexweb.netlify.app/.netlify/functions/enforceCode',
        headers: {
            'Content-Type': 'application/json'
        },
        data: data
    };
    //calling the code compilation API
    Axios(config)
        .then((response)=>{
            res.send(response.data)
            console.log(response.data)
        }).catch((error)=>{
            console.log(error);
        });
})

app.listen(process.env.PORT || PORT, () => {
    console.log(`Server listening on port ${PORT}`);
});
我们已经导入了一个微调器来指示用户点击“运行”按钮时的加载。从互联网上下载您选择的任何微调器并将其放在“ src ”文件夹中。
第 5 步:让我们为我们的应用程序添加一些样式。
文件名:App.css
CSS
.App{
  max-height: 100vh;
  width: 100%;
  overflow-y: hidden;
  background-color: #474747;
}
.main{
  display: flex;
  height: calc(100vh - 50px);
}
.left-container{
  position: relative;
  flex: 60%;
  height: calc(100vh - 50px);
}
.right-container{
  flex: 40%;
  height: calc(100vh - 50px);
  display: flex;
  flex-direction: column;
  background-color: #242424;
  border-left: 3px solid #1f65e6;
  padding: 5px;
}
.input-box{
  flex: 50%;
}
.input-box textarea{
  font-size: 16px;
}
.spinner-box{
  flex: 50%;
  background-color: #242424;
  overflow-y: auto;
  display: flex;
  justify-content: center;
  align-items: center;
}
.spinner-box img{
  width: 200px;
}
.output-box{
  flex: 50%;
  background-color: #242424;
  overflow-y: auto;
  color: white;
  position: relative;
}
.clear-btn{
  position: absolute;
  bottom: 14px;
  right: 18px;
  width: 80px;
  height: 40px;
  font-size: 22px;
  font-weight: bold;
  color: white;
  background-color: #1f65e6;
  border: none;
  border-radius: 4px;
  transition: 0.3s;
  cursor: pointer;
}
.output-box pre{
  font-size: 15px;
  white-space: pre-wrap;
}
h4{
  color: #afec3f;
}
#code-inp{
  box-sizing: border-box;
  width: 100%;
  height: 100%;
  resize: none;
  background-color: #242424;
  color: whitesmoke;
  padding: 5px;
}
#code-inp:focus{
  outline: none;
}
.run-btn{
  position: absolute;
  bottom: 10px;
  right: 18px;
  width: 80px;
  height: 40px;
  font-size: 22px;
  font-weight: bold;
  background-color: #afec3f;
  border: none;
  border-radius: 4px;
  transition: 0.3s;
  cursor: pointer;
}
.run-btn:active{
  background-color: #6e9427;
}
第 6 步:让我们构建已经导入App.js文件的导航栏。在这个导航栏中,我们可以选择语言类型,选择主题,还可以设置字体大小。因此,在src文件夹下创建一个名为“ Components ”的文件夹,并在其中创建一个名为“ Navbar.js ”的组件。
文件名:Navbar.js
Javascript
import React from 'react';
import Select from 'react-select';
import '../Styles/Navbar.css';
const Navbar = ({userLang, setUserLang, userTheme,
setUserTheme, fontSize, setFontSize}) => {
const languages = [
{ value: "c", label: "C" },
{ value: "cpp", label: "C++" },
{ value: "python", label: "Python" },
{ value: "java", label: "Java" },
];
const themes = [
{ value: "vs-dark", label: "Dark" },
{ value: "light", label: "Light" },
]
return (
Geeks Code Compiler
)
}
export default Navbar
第 7 步:让我们设计导航栏。
文件名:导航栏.css
CSS
.navbar{
    display: flex;
    align-items: center;
    padding-left: 20px;
    height: 50px;
    text-align: center;
    color: #afec3f;
    background-color: #474747;
    gap: 20px;
}
#no{
    height: 36px;
    width: 80px;
    font-size: 16px;
    color: rgb(185, 185, 185);
    border: 1px solid #afec3f;
    border-radius: 4px;
    background-color: #474747;
}
#no:focus{
    outline: none;
}
.css-2b097c-container{
    width: 120px;
    color: black;
    background-color: #474747;
}
.css-yk16xz-control{
    background-color: #474747 !important;
    border-color: #afec3f !important;
}
现在让我们开始构建后端
对于后端,我们将使用 Express.js。在这里,我们将创建一个 API 端点来编译我们的代码。因此,让我们创建一个名为“服务器”的文件夹,该文件夹将包含所有后端逻辑。
第 1 步:在终端中键入以下命令:
mkdir servercd server第 2 步:让我们初始化一个 node.js 项目:
npm init第 3 步:让我们安装一些依赖项:
npm install expressnpm install corsnpm install axios第 4 步:创建一个名为“ index.js ”的文件。这是唯一包含所有后端逻辑的文件。在这个文件中,我们将创建一个 POST 路由,它将从前端获取源代码、语言和输入(如果有)。得到这些后,它将调用代码编译 API(开源),其响应将被发送回前端,结果将显示在输出屏幕上。
文件名:index.js
Javascript
const express = require("express");
const cors = require("cors");
const Axios = require("axios");
const app = express();
const PORT = 8000;

app.use(cors());
app.use(express.json());

app.post("/compile", (req, res) => {
    //getting the required data from the request
    let code = req.body.code;
    let language = req.body.language;
    let input = req.body.input;

    if (language === "python") {
        language="py"
    }

    let data = ({
        "code": code,
        "language": language,
        "input": input
    });
    let config = {
        method: 'post',
        url: 'https://codexweb.netlify.app/.netlify/functions/enforceCode',
        headers: {
            'Content-Type': 'application/json'
        },
        data: data
    };
    //calling the code compilation API
    Axios(config)
        .then((response)=>{
            res.send(response.data)
            console.log(response.data)
        }).catch((error)=>{
            console.log(error);
        });
})

app.listen(process.env.PORT || PORT, () => {
    console.log(`Server listening on port ${PORT}`);
});
现在,我们已经成功创建了我们将从前端调用的 POST 请求路由。
启动后端服务器:
node index.js服务器将监听 localhost 端口 8000
启动前端应用程序:
npm start输出:现在打开浏览器并转到http://localhost:3000/ ,您将看到以下输出: