- Apache CXF教程
- Apache CXF-简介
- Apache CXF-简介(1)
- 讨论Apache CXF
- wsdl (1)
- Apache CXF-有用的资源
- Apache CXF-有用的资源(1)
- WSDL-示例(1)
- WSDL-示例
- Apache CXF-结论
- Apache CXF-结论(1)
- 首先 (1)
- WSDL-元素(1)
- WSDL-元素
- WSDL-元素(1)
- WSDL-元素
- WSDL-元素
- WSDL-元素
- WSDL-元素(1)
- WSDL-元素
- WSDL-元素
- WSDL-元素
- WSDL-元素
- WSDL-元素(1)
- wsdl - 任何代码示例
- 带有POJO的Apache CXF(1)
- 带有POJO的Apache CXF
- 带有JMS的Apache CXF(1)
- 带有JMS的Apache CXF
📅 最后修改于: 2020-10-28 05:34:33 🧑 作者: Mango
您开发的CXF-POJO应用程序导致客户端和服务器之间的紧密耦合。直接访问服务接口也会造成严重的安全威胁。因此,通常需要在客户端和服务器之间实现解耦,这是通过使用WSDL(Web服务描述语言)实现的。
我们在基于XML的WSDL文档中编写Web服务接口。我们将使用一个工具将此WSDL映射到Apache CXF接口,然后由我们的客户端和服务器应用程序实现和使用。为了提供去耦,从WSDL开始是首选方法。为此,您需要首先学习一种新的语言-WSDL。编写WSDL需要谨慎的方法,如果您在开始工作之前对此有所了解,那会更好。
在本课程中,我们将从在WSDL文档中定义Web服务接口开始。我们将学习如何使用CXF从WSDL开始创建服务器和客户端应用程序。我们将使应用程序简单易行,以保持对CXF使用的关注。创建服务器应用程序后,我们将使用内置的CXF类将其发布到所需的URL。
首先,让我们描述我们将要使用的WSDL。
WSDL for HelloWorld
我们将要实现的Web服务将有一个称为“问候语”的单一Web方法,该方法接受一个包含用户名的字符串参数,并在向用户名附加问候语之后向调用者返回一个字符串信息。完整的wsdl如下所示-
//Hello.wsdl
请注意,编写语法正确的wsdl一直是开发人员的挑战。有很多工具,在线编辑器可用于创建wsdl。这些编辑器询问您要实现的消息的名称,以及希望传递给消息的参数以及希望客户端应用程序接收的返回消息的类型。如果您知道wsdl语法,则可以手工编写整个文档的代码或使用其中一个编辑器创建自己的代码。
在上面的wsdl中,我们定义了一条称为greetings的消息。消息传递到运行在http:// localhost:9090 / HelloServerPort的服务HelloWorldService 。
这样,我们现在将继续进行服务器开发。在开发服务器之前,我们需要为我们的Web服务生成Apache CXF接口。这将从给定的wsdl中完成。为此,请使用名为wsdl2java的工具。
wsdl2java插件
由于我们将使用maven构建项目,因此您需要将以下插件添加到pom.xml文件中。
      org.apache.cxf
      cxf-codegen-plugin
      3.3.0


            generate-sources
            generate-sources


                     src/main/resources/hello.wsdl
                      1


               wsdl2java
请注意,我们将wsdl文件的位置指定为src / main / resources / Hello.wsdl 。您将必须确保为项目创建适当的目录结构,并将之前显示的hello.wsdl文件添加到指定的文件夹。
wsdl2java插件将编译该wsdl并在预定义的文件夹中创建Apache CXF类。此处显示了完整的项目结构,以供您随时参考。
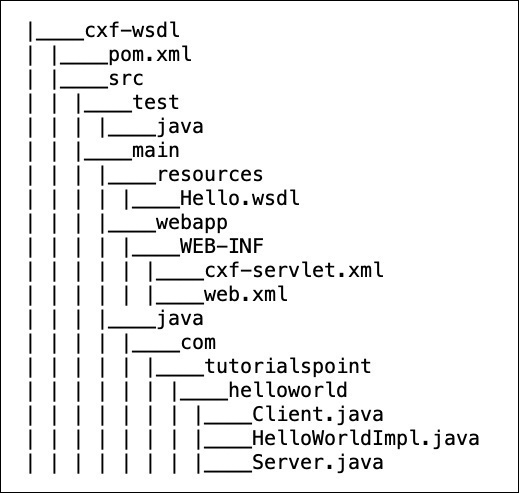
现在,您准备使用wsdl2java生成的类创建服务器。 wsdl2java创建的类如下图所示:
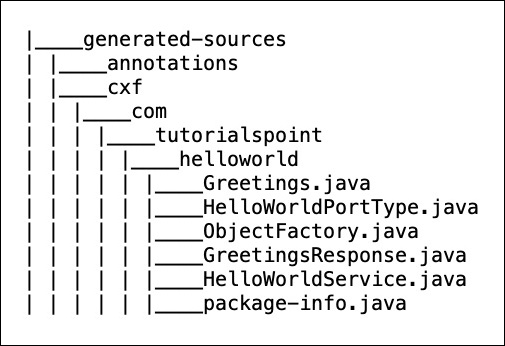
生成的服务接口
在生成的类列表中,您必须已经注意到其中一个是Apache CXF接口-这是HelloWorldPortType.java 。在代码编辑器中检查此文件。文件内容显示在这里,以供您参考-
//HelloWorldPortType.java
package com.tutorialspoint.helloworld;
import javax.jws.WebMethod;
import javax.jws.WebParam;
import javax.jws.WebResult;
import javax.jws.WebService;
import javax.xml.bind.annotation.XmlSeeAlso;
import javax.xml.ws.RequestWrapper;
import javax.xml.ws.ResponseWrapper;
/**
* This class was generated by Apache CXF 3.3.0
* 2019-02-11T12:05:55.220+05:30
* Generated source version: 3.3.0
*
*/

@WebService(targetNamespace = "http://helloworld.tutorialspoint.com/",
   name = "HelloWorldPortType")
@XmlSeeAlso({ObjectFactory.class})
public interface HelloWorldPortType {
   @WebMethod
   @RequestWrapper(localName = "greetings", targetNamespace =
      "http://helloworld.tutorialspoint.com/", className =
      "com.tutorialspoint.helloworld.Greetings")
      @ResponseWrapper(localName = "greetingsResponse", targetNamespace =
         "http://helloworld.tutorialspoint.com/", className =
         "com.tutorialspoint.helloworld.GreetingsResponse")
   @WebResult(name = "return", targetNamespace =
      "http://helloworld.tutorialspoint.com/")
   public java.lang.String greetings(
      @WebParam(name = "arg0", targetNamespace =
      "http://helloworld.tutorialspoint.com/")
      java.lang.String arg0
   );
}
请注意,该接口包含一个称为Greetings的方法。这是我们的wsdl中的消息类型。 wsdl2java工具已将此方法添加到生成的接口。现在,您可以了解,无论您在wsdl中编写什么消息,都会在接口中生成相应的方法。
现在,您的任务是实现与在wsdl中定义的各种消息相对应的所有这些方法。请注意,在前面的Apache CXF-First示例中,我们从Web服务的Apache CXF接口开始。在这种情况下,Apache CXF接口是从wsdl创建的。
实施服务接口
服务接口的实现很简单。完整的实现在下面的列表中显示-
//HelloWorldImpl.java
package com.tutorialspoint.helloworld;
public class HelloWorldImpl implements HelloWorldPortType {
   @Override
   public String greetings(String name) {
      return ("hi " + name);
   }
}
该代码实现了唯一的接口方法,称为greetings 。该方法采用字符串类型的一个参数,在其前面加上“ hi”消息,然后将结果字符串返回给调用方。
接下来,我们将编写服务器应用程序。
开发服务器
开发服务器应用程序再一次变得微不足道。在这里,我们将使用CXF提供的Endpoint类来发布我们的服务。这在以下两行代码中完成-
HelloWorldPortType implementor = new HelloWorldImpl();
   Endpoint.publish("http://localhost:9090/HelloServerPort",
      implementor,
      new LoggingFeature());
首先,我们创建服务实现程序类HelloWorldImpl的对象。然后,我们将此引用作为第二个参数传递给publish方法。第一个参数是服务发布到的地址-客户端将使用此URL访问服务。服务器应用程序的整个源在这里给出-
//Server.java
package com.tutorialspoint.helloworld;
import javax.xml.ws.Endpoint;
import org.apache.cxf.ext.logging.LoggingFeature;
public class Server {
   public static void main(String[] args) throws Exception {
      HelloWorldPortType implementor = new HelloWorldImpl();
      Endpoint.publish("http://localhost:9090/HelloServerPort",
         implementor,
         new LoggingFeature());
      System.out.println("Server ready...");
      Thread.sleep(5 * 60 * 1000);
      System.out.println("Server exiting");
      System.exit(0);
   }
}
要构建此服务器类,您将需要在pom.xml中添加一个构建配置文件。这如下所示-
   server

      test


            org.codehaus.mojo
            exec-maven-plugin
            1.6.0


                  test

                     java


                        com.tutorialspoint.helloworld.Server


         org.apache.cxf
         cxf-rt-transports-http-jetty
         3.3.0
请注意,在配置中指定了Server类的标准名称。同样,依赖标签指定我们将使用嵌入式码头网络服务器来部署我们的服务器应用程序。
部署服务器
最后,要部署服务器应用程序,您将需要在pom.xml中进行另一处修改,以将您的应用程序设置为Web应用程序。您需要在pom.xml中添加的代码如下:
install


         maven-war-plugin
         3.2.2

            src/main/webapp/WEB-INF/web.xml


                  src/main/resources
                  WEB-INF

                     *.wsdl
在部署应用程序之前,您需要再向项目中添加两个文件。这些显示在下面的屏幕截图中-
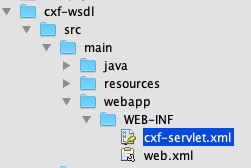
这些文件是CXF标准文件,它们定义CXFServlet的映射。这里显示了web.xml文件中的代码,供您快速参考-
//cxf-servlet.xml

   cxf

      Apache CXF Endpoint
      cxf
      cxf

         org.apache.cxf.transport.servlet.CXFServlet

      1


      cxf
      /services/*


      60
在cxf-servlet.xml中,声明服务端点的属性。这显示在下面的代码片段中-
在这里,我们定义了服务端点的ID,可以使用该服务的地址,服务名称和端点名称。现在,您了解了CXF Servlet如何路由和处理服务。
最终的pom.xml
pom.xml包含更多的依赖项。除了描述所有依赖关系之外,我们还包括以下pom.xml的最终版本:
   4.0.0
   com.tutorialspoint
   cxf-wsdl
   1.0
   jar

      UTF-8
      1.8
      1.8


      install


               maven-war-plugin
               3.2.2

                  src/main/webapp/WEB-INF/web.xml


                        src/main/resources
                        WEB-INF

                           *.wsdl


            org.apache.cxf
            cxf-codegen-plugin
            3.3.0


                  generate-sources
                  generate-sources


                           src/main/resources/Hello.wsdl
                           1


                     wsdl2java


         server

            test


                  org.codehaus.mojo
                  exec-maven-plugin
                  1.6.0


                        test

                           java


                              com.tutorialspoint.helloworld.Server


               org.apache.cxf
               cxf-rt-transports-http-jetty
               3.3.0


         client

            test


                  org.codehaus.mojo
                  exec-maven-plugin


                        test

                           java


                              com.tutorialspoint.helloworld.Client


         org.apache.cxf
         cxf-rt-frontend-jaxws
         3.3.0


         org.apache.cxf
         cxf-rt-transports-http
         3.3.0


         org.apache.cxf
         cxf-rt-management
         3.3.0


         org.apache.cxf
         cxf-rt-features-metrics
         3.3.0


         org.apache.cxf.xjc-utils
         cxf-xjc-runtime
         3.3.0


         org.apache.cxf
         cxf-rt-features-logging
         3.3.0


         org.codehaus.mojo
         exec-maven-plugin
         1.6.0


         org.slf4j
         slf4j-api
         1.8.0-beta2


         org.apache.cxf
         cxf-rt-transports-http-jetty
         3.3.0
请注意,它还包括一个用于构建客户端的配置文件,我们将在后面的部分中很快学习。
运行HelloWorld服务
现在,您可以运行网络应用了。在命令窗口中,使用以下命令运行构建脚本。
mvn clean install
这将从您的wsdl中生成适当的Apache CXF类,编译您的Apache CXF类,将服务器部署在嵌入式码头服务器上并运行您的应用程序。
您将在控制台上看到以下消息-
INFO: Setting the server's publish address to be
http://localhost:9090/HelloServerPort
Server ready...
和以前一样,您可以通过在浏览器中打开服务器URL来测试服务器。
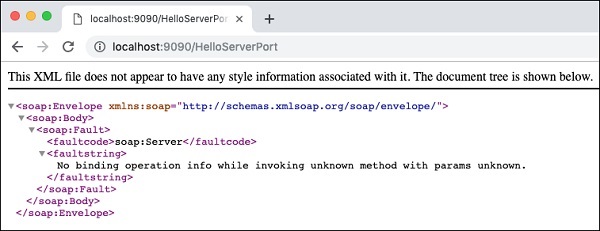
由于我们未指定任何操作,因此我们的应用程序仅将错误消息返回到浏览器。现在,尝试将?wsdl添加到您的URL中,您将看到以下输出-
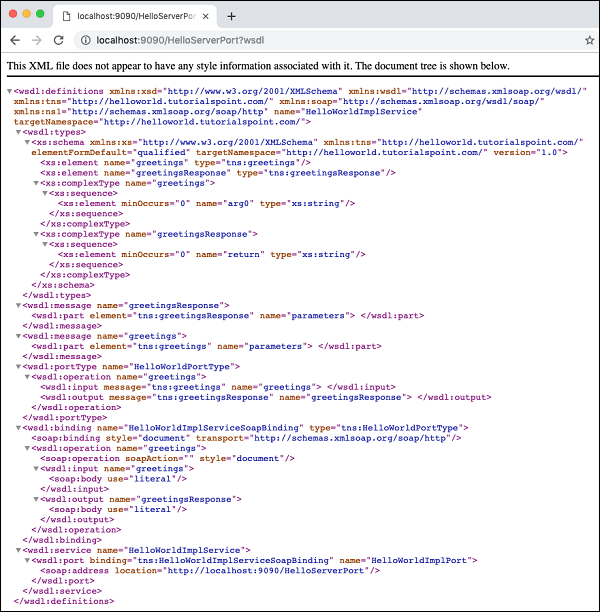
因此,我们的服务器应用程序正在按预期运行。您可以使用SOAP Client(如先前所述的Postman)进一步测试您的服务。
本教程的下一部分是编写使用我们服务的客户端。
发展中的客户
在CXF应用程序中编写客户端与编写服务器一样重要。这是客户端的完整代码,基本上仅由三行组成,其余几行仅将服务信息打印给用户。
//Client.java
package com.tutorialspoint.helloworld;
public class Client {
   public static void main(String[] args) throws Exception {
      //Create the service client with its default wsdlurl
      HelloWorldService helloServiceService = new HelloWorldService();
      System.out.println("service: " +
         helloServiceService.getServiceName());
      System.out.println("wsdl location: " +
         helloServiceService.getWSDLDocumentLocation());
      HelloWorldPortType helloService =
         helloServiceService.getHelloWorldPort();
      System.out.println(helloService.greetings
      (System.getProperty("user.name")));
   }
}
在这里,我们仅创建服务HelloWorldService的实例,通过调用getHelloWorldPort方法获取其端口,然后将问候消息传递给它。运行客户端,您将看到以下输出-
service: {http://helloworld.tutorialspoint.com/}HelloWorldService
wsdl location: file:/Users/drsarang/Desktop/tutorialpoint/cxf-
wsdl/src/main/resources/Hello.wsdl
hi drsarang
到目前为止,您已经了解了如何在Apache CXF-First和WSDL-First体系结构中使用CXF。在Apache CXF-First方法中,将POJO与CXF库中的ServerFactoryBean类一起使用来创建服务器。要创建客户端,请使用CXF库中的ClientProxyFactoryBean类。在WSDL-First方法中,使用Endpoint类在所需的URL和指定的实现者处发布服务。现在,您可以扩展这些技术以集成不同的协议和传输。