Spring MVC 文件上传
Spring MVC 架构使用“FrontController”设计模式,这是任何 MVC 设计实现的基础。 DispatcherServlet 是此设计的核心,其中 HTTP 请求被委托给控制器,视图被解析为底层视图技术,此外还提供对上传文件的支持。与任何常规 servlet 一样,DispatcherServlet 可以与自定义处理程序映射一起配置。
Note: Spring MVC acts as a pre-requisite
Spring MVC 框架支持CommonsMultipartResolver为基于 Web 的应用程序上传任何类型的文件。在这里,我们将创建一个 Spring MVC Web 应用程序并配置MultipartResolver以上传文件(图像)并在 Web 上显示它们。
执行:
Tip: We have used Eclipse ide for this project.
创建 Spring MVC 文件上传项目的步骤
第 1 步:我们需要创建一个 maven webapp 项目。现在,单击创建 Maven 项目并将 maven webapp 原型添加为基础包。输入项目的组 ID 和工件 ID,然后单击完成。
项目结构如下所示:
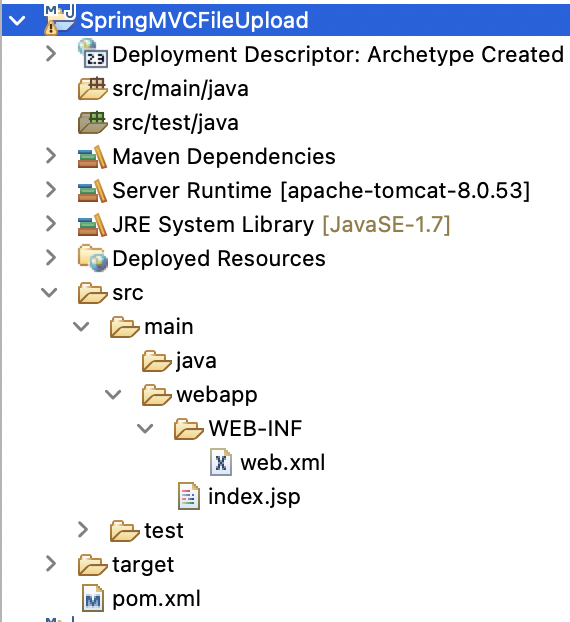
第 2 步:让我们首先在创建 maven 项目后创建的 pom.xml 中添加一些依赖项。 pom.xml 定义了 maven 必须为您获取和管理的所有依赖项。 commons-fileupload和commons-io是 MultipartResolver 的重要依赖项。根据此添加所有依赖项:
依赖文件:pom.xml
XML
  4.0.0

  com.gfg
  SpringMVCFileUpload
  0.0.1-SNAPSHOT
  war

  SpringMVCFileUpload Maven Webapp

  http://www.example.com


    UTF-8
    1.7
    1.7


      junit
      junit
      4.11
      test


    org.springframework
    spring-webmvc
    5.1.1.RELEASE


    org.apache.tomcat
    tomcat-jasper
    9.0.12


    javax.servlet
    servlet-api
    3.0-alpha-1


    javax.servlet
    jstl
    1.2


    commons-fileupload
    commons-fileupload
    1.4


    commons-io
    commons-io
    2.11.0


    SpringMVCFileUpload


          maven-clean-plugin
          3.1.0


          maven-resources-plugin
          3.0.2


          maven-compiler-plugin
          3.8.0


          maven-surefire-plugin
          2.22.1


          maven-war-plugin
          3.2.2


          maven-install-plugin
          2.5.2


          maven-deploy-plugin
          2.8.2
XML
    To do List


        login.do


        gfg

            org.springframework.web.servlet.DispatcherServlet


            contextConfigLocation
            /WEB-INF/gfg-servlet.xml

        1


        gfg
        /
XML
            /WEB-INF/views/


            .jsp
Java
// Java Program to Illustrate UploadFileController Class

package com.gfg.controller;

// Importing required classes
import java.io.File;
import java.io.FileOutputStream;
import javax.servlet.http.HttpSession;
import org.springframework.stereotype.Controller;
import org.springframework.ui.Model;
import org.springframework.web.bind.annotation.GetMapping;
import org.springframework.web.bind.annotation.RequestMapping;
import org.springframework.web.bind.annotation.RequestMethod;
import org.springframework.web.bind.annotation.RequestParam;
import org.springframework.web.multipart.commons.CommonsMultipartFile;

// Annotation
@Controller
// Class
public class UploadFileController {

    @GetMapping("/upload") public String upload()
    {
        return "fileform";
    }

    @RequestMapping(value = "/uploadfile",
                    method = RequestMethod.POST)
    public String
    fileUpload(@RequestParam("thisfile")
               CommonsMultipartFile file, HttpSession s,
               Model mod)
    {

        // Getting bytes of file and
        // storing it in a byte array
        byte[] data = file.getBytes();

        String filePath
            = s.getServletContext().getRealPath("/")
              + "WEB-INF" + File.separator + "resources"
              + File.separator + "image" + File.separator
              + file.getOriginalFilename();

        // Try block to check for exceptions
        try {

            // Creating an object of FileOutputStream class
            FileOutputStream fileout
                = new FileOutputStream(filePath);
            fileout.write(data);

            // Closing connections of file
            // using close() method
            fileout.close();
            mod.addAttribute("imgName",
                             file.getOriginalFilename());
        }

        // Catch block to handle the exceptions
        catch (Exception e) {

            // Displaying the exception/s along with
            // line number using printStackTrace() method
            e.printStackTrace();
        }

        return "showupload";
    }
}
HTML
File uploader
Upload File
HTML
<%@ page language="java" contentType="text/html; charset=UTF-8"
    pageEncoding="UTF-8"%>
<%@ taglib prefix="c" url="http://java.sun.com/jsp/jstl/core" %>


Insert title here


    File Uploaded

    "/>
"/>
第 3 步: WEB-INF文件夹中的web.xml文件定义了与不同 URL 和 servlet 的映射,以处理对这些 URL 的请求。在这个配置文件中,我们使用了应用程序启动的监听器,配置了 servlet,并添加了一个 servlet-mapping 来映射 URL。
配置文件:web.xml
XML
    To do List


        login.do


        gfg

            org.springframework.web.servlet.DispatcherServlet


            contextConfigLocation
            /WEB-INF/gfg-servlet.xml

        1


        gfg
        /
文件:gfg-servlet.xml
这是位于“ /src/main/webapp/WEB-INF/gfg.servlet.xml ”中的 gfg-servlet.xml 文件。此文件处理 Web 应用程序的所有 HTTP 请求。注解驱动启用 spring @Controller函数,资源映射有助于处理所有资源的 HTTP 请求。 bean 配置有助于识别和扫描位于 views 文件夹中的 jsp。组件扫描根据提到的注释定位和分配 bean。还添加了资源映射,将所有资源映射到查看一个页面。
第 4 步: id 为multipartResolver的 bean 将有助于实例化CommonsMultipartResolver 。
XML
            /WEB-INF/views/


            .jsp
第 7 步: com.gfg.controller中的UploadFileController类具有用于映射两个请求的方法。 upload 方法是一个 get 映射和简单的重定向到fileform.jsp视图页面。 fileUpload方法发送一个Post请求并重定向 showupload 页面。这个类有三个参数CommonsMultipartFile获取上传的文件。使用FileOutputStream将文件转换为字节数组并保存到文件中,模型参数用于将文件名作为属性添加到 showupload.jsp 文件中。
例子
Java
// Java Program to Illustrate UploadFileController Class

package com.gfg.controller;

// Importing required classes
import java.io.File;
import java.io.FileOutputStream;
import javax.servlet.http.HttpSession;
import org.springframework.stereotype.Controller;
import org.springframework.ui.Model;
import org.springframework.web.bind.annotation.GetMapping;
import org.springframework.web.bind.annotation.RequestMapping;
import org.springframework.web.bind.annotation.RequestMethod;
import org.springframework.web.bind.annotation.RequestParam;
import org.springframework.web.multipart.commons.CommonsMultipartFile;

// Annotation
@Controller
// Class
public class UploadFileController {

    @GetMapping("/upload") public String upload()
    {
        return "fileform";
    }

    @RequestMapping(value = "/uploadfile",
                    method = RequestMethod.POST)
    public String
    fileUpload(@RequestParam("thisfile")
               CommonsMultipartFile file, HttpSession s,
               Model mod)
    {

        // Getting bytes of file and
        // storing it in a byte array
        byte[] data = file.getBytes();

        String filePath
            = s.getServletContext().getRealPath("/")
              + "WEB-INF" + File.separator + "resources"
              + File.separator + "image" + File.separator
              + file.getOriginalFilename();

        // Try block to check for exceptions
        try {

            // Creating an object of FileOutputStream class
            FileOutputStream fileout
                = new FileOutputStream(filePath);
            fileout.write(data);

            // Closing connections of file
            // using close() method
            fileout.close();
            mod.addAttribute("imgName",
                             file.getOriginalFilename());
        }

        // Catch block to handle the exceptions
        catch (Exception e) {

            // Displaying the exception/s along with
            // line number using printStackTrace() method
            e.printStackTrace();
        }

        return "showupload";
    }
}
步骤 8: views文件夹中的fileform.jsp定义了 enctype 为multipart/form-data 的上传表单。我们已经使用引导程序来正确设置页面样式。
例子
HTML
File uploader
Upload File
The showupload.jsp page displays the uploaded image using jsp to map the image url.
HTML
<%@ page language="java" contentType="text/html; charset=UTF-8"
    pageEncoding="UTF-8"%>
<%@ taglib prefix="c" url="http://java.sun.com/jsp/jstl/core" %>


Insert title here


    File Uploaded

    "/>
"/>
After adding all the classes and configuration file, the project structure should look something like this:
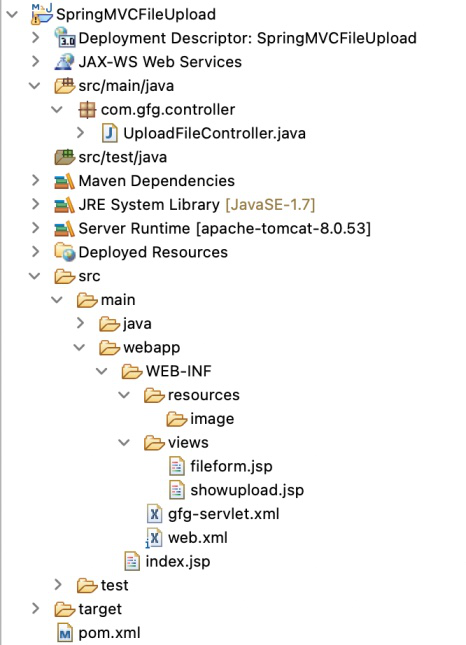
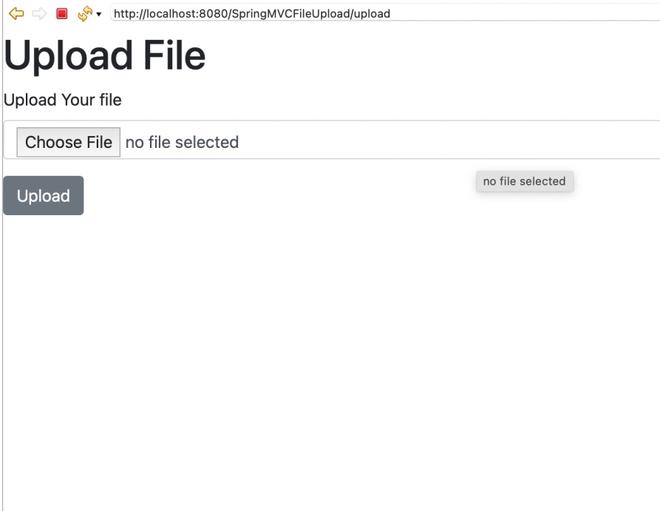
第 9 步:现在是时候运行您的项目了,启动Tomcat 服务器并运行您的应用程序,现在在任何浏览器中输入“http://localhost:8080/SpringMVCFileUpload/upload” 。
输出:
Upload the image and click on upload this will redirect you to the showupload page and you will see your uploaded image.
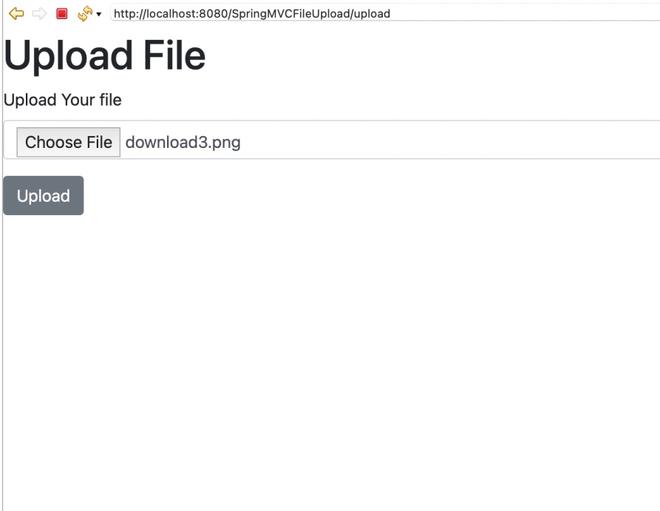
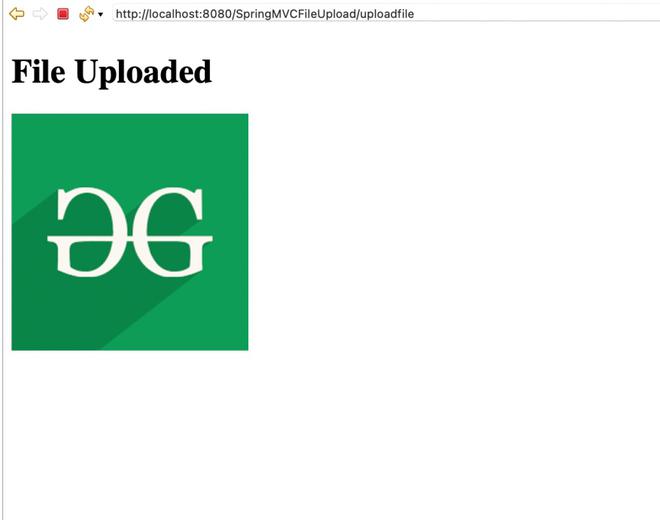
因此,我们创建了一个带有上传表单的 Spring MVC Web 应用程序,并将上传的图像显示在 Web 上。