使用 Node.js Bootstrap 和 MongoDB 构建一个简单的初学者应用程序
Node.js 是著名的开源环境之一,它允许您在浏览器之外运行 javascript 脚本。 MERN 和 MEAN 堆栈是两种最流行的组合,可帮助您创建出色的应用程序。在本文中,我们将使用 Node、Bootstrap 和 MongoDB 创建一个对初学者友好的简单联系表单应用程序。在开始项目之前,我们必须确保 Node.js 和 MongoDB 已安装在您的系统中。
项目结构:

第 1 步:创建一个项目文件夹并在 IDE 中打开该文件夹。
首先使用您提供的值创建一个package.json文件,在 IDE 的终端中使用npm init命令。
npm init您可以自定义在初始化过程中提出的问题和创建的字段或将其保留为默认值。完成此过程后,您将在项目文件夹中找到package.json文件。
第 2 步:接下来创建 项目文件夹中的index.js文件,这将是应用程序的入口点。
第 3 步:现在安装依赖项express 、 mongoose 、 和 nodemon 使用npm命令。
npm install express mongoose nodemon
安装 express、 mongoose和 nodemon
安装依赖项需要一些时间,完成后,将创建一个名为node_modules的文件夹并在 在依赖项下的package.json文件中,您将找到所有已安装依赖项的名称及其版本。
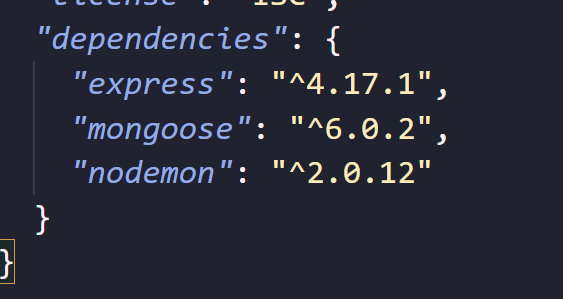
依赖项
第 4 步:接下来我们将打开 index.js文件并使用以下代码创建一个简单的快速应用程序。
Javascript
// Importing express module
var express = require("express");

// Importing mongoose module
var mongoose = require("mongoose");
const port = 80;
const app = express();

// Handling the get request
app.get("/", (req, res) => {
  res.send("Hello World");
});

// Starting the server on the 80 port
app.listen(port, () => {
  console.log(`The application started
  successfully on port ${port}`);
});
Javascript
var express = require("express");
var mongoose = require("mongoose");
const port = 80;
const app = express();

mongoose.connect("mongodb://localhost/projectDG", {
  useNewUrlParser: true,
  useUnifiedTopology: true,
});
var db = mongoose.connection;

app.use(express.json());

// For serving static HTML files
app.use(express.static("public"));
app.use(express.urlencoded({ extended: true }));

app.get("/", (req, res) => {
  res.set({
    "Allow-access-Allow-Origin": "*",
  });

  // res.send("Hello World");
  return res.redirect("index.html");
});

app.post("/formFillUp", (req, res) => {
  var name = req.body.name;
  var reason = req.body.reason;
  var email = req.body.email;
  var phone = req.body.phone;
  var city = req.body.city;
  var state = req.body.state;
  var addressline = req.body.addressline;

  var data = {
    name: name,
    reason: reason,
    email: email,
    phone: phone,
    city: city,
    state: state,
    addressline: addressline,
  };

  db.collection("users").insertOne(
  data, (err, collection) => {
    if (err) {
      throw err;
    }
    console.log("Data inserted successfully!");
  });

  return res.redirect("formSubmitted.html");
});

app.listen(port, () => {
  console.log(`The application started
  successfully on port ${port}`);
});
HTML
Contact Us
HTML
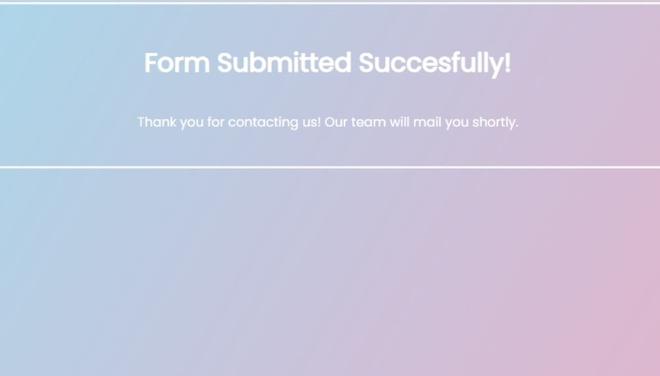
    Form Submitted Successfully


        Form Submitted Successfully!


            Thank you for contacting us! Our
            team will mail you shortly.
CSS
body {
  background-image: linear-gradient(120deg,
                 #9de7fa 0%, #f89fba 100%);
  color: white;
  font-family: "Poppins", sans-serif;
  min-height: 100vh;
}

.btn-primary {
  color: #fff;
  background-color: #f89fba;
  border-color: #f89fba;
}
.containerFormSubmittedMessage {
  display: flex;
  flex-direction: column;
  margin: auto;
  justify-content: center;
  align-items: center;
  height: 200px;
  border: 3px solid whitesmoke;
}此代码创建一个简单的快速应用程序,它启动一个服务器并在端口 80上侦听连接。该应用程序以“Hello World”响应对“/”的请求。
第 5 步:要运行代码,请转到终端并键入
nodemon index.js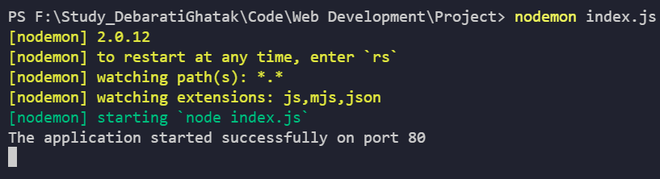
申请启动成功
第6步:然后打开浏览器, 使用 http://localhost,或简单地使用 localhost 从自身访问服务器。
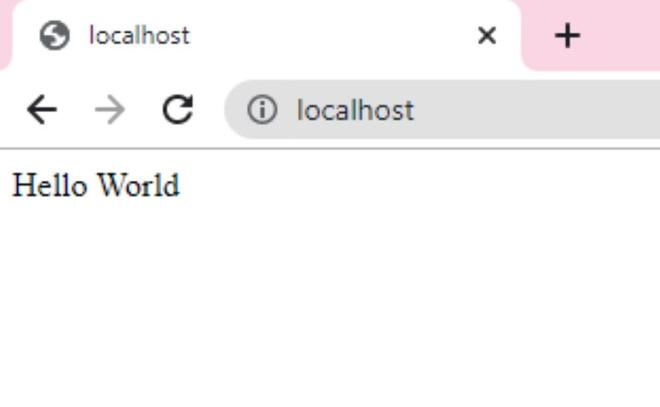
本地主机
页面显示“Hello World” ,这意味着我们的快速应用程序运行正常。
第 7 步:我们现在需要添加 2 行代码,因为我们需要express.json()和express.urlencoded()来处理 POST 和 PUT 请求。 Express为我们提供了中间件来处理请求正文中传入的数据对象。在 POST 和 PUT 请求中,我们都向服务器发送数据对象,并要求服务器接受或存储该数据对象,该数据对象包含在该请求的 req.body 中。
app.use(express.json());
app.use(express.urlencoded({ extended: true }));
第 8 步:在项目文件夹中创建一个名为public的文件夹。我们将在项目的公共目录中创建所有静态 HTML 文件。
// For serving static html files
app.use(express.static('public'));
第 9 步:现在我们将使用以下代码连接到mongoose数据库。该项目的数据库名称为projectDG
mongoose.connect("mongodb://localhost/projectDG", {
  useNewUrlParser: true,
  useUnifiedTopology: true,
});
var db = mongoose.connection;
第 10 步:接下来,我们将定义一个 post 方法来将联系表单的数据保存到我们的数据库中。我们在这里定义我们的数据对象并创建名为users的集合。成功插入数据后,我们将重定向到formSubmitted.html
这是 index.js 文件的主要部分,将在其中处理发布请求,并将数据从客户端请求正确传输到主数据库服务器。
app.post("/formFillUp", (req, res) => {
  var name = req.body.name;
  var reason = req.body.reason;
  var email = req.body.email;
  var phone = req.body.phone;
  var city = req.body.city;
  var state = req.body.state;
  var addressline = req.body.addressline;

  var data = {
    name: name,
    reason: reason,
    email: email,
    phone: phone,
    city: city,
    state: state,
    addressline: addressline,
  };

  db.collection("users").insertOne(data,
  (err, collection) => {
    if (err) {
      throw err;
    }
    console.log("Data inserted successfully!");
  });

  return res.redirect("formSubmitted.html");
});
最终 index.js 将如下所示:
文件名:index.js
Javascript
var express = require("express");
var mongoose = require("mongoose");
const port = 80;
const app = express();

mongoose.connect("mongodb://localhost/projectDG", {
  useNewUrlParser: true,
  useUnifiedTopology: true,
});
var db = mongoose.connection;

app.use(express.json());

// For serving static HTML files
app.use(express.static("public"));
app.use(express.urlencoded({ extended: true }));

app.get("/", (req, res) => {
  res.set({
    "Allow-access-Allow-Origin": "*",
  });

  // res.send("Hello World");
  return res.redirect("index.html");
});

app.post("/formFillUp", (req, res) => {
  var name = req.body.name;
  var reason = req.body.reason;
  var email = req.body.email;
  var phone = req.body.phone;
  var city = req.body.city;
  var state = req.body.state;
  var addressline = req.body.addressline;

  var data = {
    name: name,
    reason: reason,
    email: email,
    phone: phone,
    city: city,
    state: state,
    addressline: addressline,
  };

  db.collection("users").insertOne(
  data, (err, collection) => {
    if (err) {
      throw err;
    }
    console.log("Data inserted successfully!");
  });

  return res.redirect("formSubmitted.html");
});

app.listen(port, () => {
  console.log(`The application started
  successfully on port ${port}`);
});
第 11 步:现在我们将创建index.html、formSubmittedhtml , 和里面的style.css文件 公用文件夹。
索引.html:
HTML
Contact Us
输出:
索引.html
formSubmitted.html
HTML
    Form Submitted Successfully


        Form Submitted Successfully!


            Thank you for contacting us! Our
            team will mail you shortly.
输出:
formSubmitted.html
样式.css
CSS
body {
  background-image: linear-gradient(120deg,
                 #9de7fa 0%, #f89fba 100%);
  color: white;
  font-family: "Poppins", sans-serif;
  min-height: 100vh;
}

.btn-primary {
  color: #fff;
  background-color: #f89fba;
  border-color: #f89fba;
}
.containerFormSubmittedMessage {
  display: flex;
  flex-direction: column;
  margin: auto;
  justify-content: center;
  align-items: center;
  height: 200px;
  border: 3px solid whitesmoke;
}
第 12 步:创建这三个文件后,我们几乎完成了我们的项目。我们现在将启动 MongoDB。打开 Windows Powershell 窗口,然后键入命令mongod。
mongod
在 powershell 窗口中输入mongod命令
打开另一个 Windows Powershell 窗口并键入命令mongo
mongo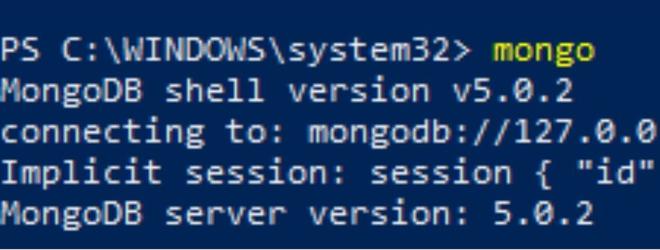
在另一个 powershell 窗口中键入mongo命令
第 13 步:打开您的 IDE,并在终端中键入nodemon index.js以启动应用程序。转到本地主机。

注意:插入成功的数据将在正确处理 post 请求后打印。
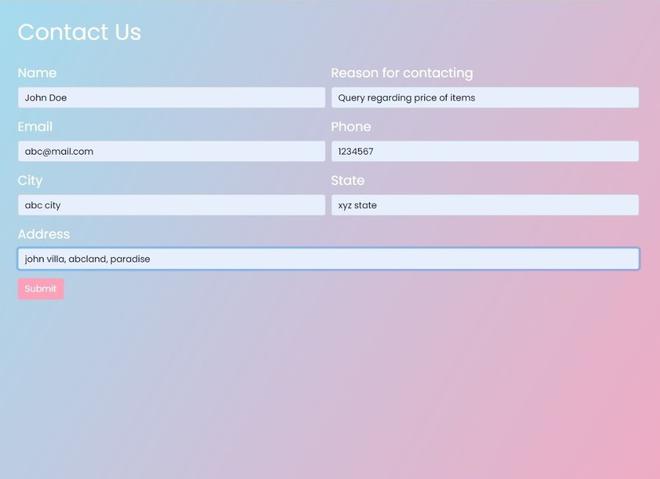
- 填写联系表格的详细信息。成功提交表单后,您将被从index.html重定向到formSubmitted.html 。
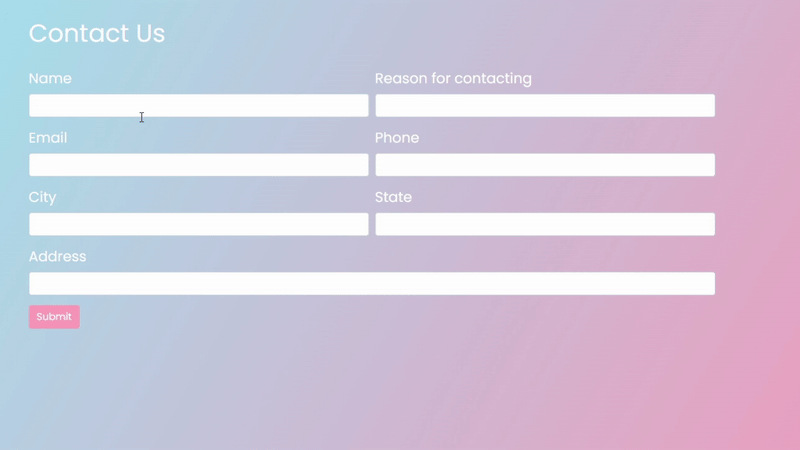
联系表
- 现在要检查我们在联系表单中输入的数据是否已保存到projectDG数据库中,我们将在第二个 Windows Powershell 窗口中使用以下命令。
此命令列出 mongoDB 中的所有数据库:
show dbs这个命令将让我们切换到我们的数据库:
use projectDG 这个命令我们将检查集合中的特定数据:
db.users.find()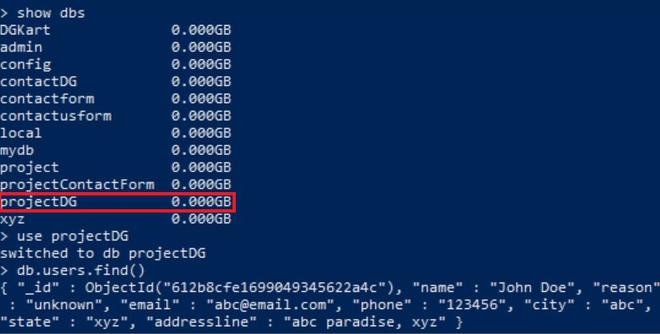
projectDG 数据库中用户集合中存在的数据
我们可以清楚地看到数据已经插入到 MongoDB 数据库中。