在Python使用 KivyMD 构建一个简单的应用程序
KivyMD是 Kivy 框架的扩展。 KivyMD 是一组用于制作移动应用程序的 GUI 框架 Kivy 的 Material Design 小部件。它类似于 Kivy 框架,但提供了更具吸引力的 GUI。在本文中,我们将看到如何使用 Screen、Label、TextFieldInput 和 Button 在 KivyMD 中创建一个简单的应用程序。
安装:
为了启动 KivyMD,您必须首先在您的计算机上安装 Kivy 框架。可以使用以下命令安装它:
pip install kivymd使用的小部件:
我们需要使用 kivyMD.uix 库导入以下小部件:
- MDLabel():这个小部件在 KivyMD 应用程序中用于添加标签或将文本显示为标签。
MDLabel(text, halign, theme_text_color, text_color, font_style)
Parameters:
- text- The text we want to put on the label.
- halign- The position where we want to put the label.
- theme_text_color- The theme for text colors like custom, primary, secondary, hint, or error.
- text_color- If theme_text_color is custom we can assign text color to an RGB tuple.
- font_style- Like caption, headings.
- MDTextField():这个小部件用于在 KivyMD 窗口中添加按钮。
MDTextField(text, pos_hint)
- text- The text we want to put in the TextField.
- pos_hint- A dictionary having the position with respect to x-axis and y-axis.
- MDRectangleFlatButton():这个小部件用于向 KivyMD 应用程序添加矩形按钮。
MDRectangleFlatButton(text, pos_hint, on_release)
- text- The text we want to put on the button.
- pos_hint- A dictionary having the position with respect to the x-axis and y-axis.
- on_release- It is a function that has the properties that we want to call on clicking the button.
让我们看看使用上述小部件创建简单应用程序的代码,然后我们将详细讨论代码。
Python3
# importing all necessary modules
# like MDApp, MDLabel Screen, MDTextField
# and MDRectangleFlatButton
from kivymd.app import MDApp
from kivymd.uix.label import MDLabel
from kivymd.uix.screen import Screen
from kivymd.uix.textfield import MDTextField
from kivymd.uix.button import MDRectangleFlatButton

# creating Demo Class(base class)
class Demo(MDApp):

    def build(self):
        screen = Screen()

        # defining label with all the parameters
        l = MDLabel(text="HI PEOPLE!", halign='center',
                    theme_text_color="Custom",
                    text_color=(0.5, 0, 0.5, 1),
                    font_style='Caption')

        # defining Text field with all the parameters
        name = MDTextField(text="Enter name", pos_hint={
                           'center_x': 0.8, 'center_y': 0.8},
                           size_hint_x=None, width=100)

        # defining Button with all the parameters
        btn = MDRectangleFlatButton(text="Submit", pos_hint={
                                    'center_x': 0.5, 'center_y': 0.3},
                                    on_release=self.btnfunc)
        # adding widgets to screen
        screen.add_widget(name)
        screen.add_widget(btn)
        screen.add_widget(l)
        # returning the screen
        return screen

    # defining a btnfun() for the button to
    # call when clicked on it
    def btnfunc(self, obj):
        print("button is pressed!!")


if __name__ == "__main__":
    Demo().run()
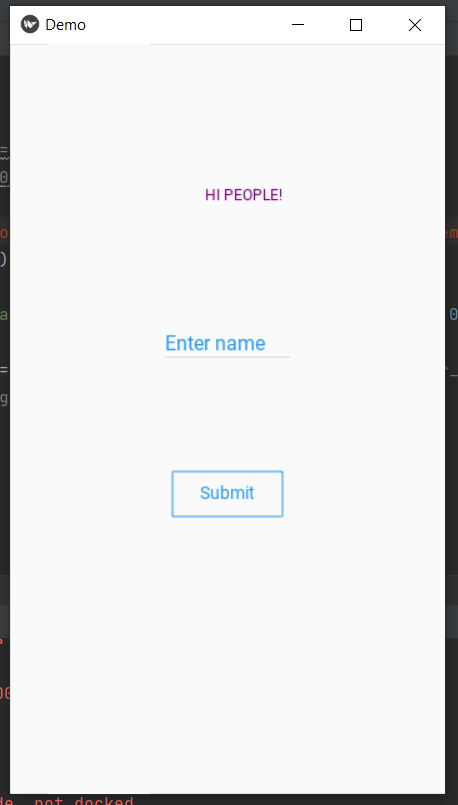
输出:

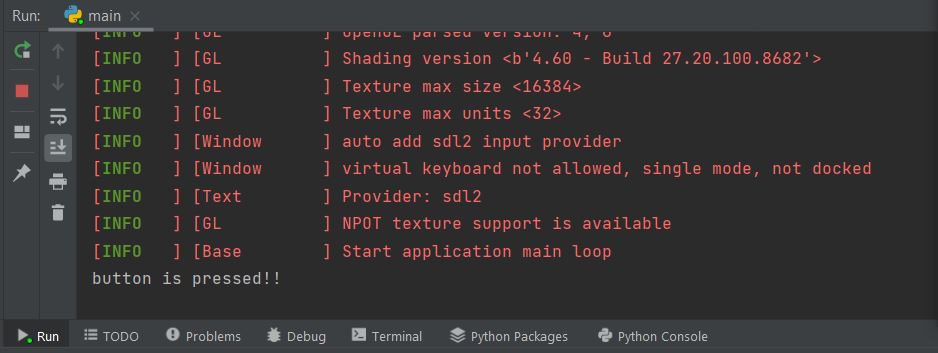
当按下按钮时,它会在命令提示符中显示以下输出:

解释:
- Demo 类派生自kivymd.app的 App() 类。这个类是创建 kivyMD 应用程序的基类。它基本上是 kivyMD 运行循环的主要入口点。
- 这里的build()方法“初始化应用程序;它只会被调用一次。如果此方法返回一个小部件(树),它将被用作根小部件并添加到窗口中。
- 在 build 方法中,我们首先为要显示的小部件定义一个屏幕。然后我们一一添加widget
- 页面标题或标题的标签。
- 用于用户输入的文本字段。您可以添加更多文本字段。
- 用于提交或执行任何函数的按钮。在单击提交按钮时,将在控制台中打印一条消息。我们已经为此创建了函数btnfunc()。
- Demo.run()是 run() 方法,它以独立模式启动应用程序并调用返回屏幕的类 Demo。