Julia 中的数组
Julia 中的数组是元素的集合,就像其他集合(如 Set、Dictionaries 等)一样。数组与 Set 不同,因为数组是元素的有序集合,并且可以保存重复值,这与要求所有元素都是唯一的集合不同。数组是 N 维容器,分为行和列。数组是可变数据类型,这意味着它们的内容可以被修改、删除、覆盖等。
数组是容器的异构类型,因此它们可以保存任何数据类型的元素。在将元素分配给数组之前,不必定义数组的数据类型。 Julia 通过分析分配给它的值自动决定数组的数据类型。由于数组的有序特性,它可以更容易地根据其索引对其值执行操作。
数组类型
根据它们的维度,数组可以是三种类型:
- 一维阵列
- 二维阵列
- 3D 阵列
一维数组:
一维数组或一维数组是元素的线性表示。一维数组只能有一行或一列。它代表一种可以被后续内存位置访问的列表类型。 Julia 中的一维数组称为向量。与其他类型的数组不同,Vectors 允许从前面或后面添加元素,从而调整数组的大小。
例子:
A = [1, 2, 3, 4]
4-element Array{Int64, 1}:
 1
 2
 3
 4
二维数组:
二维数组或二维数组是以行和列的形式表示项目。与向量不同,二维数组是数据的表格表示。 Julia 中的二维数组称为矩阵。使用行索引和列索引访问 Matrix 中的元素。可以通过在创建数组时从 Vector 中删除元素之间的逗号来创建 2D 数组。
A = [1 2; 3 4]

2×2 Array{Int64, 2}:
 1  2
 3  4
3D 阵列:
3D 数组或 3 维数组是数组的数组。 3D 数组也称为多维数组。 3D 数组的类型为 NxNxN,其中组合数组可以是任意维度。可以使用cat或reshape命令创建 3D 数组。
例子:
A = cat([1 2; 3 4], [5 6; 7 8], dims=3)

2×2×2 Array{Int64, 3}:
[:, :, 1] =
 1  2
 3  4

[:, :, 2] =
 5  6
 7  8
在这里,您可以为“ dims ”提供任何值,并且将创建该维度的数组。
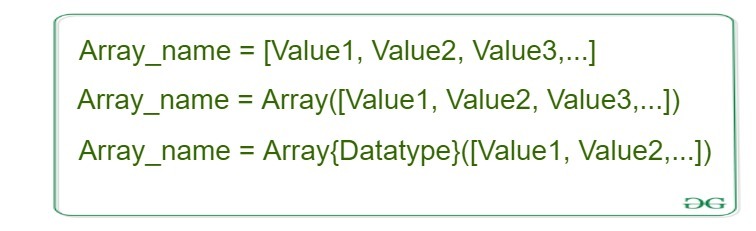
可以使用预定义的关键字Array()或简单地在方括号 ([]) 中写入数组元素来创建 Julia 中的数组。有不同的方法可以创建不同类型的数组。
- 只需将数组元素写入方括号中,以逗号(, ) 或分号(;) 分隔,即可创建一维数组。
- 可以通过编写一组不带逗号的元素,然后用分号将该组与另一组值分隔来创建二维数组。
- 同样,可以使用“cat”命令创建 3D 数组。此命令将数组和所需的维数作为输入,然后以给定的维数连接数组。
句法:
Array1 = [Value1, Value2, Value3, ...]
or
Array1 = [Value1 Value2 ; Value3 Value4]
or
Array1 = cat([Value Value; Value Value], [Value Value; Value Value], dims=3)
Python3
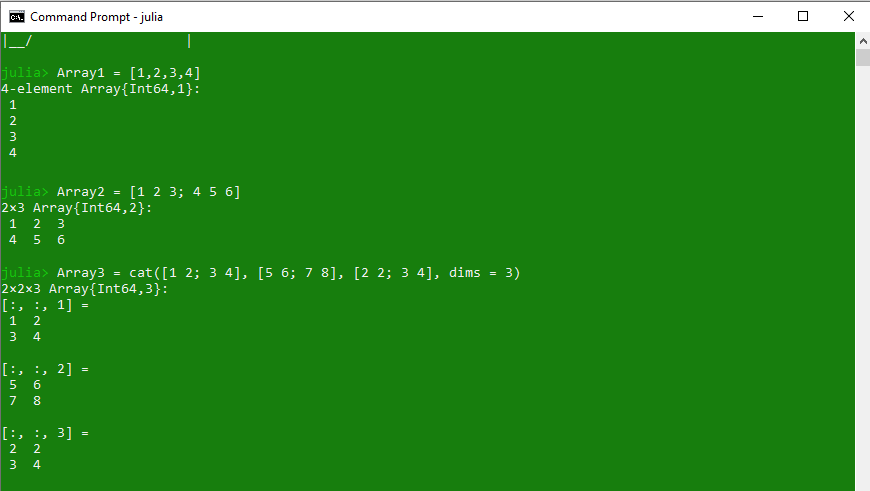
# Julia program to illustrate
# the use of Arrays

# Creating a 1D array
Array1 = [1, 2, 3, 4]
println(Array1)

# Creating a 2D array
Array2 = [1 2 3; 4 5 6]
println(Array2)

# Creating a 3D array
# using 'cat' command
Array3 = cat([1 2; 3 4], [5 6; 7 8], [2 2; 3 4], dims = 3)
println(Array3)
Python3
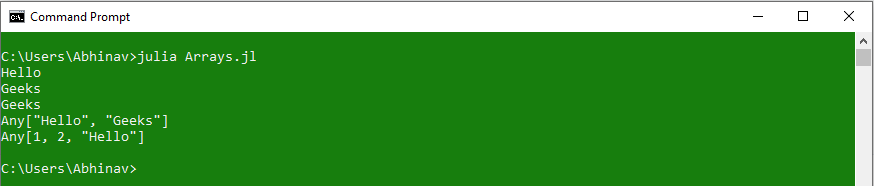
# Julia program to illustrate
# the use of Arrays

# Creating a 1D Array
Array1 = [1, 2, 3, 4, "Hello", "Geeks"]

# Passing index value
println(Array1[3])

# Accessing last value
println(Array1[end])

# Passing a bunch of index values
println(Array1[[3, 5, 6]])

# Passing a range of indices
println(Array1[3:end])

# Using true-false to print values
println(Array1[[true, true, false, false, false, true]])
Python3
# Julia program to illustrate
# the use of Arrays
# Creating a 2D Array
Array1 = [1 2 "Hello"; 3 4 "Geeks"]
# Passing index value
# row-column wise
println(Array1[1, 3])
# Accessing last value
println(Array1[2, end])
# Using getindex() function
println(getindex(Array1, 2, 3))
# Using colon to indicate every row
println(Array1[:, 3])
# Using colon to indicate every column
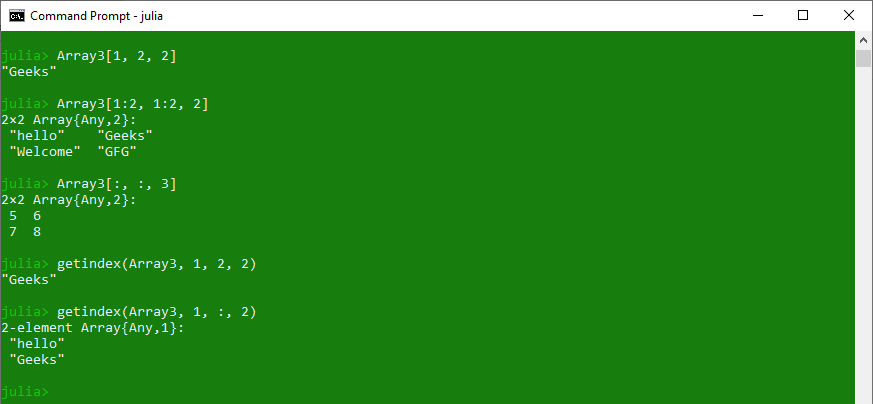
println(Array1[1, :])Python3
# Julia program to illustrate
# the use of Arrays

# Creating a 3D array
# using 'cat' command
Array3 = cat([1 2; 3 4],
              ["hello" "Geeks"; "Welcome" "GFG"],
              [5 6; 7 8], dims = 3)

# Accessing element using index value
println(Array3[1, 2, 2])

# Accessing Range of elements
println(Array3[1:2, 1:2, 2])

# Using colon to access every row or column
println(Array3[:, :, 3])

# Using getindex function
println(getindex(Array3, 1, 2, 2))

# Using getindex with colon operator
println(getindex(Array3, 1, :, 2))
Python3
# Julia program to illustrate
# the use of Arrays

# Creating a 1D Array
Array1 = [1, 2, 3, 4, "Hello", "Geeks"]

# Adding element at the end
push !(Array1, "Welcome")
println(Array1)

# Adding element at the beginning
pushfirst !(Array1, 0)
println(Array1)

# Adding element at specific position
splice !(Array1, 3:4, "GFG")
println(Array1)

# Adding a range of elements
splice !(Array1, 6:7, [1, 2, 3])
println(Array1)
Python3
# Julia program to illustrate
# the use of Arrays
# Creating a 2D Array
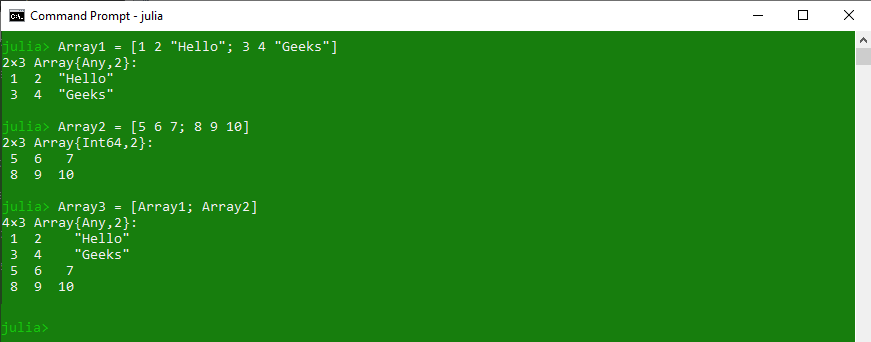
Array1 = [1 2 "Hello"; 3 4 "Geeks"]
# Array of elements which are to be added
Array2 = [5 6 7; 8 9 10]
# Appending arrays
Array3 = [Array1; Array2]
println(Array3)Python3
# Julia program to illustrate
# the use of Arrays
# Creating a 2D Array
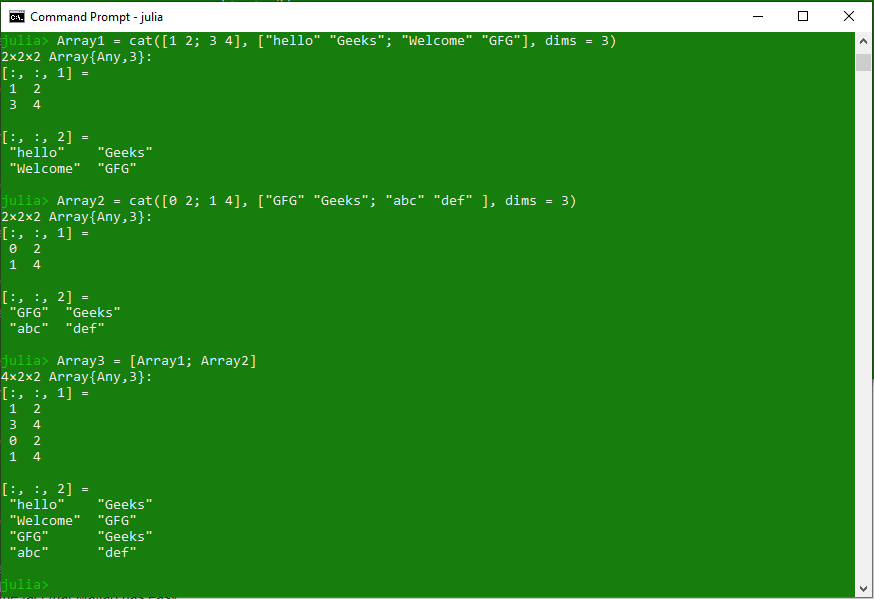
Array1 = cat([1 2; 3 4],
["hello" "Geeks"; "Welcome" "GFG"],
dims = 3)
# Array of elements which is to be added
Array2 = cat([0 2; 1 4],
["GFG" "Geeks"; "abc" "def" ],
dims = 3)
# Appending arrays
Array3 = [Array1; Array2]
println(Array3)Python3
# Julia program to illustrate
# the use of Arrays
# Creating a 1D array
Array1 = [1, 2, 3, 4, 5, 6, "a", "b"]
println("Existing 1D Array:\n", Array1)
# Updating value at specific index
Array1[4] = "Hello"
println("\nUpdated 1D Array:\n", Array1)
# Creating a 2D array
Array2 = [1 2 3; 4 5 6]
println("\nExisting 2D Array:\n", Array2)
# Updating value at specific index
Array2[2, 2] = 10
println("\nUpdated 2D Array:\n", Array2)
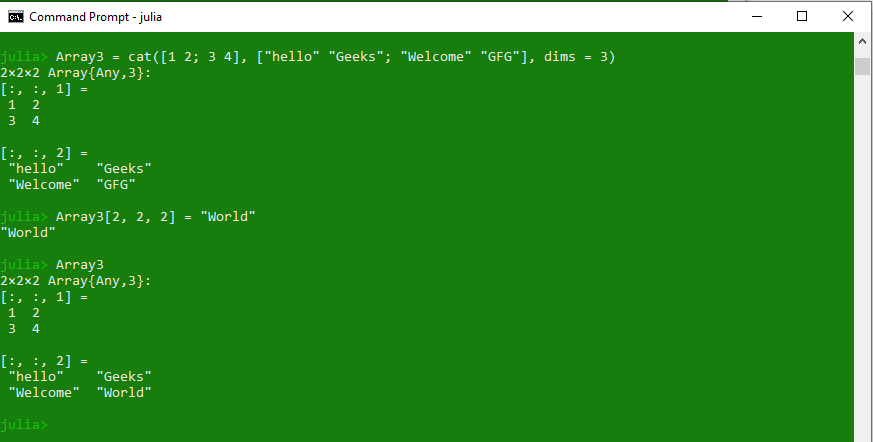
# Creating a 3D array
Array3 = cat([1 2; 3 4],
["hello" "Geeks"; "Welcome" "GFG"],
dims = 3)
println("\nExisting 3D Array:\n", Array3)
# Updating value at specific index
Array3[2, 2, 2] = "World"
println("\nUpdated 3D Array:\n", Array3)Python3
# Julia program to illustrate
# the use of Arrays

# Creating a 1D array
Array1 = [1, 2, 3, 4, 5, 6, "Hello", "Geeks"]
println("Initial Array:\n", Array1)

# Delete last element
# using pop !()
pop !(Array1)

# Printing the array
println("\nArray after deleting last element:\n", Array1)

# Delete first element
# using popfirst !()
popfirst !(Array1)
println("\nArray after deleting first element:\n", Array1)

# Deleting a specific element
# using splice !()
splice !(Array1, 4)

println("\nArray after deleting a specific(e.g. 4th) element:\n", Array1)

# Deleting a range of elements
# using deleteat !()
deleteat !(Array1, 2:4)

println("\nArray after deleting a range(e.g. 2:4) of elements:\n", Array1)

# Deleting all the elements
# using empty !()
empty !(Array1)

println("\nArray after deleting all the elements:\n", Array1)
Python3
# Julia program to illustrate
# the use of arrays

Array2 = [1 2 3; 4 5 6; "Hello" "Geeks" "World"]
println("Initial Array:\n", Array2)

# Assigning zero in place of
# element to be deleted(e.g. element at 1, 3)
Array2[1, 3] = 0

println("\nZero in place of element to be deleted:\n", Array2)

# Assigning undefined value in place of
# element to be deleted(e.g. element at 2, 3)
Array2[2, 3] = undef

println("\nundef in place of element to be deleted:\n", Array2)

# Deleting entire row of elements(e.g. 2nd row)
Array2 = Array2[1:size(Array2, 1) .!= 2, :]

println("\nArray after deleting 2nd row:\n", Array2)

# Deleting entire column of elements(e.g. 2nd column)
Array2 = Array2[:, 1:size(Array2, 2) .!= 2]

println("\nArray after deleting 2nd column:\n", Array2)
Python3
# Julia program to illustrate
# the use of arrays

# Creating a 3D array
Array3 = cat([1 2 3; 3 4 5; 5 6 7],
             ["a" "b" "c"; "c" "d" "e"; "e" "f" "g"],
             dims = 3)
println("Initial 3D Array:\n", Array3)

# Assigning zero in place of
# element to be deleted(e.g. element at 1, 3, 1)
Array3[1, 3, 1] = 0

println("\nZero in place of element to be deleted:\n", Array3)

# Assigning undefined value in place of
# element to be deleted(e.g. element at 1, 3, 2)
Array3[1, 3, 2] = undef

println("\nundef in place of element to be deleted:\n", Array3)

# Deleting entire row of elements(e.g. 2nd row)
Array3 = Array3[1:size(Array3, 2) .!= 2, :, :]

println("\nArray after deleting 2nd row:\n", Array2)

# Deleting entire column of elements(e.g. 2nd column)
Array3 = Array3[:, 1:size(Array3, 2) .!= 2, :]

println("\nArray after deleting 2nd column:\n", Array2)
输出:
使用方括号 ([]) 可以轻松提取数组的元素。循环也可用于从数组中提取多个元素。此外,还可以通过在方括号内传递一个范围,就像元组一样,从数组中提取一系列元素。
示例:访问一维数组中的元素
Python3
# Julia program to illustrate
# the use of Arrays

# Creating a 1D Array
Array1 = [1, 2, 3, 4, "Hello", "Geeks"]

# Passing index value
println(Array1[3])

# Accessing last value
println(Array1[end])

# Passing a bunch of index values
println(Array1[[3, 5, 6]])

# Passing a range of indices
println(Array1[3:end])

# Using true-false to print values
println(Array1[[true, true, false, false, false, true]])

示例:访问二维数组中的元素
Python3
# Julia program to illustrate
# the use of Arrays

# Creating a 2D Array
Array1 = [1 2 "Hello"; 3 4 "Geeks"]

# Passing index value
# row-column wise
println(Array1[1, 3])

# Accessing last value
println(Array1[2, end])

# Using getindex() function
println(getindex(Array1, 2, 3))

# Using colon to indicate every row
println(Array1[:, 3])

# Using colon to indicate every column
println(Array1[1, :])
示例:访问 3D 数组中的元素
Python3
# Julia program to illustrate
# the use of Arrays

# Creating a 3D array
# using 'cat' command
Array3 = cat([1 2; 3 4],
              ["hello" "Geeks"; "Welcome" "GFG"],
              [5 6; 7 8], dims = 3)

# Accessing element using index value
println(Array3[1, 2, 2])

# Accessing Range of elements
println(Array3[1:2, 1:2, 2])

# Using colon to access every row or column
println(Array3[:, :, 3])

# Using getindex function
println(getindex(Array3, 1, 2, 2))

# Using getindex with colon operator
println(getindex(Array3, 1, :, 2))
数组是 Julia 中的可变类型集合,因此,可以使用某些预定义的关键字来修改它们的值。 Julia 允许使用push! 在数组中添加新元素!命令。通过在拼接中传递索引值的范围,也可以将数组中的元素添加到特定索引处!函数。
示例:在一维数组中添加元素
Python3
# Julia program to illustrate
# the use of Arrays

# Creating a 1D Array
Array1 = [1, 2, 3, 4, "Hello", "Geeks"]

# Adding element at the end
push !(Array1, "Welcome")
println(Array1)

# Adding element at the beginning
pushfirst !(Array1, 0)
println(Array1)

# Adding element at specific position
splice !(Array1, 3:4, "GFG")
println(Array1)

# Adding a range of elements
splice !(Array1, 6:7, [1, 2, 3])
println(Array1)

示例:在二维数组中添加元素
Python3
# Julia program to illustrate
# the use of Arrays

# Creating a 2D Array
Array1 = [1 2 "Hello"; 3 4 "Geeks"]

# Array of elements which are to be added
Array2 = [5 6 7; 8 9 10]

# Appending arrays
Array3 = [Array1; Array2]
println(Array3)
示例:在 3D 数组中添加元素
Python3
# Julia program to illustrate
# the use of Arrays

# Creating a 2D Array
Array1 = cat([1 2; 3 4],
             ["hello" "Geeks"; "Welcome" "GFG"],
             dims = 3)

# Array of elements which is to be added
Array2 = cat([0 2; 1 4],
             ["GFG" "Geeks"; "abc" "def" ],
             dims = 3)

# Appending arrays
Array3 = [Array1; Array2]
println(Array3)
Julia 中的数组是可变的,因此它允许修改其内容。可以根据需要删除或更新数组中的元素。要更新数组的现有元素,请在方括号内传递该元素的索引值。
例子:
Python3
# Julia program to illustrate
# the use of Arrays

# Creating a 1D array
Array1 = [1, 2, 3, 4, 5, 6, "a", "b"]
println("Existing 1D Array:\n", Array1)

# Updating value at specific index
Array1[4] = "Hello"
println("\nUpdated 1D Array:\n", Array1)

# Creating a 2D array
Array2 = [1 2 3; 4 5 6]
println("\nExisting 2D Array:\n", Array2)

# Updating value at specific index
Array2[2, 2] = 10
println("\nUpdated 2D Array:\n", Array2)

# Creating a 3D array
Array3 = cat([1 2; 3 4],
             ["hello" "Geeks"; "Welcome" "GFG"],
             dims = 3)
println("\nExisting 3D Array:\n", Array3)

# Updating value at specific index
Array3[2, 2, 2] = "World"
println("\nUpdated 3D Array:\n", Array3)

Julia 允许使用预定义的函数pop! 从一维数组中删除一个元素! .此函数将简单地删除数组的最后一个元素并将数组大小减少 1。要删除数组的第一个元素,可以使用popfirst!函数。如果需要从数组中的特定索引中删除元素,请拼接!并删除!可以使用函数。
这些方法仅适用于一维数组,因为二维或其他多维数组不允许从矩阵中删除特定元素以保持其(行、列)顺序。但是,可以在要删除的元素的位置分配零或 undef。这不会影响矩阵的顺序。另一种方法是删除整行或整列。
示例:从一维数组中删除元素
Python3
# Julia program to illustrate
# the use of Arrays

# Creating a 1D array
Array1 = [1, 2, 3, 4, 5, 6, "Hello", "Geeks"]
println("Initial Array:\n", Array1)

# Delete last element
# using pop !()
pop !(Array1)

# Printing the array
println("\nArray after deleting last element:\n", Array1)

# Delete first element
# using popfirst !()
popfirst !(Array1)
println("\nArray after deleting first element:\n", Array1)

# Deleting a specific element
# using splice !()
splice !(Array1, 4)

println("\nArray after deleting a specific(e.g. 4th) element:\n", Array1)

# Deleting a range of elements
# using deleteat !()
deleteat !(Array1, 2:4)

println("\nArray after deleting a range(e.g. 2:4) of elements:\n", Array1)

# Deleting all the elements
# using empty !()
empty !(Array1)

println("\nArray after deleting all the elements:\n", Array1)

示例:从二维数组中删除元素
Python3
# Julia program to illustrate
# the use of arrays

Array2 = [1 2 3; 4 5 6; "Hello" "Geeks" "World"]
println("Initial Array:\n", Array2)

# Assigning zero in place of
# element to be deleted(e.g. element at 1, 3)
Array2[1, 3] = 0

println("\nZero in place of element to be deleted:\n", Array2)

# Assigning undefined value in place of
# element to be deleted(e.g. element at 2, 3)
Array2[2, 3] = undef

println("\nundef in place of element to be deleted:\n", Array2)

# Deleting entire row of elements(e.g. 2nd row)
Array2 = Array2[1:size(Array2, 1) .!= 2, :]

println("\nArray after deleting 2nd row:\n", Array2)

# Deleting entire column of elements(e.g. 2nd column)
Array2 = Array2[:, 1:size(Array2, 2) .!= 2]

println("\nArray after deleting 2nd column:\n", Array2)
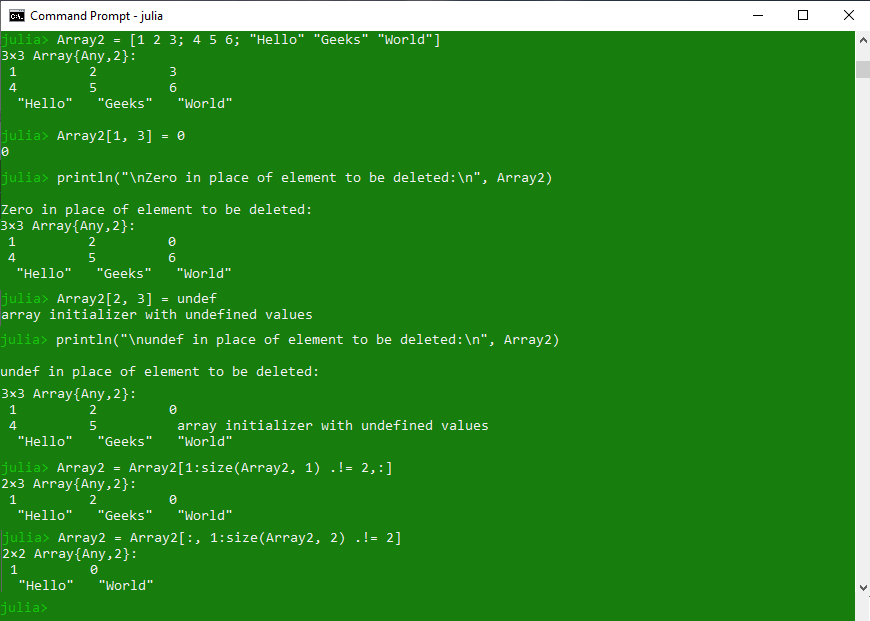
在上面的代码中,在删除整行或整列的同时,我们创建了另一个相同大小的数组,并将元素分配给新数组,不包括要删除的行或列。这样做是因为 Julia 不允许从矩阵中删除行或列。示例:从 3D 数组中删除元素
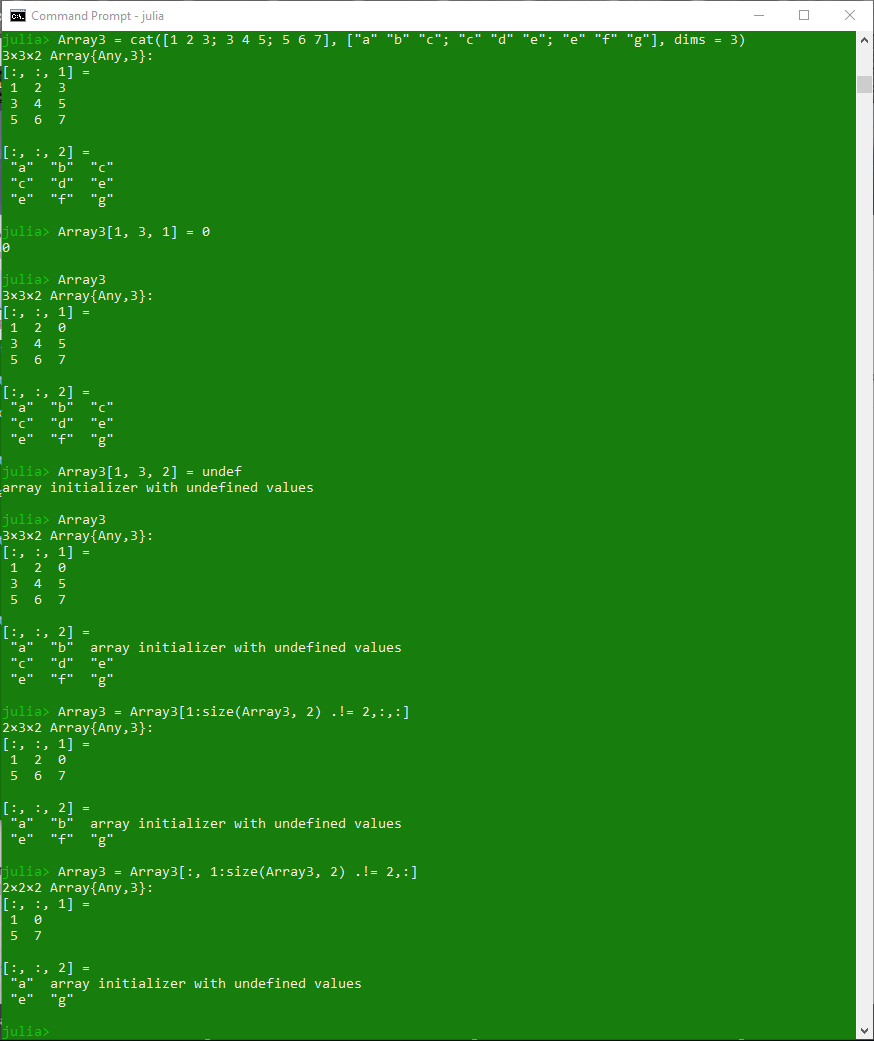
Python3
# Julia program to illustrate
# the use of arrays

# Creating a 3D array
Array3 = cat([1 2 3; 3 4 5; 5 6 7],
             ["a" "b" "c"; "c" "d" "e"; "e" "f" "g"],
             dims = 3)
println("Initial 3D Array:\n", Array3)

# Assigning zero in place of
# element to be deleted(e.g. element at 1, 3, 1)
Array3[1, 3, 1] = 0

println("\nZero in place of element to be deleted:\n", Array3)

# Assigning undefined value in place of
# element to be deleted(e.g. element at 1, 3, 2)
Array3[1, 3, 2] = undef

println("\nundef in place of element to be deleted:\n", Array3)

# Deleting entire row of elements(e.g. 2nd row)
Array3 = Array3[1:size(Array3, 2) .!= 2, :, :]

println("\nArray after deleting 2nd row:\n", Array2)

# Deleting entire column of elements(e.g. 2nd column)
Array3 = Array3[:, 1:size(Array3, 2) .!= 2, :]

println("\nArray after deleting 2nd column:\n", Array2)
数组方法
.array-table {
字体系列:arial、sans-serif;
边框折叠:折叠;
边框:1px 实心#5fb962;
宽度:100%;
}
.array-table td, th {
背景颜色:#c6ebd9;
边框:1px 实心#5fb962;
文本对齐:左;
填充:8px;
}
.array-table td:nth-child(odd) {
背景颜色:#c6ebd9;
}
.array-table th {
边框:1px 实心#5fb962;
文本对齐:左;
}
.array-table td
{
边框:1px 实心#5fb962;
颜色:黑色;
文本对齐:左!重要;
}Methods Description axes() Returns the tuple or valid range of valid indices for specified array broadcast() Used to broadcast the function f over the specified arrays, tuples or collections. broadcast!() This function is same as broadcast() function but stores the result of broadcast(f, As…) in the specified dest array cat() Used to concatenate the given input arrays along the specified dimensions in the iterable dims. colon() Used to indicate and access every row and column conj() Used to compute the complex conjugate of a specified complex number z. conj!() Transforms the specified array to its complex conjugate in-place copyto!() Used to copy all elements from the specified collection src to array dest count() Counts the number of elements in the specified array Dims() Used to represent the dimensions of the specified AbstractArray eachindex() Creates an iterable object for visiting each index of the specified array fill() Returns an array of specified dimensions filled with a specific value passed to it as parameter fill!() Takes an existing array as argument and fills it with a new specified value findall() Returns a vector of indices or keys of the all true values from the specified array findfirst() Return the index or key of the first true value in the specified array findlast() Returns the index or key of the last true value in the specified array findnext() Returns the next coming index after or including i of a true element of the specified array findprev() Returns the previous index before or including i of a true element of the specified array first() Returns the first element of the specified array getindex() Returns the constructed array of the specified type and also the element of the array at a specific index. hcat() Used to concatenate the given arrays along second dimension hvcat() Used to concatenate the given arrays horizontally and vertically in one call isassigned() Tests whether the given index contains a value in the specified array or not last() Returns the last element of the specified array length() Returns the number of elements present in the specified array ndims() Returns the number of dimension of the specified array A parent() Returns the parent array of a specified array view type (i.e, SubArray) or the array itself if it is not a view repeat() Constructs an array by repeating the specified array elements with the specified number of times reshape() Returns an array with the same data as the specified array, but with different specified dimension sizes reverse() Returns a reversed copy of the vector. reverse!() Returns an in-place reversed copy of the vector. reverseind() Returns the corresponding index in v so that v[reverseind(v, i)] == reverse(v)[i]. setindex() Used to store values from the given array X within some subset of A as specified by inds. similar() Used to create an uninitialized mutable array with the given element type and size, based upon the given source array. size() Returns a tuple containing the dimensions of the specified array stride() Returns the distance in memory between the specified adjacent elements in specified dimension strides() Returns a tuple of the memory strides in each dimension to_indices() Used to convert the given tuple I to a tuple of indices for use in indexing into array A vcat() Used to concatenate the given arrays along first dimension vec() Reshapes the specified array as a one-dimensional column vector i.e, 1D array vect() Used to create a vector with the passed elements as parameter view() Used to return a view into the given parent array A with the given indices instead of making a copy. @view() Used to create a sub array from the given indexing expression. @views() Used to convert every given array-slicing operation in the given expression.