- spring mvc (1)
- spring mvc - 任何代码示例
- spring mvc - Java 代码示例
- spring mvc - Java (1)
- C++ 中的错误处理(1)
- C-错误处理
- C-错误处理(1)
- C++ 代码示例中的错误处理
- Spring MVC-密码示例
- Spring MVC-密码示例(1)
- Spring MVC-隐藏字段示例
- Spring MVC-隐藏字段示例(1)
- spring mvc 项目示例 - Java (1)
- Spring MVC-复选框示例
- Spring MVC-复选框示例
- Spring MVC-复选框示例(1)
- Spring MVC-复选框示例(1)
- Spring – MVC 验证
- Spring MVC验证(1)
- Spring MVC验证
- Spring – MVC 验证(1)
- Spring MVC教程
- Spring MVC教程(1)
- Spring MVC教程(1)
- Spring MVC教程
- Spring – MVC 密码
- Spring – MVC 密码(1)
- 值错误处理 - Python 代码示例
- Spring – MVC 隐藏域
📅 最后修改于: 2020-11-11 06:27:20 🧑 作者: Mango
以下示例显示了如何使用Spring Web MVC Framework在表单中使用错误处理和验证器。首先,让我们拥有一个运行良好的Eclipse IDE,并考虑以下步骤,以使用Spring Web Framework开发基于动态表单的Web应用程序。
| Step | Description |
|---|---|
| 1 | Create a project with a name HelloWeb under a package com.tutorialspoint as explained in the Spring MVC – Hello World chapter. |
| 2 | Create Java classes Student, StudentController and StudentValidator under the com.tutorialspoint package. |
| 3 | Create view files addStudent.jsp, result.jsp under the jsp sub-folder. |
| 4 | The final step is to create the content of the source and configuration files and export the application as explained below. |
学生.java
package com.tutorialspoint;

public class Student {
   private Integer age;
   private String name;
   private Integer id;

   public void setAge(Integer age) {
      this.age = age;
   }
   public Integer getAge() {
      return age;
   }

   public void setName(String name) {
      this.name = name;
   }
   public String getName() {
      return name;
   }

   public void setId(Integer id) {
      this.id = id;
   }
   public Integer getId() {
      return id;
   }
}
StudentValidator.java
package com.tutorialspoint;

import org.springframework.validation.Errors;
import org.springframework.validation.ValidationUtils;
import org.springframework.validation.Validator;

public class StudentValidator implements Validator {

   @Override
   public boolean supports(Class> clazz) {
      return Student.class.isAssignableFrom(clazz);
   }

   @Override
   public void validate(Object target, Errors errors) {
      ValidationUtils.rejectIfEmptyOrWhitespace(errors,
         "name", "required.name","Field name is required.");
   }
}
StudentController.java
package com.tutorialspoint;

import org.springframework.beans.factory.annotation.Autowired;
import org.springframework.beans.factory.annotation.Qualifier;
import org.springframework.stereotype.Controller;
import org.springframework.ui.Model;
import org.springframework.validation.BindingResult;
import org.springframework.validation.Validator;
import org.springframework.validation.annotation.Validated;
import org.springframework.web.bind.WebDataBinder;
import org.springframework.web.bind.annotation.InitBinder;
import org.springframework.web.bind.annotation.ModelAttribute;
import org.springframework.web.bind.annotation.RequestMapping;
import org.springframework.web.bind.annotation.RequestMethod;
import org.springframework.web.servlet.ModelAndView;

@Controller
public class StudentController {

   @Autowired
   @Qualifier("studentValidator")
   private Validator validator;

   @InitBinder
   private void initBinder(WebDataBinder binder) {
      binder.setValidator(validator);
   }

   @RequestMapping(value = "/addStudent", method = RequestMethod.GET)
   public ModelAndView student() {
      return new ModelAndView("addStudent", "command", new Student());
   }

   @ModelAttribute("student")
   public Student createStudentModel() {
      return new Student();
   }

   @RequestMapping(value = "/addStudent", method = RequestMethod.POST)
   public String addStudent(@ModelAttribute("student") @Validated Student student,
      BindingResult bindingResult, Model model) {

      if (bindingResult.hasErrors()) {
         return "addStudent";
      }
      model.addAttribute("name", student.getName());
      model.addAttribute("age", student.getAge());
      model.addAttribute("id", student.getId());

      return "result";
   }
}
HelloWeb-servlet.xml
在这里,对于第一个服务方法student() ,我们在ModelAndView对象中传递了一个名称为“ command”的空白Studentobject,因为如果您使用的是
将针对HelloWeb / addStudent URL上的POST方法调用第二个服务方法addStudent() 。您将根据提交的信息准备模型对象。最后,服务方法将返回“结果”视图,这将导致呈现result.jsp。如果使用验证程序生成错误,然后返回相同的视图“ addStudent”,Spring会自动从视图中的BindingResult注入错误消息。
addStudent.jsp
Spring MVC Form Handling
Student Information
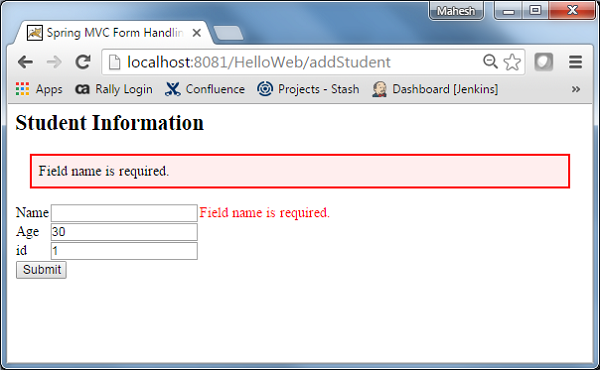
在这里,我们使用
它将为所有输入验证呈现错误消息。
我们正在将
它将为名称字段验证呈现错误消息。
result.jsp
Spring MVC Form Handling


      Submitted Student Information


            Name
            ${name}


            Age
            ${age}


           ID
           ${id}
完成创建源文件和配置文件后,导出应用程序。右键单击您的应用程序,使用“导出”→“ WAR文件”选项,并将HelloWeb.war文件保存在Tomcat的webapps文件夹中。
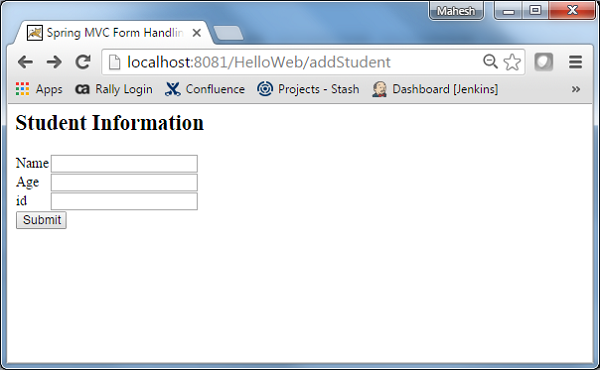
现在,启动您的Tomcat服务器,并确保您能够使用标准浏览器从webapps文件夹访问其他网页。尝试使用URL- http:// localhost:8080 / HelloWeb / addStudent ,如果Spring Web Application一切正常,我们将看到以下屏幕。
提交所需信息后,单击“提交”按钮以提交表单。如果Spring Web Application一切正常,您应该看到以下屏幕。