📌 相关文章
- PHP-Ajax RSS Feed示例(1)
- PHP-Ajax RSS Feed示例
- RSS-Feed验证和验证器
- RSS-Feed验证和验证器(1)
- Spring MVC-生成JSON示例
- Spring MVC-生成JSON示例(1)
- Spring MVC-生成Excel示例(1)
- Spring MVC-生成Excel示例
- Spring MVC-生成XML示例(1)
- Spring MVC-生成XML示例
- Spring MVC-生成PDF示例
- Spring MVC-生成PDF示例(1)
- spring mvc (1)
- 如何将 RSS Feed 和 Sitemap 添加到 Django 项目?
- Android RSS Feed阅读博客摘要(1)
- Android RSS Feed阅读博客摘要
- spring mvc - 任何代码示例
- spring mvc - Java 代码示例
- spring mvc - Java (1)
- Spring MVC-密码示例
- Spring MVC-密码示例(1)
- Spring MVC-隐藏字段示例(1)
- Spring MVC-隐藏字段示例
- Django-RSS(1)
- Django-RSS
- spring mvc 项目示例 - Java (1)
- Spring MVC-复选框示例
- Spring MVC-复选框示例(1)
- Spring MVC-复选框示例(1)
📜 Spring MVC-生成RSS Feed示例
📅 最后修改于: 2020-11-11 06:35:10 🧑 作者: Mango
以下示例显示了如何使用Spring Web MVC Framework生成RSS Feed。首先,让我们拥有一个运行良好的Eclipse IDE,然后考虑以下步骤,以使用Spring Web Framework开发基于动态表单的Web应用程序。
| Step | Description |
|---|---|
| 1 | Create a project with the name TestWeb under a package com.tutorialspoint as explained in the Spring MVC – Hello World chapter. |
| 2 | Create Java classes RSSMessage, RSSFeedViewer and RSSController under the com.tutorialspoint package. |
| 3 | Download the Rome library Rome and its dependencies rome-utils, jdom and slf4j from the same maven repository page. Put them in your CLASSPATH. |
| 4 | Create a properties file messages.properties under the SRC folder. |
| 5 | The final step is to create the content of the source and configuration files and export the application as explained below. |
RSSMessage.java
package com.tutorialspoint;

import java.util.Date;

public class RSSMessage {
   String title;
   String url;
   String summary;
   Date createdDate;
   public String getTitle() {
      return title;
   }
   public void setTitle(String title) {
      this.title = title;
   }
   public String getUrl() {
      return url;
   }
   public void setUrl(String url) {
      this.url = url;
   }
   public String getSummary() {
      return summary;
   }
   public void setSummary(String summary) {
      this.summary = summary;
   }
   public Date getCreatedDate() {
      return createdDate;
   }
   public void setCreatedDate(Date createdDate) {
      this.createdDate = createdDate;
   }
}
RSSFeedViewer.java
package com.tutorialspoint;
import java.util.ArrayList;
import java.util.List;
import java.util.Map;
import javax.servlet.http.HttpServletRequest;
import javax.servlet.http.HttpServletResponse;
import org.springframework.web.servlet.view.feed.AbstractRssFeedView;
import com.rometools.rome.feed.rss.Channel;
import com.rometools.rome.feed.rss.Content;
import com.rometools.rome.feed.rss.Item;
public class RSSFeedViewer extends AbstractRssFeedView {
@Override
protected void buildFeedMetadata(Map model, Channel feed,
HttpServletRequest request) {
feed.setTitle("TutorialsPoint Dot Com");
feed.setDescription("Java Tutorials and Examples");
feed.setLink("http://www.tutorialspoint.com");
super.buildFeedMetadata(model, feed, request);
}
@Override
protected List- buildFeedItems(Map
model,
HttpServletRequest request, HttpServletResponse response) throws Exception {
List listContent = (List) model.get("feedContent");
List- items = new ArrayList
- (listContent.size());
for(RSSMessage tempContent : listContent ){
Item item = new Item();
Content content = new Content();
content.setValue(tempContent.getSummary());
item.setContent(content);
item.setTitle(tempContent.getTitle());
item.setLink(tempContent.getUrl());
item.setPubDate(tempContent.getCreatedDate());
items.add(item);
}
return items;
}
}
RSSController.java
package com.tutorialspoint;

import java.util.ArrayList;
import java.util.Date;
import java.util.List;

import org.springframework.stereotype.Controller;
import org.springframework.web.bind.annotation.RequestMapping;
import org.springframework.web.bind.annotation.RequestMethod;
import org.springframework.web.servlet.ModelAndView;

@Controller
public class RSSController {
   @RequestMapping(value="/rssfeed", method = RequestMethod.GET)
   public ModelAndView getFeedInRss() {

      List items = new ArrayList();

      RSSMessage content  = new RSSMessage();
      content.setTitle("Spring Tutorial");
      content.setUrl("http://www.tutorialspoint/spring");
      content.setSummary("Spring tutorial summary...");
      content.setCreatedDate(new Date());
      items.add(content);

      RSSMessage content2  = new RSSMessage();
      content2.setTitle("Spring MVC");
      content2.setUrl("http://www.tutorialspoint/springmvc");
      content2.setSummary("Spring MVC tutorial summary...");
      content2.setCreatedDate(new Date());
      items.add(content2);

      ModelAndView mav = new ModelAndView();
      mav.setViewName("rssViewer");
      mav.addObject("feedContent", items);

      return mav;
   }
}
TestWeb-servlet.xml
在这里,我们创建了一个RSS feed POJO RSSMessage和一个RSS Message Viewer,它扩展了AbstractRssFeedView并覆盖了它的方法。在RSSController中,我们生成了一个示例RSS Feed。
完成创建源文件和配置文件后,导出应用程序。右键单击您的应用程序,使用“导出”→“ WAR文件”选项,并将TestWeb.war文件保存在Tomcat的webapps文件夹中。
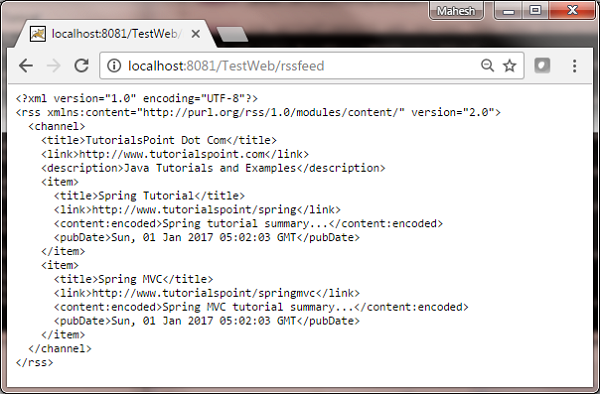
现在,启动Tomcat服务器,并确保您能够使用标准浏览器从webapps文件夹访问其他网页。尝试使用URL- http:// localhost:8080 / TestWeb / rssfeed ,我们将看到以下屏幕。
