- VB.Net-数组
- VB.Net-字符串(1)
- VB.Net-字符串
- VB.NET 和 C# 的区别(1)
- VB.NET 和 C# 的区别
- VB.Net-类和对象(1)
- VB.Net-类和对象
- VB.Net-循环
- VB.Net-循环(1)
- VB.Net-变量
- VB.Net-变量(1)
- VB.NET 和Java的区别(1)
- VB.NET 和Java的区别
- VB.Net-正则表达式(1)
- VB.Net-正则表达式
- VB.Net-功能
- VB.Net-功能(1)
- 讨论VB.Net
- 字符后的 vb.net 子字符串 - C# (1)
- VB.Net-概述
- VB.Net-概述(1)
- ASP.NET 和 VB.NET 的区别
- ASP.NET 和 VB.NET 的区别(1)
- VB.Net-声明(1)
- VB.Net-声明
- VB.Net-数据类型
- VB.Net-数据类型(1)
- vb.net 检查类型 (1)
- vb.net 数组搜索 - C# (1)
📅 最后修改于: 2020-11-19 08:59:54 🧑 作者: Mango
在本章中,让我们研究以下概念-
-
在应用程序中添加菜单和子菜单
-
以表格形式添加剪切,复制和粘贴功能
-
表单中的锚定和停靠控件
-
模态形式
在应用程序中添加菜单和子菜单
传统上, Menu , MainMenu , ContextMenu和MenuItem类用于在Windows应用程序中添加菜单,子菜单和上下文菜单。
现在, MenuStrip , ToolStripMenuItem , ToolStripDropDown和ToolStripDropDownMenu控件替换功能并将其添加到以前版本的Menu相关控件中。但是,保留了旧的控件类以用于向后兼容和将来使用。
让我们首先使用旧版本的控件创建一个典型的Windows主菜单栏和子菜单,因为这些控件仍在旧应用程序中大量使用。
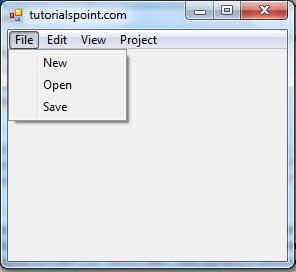
以下是一个示例,显示了我们如何创建带有菜单项的菜单栏:文件,编辑,视图和项目。文件菜单具有子菜单新建,打开和保存。
让我们双击窗体,然后将以下代码放在打开的窗口中。
Public Class Form1
   Private Sub Form1_Load(sender As Object, e As EventArgs) Handles MyBase.Load
      'defining the main menu bar
      Dim mnuBar As New MainMenu()
      'defining the menu items for the main menu bar
      Dim myMenuItemFile As New MenuItem("&File")
      Dim myMenuItemEdit As New MenuItem("&Edit")
      Dim myMenuItemView As New MenuItem("&View")
      Dim myMenuItemProject As New MenuItem("&Project")

      'adding the menu items to the main menu bar
      mnuBar.MenuItems.Add(myMenuItemFile)
      mnuBar.MenuItems.Add(myMenuItemEdit)
      mnuBar.MenuItems.Add(myMenuItemView)
      mnuBar.MenuItems.Add(myMenuItemProject)

     ' defining some sub menus
      Dim myMenuItemNew As New MenuItem("&New")
      Dim myMenuItemOpen As New MenuItem("&Open")
      Dim myMenuItemSave As New MenuItem("&Save")

      'add sub menus to the File menu
      myMenuItemFile.MenuItems.Add(myMenuItemNew)
      myMenuItemFile.MenuItems.Add(myMenuItemOpen)
      myMenuItemFile.MenuItems.Add(myMenuItemSave)

      'add the main menu to the form
      Me.Menu = mnuBar

      ' Set the caption bar text of the form.
      Me.Text = "tutorialspoint.com"
   End Sub
End Class
使用Microsoft Visual Studio工具栏上的“开始”按钮执行并运行上述代码后,它将显示以下窗口-
Windows窗体包含一组丰富的类,用于创建具有现代外观,外观和感觉的自定义菜单。 MenuStrip , ToolStripMenuItem , ContextMenuStrip控件用于有效创建菜单栏和上下文菜单。
单击以下链接以查看其详细信息-
| Sr.No. | Control & Description |
|---|---|
| 1 |
It provides a menu system for a form. |
| 2 |
It represents a selectable option displayed on a MenuStrip or ContextMenuStrip. The ToolStripMenuItem control replaces and adds functionality to the MenuItem control of previous versions. |
| 3 |
It represents a shortcut menu. |
在表单中添加剪切,复制和粘贴功能
ClipBoard类公开的方法用于在应用程序中添加剪切,复制和粘贴功能。 ClipBoard类提供了将数据放置在系统剪贴板上并从系统剪贴板检索数据的方法。
它具有以下常用方法-
| Sr.No. | Method Name & Description |
|---|---|
| 1 |
Clear Removes all data from the Clipboard. |
| 2 |
ContainsData Indicates whether there is data on the Clipboard that is in the specified format or can be converted to that format. |
| 3 |
ContainsImage Indicates whether there is data on the Clipboard that is in the Bitmap format or can be converted to that format. |
| 4 |
ContainsText Indicates whether there is data on the Clipboard in the Text or UnicodeText format, depending on the operating system. |
| 5 |
GetData Retrieves data from the Clipboard in the specified format. |
| 6 |
GetDataObject Retrieves the data that is currently on the system Clipboard. |
| 7 |
GetImage Retrieves an image from the Clipboard. |
| 8 |
GetText Retrieves text data from the Clipboard in the Text or UnicodeText format, depending on the operating system. |
| 9 |
GetText(TextDataFormat) Retrieves text data from the Clipboard in the format indicated by the specified TextDataFormat value. |
| 10 |
SetData Clears the Clipboard and then adds data in the specified format. |
| 11 |
SetText(String) Clears the Clipboard and then adds text data in the Text or UnicodeText format, depending on the operating system. |
下面是一个示例,该示例显示了我们如何使用Clipboard类的方法剪切,复制和粘贴数据。采取以下步骤-
-
在窗体上添加一个富文本框控件和三个按钮控件。
-
将按钮的text属性分别更改为“剪切”,“复制”和“粘贴”。
-
双击按钮以在代码编辑器中添加以下代码-
Public Class Form1
   Private Sub Form1_Load(sender As Object, e As EventArgs) _
    Handles MyBase.Load
      ' Set the caption bar text of the form.
      Me.Text = "tutorialspoint.com"
   End Sub

   Private Sub Button1_Click(sender As Object, e As EventArgs) _
      Handles Button1.Click
      Clipboard.SetDataObject(RichTextBox1.SelectedText)
      RichTextBox1.SelectedText = ""
   End Sub

   Private Sub Button2_Click(sender As Object, e As EventArgs) _
       Handles Button2.Click
      Clipboard.SetDataObject(RichTextBox1.SelectedText)
   End Sub

   Private Sub Button3_Click(sender As Object, e As EventArgs) _
    Handles Button3.Click
      Dim iData As IDataObject
      iData = Clipboard.GetDataObject()
      If (iData.GetDataPresent(DataFormats.Text)) Then
         RichTextBox1.SelectedText = iData.GetData(DataFormats.Text)
      Else
         RichTextBox1.SelectedText = " "
      End If
   End Sub
End Class
使用Microsoft Visual Studio工具栏上的“开始”按钮执行并运行上述代码后,它将显示以下窗口-
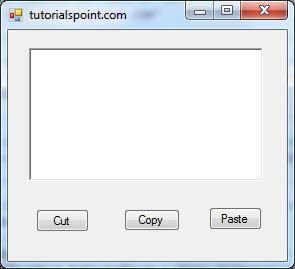
输入一些文本,然后检查按钮的工作方式。
表单中的锚定和停靠控件
锚定允许您将控件的锚点位置设置为其容器控件(例如窗体)的边缘。 Control类的Anchor属性允许您设置此属性的值。 Anchor属性获取或设置控件绑定到的容器的边缘,并确定如何使用其父控件调整控件的大小。
当您将控件锚定到窗体时,在调整窗体大小时,控件将保持其与窗体边缘的距离及其锚定位置。
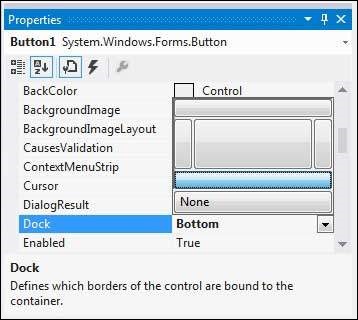
您可以从“属性”窗口中设置控件的“锚点”属性值-
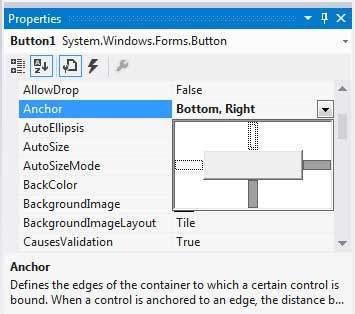
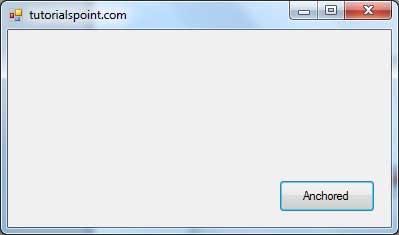
例如,让我们在窗体上添加一个Button控件,并将其anchor属性设置为Bottom,Right。运行此窗体以查看Button控件相对于窗体的原始位置。

现在,当您拉伸窗体时,“按钮”和窗体右下角之间的距离保持不变。
对接控制装置它对接,其容器的边缘中的一个的。在对接中,控件会完全填充容器的某些区域。
Control类的Dock属性执行此操作。 Dock属性获取或设置将哪些控件边框停靠到其父控件,并确定如何使用其父控件调整控件的大小。
您可以从“属性”窗口中设置控件的Dock属性值-
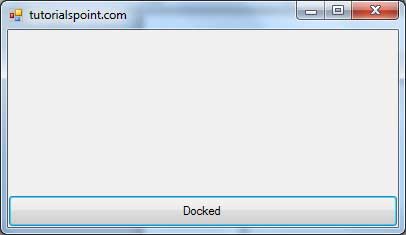
例如,让我们在窗体上添加一个Button控件,并将其Dock属性设置为Bottom。运行此窗体以查看Button控件相对于窗体的原始位置。
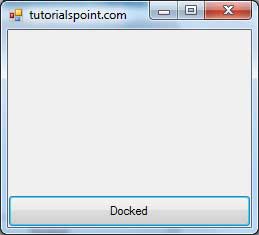
现在,当您拉伸窗体时,Button会使用窗体调整自身大小。
模态形式
模式表单是那些需要关闭或隐藏的表单,然后才能继续使用应用程序的其余部分。所有对话框都是模式形式。 MessageBox也是模式形式。
您可以通过两种方式调用模式形式-
-
调用ShowDialog方法
-
调用Show方法
让我们以一个示例为例,在该示例中,我们将创建一个模式窗体,一个对话框。采取以下步骤-
-
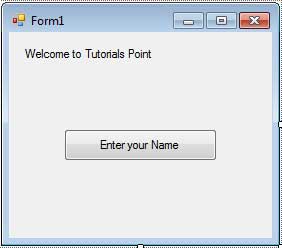
向您的应用程序中添加一个窗体Form1,并向Form1添加两个标签和一个按钮控件
-
将第一个标签和按钮的文本属性分别更改为“欢迎使用Tutorials Point”和“输入您的姓名”。保持第二个标签的文本属性为空白。
-
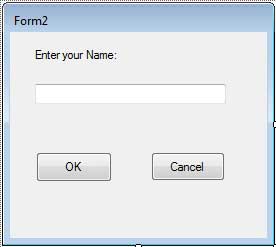
添加一个新的Windows窗体Form2,并将两个按钮,一个标签和一个文本框添加到Form2。
-
将按钮的文本属性分别更改为“确定”和“取消”。将标签的文本属性更改为“输入您的姓名:”。
-
将Form2的FormBorderStyle属性设置为FixedDialog ,以为其提供对话框边框。
-
将Form2的ControlBox属性设置为False。
-
将Form2的ShowInTaskbar属性设置为False。
-
将“确定”按钮的DialogResult属性设置为“确定”,将“取消”按钮设置为“取消”。
在Form2的Form2_Load方法中添加以下代码段-
Private Sub Form2_Load(sender As Object, e As EventArgs) _
   Handles MyBase.Load
   AcceptButton = Button1
   CancelButton = Button2
End Sub
在Form1的Button1_Click方法中添加以下代码段-
Private Sub Button1_Click(sender As Object, e As EventArgs) _
   Handles Button1.Click
   Dim frmSecond As Form2 = New Form2()

   If frmSecond.ShowDialog() = DialogResult.OK Then
      Label2.Text = frmSecond.TextBox1.Text
   End If
End Sub
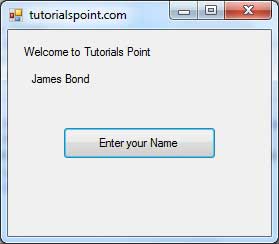
使用Microsoft Visual Studio工具栏上的“开始”按钮执行并运行上述代码后,它将显示以下窗口-
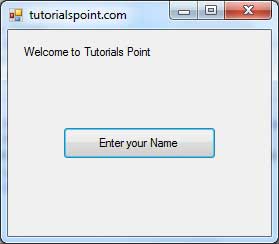
单击“输入您的姓名”按钮,将显示第二种形式-
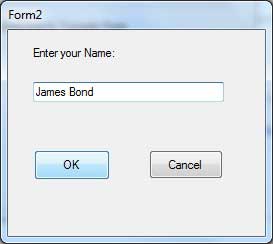
单击确定按钮,将控件和信息从模式形式返回到先前形式-