- TestNG组(1)
- TestNG组
- TestNG (1)
- TestNG - 任何代码示例
- 使用 TestNg 在Selenium WebDriver 中断言(1)
- 使用 TestNg 在Selenium WebDriver 中断言
- TestNG参数(1)
- TestNG参数
- TestNG教程
- TestNG教程(1)
- TestNG教程
- TestNG的功能
- TestNG的功能(1)
- 讨论TestNG
- 讨论TestNG(1)
- TestNG-环境(1)
- TestNG-环境
- TestNG-概述(1)
- TestNG-概述
- TestNG注释
- TestNG注释(1)
- Selenium号
- Selenium号(1)
- selenium (1)
- Selenium TestNG 在操作前延迟 - Java 代码示例
- TestNG注释属性
- TestNG注释属性(1)
- testng 中的参数化测试 (1)
- TestNG-参数化测试
📅 最后修改于: 2020-12-04 04:53:17 🧑 作者: Mango
TestNG是一个功能强大的测试框架,它是JUnit的增强版本,在TestNG出现之前已经使用了很长时间。 NG代表“下一代”。
TestNG框架提供以下功能-
- 注释可以帮助我们轻松组织测试。
- 灵活的测试配置。
- 测试用例可以更容易地分组。
- 使用TestNG可以实现测试的并行化。
- 支持数据驱动的测试。
- 内置报告。
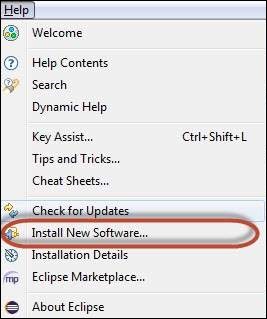
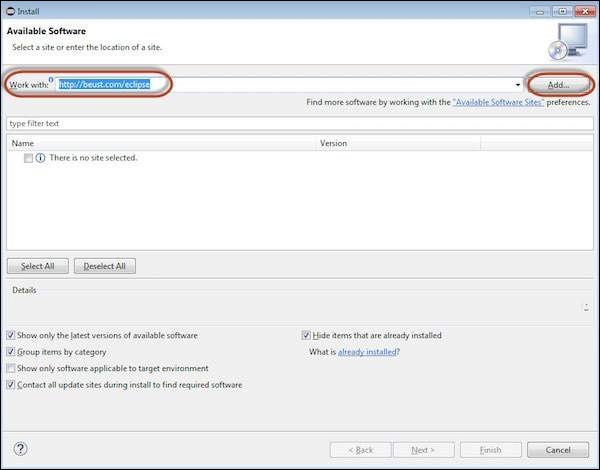
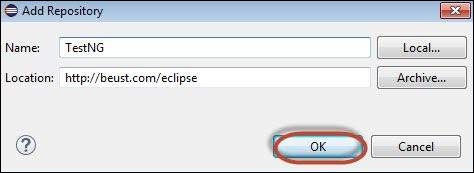
为Eclipse安装TestNG
步骤1-启动Eclipse,然后选择“安装新软件”。
步骤2-输入URL作为“ http://beust.com/eclipse”,然后单击“添加”。
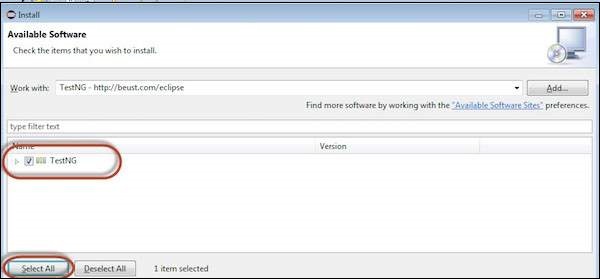
步骤3-打开“添加存储库”对话框。输入名称为“ TestNG”,然后单击“确定”
步骤4-单击“全选”,将选择“ TestNG”,如图所示。
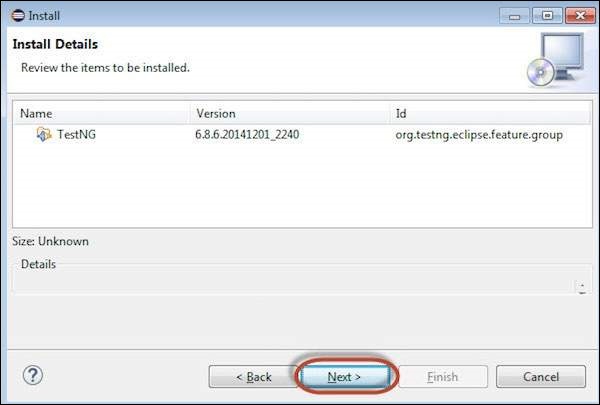
步骤5-单击“下一步”继续。

步骤6-查看选中的项目,然后单击“下一步”。
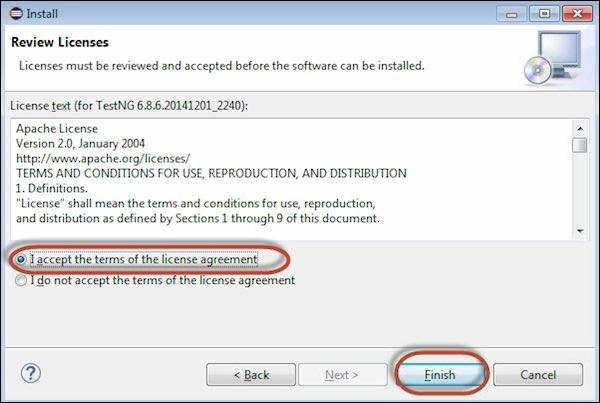
步骤7- “接受许可协议”,然后单击“完成”。
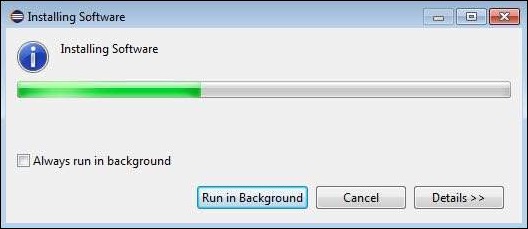
步骤8 -TestNG开始安装,进度将显示如下。
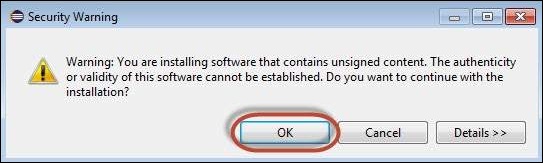
步骤9-由于无法建立软件的有效性而弹出安全警告。点击“确定”。
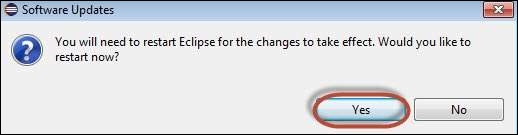
步骤10-安装程序提示重新启动Eclipse,以使更改生效。点击“是”。
TestNG中的注释
注释已在JDK 5中正式添加到Java语言中,并且TestNG选择了使用注释来注释测试类。以下是使用注释的一些好处。关于TestNG的更多信息可以在这里找到
-
TestNG通过查找注释来标识它感兴趣的方法。因此,方法名称不限于任何模式或格式。
-
我们可以将其他参数传递给注释。
-
注释是强类型的,因此编译器将立即标记任何错误。
-
测试类不再需要扩展任何内容(例如,对于JUnit 3,是TestCase)。
| Sr.No. | Annotation & Description |
|---|---|
| 1 |
@BeforeSuite The annotated method will be run only once before all the tests in this suite have run. |
| 2 |
@AfterSuite The annotated method will be run only once after all the tests in this suite have run. |
| 3 |
@BeforeClass The annotated method will be run only once before the first test method in the current class is invoked. |
| 4 |
@AfterClass The annotated method will be run only once after all the test methods in the current class have run. |
| 5 |
@BeforeTest The annotated method will be run before any test method belonging to the classes inside the |
| 6 |
@AfterTest The annotated method will be run after all the test methods belonging to the classes inside the |
| 7 |
@BeforeGroups The list of groups that this configuration method will run before. This method is guaranteed to run shortly before the first test method that belongs to any of these groups is invoked. |
| 8 |
@AfterGroups The list of groups that this configuration method will run after. This method is guaranteed to run shortly after the last test method that belongs to any of these groups is invoked. |
| 9 |
@BeforeMethod The annotated method will be run before each test method. |
| 10 |
@AfterMethod The annotated method will be run after each test method. |
| 11 |
@DataProvider Marks a method as supplying data for a test method. The annotated method must return an Object[ ][ ] where each Object[ ] can be assigned the parameter list of the test method. The @Test method that wants to receive data from this DataProvider needs to use a dataProvider name equals to the name of this annotation. |
| 12 |
@Factory Marks a method as a factory that returns objects that will be used by TestNG as Test classes. The method must return Object[ ]. |
| 13 |
@Listeners Defines listeners on a test class. |
| 14 |
@Parameters Describes how to pass parameters to a @Test method. |
| 15 |
@Test Marks a class or a method as part of the test. |
TestNG-Eclipse安装
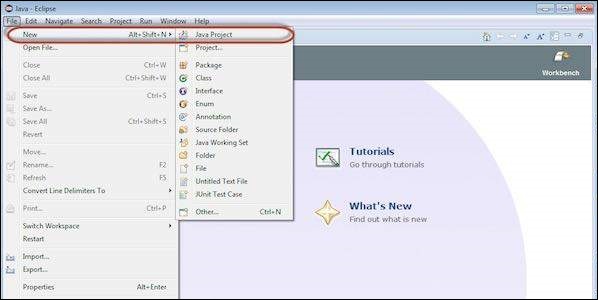
步骤1-启动Eclipse并创建一个“ New Java Project”,如下所示。
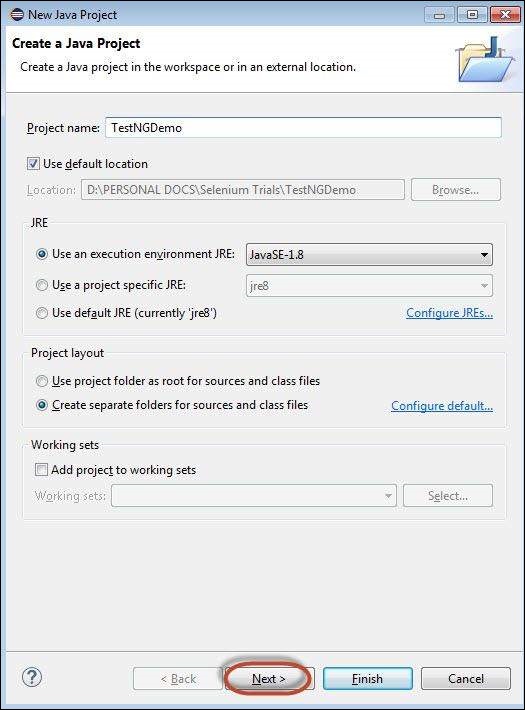
步骤2-输入项目名称,然后单击“下一步”。
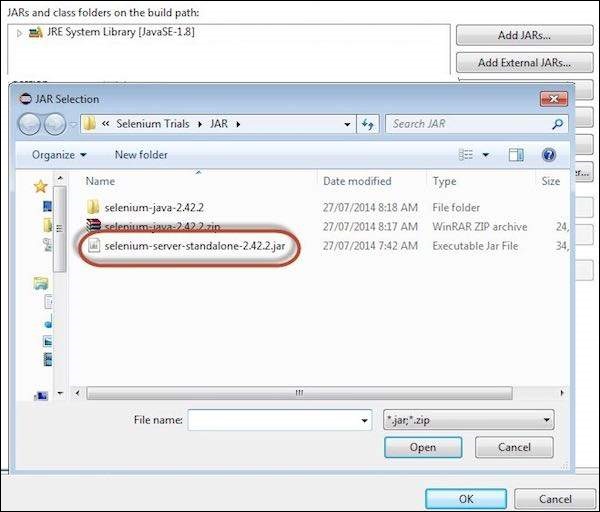
步骤3-导航到“库”选项卡,并通过单击“添加外部JAR’s”来添加Selenium远程控制服务器JAR文件,如下所示。
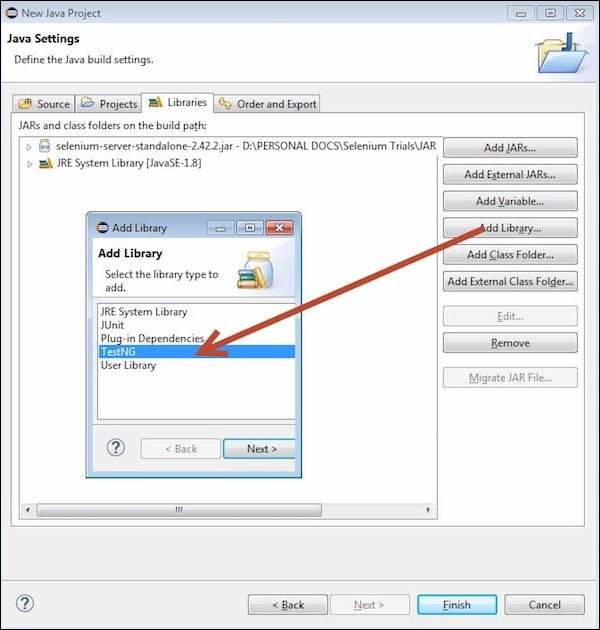
步骤4-添加的JAR文件显示在这里。点击“添加库”。

步骤5- “添加库”对话框打开。选择“ TestNG”,然后在“添加库”对话框中单击“下一步”。
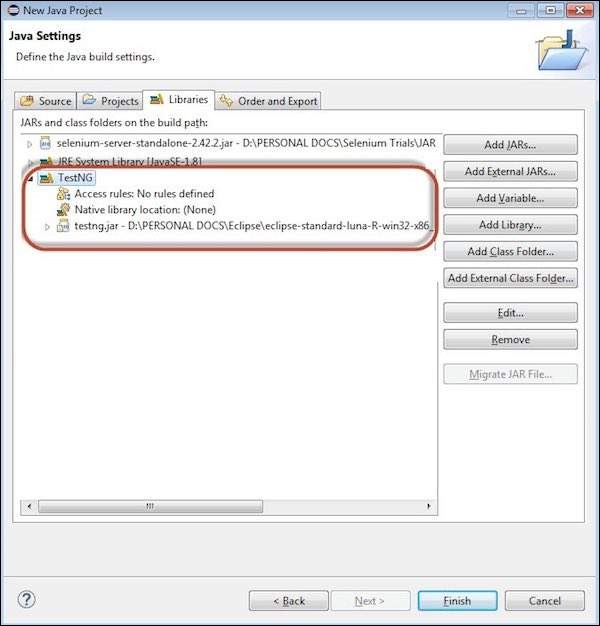
步骤6-添加了添加的“ TestNG”库,并显示如下。
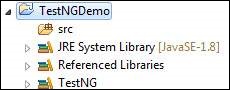
步骤7-创建项目后,项目的结构如下所示。
步骤8-右键单击“ src”文件夹,然后选择“新建” >>“其他”。
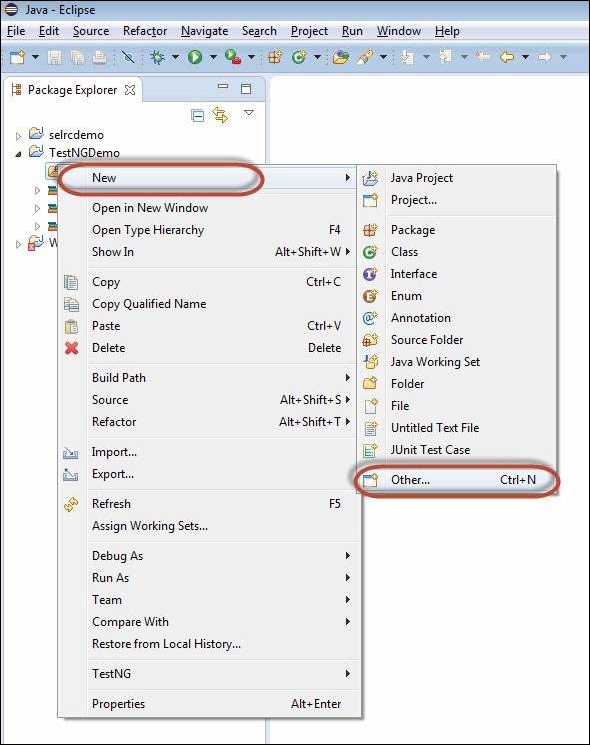
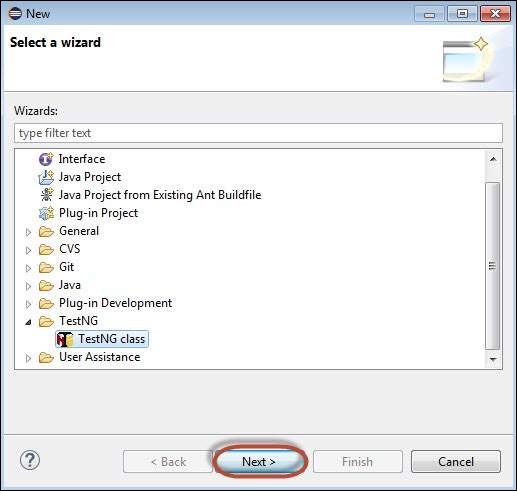
步骤9-选择“ TestNG”,然后单击“下一步”。
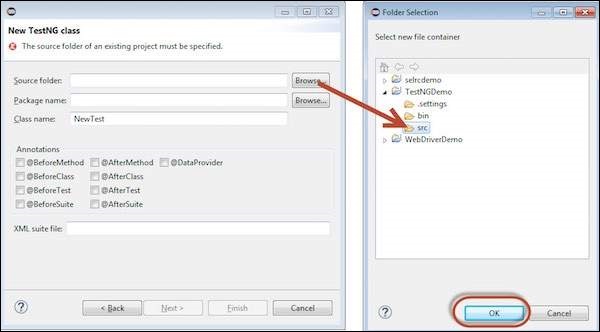
步骤10-选择“源文件夹”名称,然后单击“确定”。
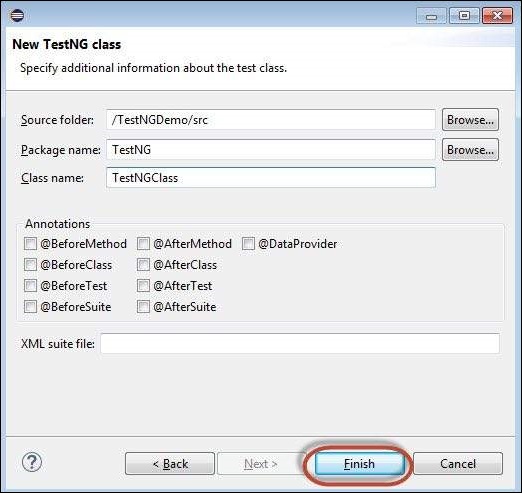
步骤11-选择“包名称”,“类名称”,然后单击“完成”。
步骤12-将显示Package Explorer和创建的类。
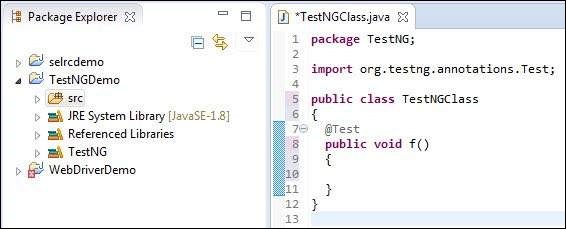
TestNG中的第一个测试
现在让我们开始使用TestNG编写脚本。让我们为用于理解WebDriver的相同示例编写脚本。我们将使用演示应用程序www.calculator.net并执行百分比计算器。
在以下测试中,您会注意到没有主要方法,因为testNG将驱动程序执行流程。初始化驱动程序后,它将执行“ @BeforeTest”方法,然后执行“ @Test”,然后执行“ @AfterTest”。请注意,一个类中可以有任意数量的“ @Test”注释,但“ @BeforeTest”和“ @AfterTest”只能出现一次。
package TestNG;

import java.util.concurrent.TimeUnit;

import org.openqa.selenium.*;
import org.openqa.selenium.firefox.FirefoxDriver;

import org.testng.annotations.AfterTest;
import org.testng.annotations.BeforeTest;
import org.testng.annotations.Test;

public class TestNGClass {
   WebDriver driver = new FirefoxDriver();

   @BeforeTest
   public void launchapp() {
      // Puts an Implicit wait, Will wait for 10 seconds before throwing exception
      driver.manage().timeouts().implicitlyWait(10, TimeUnit.SECONDS);

      // Launch website
      driver.navigate().to("http://www.calculator.net");
      driver.manage().window().maximize();
   }

   @Test
   public void calculatepercent() {
      // Click on Math Calculators
      driver.findElement(By.xpath(".//*[@id='menu']/div[3]/a")).click();

      // Click on Percent Calculators
      driver.findElement(By.xpath(".//*[@id='menu']/div[4]/div[3]/a")).click();

      // Enter value 10 in the first number of the percent Calculator
      driver.findElement(By.id("cpar1")).sendKeys("10");

      // Enter value 50 in the second number of the percent Calculator
      driver.findElement(By.id("cpar2")).sendKeys("50");

      // Click Calculate Button
      driver.findElement(By.xpath(".//*[@id='content']/table/tbody/tr/td[2]/input")).click();

      // Get the Result Text based on its xpath
      String result =
         driver.findElement(By.xpath(".//*[@id='content']/p[2]/span/font/b")).getText();

      // Print a Log In message to the screen
      System.out.println(" The Result is " + result);

      if(result.equals("5")) {
         System.out.println(" The Result is Pass");
      } else {
         System.out.println(" The Result is Fail");
      }
   }

   @AfterTest
   public void terminatetest() {
      driver.close();
   }
}
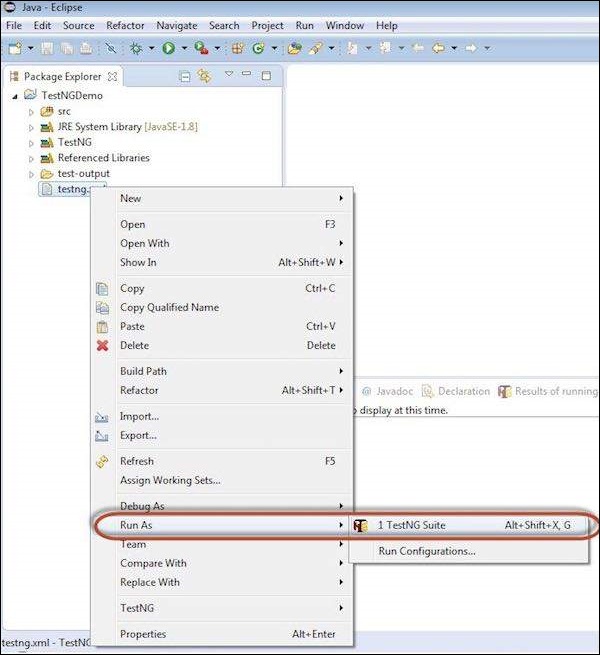
执行
要执行,右键单击创建的XML,然后选择“运行方式” >>“ TestNG Suite”
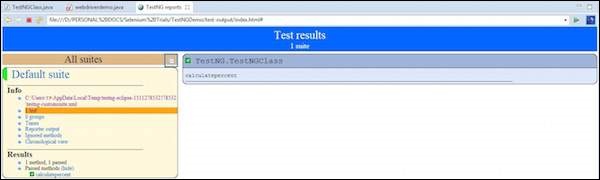
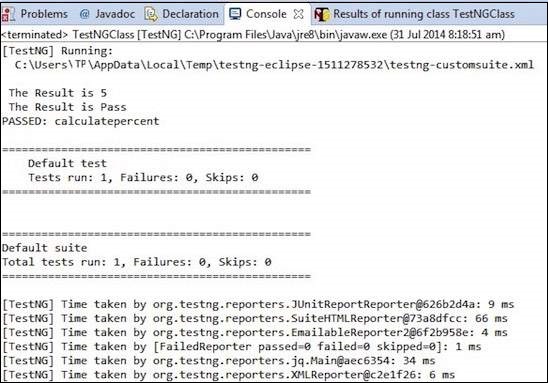
结果分析
输出被扔到控制台,它将显示如下。控制台输出还具有执行摘要。
TestNG的结果也可以在其他选项卡中看到。单击“ HTML报告视图”按钮,如下所示。

HTML结果将显示如下。