使用Python控制 Web 浏览器
在本文中,我们将看到如何使用Python使用selenium控制 Web 浏览器。 Selenium是一种自动化 Web 浏览器的开源工具。它提供了一个单一的界面,让您可以使用 Ruby、 Java、NodeJS、 PHP、Perl、 Python和 C# 等编程语言编写测试脚本。
要安装此模块,请在终端中运行以下命令:
pip install selenium对于自动化,请从此处下载最新的 Google Chrome 和 chromedriver。
在这里,我们将在“https://auth.geeksforgeeks.org”自动授权,并从登录的个人资料中提取姓名、电子邮件、研究所名称。
初始化和授权
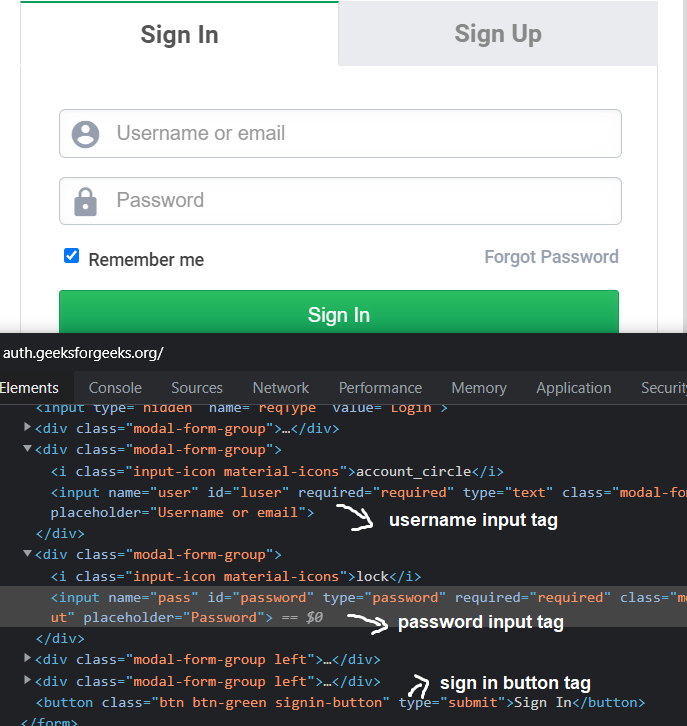
首先,我们需要使用selenium启动 web 驱动程序并向 url 发送 get 请求并识别 HTML 文档并找到接受用户名/电子邮件、密码和登录按钮的输入标签和按钮标签。

将用户给定的电子邮件和密码分别发送到输入标签:
driver.find_element_by_name('user').send_keys(email)
driver.find_element_by_name('pass').send_keys(password)
识别按钮标签并通过selenium webdriver 使用 CSS 选择器单击它:
driver.find_element_by_css_selector(‘button.btn.btn-green.signin-button’).click()
抓取数据
从 GFG Profile 中抓取基本信息
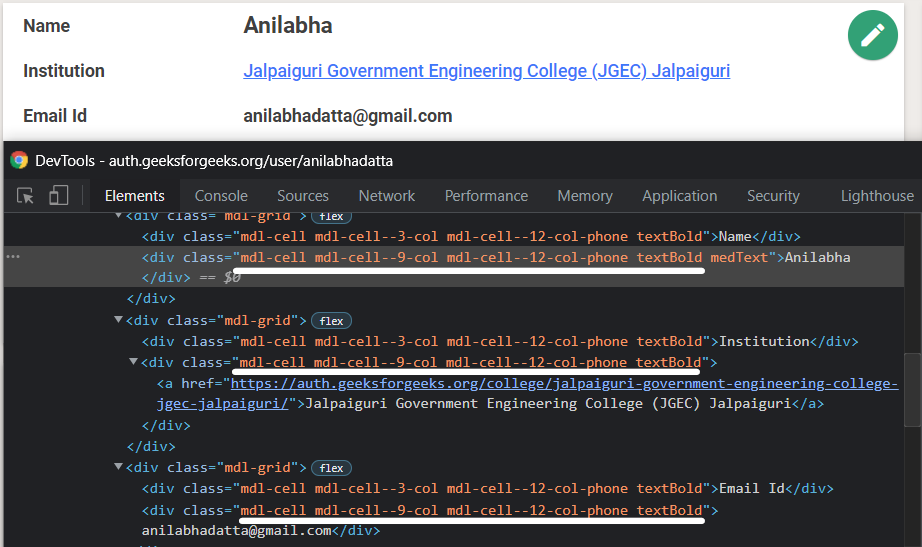
单击登录后,应加载一个包含姓名、研究所名称和电子邮件 ID 的新页面。识别包含上述数据的标签并选择它们。
container = driver.find_elements_by_css_selector(‘div.mdl-cell.mdl-cell–9-col.mdl-cell–12-col-phone.textBold’)

从返回的选定 css 选择器列表中获取每个标签的文本:
name = container[0].text
try:
    institution = container[1].find_element_by_css_selector('a').text
except:
    institution = container[1].text
email_id = container[2].text
最后,打印输出:
print({"Name": name, "Institution": institution, "Email ID": email})从“练习”选项卡中抓取信息
单击“练习”选项卡并等待几秒钟以加载页面。
driver.find_elements_by_css_selector('a.mdl-navigation__link')[1].click()
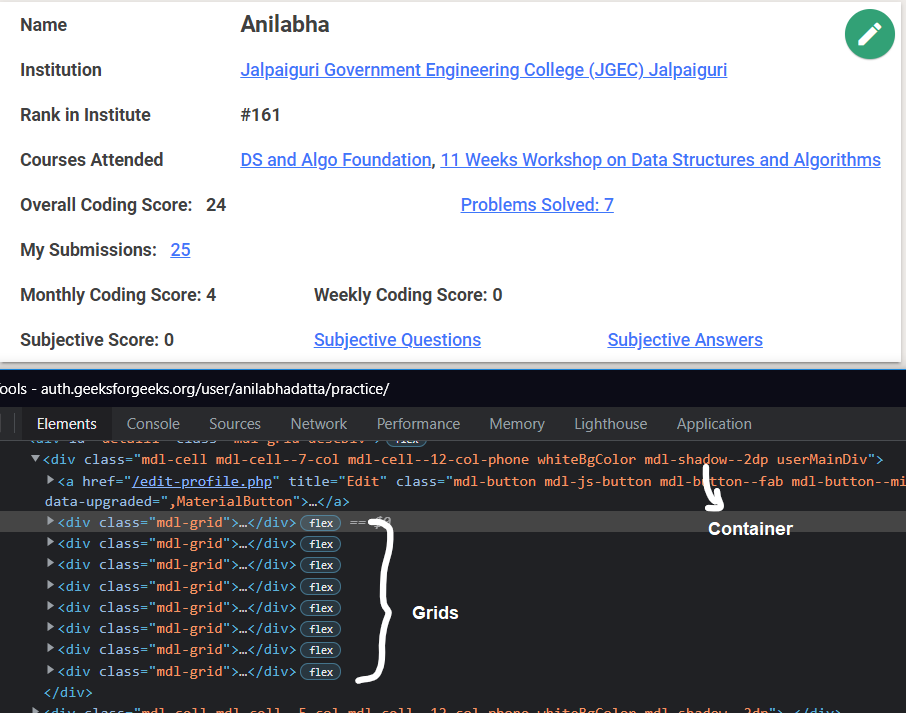
找到包含所有信息的容器,并使用 CSS 选择器从包含信息的容器中选择网格。
container = driver.find_element_by_css_selector(‘div.mdl-cell.mdl-cell–7-col.mdl-cell–12-col-phone.whiteBgColor.mdl-shadow–2dp.userMainDiv’)
grids = container.find_elements_by_css_selector(‘div.mdl-grid’)

迭代每个选定的网格并从中提取文本并将其添加到集合/列表中以进行输出。
res = set()
for grid in grids:
    res.add(grid.text.replace('\n',':'))
下面是完整的实现:
Python3
# Import the required modules
from selenium import webdriver
import time

# Main Function
if __name__ == '__main__':

    # Provide the email and password
    email = 'example@example.com'
    password = 'password'

    options = webdriver.ChromeOptions()
    options.add_argument("--start-maximized")
    options.add_argument('--log-level=3')

    # Provide the path of chromedriver present on your system.
    driver = webdriver.Chrome(executable_path="C:/chromedriver/chromedriver.exe",
                              chrome_options=options)
    driver.set_window_size(1920,1080)

    # Send a get request to the url
    driver.get('https://auth.geeksforgeeks.org/')
    time.sleep(5)

    # Finds the input box by name in DOM tree to send both
    # the provided email and password in it.
    driver.find_element_by_name('user').send_keys(email)
    driver.find_element_by_name('pass').send_keys(password)

    # Find the signin button and click on it.
    driver.find_element_by_css_selector(
        'button.btn.btn-green.signin-button').click()
    time.sleep(5)

    # Returns the list of elements
    # having the following css selector.
    container = driver.find_elements_by_css_selector(
        'div.mdl-cell.mdl-cell--9-col.mdl-cell--12-col-phone.textBold')

    # Extracts the text from name,
    # institution, email_id css selector.
    name = container[0].text
    try:
        institution = container[1].find_element_by_css_selector('a').text
    except:
        institution = container[1].text
    email_id = container[2].text

    # Output Example 1
    print("Basic Info")
    print({"Name": name,
           "Institution": institution,
           "Email ID": email})

    # Clicks on Practice Tab
    driver.find_elements_by_css_selector(
      'a.mdl-navigation__link')[1].click()
    time.sleep(5)

    # Selected the Container containing information
    container = driver.find_element_by_css_selector(
      'div.mdl-cell.mdl-cell--7-col.mdl-cell--12-col-phone.\
      whiteBgColor.mdl-shadow--2dp.userMainDiv')

    # Selected the tags from the container
    grids = container.find_elements_by_css_selector(
      'div.mdl-grid')

    # Iterate each tag and append the text extracted from it.
    res = set()
    for grid in grids:
        res.add(grid.text.replace('\n',':'))

    # Output Example 2
    print("Practice Info")
    print(res)

    # Quits the driver
    driver.close()
    driver.quit()
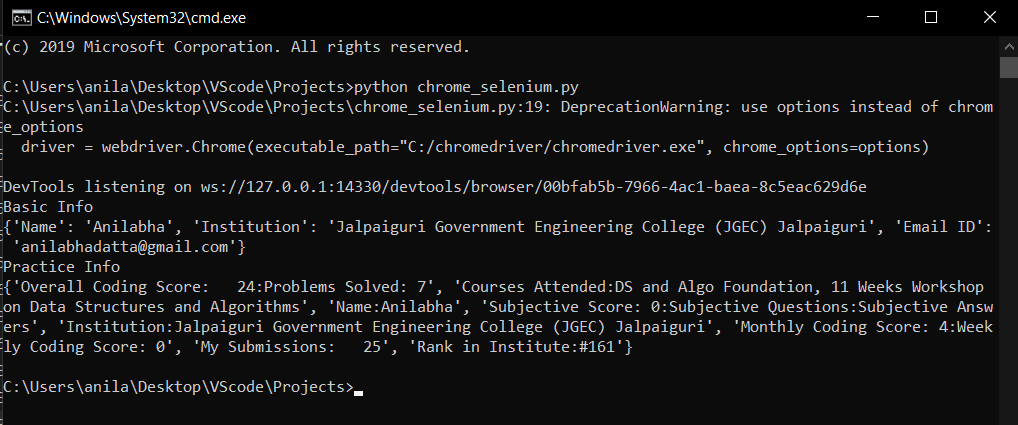
输出:

