📌 相关文章
- 延迟millis arduino - C++ (1)
- arduino (1)
- Arduino盾
- Arduino盾(1)
- Arduino库
- arduino 和 (1)
- Arduino库(1)
- 延迟millis arduino - C++ 代码示例
- javascript中的延迟(1)
- php中的延迟(1)
- javascript代码示例中的延迟
- Arduino-函数(1)
- Arduino函数(1)
- Arduino函数
- Arduino-函数
- Arduino-字符串
- Arduino字符串
- Arduino-字符串(1)
- Arduino字符串(1)
- php代码示例中的延迟
- 什么是延迟?
- 什么是延迟?(1)
- arduino 和 - 任何代码示例
- arduino - 任何代码示例
- Arduino-安装
- Arduino-安装(1)
- 什么是Arduino?(1)
- 什么是Arduino?
- jquery 延迟 - Javascript (1)
📜 Arduino延迟
📅 最后修改于: 2020-12-27 09:35:08 🧑 作者: Mango
Arduino延迟
此处,Arduino Delay指定了Arduino编程中使用的delay()函数。让我们详细讨论delay()函数。
delay()函数
delay()函数将程序或任务暂停指定的持续时间。在打开和关闭括号内指定时间(以毫秒为单位)。
哪里,
1秒= 1000毫秒
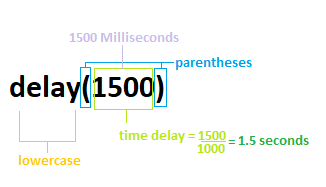
范例1:
延迟(500)
在此,指定时间为0.5秒。
如下图所示:
程序将等待指定的持续时间,然后再继续执行代码的下一行。 delay()函数允许代码中的无符号长数据类型。
根据项目的要求,我们可以使用短延迟和长延迟来创建许多草图。它不会禁用任何中断。但是,delay()函数有一些缺点。
草图中使用delay()的缺点
delay()停止(停止)其他活动,例如操纵板上的引脚,进行数学计算,在延迟函数期间读取其他传感器。程序员通常在草图中避免delay()超过10秒。
让我们借助两个示例来了解delay()函数。
范例1:
考虑下面的代码。
int LEDlightPin = 8;   // PIN 8 of the Arduino board initialized to the LED
// We can specify the variable according to our choice.
// For example, int PINonboard= 8
void setup( )
{
pinMode( LEDlightPin, OUTPUT) // the digital pin on board is set as the Output.
}
void loop( )
{
digitalWrite(LEDlightPin, HIGH);
delay(1500);  // The LED will light/ON for 1.5 seconds = 1500 milliseconds
digitalWrite(LEDlightPin, LOW);
delay(500); // The LED will dim/OFF for 0.5 seconds = 0.5x1000 = 500 milliseconds
//We can modify the time duration accoordingly.
}
范例2:
考虑下面的代码:
void setup ( )
{
Serial.begin ( 4800); //opens the serial port and set the bits per rate to 4800
}
void loop ( )
{
Serial.print(" Welcome");
delay(1000);
Serial.println("to delay");  // It will print 'to delay' followed by a new line.
delay ( 500);  // delay of 0.5 seconds between each printed line.
}
在输出中,将出现“欢迎”一词,后跟“延迟一秒钟”。 0.5秒后,将打印另一行。
输出:
输出将被重复打印。