- Arduino-循环(1)
- Arduino-循环
- C++ While循环
- while 循环 c++ (1)
- c++ while 循环 - C++ (1)
- F#while循环
- C#While循环(1)
- c#中的while循环(1)
- c# while 循环 - C# (1)
- R While循环(1)
- R – while 循环
- C中的While循环
- c++中的while循环(1)
- F#while循环(1)
- R While循环
- C#While循环
- C中的While循环(1)
- R – while 循环(1)
- while 循环 (1)
- C C++ while循环与示例(1)
- C C++ while循环与示例(1)
- While 循环的示例 (1)
- C / C++ while循环与示例
- C / C++ while循环与示例
- Python while循环
- Python while循环
- Python while循环(1)
- while 循环 - Python (1)
- Python while 循环 (1)
📅 最后修改于: 2020-12-27 09:39:10 🧑 作者: Mango
Arduino while循环
while循环()是条件循环,将继续执行括号内的代码,直到指定的条件变为假为止。
在更改测试条件或使其停止之前,while循环永远不会退出。 Arduino中while循环的常见用法包括传感器测试,校准(校准传感器的输入),可变增量等。
语法为:
while (condition)
{
// code or set of statements
}
哪里,
condition :它指定布尔表达式,该布尔表达式确定条件为true或false。
例如,
variable = 0;
while (variable < 100) {
  // performs the specified task 100 times repeatedly
  variable++ ;  // increments after every execution
}
只要变量小于100,上述while循环中花括号内的代码将连续重复执行。
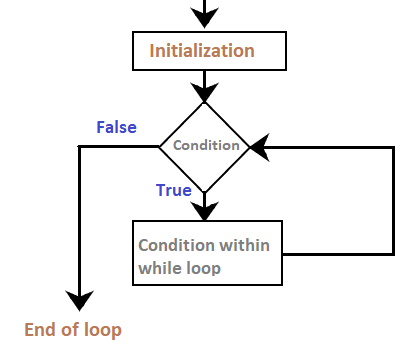
流程图
流程图如下所示:
代码示例
为了更改程序的流程,我们需要在while循环的括号内更改指定的条件。该过程非常类似于if语句。
让我们通过两个示例来了解while循环的概念。
范例1:
考虑下面的代码:
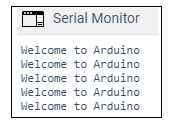
int a = 0;
void setup()
{
  Serial.begin(9600);
while( a < 5)
{
  Serial.println("Welcome to Arduino");
  a = a + 1;
}
}
  void loop()
  {
  }
输出:
循环内的消息将被打印五次,如下所示:
让我们看一下代码。
说明:首先,我们将变量a定义为0,并照常初始化串行监视器(意味着Serial.begin())。循环首先检查括号内指定的条件。首先,a = 0。条件为true(0 <5)。花括号内的代码将执行,并显示消息。
现在,a的值被递增(加1到A),并且循环再次执行。
同样,该条件保持为真的五倍。当a = 5时,条件变为假,并且循环退出并下降。执行循环外的代码。
让我们考虑另一个例子。
范例2:
代码类似于上面的示例。我们只会在循环外添加一些语句。
考虑下面的代码:
int a = 0;
void setup()
{
  Serial.begin(9600);
while( a < 5)
{
  Serial.println("Welcome to Arduino");
  a = a + 1;
}
  Serial.println("DONE");
  Serial.println("Welcome to the code outside the loop");
}
  void loop()
  {
  }
输出:

我们可以注意到,一旦循环中的条件变为假,就会打印出循环外指定的消息。
做…而
do-while循环的工作类似于while循环。 do-while内的条件将至少执行一次。这是因为条件是在循环的末尾而不是开始时进行测试的。
语法为:
do
{
// code or set of statements
} while (condition);
哪里,
condition :它指定布尔表达式,该布尔表达式确定条件为true或false。
例如,
int b = 0;
do {
  delay(100);          // wait for stabilization of the sensors
  b = readSensors();  // It checks the sensors
} while (x < 100); // specified condition
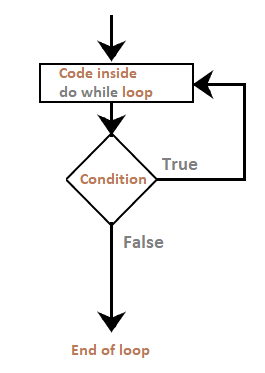
流程图
流程图如下所示:
代码示例
让我们通过一个例子来理解do-while循环的概念。
范例1:
考虑下面的代码:
int a = 0;
void setup()
{
Serial.begin(9600);
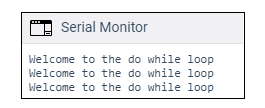
do
{
Serial.println("Welcome to the do while loop");
a = a + 1;
} while( a < 3);
}
void loop()
{
}
输出: