Python – 使用图像处理进行血细胞识别
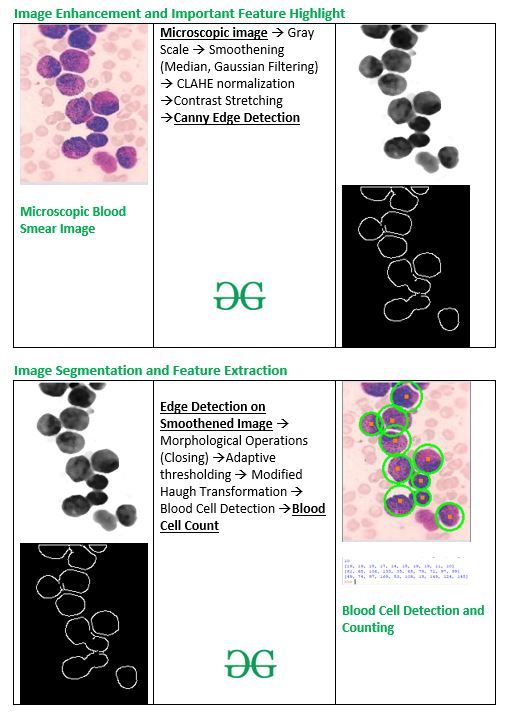
白细胞和红细胞的检测对于各种医学应用非常有用,例如白细胞计数、疾病诊断等。圆形检测是最合适的方法。本文是在获得的增强图像上实施适合血细胞识别的图像分割和特征提取技术。
为了解释图像增强和边缘检测的工作和使用,本文使用图像:
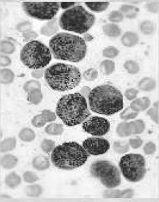
输入 :
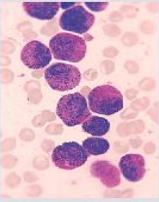
原始血涂片显微图像
代码:用于图像增强的Python代码
Python3
import numpy as np
import cv2
import matplotlib.pyplot as plt

# read original image
image = cv2.imread("c1.png")

# convert to gray scale image
gray = cv2.cvtColor(image, cv2.COLOR_BGR2GRAY)
cv2.imwrite('gray.png', gray)

# apply median filter for smoothning
blurM = cv2.medianBlur(gray, 5)
cv2.imwrite('blurM.png', blurM)

# apply gaussian filter for smoothning
blurG = cv2.GaussianBlur(gray, (9, 9), 0)
cv2.imwrite('blurG.png', blurG)

# histogram equalization
histoNorm = cv2.equalizeHist(gray)
cv2.imwrite('histoNorm.png', histoNorm)

# create a CLAHE object for
# Contrast Limited Adaptive Histogram Equalization (CLAHE)
clahe = cv2.createCLAHE(clipLimit = 2.0, tileGridSize=(8, 8))
claheNorm = clahe.apply(gray)
cv2.imwrite('claheNorm.png', claheNorm)


# contrast stretching
# Function to map each intensity level to output intensity level.
def pixelVal(pix, r1, s1, r2, s2):
    if (0 <= pix and pix <= r1):
        return (s1 / r1) * pix
    elif (r1 < pix and pix <= r2):
        return ((s2 - s1) / (r2 - r1)) * (pix - r1) + s1
    else:
        return ((255 - s2) / (255 - r2)) * (pix - r2) + s2

    # Define parameters.


r1 = 70
s1 = 0
r2 = 200
s2 = 255

# Vectorize the function to apply it to each value in the Numpy array.
pixelVal_vec = np.vectorize(pixelVal)

# Apply contrast stretching.
contrast_stretched = pixelVal_vec(gray, r1, s1, r2, s2)
contrast_stretched_blurM = pixelVal_vec(blurM, r1, s1, r2, s2)

cv2.imwrite('contrast_stretch.png', contrast_stretched)
cv2.imwrite('contrast_stretch_blurM.png',
            contrast_stretched_blurM)

# edge detection using canny edge detector
edge = cv2.Canny(gray, 100, 200)
cv2.imwrite('edge.png', edge)

edgeG = cv2.Canny(blurG, 100, 200)
cv2.imwrite('edgeG.png', edgeG)

edgeM = cv2.Canny(blurM, 100, 200)
cv2.imwrite('edgeM.png', edgeM)
Python3
# read enhanced image
img = cv2.imread('cell.png', 0)
# morphological operations
kernel = np.ones((5, 5), np.uint8)
dilation = cv2.dilate(img, kernel, iterations = 1)
closing = cv2.morphologyEx(img, cv2.MORPH_CLOSE, kernel)
# Adaptive thresholding on mean and gaussian filter
th2 = cv2.adaptiveThreshold(img, 255, cv2.ADAPTIVE_THRESH_MEAN_C, \
cv2.THRESH_BINARY, 11, 2)
th3 = cv2.adaptiveThreshold(img, 255, cv2.ADAPTIVE_THRESH_GAUSSIAN_C, \
cv2.THRESH_BINARY, 11, 2)
# Otsu's thresholding
ret4, th4 = cv2.threshold(img, 0, 255, cv2.THRESH_BINARY + cv2.THRESH_OTSU)
# Initialize the list
Cell_count, x_count, y_count = [], [], []
# read original image, to display the circle and center detection
display = cv2.imread("D:/Projects / ImageProcessing / DA1 / sample1 / cellOrig.png")
# hough transform with modified circular parameters
circles = cv2.HoughCircles(image, cv2.HOUGH_GRADIENT, 1.2, 20,
param1 = 50, param2 = 28, minRadius = 1, maxRadius = 20)
# circle detection and labeling using hough transformation
if circles is not None:
# convert the (x, y) coordinates and radius of the circles to integers
circles = np.round(circles[0, :]).astype("int")
# loop over the (x, y) coordinates and radius of the circles
for (x, y, r) in circles:
cv2.circle(display, (x, y), r, (0, 255, 0), 2)
cv2.rectangle(display, (x - 2, y - 2),
(x + 2, y + 2), (0, 128, 255), -1)
Cell_count.append(r)
x_count.append(x)
y_count.append(y)
# show the output image
cv2.imshow("gray", display)
cv2.waitKey(0)
# display the count of white blood cells
print(len(Cell_count))
# Total number of radius
print(Cell_count)
# X co-ordinate of circle
print(x_count)
# Y co-ordinate of circle
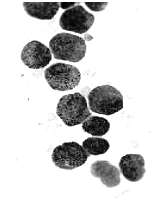
print(y_count)输出增强图像:
灰度图像

中值滤波图像

高斯滤波图像
直方图均衡图像
CLAHE 归一化图像
对比度拉伸图像

中值滤波图像的对比度拉伸
高斯滤波图像上的 Canny 边缘检测
中值滤波图像上的 Canny 边缘检测
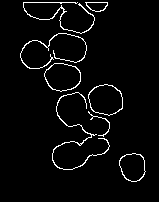
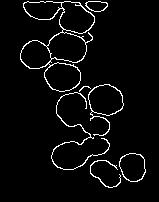
图像分割和特征提取
Python3
# read enhanced image
img = cv2.imread('cell.png', 0)

# morphological operations
kernel = np.ones((5, 5), np.uint8)
dilation = cv2.dilate(img, kernel, iterations = 1)
closing = cv2.morphologyEx(img, cv2.MORPH_CLOSE, kernel)

# Adaptive thresholding on mean and gaussian filter
th2 = cv2.adaptiveThreshold(img, 255, cv2.ADAPTIVE_THRESH_MEAN_C, \
            cv2.THRESH_BINARY, 11, 2)
th3 = cv2.adaptiveThreshold(img, 255, cv2.ADAPTIVE_THRESH_GAUSSIAN_C, \
            cv2.THRESH_BINARY, 11, 2)
# Otsu's thresholding
ret4, th4 = cv2.threshold(img, 0, 255, cv2.THRESH_BINARY + cv2.THRESH_OTSU)

# Initialize the list
Cell_count, x_count, y_count = [], [], []

# read original image, to display the circle and center detection
display = cv2.imread("D:/Projects / ImageProcessing / DA1 / sample1 / cellOrig.png")

# hough transform with modified circular parameters
circles = cv2.HoughCircles(image, cv2.HOUGH_GRADIENT, 1.2, 20,
                           param1 = 50, param2 = 28, minRadius = 1, maxRadius = 20)

# circle detection and labeling using hough transformation
if circles is not None:
        # convert the (x, y) coordinates and radius of the circles to integers
        circles = np.round(circles[0, :]).astype("int")

        # loop over the (x, y) coordinates and radius of the circles
        for (x, y, r) in circles:

                cv2.circle(display, (x, y), r, (0, 255, 0), 2)
                cv2.rectangle(display, (x - 2, y - 2),
                              (x + 2, y + 2), (0, 128, 255), -1)
                Cell_count.append(r)
                x_count.append(x)
                y_count.append(y)
        # show the output image
        cv2.imshow("gray", display)
        cv2.waitKey(0)

# display the count of white blood cells
print(len(Cell_count))
# Total number of radius
print(Cell_count)
# X co-ordinate of circle
print(x_count)
# Y co-ordinate of circle
print(y_count)
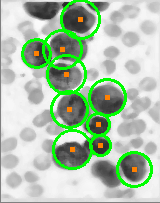
输出图像:
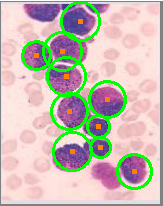
血细胞检测q
结束
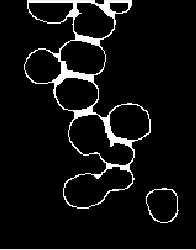
扩张
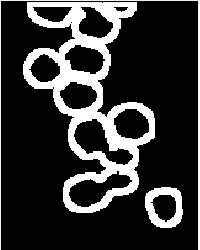
自适应阈值
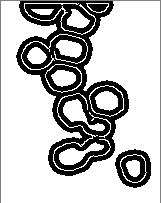
用于圆检测的改进 Haugh 变换
完整流程总结