- Flutter中的路由和导航器
- Flutter中的路由和导航器(1)
- ionic 导航和路由(1)
- ionic 导航和路由
- Flutter – 动画导航(1)
- Flutter – 动画导航
- Flutter – 命名路由
- Flutter – 命名路由(1)
- Flutter – 命名路由
- Flutter – 命名路由(1)
- Flutter – 路由转换中的动画
- Flutter – 路由转换中的动画(1)
- Flutter – 路由转换中的动画
- Flutter – 路由转换中的动画(1)
- flutter 底部导航栏(1)
- flutter 底部导航栏
- 导航到路由并刷新 Angular 6 - Javascript (1)
- 导航到路由并刷新 Angular 6 - Javascript 代码示例
- Flutter – 命名路由中的参数(1)
- Flutter – 命名路由中的参数
- Flutter – 命名路由中的参数
- Flutter – 命名路由中的参数(1)
- Python路由(1)
- Python路由
- 带有参数 vue 的导航栏路由 - Javascript (1)
- 导航到新屏幕并返回 - Flutter (1)
- 导航栏代码 (1)
- 带有参数 vue 的导航栏路由 - Javascript 代码示例
- Flutter – 自定义底部导航栏
📅 最后修改于: 2021-01-02 05:24:55 🧑 作者: Mango
flutter 导航和路由
导航和路由是所有移动应用程序的一些核心概念,它使用户可以在不同页面之间移动。我们知道,每个移动应用程序都包含几个用于显示不同类型信息的屏幕。例如,一个应用程序可以具有包含各种产品的屏幕。当用户点击该产品时,它将立即显示有关该产品的详细信息。
在Flutter中,屏幕和页面称为路线,这些路线只是一个小部件。在Android中,路由类似于活动,而在iOS中,路由等效于ViewController。
在任何移动应用程序中,导航到不同页面都定义了应用程序的工作流程,并且处理导航的方法称为路由。 Flutter提供了一个基本的路由类MaterialPageRoute和两个方法Navigator.push()和Navigator.pop() ,它们显示了如何在两个路由之间导航。要在您的应用程序中开始导航,需要执行以下步骤。
步骤1:首先,您需要创建两条路线。
步骤2:然后,使用Navigator.push()方法从另一条路线导航到一条路线。
步骤3:最后,使用Navigator.pop()方法导航到第一条路线。
让我们以一个简单的示例来了解两条路线之间的导航:
创建两条路线
在这里,我们将创建两条导航路线。在这两种路线中,我们仅创建了一个按钮。当我们点击第一页上的按钮时,它将导航到第二页。同样,当我们点击第二页上的按钮时,它将返回到第一页。下面的代码片段在Flutter应用程序中创建了两条路由。
class FirstRoute extends StatelessWidget {
  @override
  Widget build(BuildContext context) {
    return Scaffold(
      appBar: AppBar(
        title: Text('First Route'),
      ),
      body: Center(
        child: RaisedButton(
          child: Text('Open route'),
          onPressed: () {
            // Navigate to second route when tapped.
          },
        ),
      ),
    );
  }
}

class SecondRoute extends StatelessWidget {
  @override
  Widget build(BuildContext context) {
    return Scaffold(
      appBar: AppBar(
        title: Text("Second Route"),
      ),
      body: Center(
        child: RaisedButton(
          onPressed: () {
            // Navigate back to first route when tapped.
          },
          child: Text('Go back!'),
        ),
      ),
    );
  }
}
使用Navigator.push()方法导航到第二条路线
Navigator.push()方法用于导航/切换到新的路线/页面/屏幕。在这里, push()方法在堆栈上添加页面/路由,然后使用导航器对其进行管理。同样,我们使用MaterialPageRoute类,该类允许使用特定于平台的动画在路线之间进行转换。以下代码说明了Navigator.push()方法的用法。
// Within the `FirstRoute` widget
onPressed: () {
  Navigator.push(
    context,
    MaterialPageRoute(builder: (context) => SecondRoute()),
  );
}
使用Navigator.pop()方法返回第一条路线
现在,我们需要使用Navigator.pop()方法关闭第二条路线并返回到第一条路线。 pop()方法允许我们从堆栈中删除当前路由,该路由由导航器管理。
// Within the SecondRoute widget
onPressed: () {
  Navigator.pop(context);
}
现在,让我们看一下完整的代码,以实现两条路线之间的导航。首先,创建Flutter项目,并将以下代码插入main.dart文件中。
import 'package:flutter/material.dart';

void main() {
  runApp(MaterialApp(
    title: 'Flutter Navigation',
    theme: ThemeData(
      // This is the theme of your application.
      primarySwatch: Colors.green,
    ),
    home: FirstRoute(),
  ));
}

class FirstRoute extends StatelessWidget {
  @override
  Widget build(BuildContext context) {
    return Scaffold(
      appBar: AppBar(
        title: Text('First Screen'),
      ),
      body: Center(
        child: RaisedButton(
          child: Text('Click Here'),
          color: Colors.orangeAccent,
          onPressed: () {
            Navigator.push(
              context,
              MaterialPageRoute(builder: (context) => SecondRoute()),
            );
          },
        ),
      ),
    );
  }
}

class SecondRoute extends StatelessWidget {
  @override
  Widget build(BuildContext context) {
    return Scaffold(
      appBar: AppBar(
        title: Text("Second Screen"),
      ),
      body: Center(
        child: RaisedButton(
          color: Colors.blueGrey,
          onPressed: () {
            Navigator.pop(context);
          },
          child: Text('Go back'),
        ),
      ),
    );
  }
}
输出量
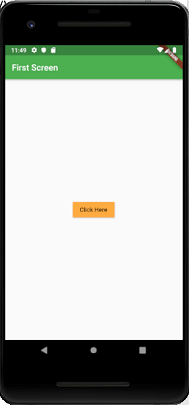
当您在Android Studio中运行该项目时,您将在模拟器中看到以下屏幕。这是仅包含一个按钮的第一个屏幕。

单击按钮Click Here,您将导航到下图所示的第二个屏幕。接下来,当您单击“返回”按钮时,您将返回第一页。

使用命名路线导航
我们已经学习了如何通过创建新路线来导航到新屏幕以及如何使用导航器进行管理。导航器维护基于堆栈的路由历史记录。如果需要在应用程序的许多部分中导航到同一屏幕,则此方法无益,因为它会导致代码重复。可以通过定义命名的路线来删除此问题的解决方案,并且可以使用命名的路线进行导航。
我们可以使用Navigator.pushNamed()函数处理命名路由。此函数接受两个必需的参数(build context和字符串)和一个可选参数。另外,我们知道MaterialPageRoute,它负责页面转换。如果我们不使用它,则很难更改页面。
以下步骤是必需的,这些步骤演示了如何使用命名路由。
步骤1:首先,我们需要创建两个屏幕。以下代码在我们的应用中创建了两个屏幕。
class HomeScreen extends StatelessWidget {
  @override
  Widget build(BuildContext context) {
    return Scaffold(
      appBar: AppBar(
        title: Text('Home Screen'),
      ),
      body: Center(
        child: RaisedButton(
          child: Text('Click Here'),
          color: Colors.orangeAccent,
          onPressed: () {
            //
          },
        ),
      ),
    );
  }
}

class SecondScreen extends StatelessWidget {
  @override
  Widget build(BuildContext context) {
    return Scaffold(
      appBar: AppBar(
        title: Text("Second Screen"),
      ),
      body: Center(
        child: RaisedButton(
          color: Colors.blueGrey,
          onPressed: () {
            //
          },
          child: Text('Go back!'),
        ),
      ),
    );
  }
}
步骤2:定义路线。
在这一步中,我们必须定义路线。 MaterialApp构造函数负责定义初始路线和其他路线本身。在这里,初始路由告诉页面的开始,而routes属性定义了可用的命名路由和小部件。以下代码对其进行了更清晰的说明。
MaterialApp(
  title: 'Named Route Navigation',
  theme: ThemeData(
    // This is the theme of your application.
    primarySwatch: Colors.green,
  ),
  // It start the app with the "/" named route. In this case, the app starts
  // on the HomeScreen widget.
  initialRoute: '/',
  routes: {
    // When navigating to the "/" route, build the HomeScreen widget.
    '/': (context) => HomeScreen(),
    // When navigating to the "/second" route, build the SecondScreen widget.
    '/second': (context) => SecondScreen(),
  },
));
步骤3:使用Navigator.pushNamed()函数导航到第二个屏幕。
在此步骤中,我们需要调用Navigator.pushNamed()方法进行导航。为此,我们需要像下面的代码片段一样,在HomeScreen的build方法中更新onPressed()回调。
onPressed: () {
  // Navigate to the second screen by using the named route.
  Navigator.pushNamed(context, '/second');
}
步骤4:使用Navigator.pop()函数返回到第一个屏幕。
这是最后一步,我们将使用Navigator.pop()方法在第一个屏幕上返回。
onPressed: () {
  Navigator.pushNamed(context, '/second');
},
让我们在Flutter项目中查看上述说明的完整代码,并在模拟器中运行它以获取输出。
import 'package:flutter/material.dart';

void main() {
  runApp( MaterialApp(
    title: 'Named Route Navigation',
    theme: ThemeData(
      // This is the theme of your application.
      primarySwatch: Colors.green,
    ),
    // Start the app with the "/" named route. In this case, the app starts
    // on the FirstScreen widget.
    initialRoute: '/',
    routes: {
      // When navigating to the "/" route, build the FirstScreen widget.
      '/': (context) => HomeScreen(),
      // When navigating to the "/second" route, build the SecondScreen widget.
      '/second': (context) => SecondScreen(),
    },
  ));
}

class HomeScreen extends StatelessWidget {
  @override
  Widget build(BuildContext context) {
    return Scaffold(
      appBar: AppBar(
        title: Text('Home Screen'),
      ),
      body: Center(
        child: RaisedButton(
          child: Text('Click Here'),
          color: Colors.orangeAccent,
          onPressed: () {
            Navigator.pushNamed(context, '/second');
          },
        ),
      ),
    );
  }
}

class SecondScreen extends StatelessWidget {
  @override
  Widget build(BuildContext context) {
    return Scaffold(
      appBar: AppBar(
        title: Text("Second Screen"),
      ),
      body: Center(
        child: RaisedButton(
          color: Colors.blueGrey,
          onPressed: () {
            Navigator.pop(context);
          },
          child: Text('Go back!'),
        ),
      ),
    );
  }
}
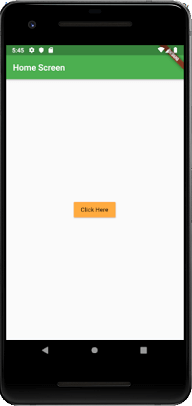
输出量

单击按钮Click Here,您将导航到下图所示的第二个屏幕。接下来,当您单击“返回”按钮时,它将返回到主页。
