- 会话管理 - 任何代码示例
- Android中的会话管理示例(1)
- Android中的会话管理示例
- CodeIgniter-会话管理
- CakePHP-会话管理(1)
- CakePHP-会话管理
- Phalcon-会话管理
- Phalcon-会话管理(1)
- 在 R 中管理包
- 在 R 中管理包(1)
- Zend框架-会话管理
- Zend框架-会话管理(1)
- PHP |会话
- PHP-会话
- PHP |会话(1)
- PHP-会话(1)
- Laravel-会话
- Laravel-会话(1)
- Laravel会话
- Laravel会话(1)
- 会话数组 - PHP (1)
- 数组会话 - PHP (1)
- 删除会话 javascript (1)
- Django会话(1)
- Django-会话(1)
- Django-会话
- Django会话
- 会话未设置 - PHP (1)
- 检查会话 php (1)
📅 最后修改于: 2021-01-05 05:31:43 🧑 作者: Mango
当希望将用户数据存储在应用程序外部时,Session可以帮助您,以便下次用户下次使用您的应用程序时,您可以轻松地获取其详细信息并相应地执行操作。
这可以通过许多方式来完成。但是,最简单,最好的方法是通过“共享首选项” 。
共享首选项
共享首选项允许您以键,值对的形式保存和检索数据。为了使用共享首选项,您必须调用方法getSharedPreferences(),该方法返回一个SharedPreference实例,该实例指向包含首选项值的文件。
SharedPreferences sharedpreferences = getSharedPreferences(MyPREFERENCES, Context.MODE_PRIVATE);
您可以使用SharedPreferences.Editor类将某些内容保存在sharedpreferences中。您将调用SharedPreference实例的edit方法,并将在编辑器对象中接收它。它的语法是-
Editor editor = sharedpreferences.edit();
editor.putString("key", "value");
editor.commit();
除了putString方法外,编辑器类中还有一些方法可用于在共享首选项内操作数据。它们列出如下-
| Sr.No | Mode & description |
|---|---|
| 1 |
apply() It is an abstract method. It will commit your changes back from editor to the sharedPreference object you are calling |
| 2 |
clear() It will remove all values from the editor |
| 3 |
remove(String key) It will remove the value whose key has been passed as a parameter |
| 4 |
putLong(String key, long value) It will save a long value in a preference editor |
| 5 |
putInt(String key, int value) It will save a integer value in a preference editor |
| 6 |
putFloat(String key, float value) It will save a float value in a preference editor |
通过共享首选项进行会话管理
为了从共享首选项执行会话管理,我们需要检查onResume方法中存储在共享首选项中的值或数据。如果没有数据,则将从新安装的应用程序开始重新启动。但是,如果获得了数据,我们将从用户离开的位置开始。在下面的示例中进行了演示-
例
下面的示例演示了会话管理的用法。它创建一个基本的应用程序,使您可以首次登录。然后,当您退出应用程序而不注销时,如果再次启动该应用程序,您将被带回到同一位置。但是,如果您从应用程序注销,则将返回到主登录屏幕。
要试验该示例,您需要在实际设备或仿真器上运行它。
| Steps | Description |
|---|---|
| 1 | You will use android studio IDE to create an Android application under a package com.example.sairamkrishna.myapplication. |
| 2 | Modify src/MainActivity.java file to add progress code to add session code. |
| 3 | Create New Activity and it name as second.java.Edit this file to add progress code to add session code. |
| 4 | Modify res/layout/activity_main.xml file to add respective XML code. |
| 5 | Modify res/layout/second_main.xml file to add respective XML code. |
| 7 | Run the application and choose a running android device and install the application on it and verify the results. |
这是MainActivity.java的内容。
package com.example.sairamkrishna.myapplication;

import android.content.Context;
import android.content.Intent;
import android.content.SharedPreferences;
import android.os.Bundle;
import android.support.v7.app.AppCompatActivity;
import android.view.View;
import android.widget.Button;
import android.widget.EditText;

public class MainActivity extends AppCompatActivity {
   EditText ed1,ed2,ed3;
   Button b1;
   Intent in;

   public static final String MyPREFERENCES = "MyPrefs" ;
   public static final String Name = "nameKey";
   public static final String Phone = "phoneKey";
   public static final String Email = "emailKey";
   SharedPreferences sharedpreferences;

   @Override
   protected void onCreate(Bundle savedInstanceState) {
      super.onCreate(savedInstanceState);
      setContentView(R.layout.activity_main);

      ed1=(EditText)findViewById(R.id.editText);
      ed2=(EditText)findViewById(R.id.editText2);
      ed3=(EditText)findViewById(R.id.editText3);

      b1=(Button)findViewById(R.id.button);
      sharedpreferences = getSharedPreferences(MyPREFERENCES, Context.MODE_PRIVATE);

      b1.setOnClickListener(new View.OnClickListener() {
         @Override
         public void onClick(View v) {
            String n  = ed1.getText().toString();
            String ph  = ed2.getText().toString();
            String e  = ed3.getText().toString();

            SharedPreferences.Editor editor = sharedpreferences.edit();

            editor.putString(Name, n);
            editor.putString(Phone, ph);
            editor.putString(Email, e);
            editor.commit();

            in = new Intent(MainActivity.this,second_main.class);
            startActivity(in);
         }
      });
   }
}
这是second_main.java的内容。
package com.example.sairamkrishna.myapplication;

import android.app.Activity;
import android.content.Context;
import android.content.SharedPreferences;
import android.os.Bundle;
import android.view.View;
import android.widget.Button;

public class second_main extends Activity {
   Button bu=null;
   Button bu2=null;

   @Override
   protected void onCreate(Bundle savedInstanceState) {
      super.onCreate(savedInstanceState);
      setContentView(R.layout.second_main);

      bu=(Button)findViewById(R.id.button2);
      bu2=(Button)findViewById(R.id.button3);
   }

   public  void logout(View view){
      SharedPreferences sharedpreferences = getSharedPreferences(MainActivity.MyPREFERENCES, Context.MODE_PRIVATE);
      SharedPreferences.Editor editor = sharedpreferences.edit();
      editor.clear();
      editor.commit();
   }

   public void close(View view){
      finish();
   }
}
这是activity_main.xml的内容。
这是second_main.xml的内容。
这是Strings.xml的内容。
My Application
这是AndroidManifest.xml的内容。
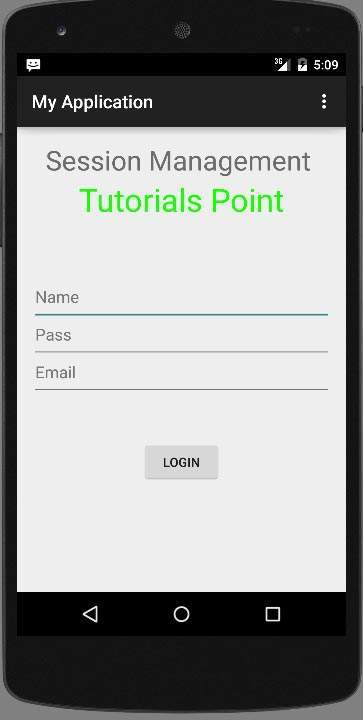
让我们尝试运行您的应用程序。我假设您在进行环境设置时已创建了AVD。要从Android Studio运行该应用,请打开您项目的活动文件之一,然后点击运行 工具栏中的图标。 Android studio将应用程序安装在您的AVD上并启动它,如果设置和应用程序一切正常,它将显示在“模拟器”窗口下面-

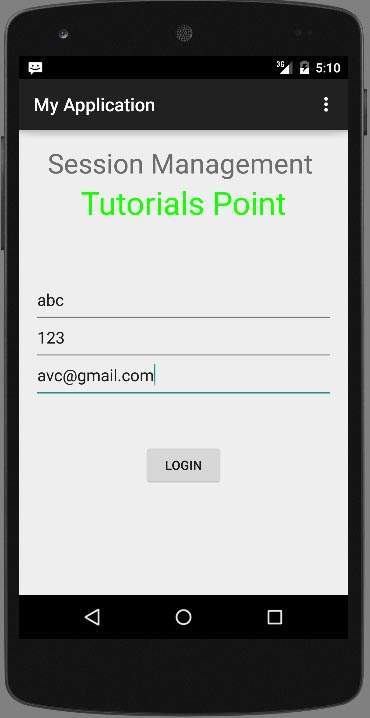
输入您的用户名和密码(输入您喜欢的任何内容,但要记住输入的内容) ,然后单击登录按钮。如下面的图片所示-

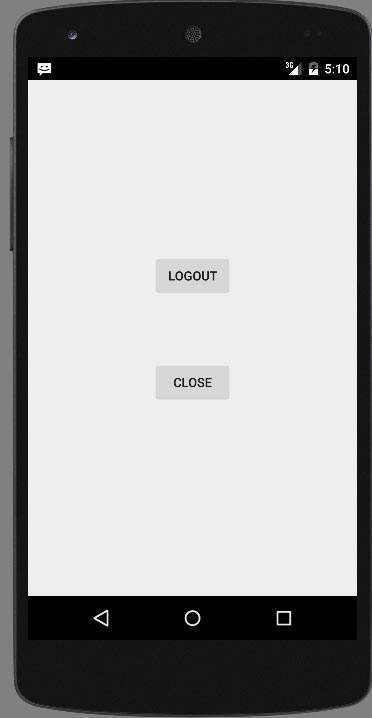
单击登录按钮后,您将被带到该欢迎屏幕。现在,您的登录信息存储在共享首选项中。

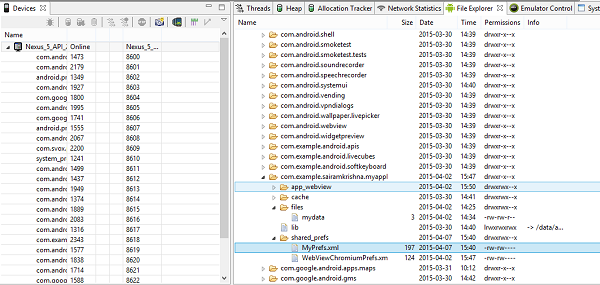
现在,单击退出而不注销按钮,您将回到主屏幕,并且输出的首选项文件如下图所示。

如果将myPref.xml文件作为注释文件打开,则如下所示

如果单击注销按钮,它将清除首选项值。如果您输入不同的值作为输入,它将在XML中输入这些值作为首选项。