- Android 传感器示例
- Android 传感器示例(1)
- 传感器 (1)
- Android 传感器教程
- Android 传感器教程(1)
- 传感器 - 任何代码示例
- 列出java中的所有android传感器(1)
- 如何在 Android 中使用接近传感器?(1)
- 如何在 Android 中使用接近传感器?
- 列出java代码示例中的所有android传感器
- 如何将传感器数据写入文件 android studio - Java (1)
- 如何将传感器数据写入文件 android studio - Java 代码示例
- 什么是Arduino传感器(1)
- 什么是Arduino传感器
- 传感器网络架构
- 传感器网络架构(1)
- 如何在Android中构建测试运动传感器的应用程序?
- 如何以编程方式显示Android设备中存在的传感器列表?(1)
- 如何以编程方式显示Android设备中存在的传感器列表?
- 模拟通信-传感器(1)
- 模拟通信-传感器
- 有源传感器
- 有源传感器(1)
- 传感器和执行器的区别(1)
- 传感器和执行器的区别
- Arduino运动传感器
- Arduino运动传感器(1)
- 无源传感器(1)
- 无源传感器
📅 最后修改于: 2021-01-05 05:30:55 🧑 作者: Mango
大多数android设备都有内置的传感器,可以测量运动,方向和各种环境条件。 android平台支持三大类传感器。
- 运动传感器
- 环境传感器
- 位置传感器
一些传感器是基于硬件的,而某些是基于软件的传感器。无论传感器是什么,android都允许我们从这些传感器获取原始数据,并将其用于我们的应用程序中。为此,android为我们提供了一些类。
Android提供了SensorManager和Sensor类,以在我们的应用程序中使用传感器。为了使用传感器,您需要做的第一件事就是实例化SensorManager类的对象。可以如下实现。
SensorManager sMgr;
sMgr = (SensorManager)this.getSystemService(SENSOR_SERVICE);
接下来需要做的是通过调用SensorManager类的getDefaultSensor()方法来实例化Sensor类的对象。其语法如下-
Sensor light;
light = sMgr.getDefaultSensor(Sensor.TYPE_LIGHT);
声明该传感器后,您需要注册其侦听器并重写onAccuracyChanged和onSensorChanged这两个方法。它的语法如下-
sMgr.registerListener(this, light,SensorManager.SENSOR_DELAY_NORMAL);
public void onAccuracyChanged(Sensor sensor, int accuracy) {
}

public void onSensorChanged(SensorEvent event) {
}
获取支持的传感器列表
您可以通过调用getSensorList方法获取设备支持的传感器列表,该方法将返回包含传感器名称和版本号以及更多信息的传感器列表。然后,您可以遍历列表以获取信息。其语法如下-
sMgr = (SensorManager)this.getSystemService(SENSOR_SERVICE);
List list = sMgr.getSensorList(Sensor.TYPE_ALL);
for(Sensor sensor: list){
}
除了这些方法之外,SensorManager类还提供了其他方法来管理传感器框架。这些方法在下面列出-
| Sr.No | Method & description |
|---|---|
| 1 |
getDefaultSensor(int type) This method get the default sensor for a given type. |
| 2 |
getInclination(float[] I) This method computes the geomagnetic inclination angle in radians from the inclination matrix. |
| 3 |
registerListener(SensorListener listener, int sensors, int rate) This method registers a listener for the sensor |
| 4 |
unregisterListener(SensorEventListener listener, Sensor sensor) This method unregisters a listener for the sensors with which it is registered. |
| 5 |
getOrientation(float[] R, float[] values) This method computes the device’s orientation based on the rotation matrix. |
| 6 |
getAltitude(float p0, float p) This method computes the Altitude in meters from the atmospheric pressure and the pressure at sea level. |
例
这是一个演示使用SensorManager类的示例。它创建了一个基本应用程序,可让您查看设备上的传感器列表。
要试验此示例,可以在实际设备或仿真器中运行它。
| Steps | Description |
|---|---|
| 1 | You will use Android studio to create an Android application under a package com.example.sairamkrishna.myapplication. |
| 2 | Modify src/MainActivity.java file to add necessary code. |
| 3 | Modify the res/layout/activity_main to add respective XML components. |
| 4 | Run the application and choose a running android device and install the application on it and verify the results. |
以下是修改后的MainActivity.java的内容。
package com.example.sairamkrishna.myapplication;

import android.app.Activity;
import android.hardware.SensorManager;
import android.os.Bundle;

import android.util.Log;

import android.view.Menu;
import android.view.MenuItem;
import android.view.View;

import android.widget.TextView;

import java.util.List;
import android.hardware.Sensor;
import android.hardware.SensorManager;

public class MainActivity extends Activity {
   TextView tv1=null;
   private SensorManager mSensorManager;
   @Override

   protected void onCreate(Bundle savedInstanceState) {
      super.onCreate(savedInstanceState);
      setContentView(R.layout.activity_main);

      tv1 = (TextView) findViewById(R.id.textView2);
      tv1.setVisibility(View.GONE);

      mSensorManager = (SensorManager) getSystemService(SENSOR_SERVICE);
      List mList= mSensorManager.getSensorList(Sensor.TYPE_ALL);

      for (int i = 1; i < mList.size(); i++) {
         tv1.setVisibility(View.VISIBLE);
         tv1.append("\n" + mList.get(i).getName() + "\n" + mList.get(i).getVendor() + "\n" + mList.get(i).getVersion());
      }
   }

   @Override
   public boolean onCreateOptionsMenu(Menu menu) {
      // Inflate the menu; this adds items to the action bar if it is present.
      getMenuInflater().inflate(R.menu.menu_main, menu);
      return true;
   }

   @Override
   public boolean onOptionsItemSelected(MenuItem item) {
      // Handle action bar item clicks here. The action bar will
      // automatically handle clicks on the Home/Up button, so long
      // as you specify a parent activity in AndroidManifest.xml.

      int id = item.getItemId();

      //noinspection SimplifiableIfStatement
      if (id == R.id.action_settings) {
         return true;
      }
      return super.onOptionsItemSelected(item);
   }
}
以下是xml activity_main.xml的修改内容。
在以下代码中, abc指示有关tutorialspoint.com徽标的信息
以下是res / values /字符串.xml的内容。
   My Application
   Hello world!
   Settings
以下是AndroidManifest.xml文件的内容。
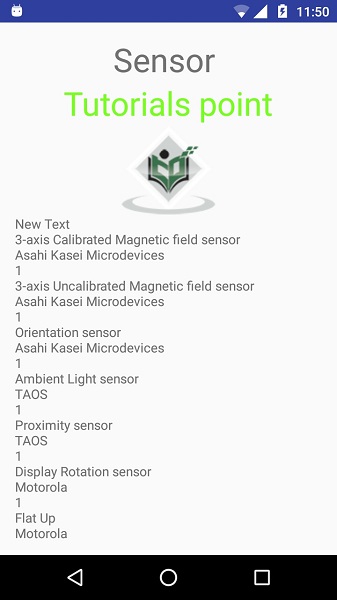
让我们尝试运行刚刚修改的应用程序。我假设您在进行环境设置时已创建了AVD 。要从Android Studio运行该应用,请打开您项目的活动文件之一,然后点击运行 工具栏中的图标。 Android studio将应用安装在您的AVD上并启动它,如果设置和应用程序一切正常,它将显示在“模拟器”窗口下方-

现在,如果您查看设备屏幕,您将看到设备支持的传感器列表以及它们的名称和版本以及其他信息。
如果要在其他设备上运行此应用程序,则输出将有所不同,因为输出取决于设备支持的传感器数量。