- Spring Boot多模块项目(1)
- Spring Boot – 多模块项目
- 如何创建一个 Spring Boot 项目?(1)
- 如何创建一个 Spring Boot 项目?
- Spring Boot CLI-创建项目(1)
- Spring Boot CLI-创建项目
- spring boot - CSS (1)
- Spring Boot属性(1)
- Spring Boot属性
- Spring 和 Spring Boot 的区别
- Spring 和 Spring Boot 的区别(1)
- spring boot - CSS 代码示例
- Spring和Spring Boot之间的区别(1)
- Spring和Spring Boot之间的区别
- Spring Boot应用程序
- Spring Boot应用程序(1)
- Spring Boot版本
- Spring Boot版本(1)
- Spring Boot教程(1)
- Spring Boot教程
- 什么是 Spring Boot - Java (1)
- Spring Boot 简介(1)
- Spring Boot 简介
- Spring Boot-简介(1)
- Spring Boot-简介
- Spring Cloud与Spring Boot
- Spring Cloud与Spring Boot(1)
- 讨论Spring Boot
- 讨论Spring Boot(1)
📅 最后修改于: 2021-01-11 05:11:08 🧑 作者: Mango
Spring Boot多模块项目
多模块项目
包含嵌套Maven项目的Spring Boot项目称为多模块项目。在多模块项目中,父项目充当基础Maven配置的容器。
换句话说,一个多模块项目是由管理一组子模块的父pom构建的。或者,一个多模块项目是由父POM引用一个或多个子模块定义的。
父Maven项目必须包含使项目成为聚合器的包装类型pom。父项目的pom.xml文件包含子项目继承的所有模块,公共依赖项和属性的列表。父pom位于项目的根目录中。子模块是实际的Spring Boot项目,它们从父项目继承maven属性。
当我们运行多模块项目时,所有模块都一起部署在嵌入式Tomcat服务器中。我们也可以部署一个单独的模块。
父POM
父POM定义组ID,工件ID,版本和包装。在以前的Maven项目中,我们已经看到父POM定义了包装罐。但是在多模块项目中,父POM定义了包装pom。包装pom涉及其他Maven项目。
为什么我们需要多模块项目
将项目分为多个模块非常有用且易于维护。我们还可以轻松编辑或删除项目中的模块,而不会影响其他模块。当我们需要单独部署模块时,这很有用。
我们只需要在父pom中指定所有依赖项即可。所有其他模块共享相同的pom,因此我们无需在每个模块中分别指定相同的依赖项。它使代码更易于与大型项目保持一致。
子模块的耳朵,战争和罐子
子模块可以是任何项目,并且可以具有任何包装。我们可以自由地在模块和包之间创建任何类型的依赖关系。
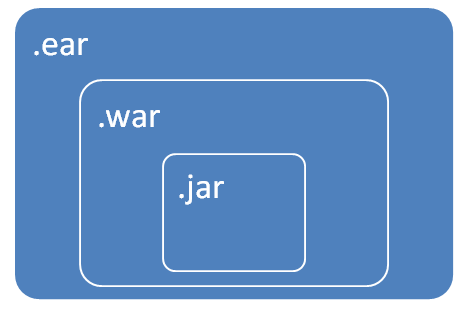
例如,我们正在创建EAR (企业归档), WAR (Web归档)和JAR (Java归档)文件。 JAR文件捆绑到war文件中,而war文件捆绑到EAR文件中。 EAR文件是准备在应用服务器上部署的最终软件包。
EAR文件包含一个或多个WAR文件。每个WAR文件都包含服务项目,该项目对所有WAR文件和JAR中的包装类型具有通用代码。
Maven子项目/模块
- 子模块是独立的Maven项目,它们共享父项目的属性。
- 可以使用单个命令来构建所有子项目,因为它位于父项目中。
- 定义项目之间的关系更容易。
多模块项目目录结构
让我们了解多模块项目目录结构。
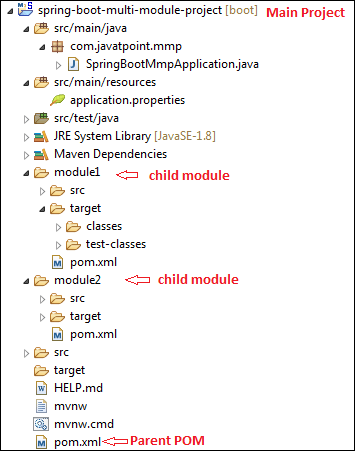
在下图中,我们创建了一个名为spring-boot-multi-module-project的项目。它在目录底部包含父pom。之后,我们创建了两个分别名为module1和module2的Maven模块。这两个模块包含自己的pom文件。
让我们打开父POM并查看在项目中创建Maven模块时其配置。
pom.xml
4.0.0

org.springframework.boot
spring-boot-starter-parent
2.2.2.BUILD-SNAPSHOT


com.javatpoint
spring-boot-example
0.0.1-SNAPSHOT
spring-boot-multi-module-project
Demo project for Spring Boot

1.8

pom


org.springframework.boot
spring-boot-starter


 org.springframework.boot
spring-boot-starter-parent
2.2.1.RELEASE
pom


org.springframework.boot
spring-boot-starter-web


org.springframework
spring-webmvc


org.springframework.boot
spring-boot-starter-test
test


org.junit.vintage
junit-vintage-engine


org.springframework.boot
spring-boot-maven-plugin


spring-milestones
Spring Milestones
https://repo.spring.io/milestone


spring-snapshots
Spring Snapshots
https://repo.spring.io/snapshot

true


spring-milestones
Spring Milestones
https://repo.spring.io/milestone


spring-snapshots
Spring Snapshots
https://repo.spring.io/snapshot

true


module1
module2
上面的pom文件与我们在前面的示例中看到的相同。但是在此pom文件中,需要注意两件事:包装和模块。
创建多模块项目时,需要在父pom文件而不是jar中配置包装pom。
pom
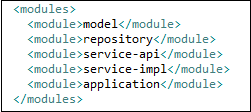
当我们在项目中创建Maven模块时,Spring Boot会自动在module标签内的父pom中配置模块,如下所示。
module1
module2
现在,我们将看到module1的pom文件中包含什么。
pom.xml
4.0.0

com.javatpoint
spring-boot-multi-module-project
0.0.1-SNAPSHOT

com.javatpoint
module1
0.0.1-SNAPSHOT
module1
http://maven.apache.org

UTF-8


junit
junit
3.8.1
test
在这里,需要注意的一点是,以上pom文件不包含诸如starter-web,web-mvc等通用依赖关系。它继承了父pom的所有通用依赖关系和属性。
Spring Boot多模块项目示例
让我们创建一个多模块应用程序的示例。
- 在以下示例中,我们创建了一个名为spring-boot-multimodule的Maven项目。它是主要应用程序。在主应用程序中,我们创建了五个模块,如下所示:
- 应用
- 模型
- 资料库
- 服务API
- 服务说明
应用模块
应用程序模块是项目的主要模块。它包含应用程序类,在其中定义了运行Spring Boot Application所需的main方法。它还包含应用程序配置属性,Controller,视图和资源。
应用程序模块包括模型模块,作为依赖的服务实现模块,其中包含模型模块,存储库模块和服务API模块。
模型模块
模型模块包含要在项目中使用的实体和视觉对象。
储存库模块
存储库模块包含要在项目中使用的存储库。这取决于模型模块。
服务API模块
服务API模块包含所有项目服务。它还取决于模型模块。
服务实施模块
服务实现模块实现服务。它取决于存储库模块和服务API模块。
POM聚合器(父POM)
父pom包含所有应用程序模块。它还包括一个以上模块所需的所有常见依赖关系和属性。定义的依赖项没有版本,因为该项目已将Spring IO Platform定义为父项。
让我们了解所创建的多模块应用程序的结构。
Spring-boot-multimodule
├── pom.xml
│   └── REDME.adoc
├── application
│   ├── pom.xml
│   └── src
│       └── main
│           ├── java
│           │   └── sample
│           │       └── multimodule
│           │           ├── SampleWebJspApplication.java
│           │           └── web
│           │               └── WelcomeController.java
│           └── resources
│               ├── application.properties
│               └── templates
│                   └── welcome
│                       └── show.html
├── model
│   ├── pom.xml
│   └── src
│       └── main
│           └── java
│               └── sample
│                   └── multimodule
│                       └── domain
│                           └── entity
│                               └── Account.java
|
├── repository
│   ├── pom.xml
│   └── src
│       └── main
│           └── java
│               └── sample
│                   └── multimodule
│                       └── repository
│                           └── AccountRepository.java
├── service-api
│   ├── pom.xml
│   └── src
│       └── main
│           └── java
│               └── sample
│                   └── multimodule
│                       └── service
│                           └── api
│                               ├── AccountNotFoundException.java
│                               └── AccountService.java
└── service-impl
    ├── pom.xml
    └── src
        └── main
            └── java
                └── sample
                    └── multimodule
                        └── service
                            └── impl
                                └── AccountServiceImpl.java
步骤1:使用名称spring-boot-multimodule创建一个Maven项目。
步骤2:打开pom.xml (父pom)文件,并将打包类型jar更改为pom。
pom.xml(父pom)
4.0.0


io.spring.platform
platform-bom
2.0.1.RELEASE

sample.multimodule
sample.multimodule
0.0.1-SNAPSHOT
pom
Parent - Pom Aggregator

1.8


org.springframework.boot
spring-boot-starter


org.springframework.boot
spring-boot-starter-data-jpa


org.springframework.boot
spring-boot-starter-test
test
在上面的pom文件中要注意的一件事是,由于我们尚未创建,因此未配置任何Maven模块。现在,我们将如上所述创建一个Maven模块。
步骤3:使用名称应用程序创建Maven模块。
步骤4:打开应用程序模块的pom.xml文件,并确保打包类型为jar。
pom.xml
    4.0.0

        sample.multimodule
        sample.multimodule
        0.0.1-SNAPSHOT

    sample.multimodule.application
    jar
    Project Module - Application


        sample.multimodule
        sample.multimodule.service.impl
        ${project.version}


              org.apache.tomcat.embed
              tomcat-embed-jasper
              provided


        org.springframework.boot
        spring-boot-starter-web


        org.springframework.boot
        spring-boot-starter-thymeleaf


                org.springframework.boot
                spring-boot-maven-plugin
步骤5:创建主类。这是要运行的类。
SampleWebJspApplication.java
package sample.multimodule;
import org.springframework.boot.autoconfigure.SpringBootApplication;
import org.springframework.boot.SpringApplication;
import org.springframework.boot.orm.jpa.EntityScan;
@SpringBootApplication
public class SampleWebJspApplication
{
public static void main(String[] args) throws Exception
{
SpringApplication.run(SampleWebJspApplication.class, args);
}
}
步骤6:在smaple.multimodule.web包下创建一个名称为WelocameController的Controller类。
WelcomeController.java
package sample.multimodule.web;
import java.util.Date;
import java.util.Map;
import org.springframework.beans.factory.annotation.Autowired;
import org.springframework.beans.factory.annotation.Value;
import org.springframework.stereotype.Controller;
import org.springframework.web.bind.annotation.RequestMapping;
import sample.multimodule.domain.entity.Account;
import sample.multimodule.service.api.AccountService;
@Controller
public class WelcomeController
{
@Value("${application.message:Hello World}")
private String message = "Hello World";
@Autowired
protected AccountService accountService;
@RequestMapping("/")
public String welcome(Map model)
{
// Trying to obtain 23 account
Account account = accountService.findOne("23");
if(account == null){
// If there's some problem creating account, return show view with error status
model.put("message", "Error getting account!");
model.put("account", "");
return "welcome/show";
}
// Return show view with 23 account info
String accountInfo = "Your account number is ".concat(account.getNumber());
model.put("message", this.message);
model.put("account", accountInfo);
return "welcome/show";
}
@RequestMapping("foo")
public String foo(Map model) {
throw new RuntimeException("Foo");
}
}
步骤7:在src / main / resource->模板-> welcome文件夹下创建一个名为show.html的HTML文件。
show.html
    Spring Boot Multimodule


      Message:


      Your account:
步骤8:打开application.properties文件,将应用程序消息和thymeleaf缓存配置为false。
application.properties
# Application messages
application.message = Hello User!
dummy.type = type-inside-the-war
# Spring Thymeleaf config
spring.thymeleaf.cache = false
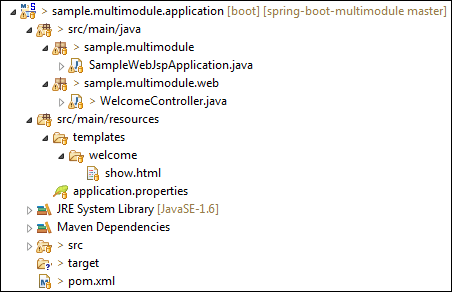
创建上述所有文件之后,应用程序模块目录如下所示:
让我们创建第二个模型模块。
步骤9:使用名称模型创建Maven模块。
步骤10:打开模型模块的pom.xml文件,并确保包装类型为jar。
pom.xml
    4.0.0

        sample.multimodule
        sample.multimodule
        0.0.1-SNAPSHOT

    sample.multimodule.model
    jar
    Project Module - Model
    Module that contains all Entities and Visual Objects to be used in the project. It doesn't have any dependencies.
步骤11:在包sample.multimodule.domain.entity下创建一个名称为Account的类。
Account.java
package sample.multimodule.domain.entity;
import javax.persistence.Entity;
import javax.persistence.Id;
import javax.persistence.GeneratedValue;
import javax.persistence.GenerationType;
@Entity
public class Account
{
    @Id
    @GeneratedValue(strategy = GenerationType.AUTO)
    private Long id;

    private String number;

    private String type;

    private String creditCardNumber;

    /**
     * Create an empty account.
     */
    public Account() {

    }

    /**
     * Create a new account.
     *
     * @param number
     *            the account number
     * @param id
     *            the account id
     */
    public Account(Long id, String number) {
        this.number = number;
        this.id = id;
    }

    public Long getId() {
        return id;
    }

    public void setId(Long id) {
        this.id = id;
    }

    public String getNumber() {
        return number;
    }

    public void setNumber(String number) {
        this.number = number;
    }

    public String getType() {
        return type;
    }

    public void setType(String type) {
        this.type = type;
    }

    public String getCreditCardNumber() {
        return creditCardNumber;
    }

    public void setCreditCardNumber(String creditCardNumber) {
        this.creditCardNumber = creditCardNumber;
    }

}
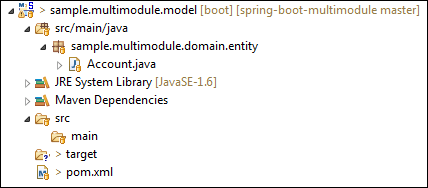
创建上述所有文件之后,模型模块目录如下所示:
让我们创建第三个模块,即存储库。
步骤12:使用名称存储库创建Maven模块。
步骤13:打开应用程序模块的pom.xml文件,并确保打包类型为jar。
pom.xml
    4.0.0

        sample.multimodule
        sample.multimodule
        0.0.1-SNAPSHOT

    sample.multimodule.repository
    jar
    Project Module - Repository
    Module that contains all repositories to be used in the project. Depends of Model Module.


        sample.multimodule
        sample.multimodule.model
        ${project.version}


        org.hsqldb
        hsqldb
        runtime
步骤14:在包sample.multimodule.repository下创建一个名称为AccountRepository的类。
AccountRepository.java
package sample.multimodule.repository;
import org.springframework.data.domain.*;
import org.springframework.data.repository.*;
import org.springframework.stereotype.Repository;
import sample.multimodule.domain.entity.Account;
@Repository
public interface AccountRepository extends CrudRepository
{
Account findByNumber(String number);
}
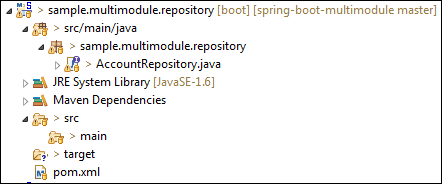
创建上述所有文件之后,存储库模块目录如下所示:
让我们创建第四个模块,即service-api。
步骤15:使用名称service-api创建一个Maven模块。
步骤16:打开应用程序service-api的pom.xml文件,并确保打包类型为jar。
pom.xml
    4.0.0

        sample.multimodule
        sample.multimodule
        0.0.1-SNAPSHOT

    sample.multimodule.service.api
    jar
    Project Module - Service API
    Module that contains API of all project services. Depends of Model Module.


        sample.multimodule
        sample.multimodule.model
        ${project.version}
步骤17:创建一个名为sample.multimodule.service.api的包。
步骤18:创建一个名称为AccountNotFoundException的类。如果找不到该帐户,它将处理异常。
AccountNotFoundException.java
package sample.multimodule.service.api;
public class AccountNotFoundException extends RuntimeException
{
private static final long serialVersionUID = -3891534644498426670L;
public AccountNotFoundException(String accountId)
{
super("No such account with id: " + accountId);
}
}
步骤19:创建一个名称为AccountService的类。它提供与帐户相关的服务,例如查找和创建帐户。
AccountService.java
package sample.multimodule.service.api;
import java.util.List;
import sample.multimodule.domain.entity.Account;
public interface AccountService
{
    /**
     * Finds the account with the provided account number.
     *
     * @param number The account number
     * @return The account
     * @throws AccountNotFoundException If no such account exists.
     */
    Account findOne(String number) throws AccountNotFoundException;
    /**
     * Creates a new account.
     * @param number
     * @return created account
     */
    Account createAccountByNumber(String number);
}
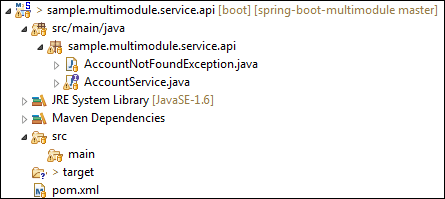
创建上述所有文件之后,service-api模块目录如下所示:
步骤20:使用名称service-impl创建一个Maven模块。
步骤21:打开应用程序service-impl的pom.xml文件,并确保打包类型为jar。
pom.xml
    4.0.0

        sample.multimodule
        sample.multimodule
        0.0.1-SNAPSHOT

    sample.multimodule.service.impl
    jar
    Project Module - Service Implementation
    Module that contains services implementation defined on Service API module. Depends of Repository Module and Service API Module.


        sample.multimodule
        sample.multimodule.repository
        ${project.version}


        sample.multimodule
        sample.multimodule.service.api
        ${project.version}
步骤22:在包sample.multimodule.service.impl下创建一个名称为AccountServiceImpl的类。
AccountServiceImpl.java
package sample.multimodule.service.impl;
import java.util.ArrayList;
import java.util.List;
import org.springframework.beans.factory.annotation.Value;
import org.springframework.beans.factory.annotation.Autowired;
import org.springframework.stereotype.Service;
import sample.multimodule.domain.entity.Account;
import sample.multimodule.repository.AccountRepository;
import sample.multimodule.service.api.AccountService;
import sample.multimodule.service.api.AccountNotFoundException;
@Service
public class AccountServiceImpl implements AccountService
{
@Value("${dummy.type}")
private String dummyType;
@Autowired
    private AccountRepository accountRepository;
    /**
     * {@inheritDoc}
     *
     * Dummy method for testing purposes.
     *
     * @param number The account number. Set 0000 to get an {@link AccountNotFoundException}
     */
    @Override
    public Account findOne(String number) throws AccountNotFoundException {
        if(number.equals("0000")) {
            throw new AccountNotFoundException("0000");
        }
        Account account = accountRepository.findByNumber(number);
        if(account == null){
          account = createAccountByNumber(number);
        }
        return account;
    }
    @Override
    public Account createAccountByNumber(String number) {
        Account account = new Account();
        account.setNumber(number);
        return accountRepository.save(account);
    }
    public String getDummyType() {
        return dummyType;
    }
    public void setDummyType(String dummyType) {
        this.dummyType = dummyType;
    }
}
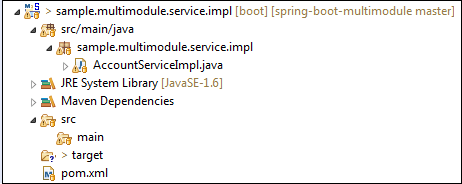
创建上述所有文件之后, service-impl模块目录如下所示:
现在打开父pom文件,我们看到我们创建的所有Maven模块都在父pom中进行了配置。
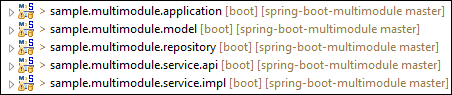
现在确保已创建所有五个模块,如下所示:
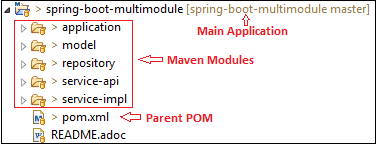
创建所有模块后,主项目目录如下所示:
步骤23:现在将SampleWebJspApplication.java文件作为Java Application运行。
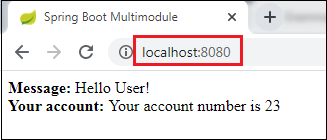
步骤24:打开浏览器并调用URL http:// localhost:8080。它返回消息和帐号为23。