Python网络编程
Python提供了两个级别的网络编程访问。这些都是 -
- 低级访问:在低级,您可以访问操作系统的基本套接字支持。您可以为面向连接和无连接协议实现客户端和服务器。
- 高级访问:在高级允许实现 HTTP、FTP 等协议。
在本文中,我们将讨论网络套接字编程。但在开始之前,让我们先了解一下什么是套接字。
什么是套接字?
考虑一个双向通信通道,套接字是该通信通道的端点。这些套接字(端点)可以在进程内、同一台机器上的进程之间或不同机器上的进程之间进行通信。套接字使用不同的协议来确定客户端和服务器之间端口到端口通信的连接类型。
套接字词汇
套接字有自己的一套词汇,我们来看看—— Identifies a network interface. It can be a Term Description Domain The set of protocols used for transport mechanisms like AF_INET, PF_INET, etc. Type Type of communication between sockets Protocol Identifies the type of protocol used within domain and type. Typically it is zero Port The server listens for clients calling on one or more ports. it can be a string containing a port number, a name of the service, or a Fixnum port Hostname
套接字编程
套接字编程是一种连接网络上的两个节点以相互通信的方式。一个套接字(节点)在 IP 的特定端口上侦听,而另一个套接字伸手到另一个以形成连接。服务器形成侦听器套接字,而客户端伸手到服务器。它们是网页浏览背后的真正支柱。简单来说,有一个服务器和一个客户端。我们可以使用socket模块进行socket编程。为此,我们必须包含套接字模块——
import socket要创建一个套接字,我们必须使用 socket.socket() 方法。
句法:
socket.socket(socket_family, socket_type, protocol=0)在哪里,
- socket_family: AF_UNIX 或 AF_INET
- socket_type: SOCK_STREAM 或 SOCK_DGRAM。
- 协议:通常省略,默认为 0。
例子:
Python3
import socket


s = socket.socket(socket.AF_INET, socket.SOCK_STREAM)
print(s)
Python3
# first of all import the socket library
import socket

# next create a socket object
s = socket.socket()
print ("Socket successfully created")

# reserve a port on your computer in our
# case it is 40674 but it can be anything
port = 40674

# Next bind to the port
# we have not typed any ip in the ip field
# instead we have inputted an empty string
# this makes the server listen to requests
# coming from other computers on the network
s.bind(('', port))
print ("socket binded to %s" %(port))

# put the socket into listening mode
s.listen(5)
print ("socket is listening")

# a forever loop until we interrupt it or
# an error occurs
while True:

    # Establish connection with client.
    c, addr = s.accept()
    print ('Got connection from', addr )

    # send a thank you message to the client.
    c.send(b'Thank you for connecting')

    # Close the connection with the client
    c.close()
Python3
# Import socket module
import socket

# Create a socket object
s = socket.socket()

# Define the port on which you want to connect
port = 40674

# connect to the server on local computer
s.connect(('127.0.0.1', port))

# receive data from the server
print(s.recv(1024))

# close the connection
s.close()
输出:
socket 模块为客户端和服务器端编程提供了各种方法。让我们详细了解每种方法。
套接字服务器方法
这些方法用于服务器端。让我们详细了解每种方法 -Function Name Description s.bind() Binds address to the socket. The address contains the pair of hostname and the port number. s.listen() Starts the TCP listener s.accept() Passively accepts the TCP client connection and blocks until the connection arrives
套接字客户端方法
此方法用于客户端。让我们详细看看这个方法——Function Name Description s.connect() Actively starts the TCP server connection
套接字通用方法
这些是socket模块的通用方法。让我们详细了解每种方法。Function Name Description s.send() Sends the TCP message s.sendto() Sends the UDP message s.recv() Receives the TCP message s.recvfrom() Receives the UDP message s.close() Close the socket socket.ghostname() Returns the host name
简单的服务器客户端程序
服务器
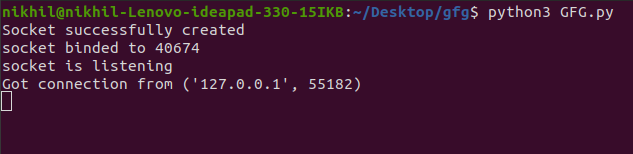
服务器有一个 bind() 方法,它将它绑定到特定的 IP 和端口,以便它可以侦听该 IP 和端口上的传入请求。服务器有一个listen() 方法,该方法将服务器置于监听模式。这允许服务器监听传入的连接。最后一个服务器有一个 accept() 和 close() 方法。 accept 方法启动与客户端的连接,close 方法关闭与客户端的连接。
示例:网络编程服务器端
Python3
# first of all import the socket library
import socket

# next create a socket object
s = socket.socket()
print ("Socket successfully created")

# reserve a port on your computer in our
# case it is 40674 but it can be anything
port = 40674

# Next bind to the port
# we have not typed any ip in the ip field
# instead we have inputted an empty string
# this makes the server listen to requests
# coming from other computers on the network
s.bind(('', port))
print ("socket binded to %s" %(port))

# put the socket into listening mode
s.listen(5)
print ("socket is listening")

# a forever loop until we interrupt it or
# an error occurs
while True:

    # Establish connection with client.
    c, addr = s.accept()
    print ('Got connection from', addr )

    # send a thank you message to the client.
    c.send(b'Thank you for connecting')

    # Close the connection with the client
    c.close()
解释:
- 我们制作了一个套接字对象并在我们的电脑上保留了一个端口。
- 之后,我们将我们的服务器绑定到指定的端口。传递一个空字符串意味着服务器也可以监听来自其他计算机的传入连接。如果我们通过了 127.0.0.1,那么它只会监听本地计算机内的那些调用。
- 之后,我们将服务器置于监听模式。这里的 5 表示如果服务器忙,则保持 5 个连接等待,如果第 6 个套接字尝试连接,则连接被拒绝。
- 最后,我们创建一个while循环并开始接受所有传入的连接,并在向所有连接的套接字发送感谢消息后关闭这些连接。
客户
现在我们需要一个服务器可以与之交互的东西。我们可以这样对待服务器,只是为了知道我们的服务器正在工作。在终端中键入以下命令:
# start the server
python server.py

# keep the above terminal open
# now open another terminal and type:

telnet localhost 12345
输出 :
在 telnet 终端中,您将获得以下信息:
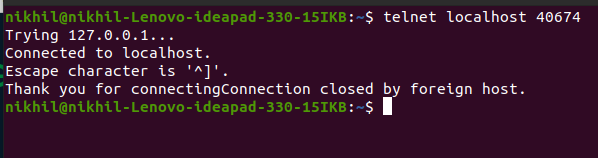
此输出表明我们的服务器正在运行。现在对于客户端:
示例:网络编程客户端
Python3
# Import socket module
import socket

# Create a socket object
s = socket.socket()

# Define the port on which you want to connect
port = 40674

# connect to the server on local computer
s.connect(('127.0.0.1', port))

# receive data from the server
print(s.recv(1024))

# close the connection
s.close()
输出:


解释:
- 我们在端口 40674(我们的服务器运行的端口)上连接到 localhost,最后,我们从服务器接收数据并关闭连接。
- 现在将此文件保存为 client.py 并在启动服务器脚本后从终端运行它。
注意:有关套接字编程的更多信息,请参阅我们的Python教程中的套接字编程