使用 Flask 和 MySQL 的登录和注册项目
项目名称:使用 Flask 框架和 MySQL Workbench 登录和注册项目。
应用程序类型(类别): Web 应用程序。
简介:框架是一个代码库,通过为常见操作提供可重用代码,使开发人员在构建 Web 应用程序时的工作更加轻松。 Python有许多框架,包括 Flask、Tornado、Pyramid 和 Django。 Flask 是一个轻量级的 Web 应用程序框架。它被归类为微框架,因为它不需要特定的工具或库。
先决条件: Python、MySQL Workbench 和 Flask 框架基础知识。系统中应安装Python和 MySQL Workbench。 Visual Studio 代码或 Spyder 或任何代码编辑器来处理应用程序。
项目中使用的技术: Flask 框架、MySQL Workbench。
项目实施:
(1) 创造环境
步骤 1:创建环境。在其中创建一个项目文件夹和一个 venv 文件夹。
py -3 -m venv venv
步骤 2:激活环境。
venv\Scripts\activate
第 3 步:安装 Flask。
pip install Flask
(2) MySQL 工作台
步骤 1:安装 MySQL 工作台。
安装链接:https://dev.mysql.com/downloads/workbench/
了解更多:https://www.mysql.com/products/workbench/
第 2 步:在您的 venv 中安装“mysqlbd”模块。
pip install flask-mysqldb
步骤 3:打开 MySQL 工作台。
第 4 步:编写以下代码。上面的 SQL 语句将使用表帐户创建我们的数据库geeklogin 。
步骤 5:执行查询。 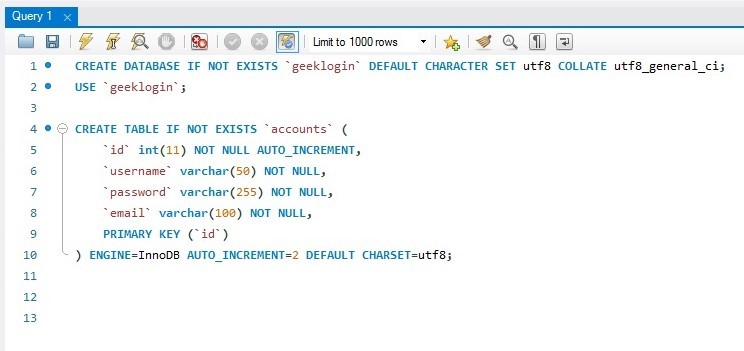
(3) 创建项目
步骤 1:创建一个空文件夹'login' 。
第 2 步:现在打开您的代码编辑器并打开此“登录”文件夹。
第 3 步:创建“app.py”文件夹并编写下面给出的代码。
# Store this code in 'app.py' file

from flask import Flask, render_template, request, redirect, url_for, session
from flask_mysqldb import MySQL
import MySQLdb.cursors
import re


app = Flask(__name__)


app.secret_key = 'your secret key'

app.config['MYSQL_HOST'] = 'localhost'
app.config['MYSQL_USER'] = 'root'
app.config['MYSQL_PASSWORD'] = 'your password'
app.config['MYSQL_DB'] = 'geeklogin'

mysql = MySQL(app)

@app.route('/')
@app.route('/login', methods =['GET', 'POST'])
def login():
    msg = ''
    if request.method == 'POST' and 'username' in request.form and 'password' in request.form:
        username = request.form['username']
        password = request.form['password']
        cursor = mysql.connection.cursor(MySQLdb.cursors.DictCursor)
        cursor.execute('SELECT * FROM accounts WHERE username = % s AND password = % s', (username, password, ))
        account = cursor.fetchone()
        if account:
            session['loggedin'] = True
            session['id'] = account['id']
            session['username'] = account['username']
            msg = 'Logged in successfully !'
            return render_template('index.html', msg = msg)
        else:
            msg = 'Incorrect username / password !'
    return render_template('login.html', msg = msg)

@app.route('/logout')
def logout():
    session.pop('loggedin', None)
    session.pop('id', None)
    session.pop('username', None)
    return redirect(url_for('login'))

@app.route('/register', methods =['GET', 'POST'])
def register():
    msg = ''
    if request.method == 'POST' and 'username' in request.form and 'password' in request.form and 'email' in request.form :
        username = request.form['username']
        password = request.form['password']
        email = request.form['email']
        cursor = mysql.connection.cursor(MySQLdb.cursors.DictCursor)
        cursor.execute('SELECT * FROM accounts WHERE username = % s', (username, ))
        account = cursor.fetchone()
        if account:
            msg = 'Account already exists !'
        elif not re.match(r'[^@]+@[^@]+\.[^@]+', email):
            msg = 'Invalid email address !'
        elif not re.match(r'[A-Za-z0-9]+', username):
            msg = 'Username must contain only characters and numbers !'
        elif not username or not password or not email:
            msg = 'Please fill out the form !'
        else:
            cursor.execute('INSERT INTO accounts VALUES (NULL, % s, % s, % s)', (username, password, email, ))
            mysql.connection.commit()
            msg = 'You have successfully registered !'
    elif request.method == 'POST':
        msg = 'Please fill out the form !'
    return render_template('register.html', msg = msg)
第 4 步:创建文件夹“模板” 。在“模板”文件夹中创建文件“login.html”、“register.html”、“index.html”。
第 5 步:打开“login.html”文件并编写下面给出的代码。在“login.html”中,我们有两个字段,即用户名和密码。当用户输入正确的用户名和密码时,它会将您引导到索引页面,否则会显示“用户名/密码不正确”。
Login
第 6 步:打开“register.html”文件并编写下面给出的代码。在“register.html”中,我们有三个字段,即用户名、密码和电子邮件。当用户输入所有信息后,将数据存储在数据库中,并显示“注册成功”。
Register
第 7 步:打开“index.html”文件并编写下面给出的代码。登录成功时显示此页面,同时显示用户名。此页面还包含注销功能。当用户注销时,它会再次移动到新的登录页面。
Index
步骤 8:创建文件夹'static' 。在“static”文件夹中创建文件“style.css”并粘贴给定的 CSS 代码。
/* Store this code in 'style.css' file inside the 'static' folder*/

            .header{
                padding: 5px 120px;
                width: 150px;
                height: 70px;
                background-color: #236B8E;
            }

            .border{
                padding: 80px 50px;
                width: 400px;
                height: 450px;
                border: 1px solid #236B8E;
                border-radius: 0px;
                background-color: #9AC0CD;
            }

            .btn {
                padding: 10px 40px;
                background-color: #236B8E;
                color: #FFFFFF;
                font-style: oblique;
                font-weight: bold;
                border-radius: 10px;
            }

            .textbox{
                padding: 10px 40px;
                background-color: #236B8E;
                text-color: #FFFFFF;
                border-radius: 10px;
            }

            ::placeholder {
                color: #FFFFFF;
                opacity: 1;
                font-style: oblique;
                font-weight: bold;
            }

            .word{
                color: #FFFFFF;
                font-style: oblique;
                font-weight: bold;
            }

            .bottom{
                color: #236B8E;
                font-style: oblique;
                font-weight: bold;
            }
步骤 9:项目结构将如下所示。 
(4) 运行项目
步骤 1:运行服务器。
第 2 步:浏览 URL 'localhost:5000'。
Step-3:将显示输出网页。
(5) 应用程序的测试
Step-1:如果您是新用户,请转到注册页面并填写详细信息。
Step-2:注册后,进入登录页面。输入您的用户名和密码并登录。
Step-3:如果您登录成功,您将被移动到索引页面并显示您的姓名。
输出:
登录页面: 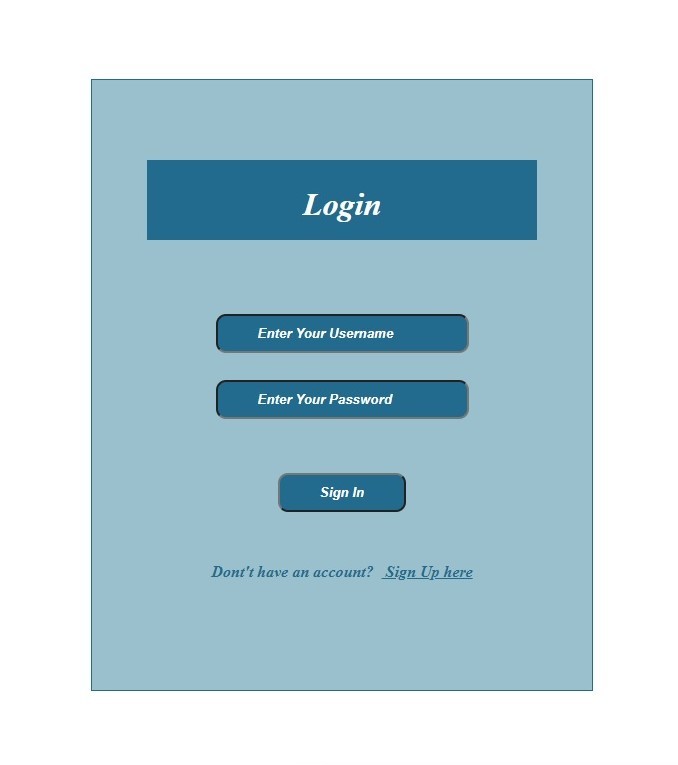
注册页面: 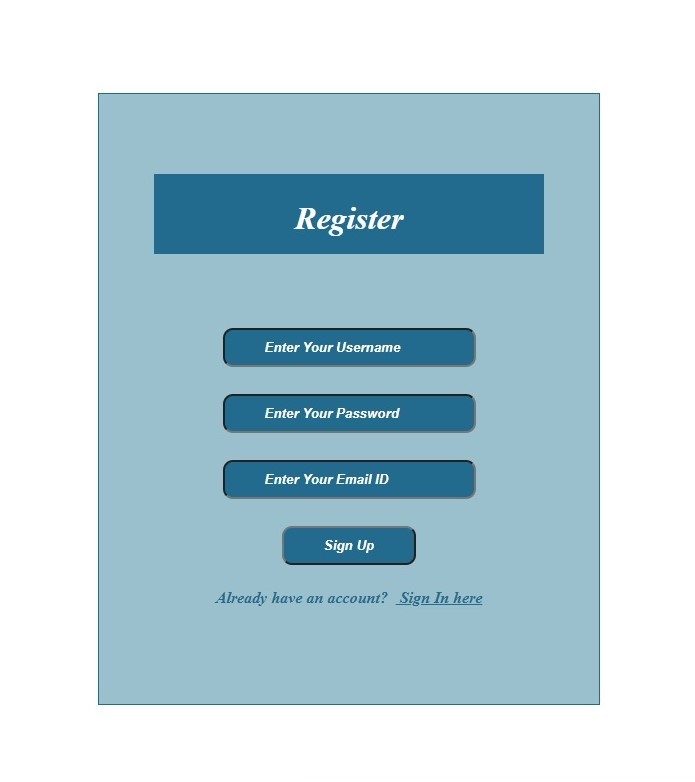
如果注册成功: 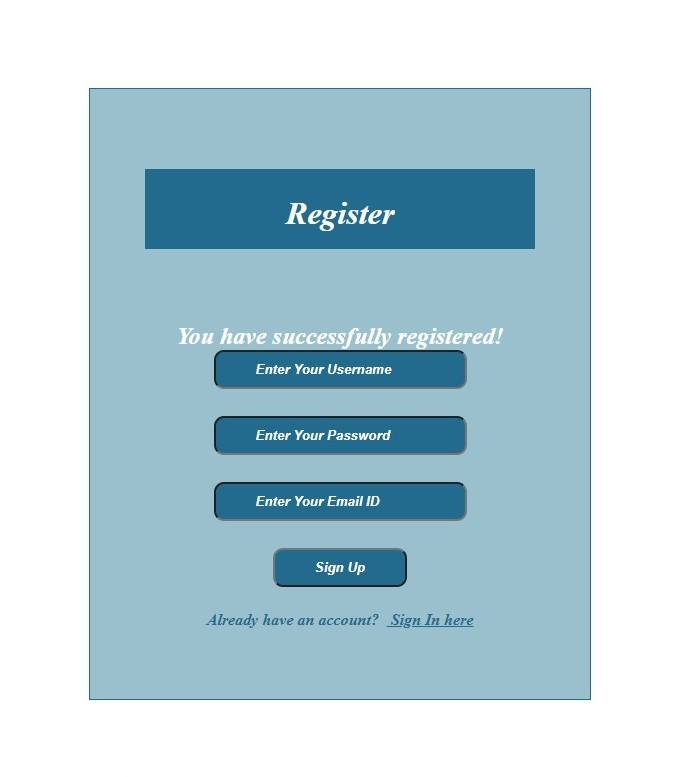
注册前,数据库表: 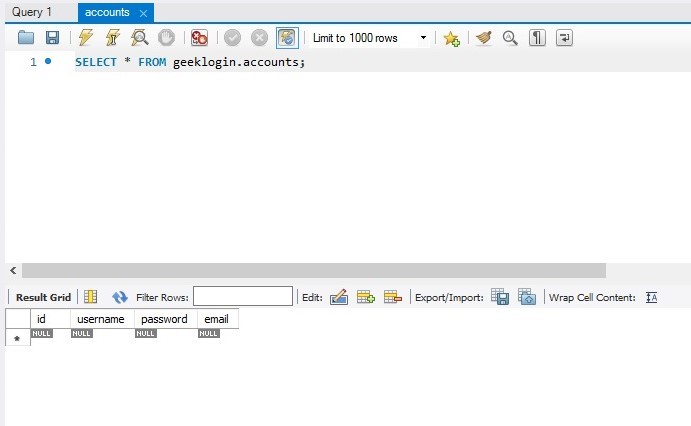
注册后,数据库表: 
如果登录成功,会显示Indexpage: 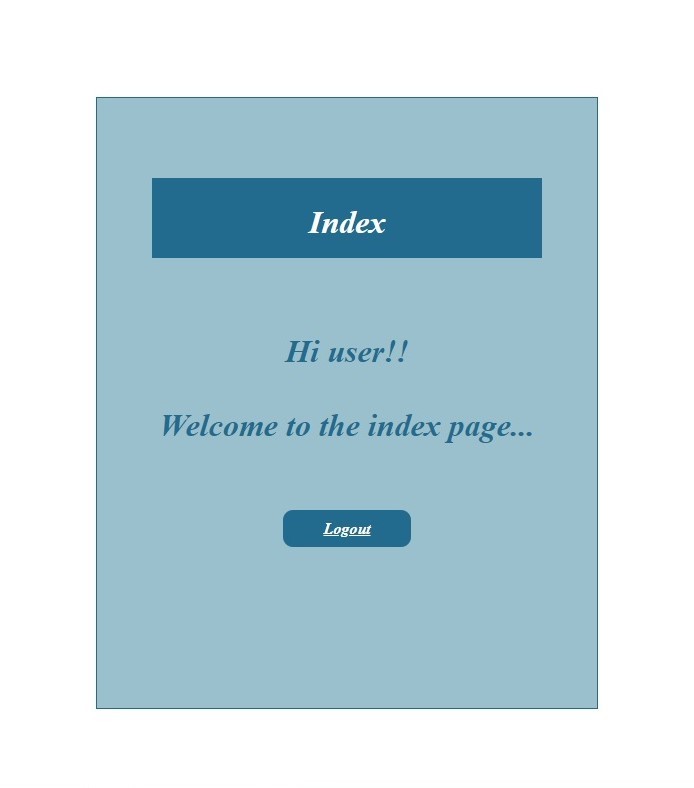
如果登录失败: 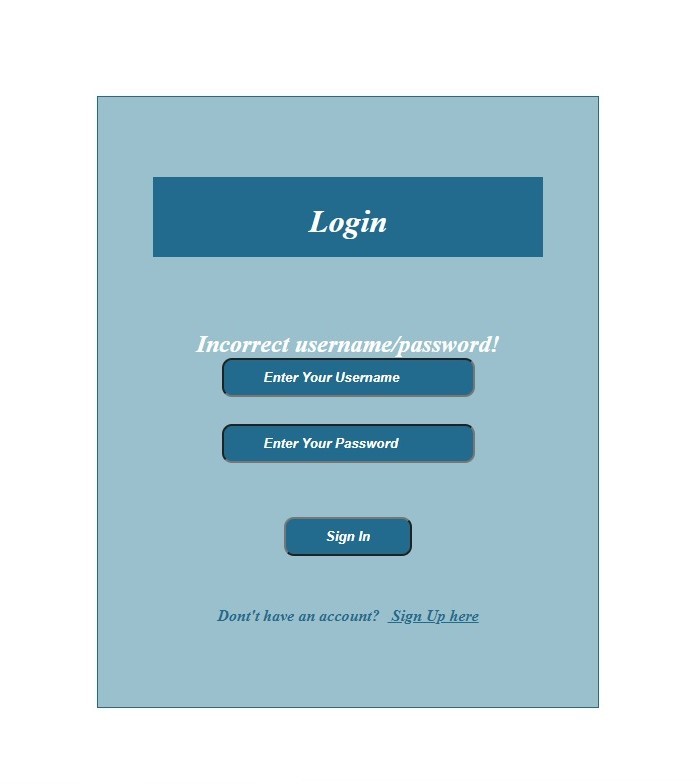
在评论中写代码?请使用 ide.geeksforgeeks.org,生成链接并在此处分享链接。