使用Python Flask 和 MySQL 分析应用程序
项目名称:使用Python Flask 和 MySQL 的配置文件应用程序
应用程序类型(类别): Web 应用程序。
简介:框架是一个代码库,通过为常见操作提供可重用代码,使开发人员在构建 Web 应用程序时的工作更加轻松。 Python有许多框架,包括 Flask、Tornado、Pyramid 和 Django。 Flask 是一个轻量级的 Web 应用程序框架。它被归类为微框架,因为它不需要特定的工具或库。侧选项卡用于单页 Web 应用程序或显示不同的内容。
先决条件: Python、MySQL Workbench 和 Flask 框架基础知识。系统中应安装Python和 MySQL Workbench。 Visual Studio 代码或 Spyder 或任何代码编辑器来处理应用程序。
项目中使用的技术: Flask 框架、MySQL Workbench。
项目实施:
(1) 创造环境
步骤 1:创建环境。在其中创建一个项目文件夹和一个 venv 文件夹。
py -3 -m venv venv
步骤 2:激活环境。
venv\Scripts\activate
第 3 步:安装 Flask。
pip install Flask
(2) MySQL 工作台
步骤 1:安装 MySQL 工作台。
安装链接:https://dev.mysql.com/downloads/workbench/
了解更多:https://www.mysql.com/products/workbench/
第 2 步:在您的 venv 中安装“mysqlbd”模块。
pip install flask-mysqldb
步骤 3:打开 MySQL 工作台。
第 4 步:编写以下代码。上面的 SQL 语句将使用表accounts创建我们的数据库geekprofile 。
步骤 5:执行查询。 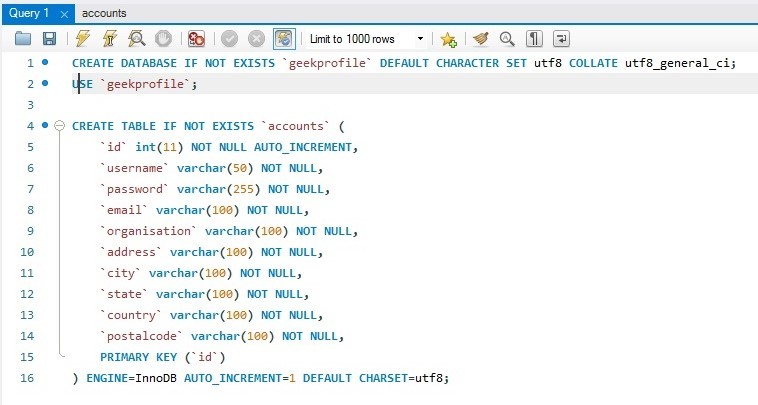
(3) 创建项目
步骤 1:创建一个空文件夹'geeksprofile' 。
第 2 步:现在打开您的代码编辑器并打开这个“geeksprofile”文件夹。
第 3 步:创建“app.py”文件夹并编写下面给出的代码。
# Store this code in 'app.py' file
from flask import Flask, render_template, request, redirect, url_for, session
from flask_mysqldb import MySQL
import MySQLdb.cursors
import re


app = Flask(__name__)


app.secret_key = 'your secret key'


app.config['MYSQL_HOST'] = 'localhost'
app.config['MYSQL_USER'] = 'root'
app.config['MYSQL_PASSWORD'] = 'password'
app.config['MYSQL_DB'] = 'geekprofile'


mysql = MySQL(app)


@app.route('/')
@app.route('/login', methods =['GET', 'POST'])
def login():
    msg = ''
    if request.method == 'POST' and 'username' in request.form and 'password' in request.form:
        username = request.form['username']
        password = request.form['password']
        cursor = mysql.connection.cursor(MySQLdb.cursors.DictCursor)
        cursor.execute('SELECT * FROM accounts WHERE username = % s AND password = % s', (username, password, ))
        account = cursor.fetchone()
        if account:
            session['loggedin'] = True
            session['id'] = account['id']
            session['username'] = account['username']
            msg = 'Logged in successfully !'
            return render_template('index.html', msg = msg)
        else:
            msg = 'Incorrect username / password !'
    return render_template('login.html', msg = msg)

@app.route('/logout')
def logout():
   session.pop('loggedin', None)
   session.pop('id', None)
   session.pop('username', None)
   return redirect(url_for('login'))

@app.route('/register', methods =['GET', 'POST'])
def register():
    msg = ''
    if request.method == 'POST' and 'username' in request.form and 'password' in request.form and 'email' in request.form and 'address' in request.form and 'city' in request.form and 'country' in request.form and 'postalcode' in request.form and 'organisation' in request.form:
        username = request.form['username']
        password = request.form['password']
        email = request.form['email']
        organisation = request.form['organisation']
        address = request.form['address']
        city = request.form['city']
        state = request.form['state']
        country = request.form['country']
        postalcode = request.form['postalcode']
        cursor = mysql.connection.cursor(MySQLdb.cursors.DictCursor)
        cursor.execute('SELECT * FROM accounts WHERE username = % s', (username, ))
        account = cursor.fetchone()
        if account:
            msg = 'Account already exists !'
        elif not re.match(r'[^@]+@[^@]+\.[^@]+', email):
            msg = 'Invalid email address !'
        elif not re.match(r'[A-Za-z0-9]+', username):
            msg = 'name must contain only characters and numbers !'
        else:
            cursor.execute('INSERT INTO accounts VALUES (NULL, % s, % s, % s, % s, % s, % s, % s, % s, % s)', (username, password, email, organisation, address, city, state, country, postalcode, ))
            mysql.connection.commit()
            msg = 'You have successfully registered !'
    elif request.method == 'POST':
        msg = 'Please fill out the form !'
    return render_template('register.html', msg = msg)


@app.route("/index")
def index():
    if 'loggedin' in session:
        return render_template("index.html")
    return redirect(url_for('login'))


@app.route("/display")
def display():
    if 'loggedin' in session:
        cursor = mysql.connection.cursor(MySQLdb.cursors.DictCursor)
        cursor.execute('SELECT * FROM accounts WHERE id = % s', (session['id'], ))
        account = cursor.fetchone()
        return render_template("display.html", account = account)
    return redirect(url_for('login'))

@app.route("/update", methods =['GET', 'POST'])
def update():
    msg = ''
    if 'loggedin' in session:
        if request.method == 'POST' and 'username' in request.form and 'password' in request.form and 'email' in request.form and 'address' in request.form and 'city' in request.form and 'country' in request.form and 'postalcode' in request.form and 'organisation' in request.form:
            username = request.form['username']
            password = request.form['password']
            email = request.form['email']
            organisation = request.form['organisation']
            address = request.form['address']
            city = request.form['city']
            state = request.form['state']
            country = request.form['country']
            postalcode = request.form['postalcode']
            cursor = mysql.connection.cursor(MySQLdb.cursors.DictCursor)
            cursor.execute('SELECT * FROM accounts WHERE username = % s', (username, ))
            account = cursor.fetchone()
            if account:
                msg = 'Account already exists !'
            elif not re.match(r'[^@]+@[^@]+\.[^@]+', email):
                msg = 'Invalid email address !'
            elif not re.match(r'[A-Za-z0-9]+', username):
                msg = 'name must contain only characters and numbers !'
            else:
                cursor.execute('UPDATE accounts SET  username =% s, password =% s, email =% s, organisation =% s, address =% s, city =% s, state =% s, country =% s, postalcode =% s WHERE id =% s', (username, password, email, organisation, address, city, state, country, postalcode, (session['id'], ), ))
                mysql.connection.commit()
                msg = 'You have successfully updated !'
        elif request.method == 'POST':
            msg = 'Please fill out the form !'
        return render_template("update.html", msg = msg)
    return redirect(url_for('login'))

if __name__ == "__main__":
    app.run(host ="localhost", port = int("5000"))
第 4 步:创建文件夹“模板” 。在“模板”文件夹中创建文件“index.html”、“display.html”、“update.html”、“login.html”、“register.html”。
第 5 步:打开“login.html”文件并编写下面给出的代码。在“login.html”中,我们有两个字段,即用户名和密码。当用户输入正确的用户名和密码时,它会将您引导到索引页面,否则会显示“用户名/密码不正确”。
Login
Login
New to this page? Register here
第 6 步:打开“register.html”文件并编写下面给出的代码。在“register.html”中,我们有九个字段,即用户名、密码、电子邮件、组织、地址、城市、州、国家、邮政编码。当用户输入所有信息后,将数据存储在数据库中,并显示“注册成功”。
register
Register
Already have account? Login here
第 7 步:打开“index.html”文件并编写下面给出的代码。用户登录成功后,显示此页面并显示“登录成功!”被陈列。
第 8 步:打开“display.html”文件并编写下面给出的代码。这里显示了存储在数据库中的用户信息。
第 9 步:打开“update.html”文件并编写下面给出的代码。用户可以更新他/她的数据,这也更新了数据库。
步骤 10:创建文件夹'static' 。在“static”文件夹中创建文件“style.css”并粘贴给定的 CSS 代码。
/*Store this code in 'style.css' file inside the 'static' folder*/

.logincontent{
    margin: 0 auto;
    height: 500px;
    width: 400px;
    background-color: #e6ffee;
    border-radius: 10px;
}

.registercontent{
    margin: 0 auto;
    height: 720px;
    width: 400px;
    background-color: #e6ffee;
    border-radius: 10px;
}

.logintop{
    height: 60px;
    width: 400px;
    background-color: #009933;
    color: #ffffff;
}

.registertop{
    height: 60px;
    width: 400px;
    background-color: #009933;
    color: #ffffff;
}

.textbox{
    padding: 10px 40px;
    background-color: #009933;
    border-radius: 10px;
}

::placeholder {
    color: #FFFFFF;
    opacity: 1;
    font-style: oblique;
    font-weight: bold;
}

.btn {
    padding: 10px 40px;
    background-color: #009933;
    color: #FFFFFF;
    font-style: oblique;
    font-weight: bold;
    border-radius: 10px;
}

.worddark{
    color: #009933;
    font-style: oblique;
    font-weight: bold;
}

.wordlight{
    color: #FFFFFF;
    font-style: oblique;
    font-weight: bold;
}

*{
    margin: 0;
    padding: 0;
    box-sizing: border-box;
    list-style: none;
    text-decoration: none;
    font-family: 'Josefin Sans', sans-serif;
}

.one{
    display: flex;
    position: relative;
}

.one .two{
     width: 225px;
    height: 100%;
    background: #009933;
    padding: 30px 0px;
    position: fixed;
}

.one .two h1{
    color: #fff;
    text-transform: uppercase;
    text-align: center;
    margin-bottom: 30px;
    font-style: oblique;
    font-weight: bold;
}

.one .two h2{
    color: #fff;
    text-align: center;
}

.one .two .active{
     background: #0a8032;
}

.one .two ul li{
    text-align: center;
    padding: 15px;
    border-bottom: 0.1px solid white;
    border-top: 0.1px solid white;
}

.one .two ul li a{
    color: #ffffff;
    display: block;
}

.one .two ul li a .side{
    width: 25px;
    align:center;
}

.one .content{
    width: 100%;
    margin-left: 200px;
}

.one .content .topbar{
    text-align: center;
    padding: 20px;
    background: #00b33c;
    color: white;
}

.one .content .contentbar{
    margin: auto;
}

.one .content .contentbar h1{
    color: #11a844;
    text-align: center;
    font-style: oblique;
    font-weight: bold;
}
第 11 步:项目结构将如下所示。 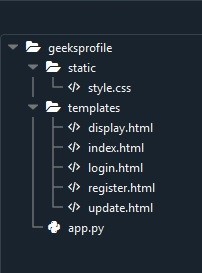
(4) 运行项目
步骤 1:运行服务器。
第 2 步:浏览 URL 'localhost:5000'。
Step-3:将显示输出网页。
(5) 应用程序的测试
Step-1:如果您是新用户,请转到注册页面并填写详细信息。
Step-2:注册后,进入登录页面。输入您的用户名和密码并登录。
Step-3:如果您登录成功,您将被移动到索引页面并显示您的姓名。
Step-4:您可以在显示页面查看您的个人资料详细信息,也可以在更新页面更新您的详细信息。
输出:
登录页面: 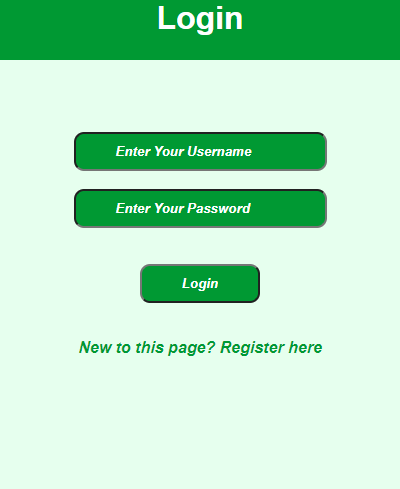
注册页面: 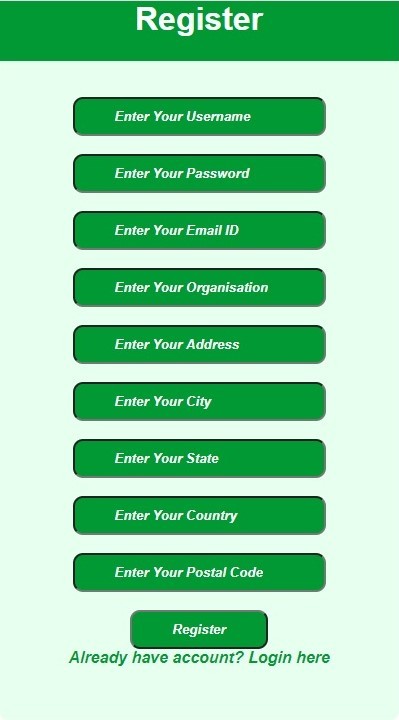
如果登录成功,索引页面: 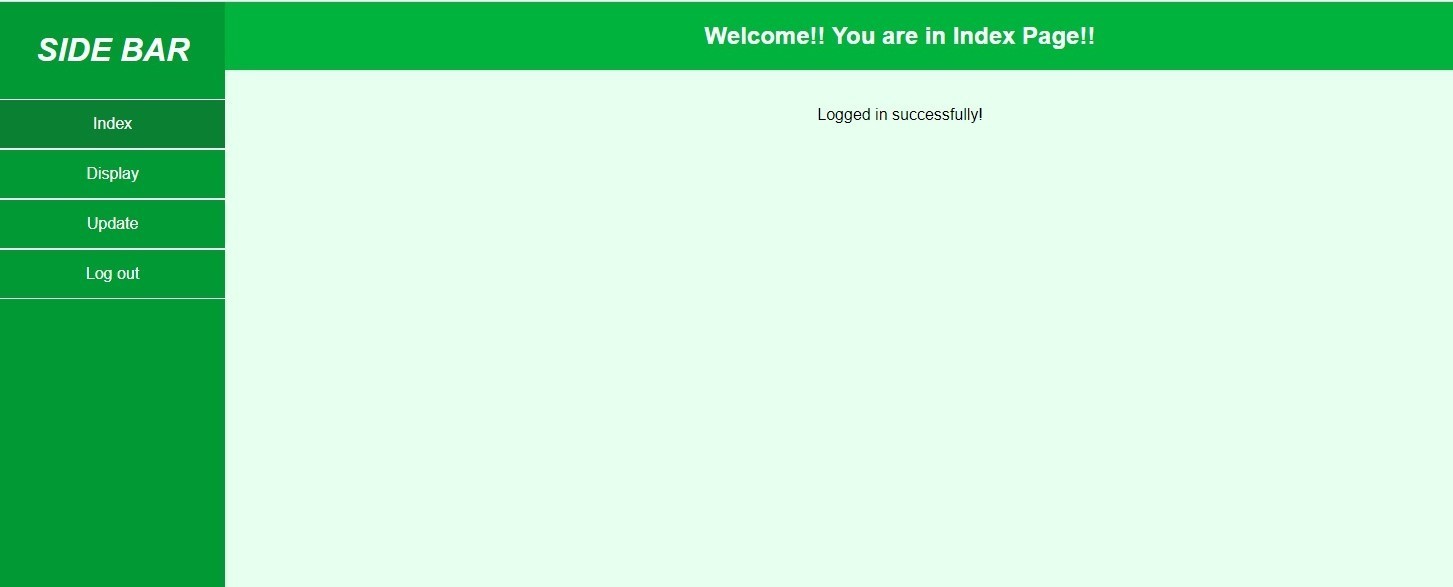
更新页面: 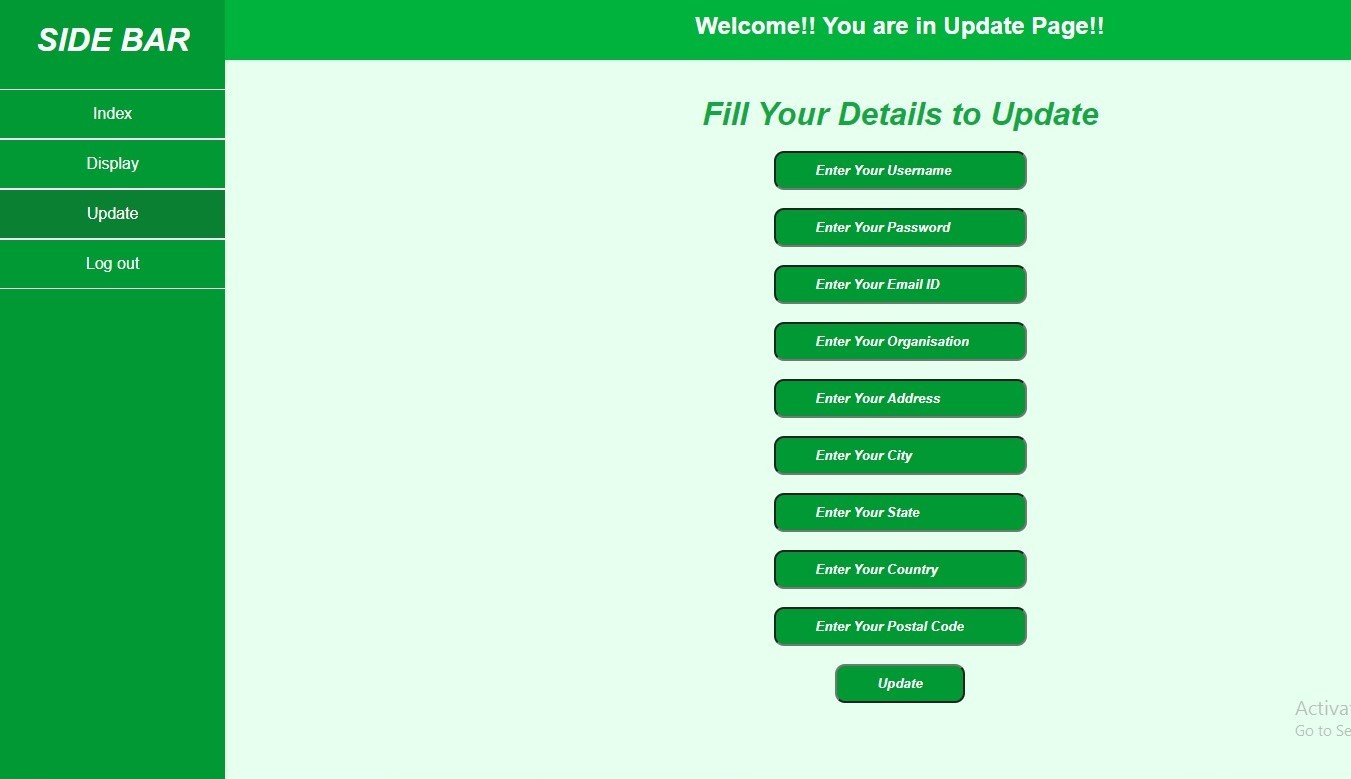
更新前,显示页面: 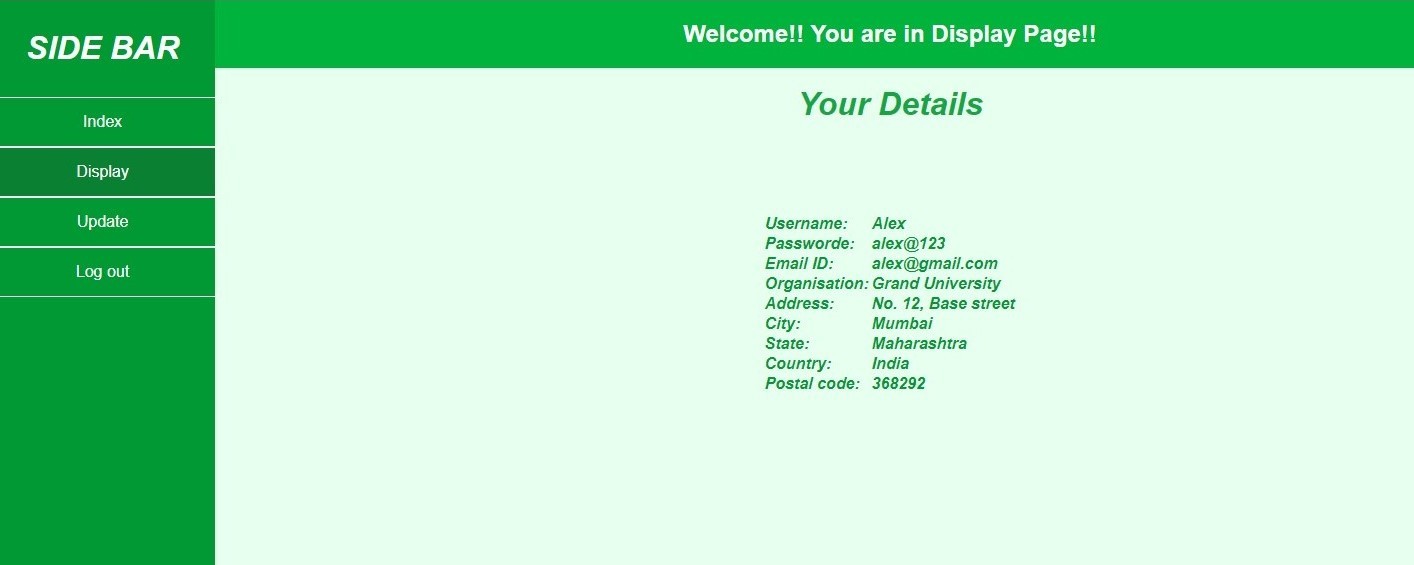
更新后显示页面: 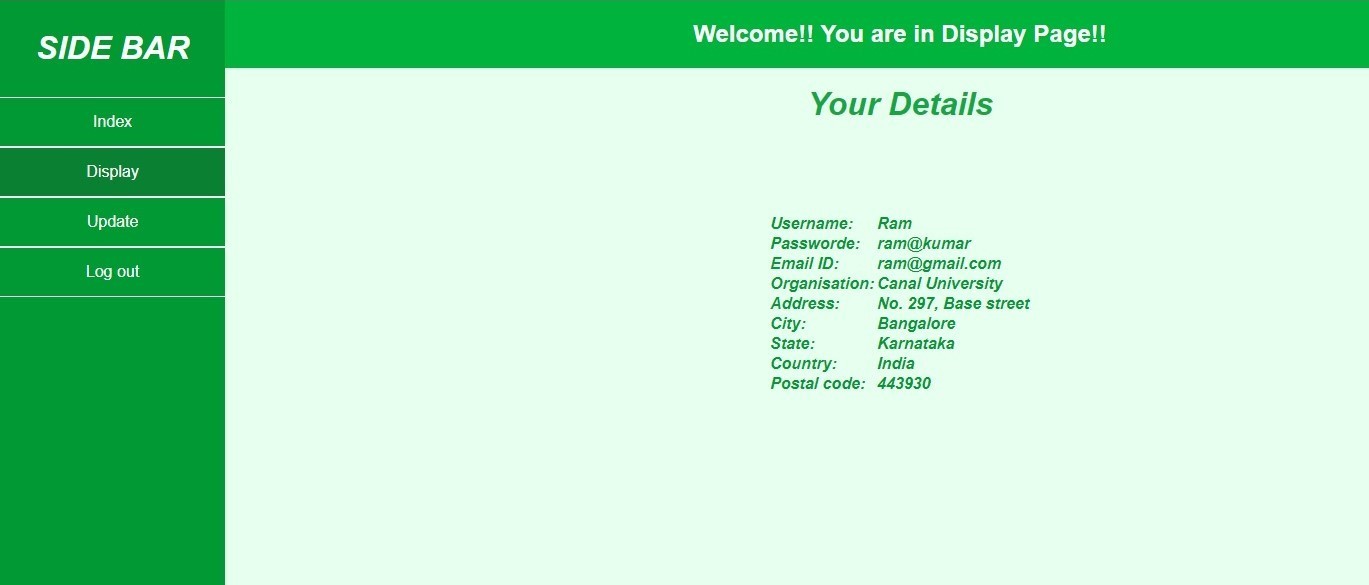
数据库 - 更新前: 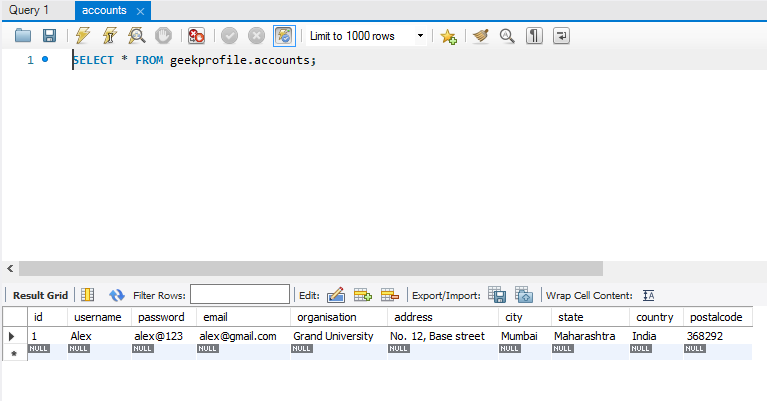
数据库 - 更新后: 