Spring Boot – AOP After Advice
先决条件:Spring框架中的面向切面编程和AOP
顾名思义,面向方面的编程(AOP)在编程中使用方面。它可以定义为将代码分解为不同的模块,也称为模块化,其中方面是模块化的关键单元。方面支持横切关注点的实现,例如事务、日志记录,这些不是业务逻辑的核心,而不会使代码核心与其功能杂乱无章。它通过添加作为现有代码建议的附加行为来实现。例如,安全性是一个横切关注点,在应用程序中的许多方法中都可以应用安全规则,因此在每个方法中重复代码,在公共类中定义功能,并且控件将在整个应用程序中应用该功能。在本文中,我们将介绍 After Advice 的一个工作示例。
After Advice 在连接点执行之后执行。它由@After注释表示。建议方法的执行与匹配方法的执行流程无关。无论是方法正常执行还是通知执行后发生任何异常,无论如何都会执行。这与 after-return 的执行相反,后者仅在方法成功完成时才运行通知,而在抛出异常后,仅在方法通过抛出异常退出时才运行通知。 After通知一般用于释放资源。
在 Spring Boot 应用程序中建议后实现 AOP 的步骤
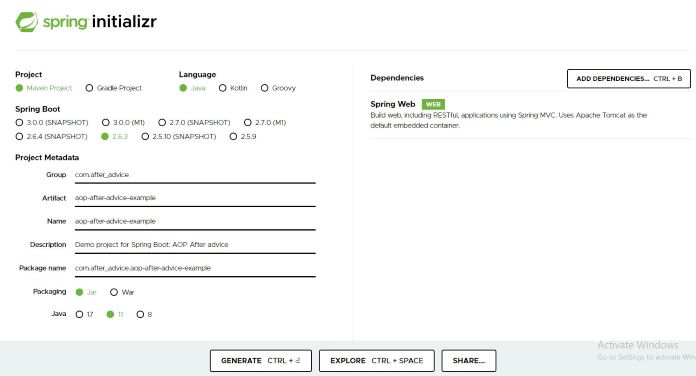
第一步:打开 Spring Initializr http://start.spring.io
第 2 步:提供组名称:com.after_advice
第 3 步:提供工件 ID :aop-after-advice-example
第 4 步:添加Spring Web依赖项。
第五步:点击生成按钮。一个 zip 文件将被下载到系统中。提取它。
步骤 6:使用以下步骤在 IDE 中导入文件夹:
文件 -> 导入 -> 现有 Maven 项目 -> 下一步 -> 浏览 -> 查找文件夹aop-after-advice-example -> 完成。导入项目时,它将安装依赖项。完成后,请按照以下步骤操作。
第七步:在 pom.xml 中添加 spring AOP 的依赖
pom.xml 文件:
XML
 4.0.0
 com.before_advice
 aop-before-advice-example
 0.0.1-SNAPSHOT

 jar

 aop-before-advice-example
 Demo project for Spring Boot


     org.springframework.boot
     spring-boot-starter-parent
     2.2.2.RELEASE


     UTF-8
     UTF-8
     1.8


        org.springframework.boot
        spring-boot-starter-web


        org.springframework.boot
        spring-boot-starter-aop


   org.springframework.boot
   spring-boot-maven-plugin
Java
package com.after_advice.model;

public class Student {
    private String firstName;
    private String secondName;

    public Student() {
    }

    public String getFirstName() {
        return firstName;
    }

    public void setFirstName(String firstName) {
        this.firstName = firstName;
    }

    public String getSecondName() {
        return secondName;
    }

    public void setSecondName(String secondName) {
        this.secondName = secondName;
    }
}
Java
package com.after_advice.service;

import org.springframework.stereotype.Service;

import com.after_advice.model.Student;

@Service
public class StudentService {

    public Student addStudent(String fname, String sname) {
        System.out.println("Add student service method called");
        Student stud = new Student();
        stud.setFirstName(fname);
        stud.setSecondName(sname);
        if(fname.length()<=3)
            throw new RuntimeException("Length of firstname must be 4 or more" );
        return stud;
    }

}
Java
package com.after_advice.controller;

import com.after_advice.model.Student;
import com.after_advice.service.StudentService;
import org.springframework.beans.factory.annotation.Autowired;
import org.springframework.web.bind.annotation.GetMapping;
import org.springframework.web.bind.annotation.RequestParam;
import org.springframework.web.bind.annotation.RestController;

@RestController
public class StudentController {

    @Autowired private StudentService studentService;

    @GetMapping(value = "/add")
    public Student addStudent(
        @RequestParam("firstName") String firstName,
        @RequestParam("secondName") String secondName)
    {
        return studentService.addStudent(firstName,
                                         secondName);
    }
}
Java
package com.after_advice.aspect;

import org.aspectj.lang.JoinPoint;
import org.aspectj.lang.annotation.After;
import org.aspectj.lang.annotation.Aspect;
import org.aspectj.lang.annotation.Pointcut;
import org.springframework.stereotype.Component;

@Aspect
@Component
public class StudentServiceAspect {

    // the pointcut expression specifying execution of any
    // method in com.after_advice.service.StudentService
    // class of any return type with 0 or more number of
    // arguments
    @Pointcut("execution(* com.aftere_advice.service.StudentService.*(..)) ")
      // the pointcut signature
    private void anyStudentService()  { }

    @After("anyStudentService() && args(fname, sname)")
    public void afterAdvice(JoinPoint joinPoint,
                             String fname, String sname)
    {
        System.out.println(
            "After method:" + joinPoint.getSignature()
            + "\n "
            + "Added Student with first name - " + fname
            + ", second name - " + sname);
    }
}
保存更改,它将下载 jar。完成后,继续下一步。
Note: If the jars are not added properly, you may get some errors.
第 8 步:创建一个名为 com.after_advice.model 的包。并向其添加一个学生模型类。
学生班级:
Java
package com.after_advice.model;

public class Student {
    private String firstName;
    private String secondName;

    public Student() {
    }

    public String getFirstName() {
        return firstName;
    }

    public void setFirstName(String firstName) {
        this.firstName = firstName;
    }

    public String getSecondName() {
        return secondName;
    }

    public void setSecondName(String secondName) {
        this.secondName = secondName;
    }
}
第 9 步:创建一个名为 com.after_advice.service 的包。并向其中添加一个学生服务类。添加一个方法来添加具有给定名称参数的学生。
学生服务类:
Java
package com.after_advice.service;

import org.springframework.stereotype.Service;

import com.after_advice.model.Student;

@Service
public class StudentService {

    public Student addStudent(String fname, String sname) {
        System.out.println("Add student service method called");
        Student stud = new Student();
        stud.setFirstName(fname);
        stud.setSecondName(sname);
        if(fname.length()<=3)
            throw new RuntimeException("Length of firstname must be 4 or more" );
        return stud;
    }

}
第 10 步:创建一个名为 com.after_advice.controller 的包。并向其添加一个学生控制器类。添加一个方法来处理 Get 请求并从中调用 Student Service。
学生控制器类:
Java
package com.after_advice.controller;

import com.after_advice.model.Student;
import com.after_advice.service.StudentService;
import org.springframework.beans.factory.annotation.Autowired;
import org.springframework.web.bind.annotation.GetMapping;
import org.springframework.web.bind.annotation.RequestParam;
import org.springframework.web.bind.annotation.RestController;

@RestController
public class StudentController {

    @Autowired private StudentService studentService;

    @GetMapping(value = "/add")
    public Student addStudent(
        @RequestParam("firstName") String firstName,
        @RequestParam("secondName") String secondName)
    {
        return studentService.addStudent(firstName,
                                         secondName);
    }
}
第 11 步:创建一个名为 com.after_advice.aspect 的包。并向其中添加一个 Student Service Aspect 类。在这里,我们将添加我们的 Advice 方法和 PointCut 表达式。
StudentServiceAspect 类:
Java
package com.after_advice.aspect;

import org.aspectj.lang.JoinPoint;
import org.aspectj.lang.annotation.After;
import org.aspectj.lang.annotation.Aspect;
import org.aspectj.lang.annotation.Pointcut;
import org.springframework.stereotype.Component;

@Aspect
@Component
public class StudentServiceAspect {

    // the pointcut expression specifying execution of any
    // method in com.after_advice.service.StudentService
    // class of any return type with 0 or more number of
    // arguments
    @Pointcut("execution(* com.aftere_advice.service.StudentService.*(..)) ")
      // the pointcut signature
    private void anyStudentService()  { }

    @After("anyStudentService() && args(fname, sname)")
    public void afterAdvice(JoinPoint joinPoint,
                             String fname, String sname)
    {
        System.out.println(
            "After method:" + joinPoint.getSignature()
            + "\n "
            + "Added Student with first name - " + fname
            + ", second name - " + sname);
    }
}
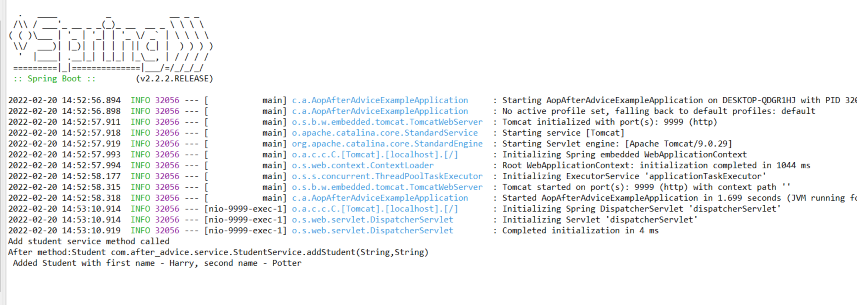
第 12 步:我们完成了代码结构。现在要运行应用程序,将应用程序启动为“作为启动应用程序运行”。打开浏览器并点击以下 URL 进行获取请求调用:http://localhost:{portNumber}/add?firstName={fname}&secondName={sname}

在演示中,我们使用 fname 为 Harry 和 sname 为 Potter 来访问 URL。在这种情况下,该方法将正常执行。
当我们点击 fname 为 Tom 的 URL 时,服务方法将抛出异常。 After 通知将被执行。

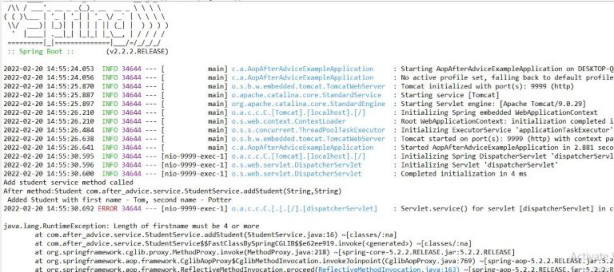
从输出中可以看出,在服务方法成功执行或引发任何异常后调用通知方法。