使用 CNN 从胸部 X 射线图像中检测 COVID-19
一个基于 Django 的 Web 应用程序,用于从胸部 X 射线图像中检测 COVID-19 的存在,具有在预建架构上训练的多个机器学习模型。该项目使用了三种不同的机器学习模型,即 Xception、ResNet50 和 VGG16。深度学习模型在公开可用的数据集 SARS-COV-2-Ct-Scan 数据集上进行了训练。该项目的目的是在初步阶段应用卷积神经网络 (CNN) 架构解决大流行问题。
使用的工具和技术
下面列出了一些重要的库和使用的技术
- 编程语言: Python
- 网络框架:Django
- 机器学习框架:Tensorflow
- 前端开发:HTML、CSS(BootStrap)
- 基本库:keras、sklearn、venv、seaborn、matplotlib
可以在此处找到所有库的详细列表。
分步实施
深度学习部分
1)将数据集转换为数据框
- 从这里下载数据集
- 将数据转换为具有相应列的 pandas 数据框
- 文件 [图像文件]
- 疾病ID [序列号]
- 疾病类型 [COVID,非 COVID]
Python3
train_dir = 'path/to/dataset'
train_data = []

for defects_id, sp in enumerate(disease_types):
    for file in os.listdir(os.path.join(train_dir, sp)):
        train_data.append(['{}/{}'.format(sp, file), defects_id, sp])

train = pd.DataFrame(train_data, columns=['File', 'DiseaseID', 'Disease Type'])
Python3
IMAGE_SIZE = 64

def read_image(filepath):
    return cv2.imread(os.path.join(data_dir, filepath))

def resize_image(image, image_size):
    return cv2.resize(image.copy(), image_size,
                      interpolation=cv2.INTER_AREA)

X_train = np.zeros((train.shape[0], IMAGE_SIZE, IMAGE_SIZE, 3))

for i, file in tqdm(enumerate(train['File'].values)):
    image = read_image(file)
    if image is not None:
        X_train[i] = resize_image(image, (IMAGE_SIZE, IMAGE_SIZE))

X_Train = X_train / 255.

Y_train = train['DiseaseID'].values
Y_train = to_categorical(Y_train, num_classes=2)
Python3
X_train, X_val, Y_train, Y_val = train_test_split(
  X_Train, Y_train, test_size=0.2, random_state = 42)
Python3
def build_model():

    # Use Any One of the Following Lines
    resnet50 = ResNet50(weights='imagenet', include_top=False)
    xception = Xception(weights='imagenet', include_top=False)
    vgg16 = VGG16(weights='imagenet', include_top=False)

    input = Input(shape=(SIZE, SIZE, N_ch))
    x = Conv2D(3, (3, 3), padding='same')(input)

    # Use Any One of the Following Lines
    x = resnet50(x)
    x = xception(x)
    x = vgg16(x)

    x = GlobalAveragePooling2D()(x)
    x = BatchNormalization()(x)
    x = Dropout(0.5)(x)
    x = Dense(256, activation='relu')(x)
    x = BatchNormalization()(x)
    x = Dropout(0.5)(x)

    # multi output
    output = Dense(2, activation='softmax', name='root')(x)

    # model
    model = Model(input, output)

    optimizer = Adam(lr=0.003, beta_1=0.9, beta_2=0.999,
                     epsilon=0.1, decay=0.0)

    model.compile(loss='categorical_crossentropy',
                  optimizer=optimizer, metrics=['accuracy'])

    model.summary()

    return model
Python3
# Use Any one of the Lines Below
hdf5_save = 'ResNet50_Model.hdf5'
hdf5_save = 'Xception_Model.hdf5'
hdf5_save = 'VGG16_Model.hdf5'

model = build_model()
annealer = ReduceLROnPlateau(
    monitor='val_accuracy', factor=0.70, patience=5,
    verbose=1, min_lr=1e-4)

checkpoint = ModelCheckpoint(h5f5_save, verbose=1, save_best_only=True)

datagen = ImageDataGenerator(rotation_range=360,
                             width_shift_range=0.2,
                             height_shift_range=0.2,
                             zoom_range=0.2,
                             horizontal_flip=True,
                             vertical_flip=True)

datagen.fit(X_train)

# Use Any one of the lines Below
model_graph = 'ResNet50.json'
model_graph = 'Xception.json'
model_graph = 'VGG16.json'

model_json = model.to_json()
with open(model_graph, "w") as json_file:
    json_file.write(model_json)
HTML
2)读取和预处理数据帧
- 阅读图片
- 将图像转换为 (64 x 64) 的标准尺寸
- 为输入/输出 X_Train 和 Y_Train 创建 numpy 数组
- 通过除以 255 标准化 RGB 值。
Python3
IMAGE_SIZE = 64

def read_image(filepath):
    return cv2.imread(os.path.join(data_dir, filepath))

def resize_image(image, image_size):
    return cv2.resize(image.copy(), image_size,
                      interpolation=cv2.INTER_AREA)

X_train = np.zeros((train.shape[0], IMAGE_SIZE, IMAGE_SIZE, 3))

for i, file in tqdm(enumerate(train['File'].values)):
    image = read_image(file)
    if image is not None:
        X_train[i] = resize_image(image, (IMAGE_SIZE, IMAGE_SIZE))

X_Train = X_train / 255.

Y_train = train['DiseaseID'].values
Y_train = to_categorical(Y_train, num_classes=2)
3) 将数据集拆分为训练/验证
- 拆分为训练、验证数据集
- 相应地选择拆分百分比和随机状态
Python3
X_train, X_val, Y_train, Y_val = train_test_split(
  X_Train, Y_train, test_size=0.2, random_state = 42)
4) 定义模型架构
- 我们将导入下面列出的三种不同架构:
- VGG16
- ResNet50
- 异常
- 模型架构的结构
- 输入形状的 Conv2D (3,3)
- ResNet50/Xception/VGG16 架构
- 添加一个 GlobalAveragePooling2D()
- 添加辍学层
- 具有 relu 激活的最终 DenseNet 层
- 对于多输出添加 Softmax 层
- 使用“adam”优化器,可以相应地调整超参数
- 以下代码提出了构建模型的示例代码
Python3
def build_model():

    # Use Any One of the Following Lines
    resnet50 = ResNet50(weights='imagenet', include_top=False)
    xception = Xception(weights='imagenet', include_top=False)
    vgg16 = VGG16(weights='imagenet', include_top=False)

    input = Input(shape=(SIZE, SIZE, N_ch))
    x = Conv2D(3, (3, 3), padding='same')(input)

    # Use Any One of the Following Lines
    x = resnet50(x)
    x = xception(x)
    x = vgg16(x)

    x = GlobalAveragePooling2D()(x)
    x = BatchNormalization()(x)
    x = Dropout(0.5)(x)
    x = Dense(256, activation='relu')(x)
    x = BatchNormalization()(x)
    x = Dropout(0.5)(x)

    # multi output
    output = Dense(2, activation='softmax', name='root')(x)

    # model
    model = Model(input, output)

    optimizer = Adam(lr=0.003, beta_1=0.9, beta_2=0.999,
                     epsilon=0.1, decay=0.0)

    model.compile(loss='categorical_crossentropy',
                  optimizer=optimizer, metrics=['accuracy'])

    model.summary()

    return model
5) 训练模型
- 调用 build_model()函数
- 使用退火器,一个监控数量的回调,如果“耐心”的时期数没有改善,学习率就会降低。
- 使用 ImageDataGenerator 进行实时图像数据增强
- 在 x_train、y_train 上训练模型
- 以 .hdf5 格式保存模型权重,以 .json 格式保存模型图
Python3
# Use Any one of the Lines Below
hdf5_save = 'ResNet50_Model.hdf5'
hdf5_save = 'Xception_Model.hdf5'
hdf5_save = 'VGG16_Model.hdf5'

model = build_model()
annealer = ReduceLROnPlateau(
    monitor='val_accuracy', factor=0.70, patience=5,
    verbose=1, min_lr=1e-4)

checkpoint = ModelCheckpoint(h5f5_save, verbose=1, save_best_only=True)

datagen = ImageDataGenerator(rotation_range=360,
                             width_shift_range=0.2,
                             height_shift_range=0.2,
                             zoom_range=0.2,
                             horizontal_flip=True,
                             vertical_flip=True)

datagen.fit(X_train)

# Use Any one of the lines Below
model_graph = 'ResNet50.json'
model_graph = 'Xception.json'
model_graph = 'VGG16.json'

model_json = model.to_json()
with open(model_graph, "w") as json_file:
    json_file.write(model_json)
构建 Web 应用程序
- 创建一个 Django 项目,并在其中初始化一个应用程序,该应用程序将使用保存的模型权重来预测上传的胸部 X 射线图像
- 使用表单创建一个基本的静态页面以将图像文件发送到后端
HTML
- 在 views.py 文件夹中,处理上传的图像。加载模型文件并将响应发送回前端。
- 响应将包含以下详细信息
- 模型预测
- 信心分数
- 预测持续时间(秒)
- 相应地使用 CSS (Bootstrap) 将样式添加到前端
注意:加载多个模型并使用model.predict()会花费大量时间,而且在云实例中没有 GPU 服务的情况下会花费更多时间。要将此应用程序扩展到更高的服务器负载,请考虑使用 TensorFlow Serving
演示
下面的视频演示了在 localhost 上构建和测试的项目的演示版本
COV-CNN 演示
在现实生活和未来工作中的应用
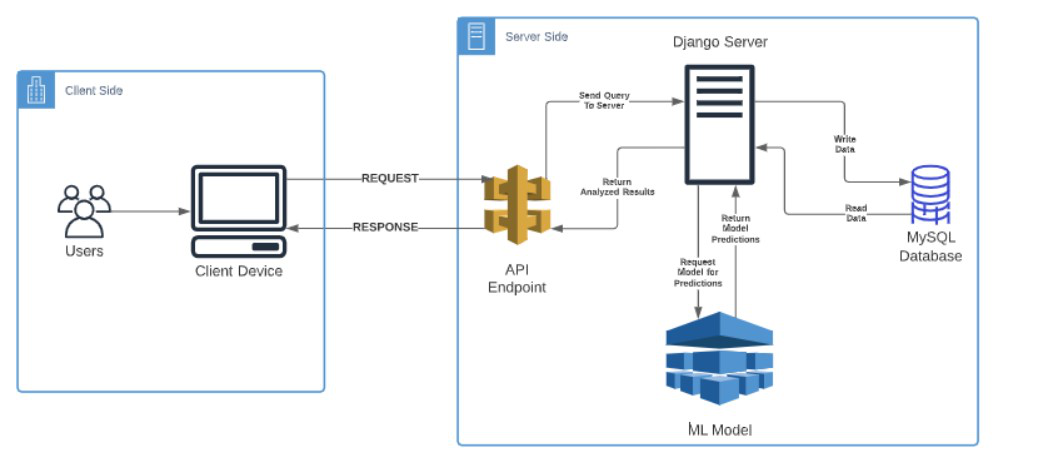
前几条线建设的项目不能直接应用,但是很多这样的应用可以建立在类似的切线上,服务于基于患者投入的初步医疗诊断的目的,为医疗行业节省了大量的筛查阶段成本.项目中展示的机器学习管道可以通过使其本质上具有动态性来提升一个档次。通过向模型动态添加更多训练数据并对其进行训练以提高其准确性。 ML 模型可以转换为 REST API,使应用程序在本质上更加健壮和可扩展。 MySQL 数据库可用于存储具有诊断详细信息和其他参数的患者数据。我已经展示了一个使用草图来说明应用程序的架构,该应用程序可以在不久的将来构建以应用于医疗行业。
资源
- GitHub存储库: https://github.com/dwaipayan05/CovCNN-WebApp
- Google Drive 链接:笔记本/重量文件/数据集