安卓 |带有示例的隐式和显式意图
先决条件:
- 面向初学者的 Android 应用开发基础知识
- 安装和设置 Android Studio 指南
- 安卓 |从第一个 app/android 项目开始
- 安卓 |运行您的第一个 Android 应用程序
本文旨在讲述隐式和显式意图以及如何在 Android 应用程序中使用它们。
Android中的意图是什么?
Intent是一个消息传递对象,它在服务、内容提供者、活动等组件之间传递。通常startActivity()方法用于调用任何活动。
意图的一些一般功能是:
- 启动服务
- 启动活动
- 显示网页
- 显示联系人列表
- 消息广播
方法及其描述
| Methods | Description |
|---|---|
| Context.startActivity() | This is to launch a new activity or get an existing activity to be action. |
| Context.startService() | This is to start a new service or deliver instructions for an existence service. |
| Context.sendBroadcast() | This is to deliver the message to broadcast receivers. |
意图分类
有两种类型的意图
1. Implicit Intent
2. Explicit Intent
- 隐式意图:使用隐式意图,组件不能被指定。要执行的动作由隐式意图声明。然后android操作系统会过滤掉响应动作的组件。
例如
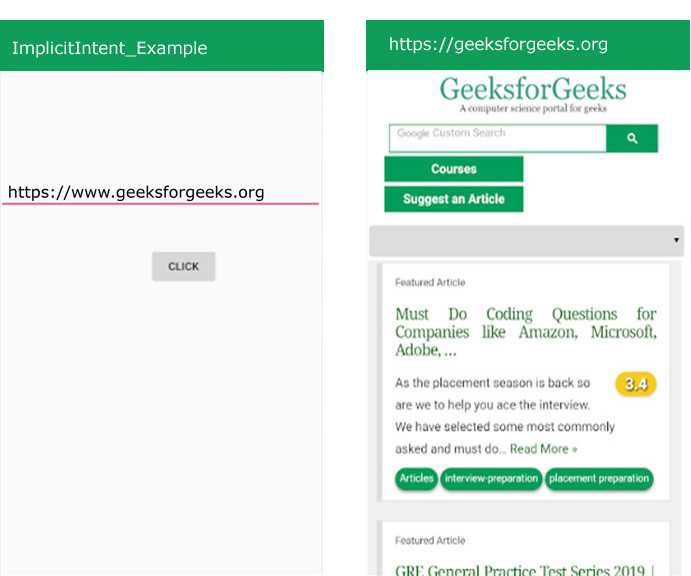
在上面的例子中,没有指定任何组件,而是执行了一个动作,即将打开一个网页。当您输入所需网页的名称并单击“点击”按钮时。您的网页已打开。
如何创建一个 Android 应用程序以使用隐式意图打开网页(附示例)
- 第 1 步:创建 XML 文件和Java文件。请参阅先决条件以了解有关此步骤的更多信息。

- 第 2 步:打开“activity_main.xml”文件并在约束布局中添加以下小部件。
1. 一个EditText输入文本。
2.一个按钮打开网页。
此外,为每个组件分配ID ,如图像和下面的代码所示。为组件分配的 ID有助于识别组件,并且可以在Java文件中轻松使用。
句法:android:id="@+id/id_name"这里给定的ID: editText1 , button1
这将制作应用程序的 UI。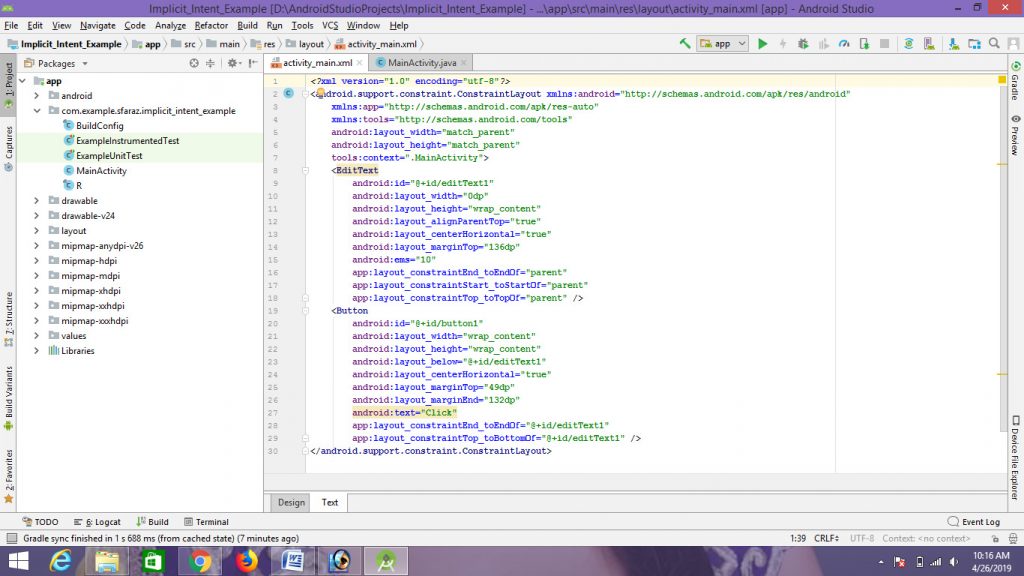
- 第 3 步:现在,在 UI 之后,此步骤将创建应用程序的后端。为此,打开“MainActivity. Java”文件并使用 findViewById() 方法实例化在 XML 文件中创建的组件(按钮)。此方法借助分配的 ID 将创建的对象绑定到 UI 组件。
一般语法:ComponentType object = (ComponentType)findViewById(R.id.IdOfTheComponent);
使用的组件(EditText、Button)的语法:
EditText editText = (EditText)findViewById(R.id.editText1);
Button button = (Button)findViewById(R.id.button1); - 第 4 步:此步骤涉及设置操作以显示 Toast 消息。这些操作如下:
一种)。首先在按钮上添加监听器,此按钮将打开网页。
button.setOnClickListener(new View.OnClickListener() {});乙)。创建字符串类型变量以存储“EditText”的值。值被接受并转换为字符串。
String url = editText1.getText().toString();
C)。创建一个 Intent 对象 MainActivity。 Java类打开网页。
Intent intent = new Intent(Intent.ACTION_VIEW, Uri.parse(url));
d)。 startActivity() 方法开始调用意图指定的打开网页。
startActivity(intent);
因此,隐式意图的代码片段:
String url = editText1.getText().toString();
Intent intent=new Intent(Intent.ACTION_VIEW, Uri.parse(url));
startActivity(intent);
隐式Intent的完整代码
activity_main.xml
MainActivity.java
package org.geeksforgeeks.implicitIntent_example;

import android.app.Activity;
import android.content.Intent;
import android.net.Uri;
import android.os.Bundle;
import android.view.View;
import android.widget.Button;
import android.widget.EditText;

public class MainActivity extends Activity {

    @Override
    protected void onCreate(Bundle savedInstanceState)
    {
        super.onCreate(savedInstanceState);
        setContentView(R.layout.activity_main);

        // Bind the components to their respective objects
        // by assigning their IDs
        // with the help of findViewById() method
        final EditText editText1 = (EditText)findViewById(R.id.editText1);
        Button button = (Button)findViewById(R.id.button1);

        // implementation of onClick event for Implicit Intent
        button.setOnClickListener(new View.OnClickListener() {
            @Override
            public void onClick(View v)
            {

                // performing webpage open action
                String url = editText1.getText().toString();
                Intent intent = new Intent(Intent.ACTION_VIEW, Uri.parse(url));
                startActivity(intent);
            }
        });
    }
}
activity_main.xml
MainActivity.java
package org.geeksforgeeks.explicit_intent;

import android.os.Bundle;
import android.app.Activity;
import android.content.Intent;
import android.view.View;
import android.view.View.OnClickListener;
import android.widget.Button;

public class MainActivity extends Activity {
    // Defining the object for button
    Button button1;
    @Override
    public void onCreate(Bundle savedInstanceState)
    {
        super.onCreate(savedInstanceState);
        setContentView(R.layout.activity_main);

        // Bind the components to their respective objects
        // by assigning their IDs
        // with the help of findViewById() method
        button1 = (Button)findViewById(R.id.Button01);

        button1.setOnClickListener(new OnClickListener() {
            public void onClick(View view)
            {

                // Creating explicit intent
                Intent i = new Intent(getApplicationContext(),
                                      ActivityTwo.class);
                startActivity(i);
            }
        });
    }
}
activity_two.xml
ActivityTwo.java
package org.geeksforgeeks.explicit_intent;

import android.app.Activity;
import android.content.Intent;
import android.os.Bundle;
import android.view.View;
import android.view.View.OnClickListener;
import android.widget.Button;

public class ActivityTwo extends Activity {

    // Defining the object for button
    Button button1;
    @Override
    public void onCreate(Bundle bundle)
    {
        super.onCreate(bundle);
        setContentView(R.layout.activity_two);

        // Bind the components to their respective objects
        // by assigning their IDs
        // with the help of findViewById() method
        button1 = (Button)findViewById(R.id.Button01);

        button1.setOnClickListener(new OnClickListener() {
            public void onClick(View view)
            {

                // Creating explicit intent
                Intent i = new Intent(getApplicationContext(),
                                      MainActivity.class);
                startActivity(i);
            }
        });
    }
}
输出:
- 第 1 步:创建 XML 文件和Java文件。请参阅先决条件以了解有关此步骤的更多信息。
- 显式意图:使用显式意图可以指定任何其他组件。换句话说,目标组件是由明确的意图指定的。所以只会调用指定的目标组件。
例如:

显式意图示例
在上面的示例中,有两个活动(FirstActivity、SecondActivity)。当您在第一个活动中单击“转到其他活动”按钮时,您将转到第二个活动。当您在第二个活动中单击“GO TO HOME ACTIVITY”按钮时,您将转到第一个活动。这是通过显式意图完成的。
如何使用 Explicit Intent 创建一个 Android 应用程序以移动到下一个活动(附示例)
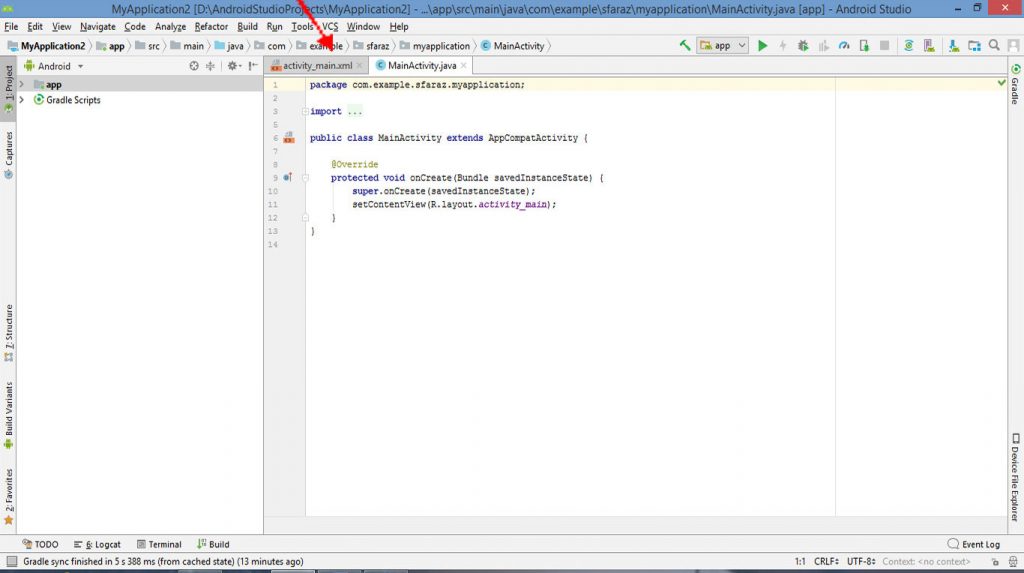
- 第 1 步:创建 XML 文件和Java文件。请参阅先决条件以了解有关此步骤的更多信息。
- 第 2 步:打开“activity_main.xml”文件并在约束布局中添加以下小部件。
1. 用于移动到第二个活动的按钮。
2. 用于编写一些文本的TextView 。
此外,为每个组件(按钮、TextView)分配ID ,如图所示和下面的代码。为组件分配的 ID有助于识别组件,并且可以在Java文件中轻松使用。
句法:android:id="@+id/id_name"这里给定的 ID: Button01 , TextView01 。
这将制作应用程序的 UI。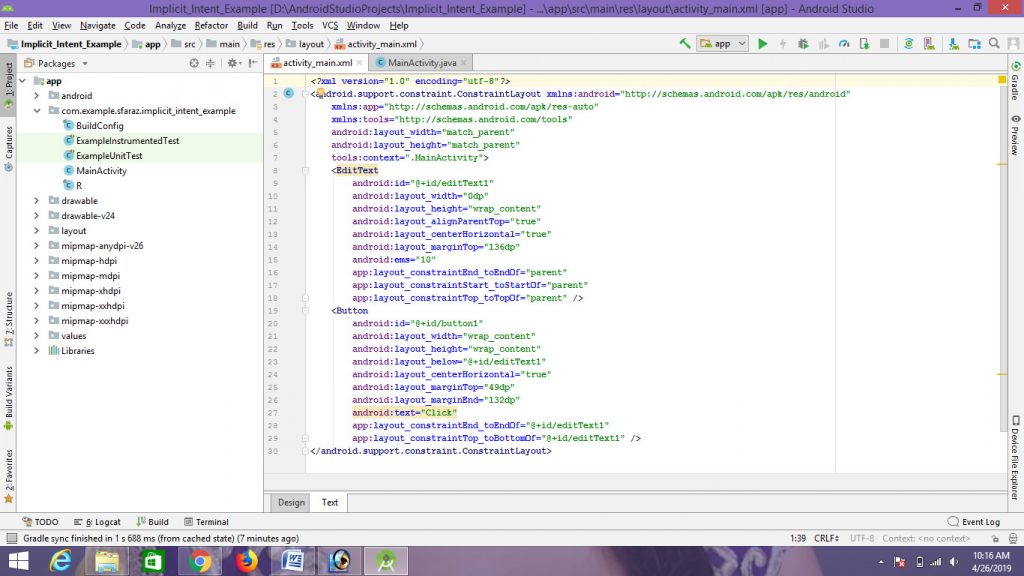
- 第 3 步:现在,在 UI 之后,此步骤将创建应用程序的后端。为此,打开“MainActivity. Java”文件并使用 findViewById() 方法实例化在 XML 文件中创建的组件(Button、TextView)。此方法借助分配的 ID 将创建的对象绑定到 UI 组件。
一般语法:
ComponentType object = (ComponentType)findViewById(R.id.IdOfTheComponent);
使用的组件(Button、TextView)的语法:
1. Button button = (Button)findViewById(R.id.Button01);
2. TextView textView = (TextView)findViewById(R.id.TextView01); - 第 4 步:此步骤涉及设置操作以创建显式意图。这些操作如下:
一种。首先在按钮上添加侦听器,然后使用此按钮您将移动到其他活动。
button1.setOnClickListener(new View.OnClickListener() {});
湾。现在,创建一个意图。
Intent i = new Intent(getApplicationContext(), SecondActivityName.class);参数:这有两个参数:
- getApplicationContext():返回整个应用程序的上下文。
- OtherActivityName.class:您应该在此处使用您的活动名称。
因此,明确意图的代码是:
Intent i = new Intent(getApplicationContext(), ActivityTwo.class);C。现在开始有针对性的活动。
startActivity(i):这会启动目标活动。
显式意图的代码片段:Intent i = new Intent(getApplicationContext(), ActivityTwo.class); startActivity(i);- 第 5 步:现在我们必须创建第二个活动作为目标活动。
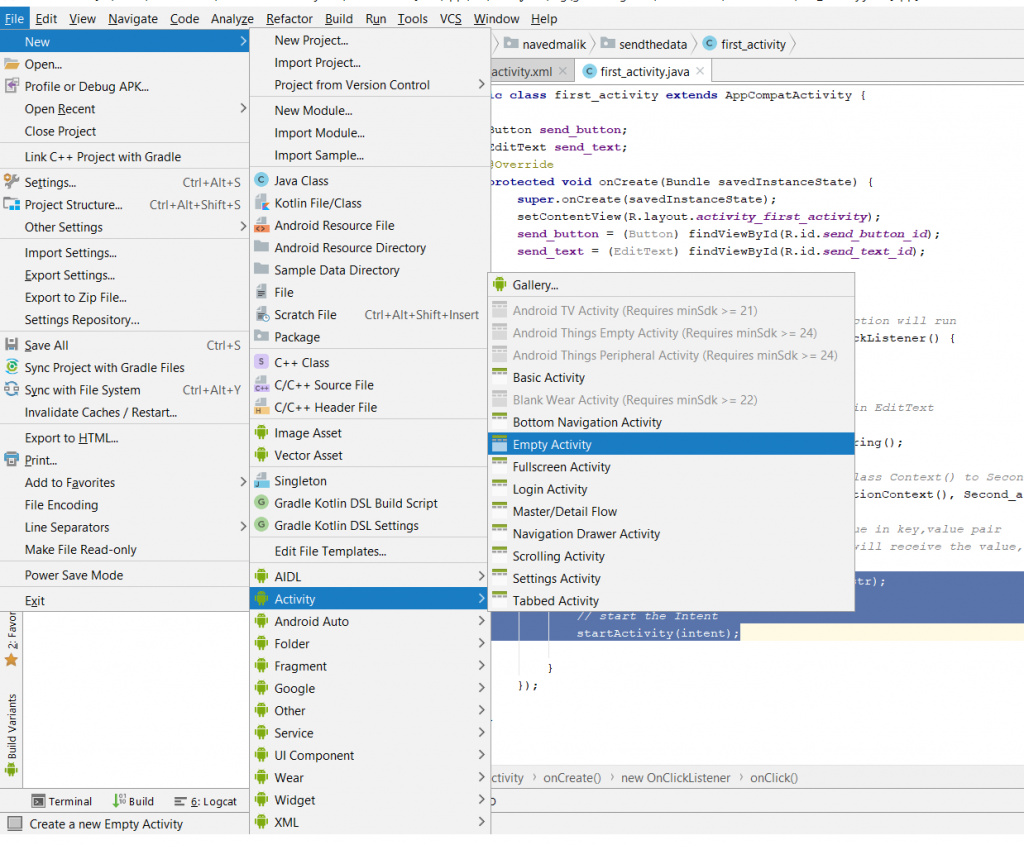
创建第二个活动的步骤如下:android project > File > new > Activity > Empty Activity
- 第 6 步:现在打开您的第二个 xml 文件。
添加Button和TextView用于返回主活动并分别在活动上编写一些文本。将 ID 分配给 Button 和 Textview。第二个活动如下图所示:
- 第 7 步:现在,打开您的第二个活动Java文件并执行以下操作。
一种。首先在按钮上添加侦听器,然后使用此按钮您将移动到主页活动。
button1.setOnClickListener(new View.OnClickListener() {});湾。现在,创建一个意图。
Intent i = new Intent(getApplicationContext(), OtherActivityName.class);因此,明确意图的代码是:
Intent i = new Intent(getApplicationContext(), MainActivity.class);C。现在开始有针对性的活动。
startActivity(i):This starts target activity.
显示 Toast 消息的代码:
Intent i = new Intent(getApplicationContext(), MainActivity.class);
startActivity(i);- 第 8 步:现在运行应用程序,操作如下:
当应用程序打开时,它会显示一个“转到其他活动”按钮。
单击“转到其他活动”按钮。
然后您将转到第二个活动。
此外,您将在第二个活动上获得“GO TO HOME ACTIVITY”按钮,当您单击此按钮时,您将移至主活动。
Explicit Intent 的完整代码
activity_main.xml
主要活动。Java
package org.geeksforgeeks.explicit_intent;

import android.os.Bundle;
import android.app.Activity;
import android.content.Intent;
import android.view.View;
import android.view.View.OnClickListener;
import android.widget.Button;

public class MainActivity extends Activity {
    // Defining the object for button
    Button button1;
    @Override
    public void onCreate(Bundle savedInstanceState)
    {
        super.onCreate(savedInstanceState);
        setContentView(R.layout.activity_main);

        // Bind the components to their respective objects
        // by assigning their IDs
        // with the help of findViewById() method
        button1 = (Button)findViewById(R.id.Button01);

        button1.setOnClickListener(new OnClickListener() {
            public void onClick(View view)
            {

                // Creating explicit intent
                Intent i = new Intent(getApplicationContext(),
                                      ActivityTwo.class);
                startActivity(i);
            }
        });
    }
}
activity_two.xml
活动二。Java
package org.geeksforgeeks.explicit_intent;

import android.app.Activity;
import android.content.Intent;
import android.os.Bundle;
import android.view.View;
import android.view.View.OnClickListener;
import android.widget.Button;

public class ActivityTwo extends Activity {

    // Defining the object for button
    Button button1;
    @Override
    public void onCreate(Bundle bundle)
    {
        super.onCreate(bundle);
        setContentView(R.layout.activity_two);

        // Bind the components to their respective objects
        // by assigning their IDs
        // with the help of findViewById() method
        button1 = (Button)findViewById(R.id.Button01);

        button1.setOnClickListener(new OnClickListener() {
            public void onClick(View view)
            {

                // Creating explicit intent
                Intent i = new Intent(getApplicationContext(),
                                      MainActivity.class);
                startActivity(i);
            }
        });
    }
}
输出:

- 第 1 步:创建 XML 文件和Java文件。请参阅先决条件以了解有关此步骤的更多信息。