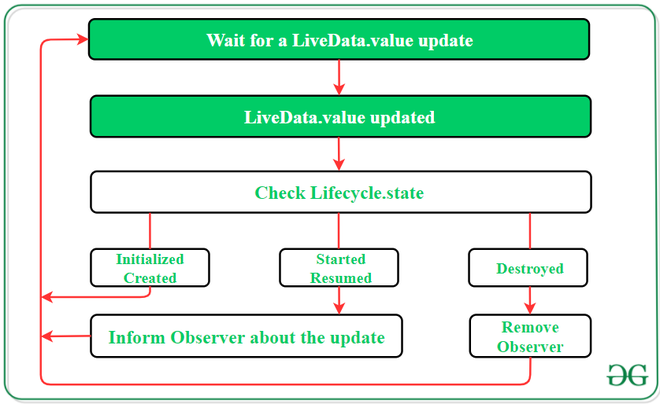
LiveData是android体系结构组件之一。 LiveData是可观察的数据持有者类。可观察的含义在这里,可观察的意思是实时数据可以通过活动和片段(UI控制器)等其他组件进行观察。 LiveData最重要的事情是,它具有有关其观察者生命周期(例如活动或片段)的知识。这意味着实时数据只会更新处于活动生命周期状态的应用程序组件,例如“活动”或“片段”。 LiveData通知处于生命周期已开始或已恢复状态的观察者(活动或片段)。未注册注册以观看LiveData对象的非活动观察者不会收到有关更改的通知。此处非活动观察者的含义是未处于“已启动”或“已恢复”状态。可以注册一个与实现LifecycleOwner接口的对象配对的观察者,我们将在我们的示例中看到该接口。当对应的Lifecycle对象的状态更改为DESTROYED时,此关系允许除去观察者。
该组件是可观察的数据持有者类别,即可以观察到所包含的值。 LiveData是生命周期感知的组件,因此它根据其他应用程序组件的生命周期状态执行其功能。此外,如果观察者的生命周期状态为活动状态,即STARTED或RESUMED,则只有LiveData才能更新应用程序组件。 LiveData始终在进行任何更新之前检查观察者的状态,以确保观察者必须处于活动状态才能接收它。如果观察者的生命周期状态被破坏,LiveData可以将其删除,从而避免内存泄漏。它使数据同步的任务更加容易。

必须通过LiveData实现onActive和onInactive方法:
class LocationLiveData(context: Context)
: LiveData
private val locationManager: LocationManager =
context.getSystemService(Context.LOCATION_SERVICE) as LocationManager
override fun onActive() {
info(“onActive”)
locationManager.requestLocationUpdates(LocationManager.GPS_PROVIDER, 0, 0f, this)
}
override fun onInactive() {
info(“onInactive”)
locationManager.removeUpdates(this)
}
// ….
}
为了观察LiveData组件的观察者(LifecycleOwner,Observer
fun observeLocation() {
val location = LocationLiveData(this)
location.observe(this,
Observer { location ->
info(“location: $location”)
})
}
}
在Android App中实施
在此示例中,我们将创建一个简单的计数器应用程序,仅需5秒,您可以使用LiveData进行任何操作,但现在让我们构建一个小型应用程序。
步骤1:在build.gradle文件中添加这些依赖项
def lifecycle_version = “2.3.0”
// ViewModel
implementation “androidx.lifecycle:lifecycle-viewmodel-ktx:$lifecycle_version”
// LiveData
implementation “androidx.lifecycle:lifecycle-livedata-ktx:$lifecycle_version”
implementation “androidx.lifecycle:lifecycle-runtime-ktx:$lifecycle_version”
implementation “androidx.core:core-ktx:1.3.2”
步骤2:使用activity_main.xml文件
导航到应用程序> res>布局> activity_main.xml,然后将以下代码添加到该文件中。以下是activity_main.xml文件的代码。
XML
Kotlin
import androidx.lifecycle.ViewModel

class MainActivityViewModel:ViewModel() {

    private val _seconds = MutableLiveData()
    private val _finished = MutableLiveData()

    // getter method for seconds var
    fun seconds():LiveData{
        return _seconds
    }

    // getter method for finished var
    fun finished():LiveData{
        return _finished
    }


    // Counter method that uses CountDownTimer()
    fun startCounter(){

        // you can change the millisInFuture value
        object : CountDownTimer(5000, 100) {
            override fun onTick(millisUntilFinished: Long) {
                val time = millisUntilFinished / 1000

                // setting the count value
                _seconds.value = time.toInt()
            }

            override fun onFinish() {
                 // if millisInFuture completed
                 // it set the value true
                _finished.value = true
            }
        }.start()
    }
}
Kotlin
class MainActivity : AppCompatActivity() {
    override fun onCreate(savedInstanceState: Bundle?) {
        super.onCreate(savedInstanceState)
        setContentView(R.layout.activity_main)

        // creating instance of our ViewModel class
        val viewModel = ViewModelProvider(this).get(MainActivityViewModel::class.java)

        // calling start counter methos which is in our viewmodel class
        viewModel.startCounter()


        // observing the second value of our view model class
        viewModel.seconds().observe(this, Observer {

            // setting textview value
            textView.text = it.toString()
        })

        viewModel.finished().observe(this, Observer {
            if(it){
                // if count time finished it set the value
                textView.text = "Finished"
            }
        })
    }
}步骤3:创建Kotlin类文件MainActivityViewModel.kt。我们的MainActivity类文件扩展了ViewModel类。
Refer to this article: How to Create Classes in Android Studio?
科特林
import androidx.lifecycle.ViewModel

class MainActivityViewModel:ViewModel() {

    private val _seconds = MutableLiveData()
    private val _finished = MutableLiveData()

    // getter method for seconds var
    fun seconds():LiveData{
        return _seconds
    }

    // getter method for finished var
    fun finished():LiveData{
        return _finished
    }


    // Counter method that uses CountDownTimer()
    fun startCounter(){

        // you can change the millisInFuture value
        object : CountDownTimer(5000, 100) {
            override fun onTick(millisUntilFinished: Long) {
                val time = millisUntilFinished / 1000

                // setting the count value
                _seconds.value = time.toInt()
            }

            override fun onFinish() {
                 // if millisInFuture completed
                 // it set the value true
                _finished.value = true
            }
        }.start()
    }
}
Note: Here we are using MutableLiveData right. but the question is why? because there is already LiveData is available, MutableLiveData extends LiveData class and two functions setValue() and postValue() are publicly available for use.
步骤4:使用MainActivity.kt文件
转到MainActivity.kt文件,并参考以下代码。下面是MainActivity.kt文件的代码。
科特林
class MainActivity : AppCompatActivity() {
    override fun onCreate(savedInstanceState: Bundle?) {
        super.onCreate(savedInstanceState)
        setContentView(R.layout.activity_main)

        // creating instance of our ViewModel class
        val viewModel = ViewModelProvider(this).get(MainActivityViewModel::class.java)

        // calling start counter methos which is in our viewmodel class
        viewModel.startCounter()


        // observing the second value of our view model class
        viewModel.seconds().observe(this, Observer {

            // setting textview value
            textView.text = it.toString()
        })

        viewModel.finished().observe(this, Observer {
            if(it){
                // if count time finished it set the value
                textView.text = "Finished"
            }
        })
    }
}
Note: Here inside Observe() “this” is the Life cycle owner as we discussed above to observe the value, we should pass the Lifecycle Owner. Here this means MainActivity which is the observer here.
输出:
使用LiveData的优势
- 无需每次都更新UI: LiveData遵循观察者模式。当发生任何更改时,LiveData会通知Observer对象。
- 无内存泄漏:观察者绑定到Lifecycle对象,并在销毁其关联的生命周期后自行清理。
- 不再需要手动进行生命周期处理: UI组件仅观察相关数据,而不会停止或继续观察。由于LiveData在观察的同时知道相关生命周期状态的变化,因此它会自动管理所有这一切。
- 正确的配置更改:如果由于配置更改(例如设备旋转)而重新创建活动或片段,则该活动或片段会立即接收最新的可用数据。