如果有两个类,即A类和B类,而A类依赖于B类,则将B类称为依赖于A类。

因此,每次我们想要访问A类中的B类时,都需要在A类中创建B类的实例或使用静态工厂方法来访问A类。但这将使我们的代码紧密耦合,难以管理和测试。 。为了消除这些问题,我们使用依赖注入。依赖注入是一种设计模式,可从编程代码中消除依赖,并使应用程序易于管理和测试。这也使编程代码松散耦合。
Android中的依赖注入
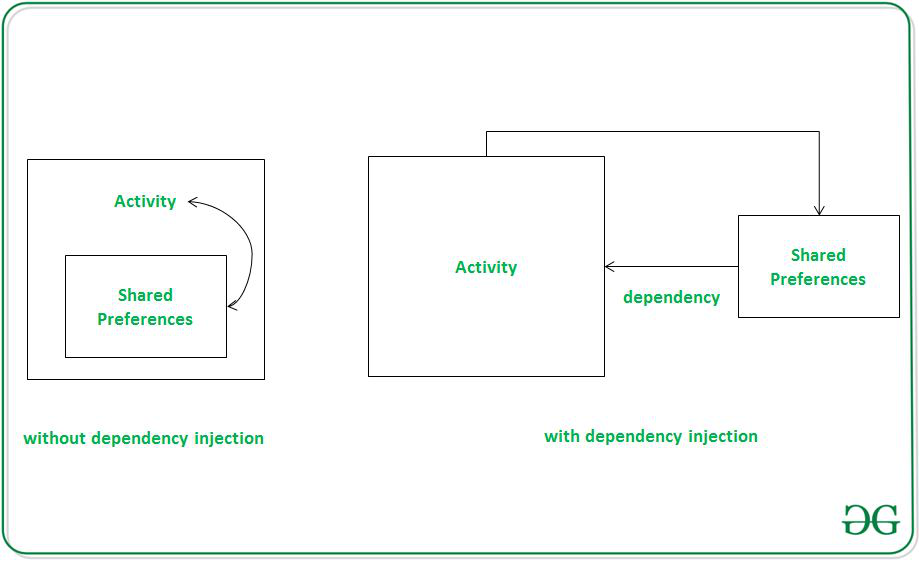
让我们假设,我们要在SharedPreferences中存储一些数据。为了保存或检索共享首选项数据,我们需要在Activity的样板代码中使用共享首选项的实例。如果我们的代码库很大,可能会导致测试,管理等方面的问题。这就是Android依赖注入的帮助。在这里,SharedPreferences充当Activity的依赖项,因此,我们不在活动中创建它的实例,而是从其他类注入它。下面是这种情况的说明。

匕首2
Dagger 2是一个使用Java Specification Request 330和Annotations的编译时android依赖项注入框架。匕首2中使用的一些基本注释是:
- @Module此注释用于用于构造对象和提供依赖项的类。
- @Provides这将在将返回对象的模块类中的方法上使用。
- @Inject在字段,构造函数或方法上使用,表示请求了依赖项。
- @Component在组件接口上使用,该接口充当@Module和@Inject之间的桥梁。 (模块类不直接提供对请求类的依赖,它使用组件接口)
- @Singleton这用于指示仅创建依赖项对象的单个实例。
例子
在此示例中,我们将一些数据添加到共享首选项,然后使用dagger 2库从那里检索数据。下面是在此示例中我们将要做的事情的图片。注意,我们将使用Java语言实现该项目。

分步实施
步骤1:创建一个新项目
要在Android Studio中创建新项目,请参阅如何在Android Studio中创建/启动新项目。请注意,选择Java作为编程语言。
步骤2:添加依赖项
为了在dagger 2库的帮助下使用依赖注入,我们需要添加它的依赖。转到Gradle脚本> build.gradle(Module:app)并添加以下依赖项。添加这些依赖项后,您需要单击立即同步。
dependencies {
implementation “com.google.dagger:hilt-core:2.29-alpha”
annotationProcessor “com.google.dagger:hilt-compiler:2.29-alpha”
}
在继续之前,让我们添加一些颜色属性以增强应用程序栏。转到应用程序> res>值> colors.xml并添加以下颜色属性。
XML
    #0F9D58
    #16E37F
    #03DAC5
XML
Java
import android.content.Context;
import android.content.SharedPreferences;
import android.preference.PreferenceManager;
import javax.inject.Singleton;
import dagger.Module;
import dagger.Provides;

// @Module annotation is used over the class that
// creates construct object and provides dependencies
@Module
public class SharedPreferenceModule {
    private Context context;

    // Context gets initialize from the constructor itself
    public SharedPreferenceModule(Context context) {
        this.context = context;
    }

    @Singleton
    @Provides
    public Context provideContext() {
        return context;
    }

    // @Singleton indicates that only single instance
    // of dependency object is created
    // @Provide annotations used over the methods that
    // will provides the object of module class
    // This method will return the dependent object
    @Singleton
    @Provides
    public SharedPreferences provideSharedPreferences(Context context) {
        return PreferenceManager.getDefaultSharedPreferences(context);
    }
}
Java
import javax.inject.Singleton;
import dagger.Component;

// All the modules are mentioned under
// the @Component annotation
@Singleton
@Component(modules = {SharedPreferenceModule.class})
public interface SharedPreferenceComponent {
    void inject(MainActivity mainActivity);
}
Java
import android.content.SharedPreferences;
import android.os.Bundle;
import android.view.View;
import android.widget.Button;
import android.widget.EditText;
import android.widget.TextView;
import androidx.appcompat.app.AppCompatActivity;
import javax.inject.Inject;

public class MainActivity extends AppCompatActivity implements View.OnClickListener {

    EditText editText;
    TextView textView;
    Button saveBtn, getBtn;
    private SharedPreferenceComponent sharedPreferenceComponent;

    // @Inject is used to tell which activity,
    // fragment or service is allowed to request
    // dependencies declared in Module class
    @Inject
    SharedPreferences sharedPreferences;

    @Override
    protected void onCreate(Bundle savedInstanceState) {
        super.onCreate(savedInstanceState);
        setContentView(R.layout.activity_main);

        // Referencing the EditText, TextView and Buttons
        editText = (EditText) findViewById(R.id.inputField);
        textView = (TextView) findViewById(R.id.outputField);
        saveBtn = (Button) findViewById(R.id.saveBtn);
        getBtn = (Button) findViewById(R.id.getBtn);

        // Setting onClickListener behavior on button to reference
        // to the current activity(this MainActivity)
        saveBtn.setOnClickListener(this);
        getBtn.setOnClickListener(this);

        // Here we are binding dagger to our application
        // Dagger keyword will be prefix to the component name
        sharedPreferenceComponent = DaggerSharedPreferenceComponent.builder().sharedPreferenceModule(
                new SharedPreferenceModule(this)).build();

        // we are injecting the shared preference dependent object
        sharedPreferenceComponent.inject(this);
    }

    @Override
    public void onClick(View view) {
        switch (view.getId()) {
            case R.id.saveBtn:
                // Saving data to shared preference
                // inputField acts as key and editText data as value to that key
                SharedPreferences.Editor editor = sharedPreferences.edit();
                editor.putString("inputField", editText.getText().toString().trim());
                editor.apply();
                break;
            case R.id.getBtn:
                // getting shared preferences data and set it to textview
                // s1: is the default string, You can write any thing there or leave it
                textView.setText(sharedPreferences.getString("inputField", ""));
                break;
        }
    }
}
步骤3:使用activity_main.xml文件
在此步骤中,我们将为应用程序创建一个布局文件。我们使用EditText从用户处获取输入,并使用TextView分别显示输出以及保存和显示按钮。以下是activity_main.xml文件的代码段。
XML格式
步骤4:创建模块类
现在,我们将创建一个Module类,该类用于构造对象并提供依赖项。 @Module批注用于模块类。此类包含一个构造函数,该构造函数将初始化上下文,以及一个方法,该方法将返回使用@Provides批注的从属对象。在这里,provideSharedPreferences()方法将返回依赖对象。通常,返回依赖对象的方法后将带有单词provide。转到应用程序> Java >程序包>右键单击并创建一个新的Java类,并将其命名为SharedPreferenceModule 。以下是SharedPreferenceModule的代码段。 Java文件。
Java
import android.content.Context;
import android.content.SharedPreferences;
import android.preference.PreferenceManager;
import javax.inject.Singleton;
import dagger.Module;
import dagger.Provides;

// @Module annotation is used over the class that
// creates construct object and provides dependencies
@Module
public class SharedPreferenceModule {
    private Context context;

    // Context gets initialize from the constructor itself
    public SharedPreferenceModule(Context context) {
        this.context = context;
    }

    @Singleton
    @Provides
    public Context provideContext() {
        return context;
    }

    // @Singleton indicates that only single instance
    // of dependency object is created
    // @Provide annotations used over the methods that
    // will provides the object of module class
    // This method will return the dependent object
    @Singleton
    @Provides
    public SharedPreferences provideSharedPreferences(Context context) {
        return PreferenceManager.getDefaultSharedPreferences(context);
    }
}
步骤5:创建组件接口
在这一步中,我们将创建一个接口。转到应用程序> Java >程序包>右键单击并创建一个接口,并将其命名为SharedPreferenceComponent 。为了提及所有模块,我们使用@Component批注。
@Component(modules={SharedPreferenceModule})
可能要求模块声明的依赖项的活动,片段或服务必须在此接口中使用单独的inject()方法声明。以下是SharedPreferenceComponent的代码段。 Java接口。
Java
import javax.inject.Singleton;
import dagger.Component;

// All the modules are mentioned under
// the @Component annotation
@Singleton
@Component(modules = {SharedPreferenceModule.class})
public interface SharedPreferenceComponent {
    void inject(MainActivity mainActivity);
}
步骤6:使用MainActivity。 Java文件
在这一步中,我们将首先初始化我们的Views,然后将Dagger绑定到我们的应用程序。对于哪个组件接口,后跟Dagger关键字。
sharedPreferenceComponent = DaggerSharedPreferenceComponent.builder().sharedPreferenceModule(new SharedPreferenceModule(this)).build();
sharedPreferenceComponent.inject(this);
以下是MainActivity的代码段。 Java文件。
Note: When you will use Dagger as a prefix with Component(here, SharedPreferenceComponent) sometimes you may get an error or warning this is because DaggerSharedPreferenceComponent is generated after compilation.
Java
import android.content.SharedPreferences;
import android.os.Bundle;
import android.view.View;
import android.widget.Button;
import android.widget.EditText;
import android.widget.TextView;
import androidx.appcompat.app.AppCompatActivity;
import javax.inject.Inject;

public class MainActivity extends AppCompatActivity implements View.OnClickListener {

    EditText editText;
    TextView textView;
    Button saveBtn, getBtn;
    private SharedPreferenceComponent sharedPreferenceComponent;

    // @Inject is used to tell which activity,
    // fragment or service is allowed to request
    // dependencies declared in Module class
    @Inject
    SharedPreferences sharedPreferences;

    @Override
    protected void onCreate(Bundle savedInstanceState) {
        super.onCreate(savedInstanceState);
        setContentView(R.layout.activity_main);

        // Referencing the EditText, TextView and Buttons
        editText = (EditText) findViewById(R.id.inputField);
        textView = (TextView) findViewById(R.id.outputField);
        saveBtn = (Button) findViewById(R.id.saveBtn);
        getBtn = (Button) findViewById(R.id.getBtn);

        // Setting onClickListener behavior on button to reference
        // to the current activity(this MainActivity)
        saveBtn.setOnClickListener(this);
        getBtn.setOnClickListener(this);

        // Here we are binding dagger to our application
        // Dagger keyword will be prefix to the component name
        sharedPreferenceComponent = DaggerSharedPreferenceComponent.builder().sharedPreferenceModule(
                new SharedPreferenceModule(this)).build();

        // we are injecting the shared preference dependent object
        sharedPreferenceComponent.inject(this);
    }

    @Override
    public void onClick(View view) {
        switch (view.getId()) {
            case R.id.saveBtn:
                // Saving data to shared preference
                // inputField acts as key and editText data as value to that key
                SharedPreferences.Editor editor = sharedPreferences.edit();
                editor.putString("inputField", editText.getText().toString().trim());
                editor.apply();
                break;
            case R.id.getBtn:
                // getting shared preferences data and set it to textview
                // s1: is the default string, You can write any thing there or leave it
                textView.setText(sharedPreferences.getString("inputField", ""));
                break;
        }
    }
}