在Android应用程序中, ActionBar是活动屏幕顶部的元素。这是移动应用程序的一项显着功能,在其所有活动中都具有一致的状态。它为应用程序提供了视觉结构,并包含一些用户常用的元素。 Google于2013年发布了Android 3.0(API 11) ,从而推出了Android ActionBar。在此之前,最重要的视觉元素的名称是AppBar 。 AppBar仅包含应用程序或当前活动的名称。它对用户不是很有用,开发人员也可以选择自定义它。
Google宣布了一个支持库以及ActionBar的引入。该库是AppCompat的一部分,其目的是为较旧版本的Android提供向后兼容性并支持选项卡式界面。所有使用Android(Theme.AppCompat.Light.DarkActionBar)提供的默认主题的应用程序默认都包含一个ActionBar。但是,开发人员可以根据需要以几种方式对其进行自定义。 ActionBar中包含的组件是:
- 应用程序图标:显示应用程序的品牌徽标/图标。
- 查看控件:显示应用程序或当前活动名称的部分。开发人员还可以包括微调器或选项卡式导航,以在视图之间进行切换。
- 操作按钮:包含用户可能经常需要的一些重要的应用程序操作/元素。
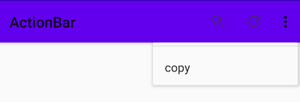
- 动作溢出:包括其他将作为菜单显示的动作。
设计自定义ActionBar
下面的示例演示为应用程序的MainActivity创建自定义ActionBar所涉及的步骤。涵盖了视觉元素的所有重要方面,例如图标,标题,字幕,操作按钮和溢出菜单。
Note: Following steps are performed on Android Studion version 4.0
步骤1:默认ActionBar
如前所述,每个Android应用默认都包含一个ActionBar。该预先包含的ActionBar显示标题,用于由AncdroidManifest.xml文件管理的当前活动。应用程序标题的字符串值由应用程序节点下的@ 字符串/ app_name资源提供。
….. ….. android:label=”@string/app_name” …..
输出:

步骤2:创建新目录和ActionBar的设计项
要对ActionBar的元素进行编码,请在应用程序项目文件的resource文件夹中创建一个新目录。右键单击res文件夹,然后选择New-> Directory 。将名称“ menu”命名为新目录。

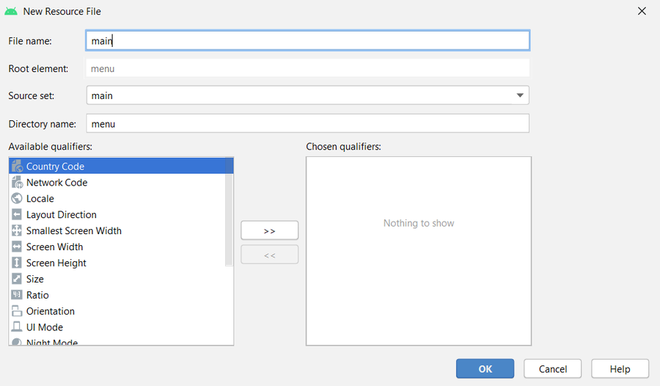
此外,通过右键单击菜单目录来创建新的菜单资源文件。在为主活动创建ActionBar时,在菜单资源文件中键入名称“ main” 。这样,必须在菜单目录下创建一个名为“ main.xml”的新文件。在此文件中,可以声明将显示为ActionBar的操作按钮的项目。

对于每个菜单项,需要配置以下属性:
- android:title:其值包含菜单项的标题,当用户单击该菜单项并将其保留在应用程序中时,该菜单项将显示。
- android:id:菜单项的唯一ID,将用于在整个应用程序文件中的任何位置访问菜单项。
- android:orderInCategory:此属性的值指定项目在ActionBar中的位置。有两种方法可以定义不同菜单项的位置。第一个是为所有项目提供相同的此属性值,并将按照代码中声明的相同顺序定义位置。第二种方法是为所有项目提供不同的数值,然后这些项目将根据此属性值的升序进行自身定位。
- app:showAsAction:此属性定义项目在操作栏中的显示方式。有四种可能的标志可供选择:
- 一种。始终:要始终在ActionBar中显示该项目。
- b。 ifRoom:如果有可用空间,则保留该项目。
- C。从不:使用此标志,该项目将不会在ActionBar中显示为图标,而是会出现在溢出菜单中。
- d。 withText:要将一个项目既表示为图标又表示标题,可以在此标志后附加always或ifRoom标志(always | withText或ifRoom | withText)。
- android:icon:通过此属性在可绘制目录中引用了项目的图标。
ActionBar项的图标
为了向项目提供图标,请右键单击res文件夹,选择new,然后选择Image Asset 。将出现一个对话框,选择“图标类型”作为“操作栏”和“选项卡图标” 。选择资产类型为“剪贴画”,然后从剪贴画集合中选择图像。为图标提供所需的名称。单击下一步,然后单击完成。现在,此图标将被加载到res文件夹的drawable目录中。开发人员为这些图标提供的名称现在将用于引用该项目的图标资源。

以下是在ActionBar中放置搜索图标,刷新图标和溢出菜单的代码。
XML
Java
import androidx.annotation.NonNull;
import androidx.appcompat.app.ActionBar;
import androidx.appcompat.app.AppCompatActivity;
import android.os.Bundle;
import android.view.Menu;
import android.view.MenuItem;
import android.widget.Toast;

public class MainActivity extends AppCompatActivity {

    @Override
    protected void onCreate( Bundle savedInstanceState ) {
        super.onCreate(savedInstanceState);
        setContentView(R.layout.activity_main);

        // calling this activity's function to
        // use ActionBar utility methods
        ActionBar actionBar = getSupportActionBar();

        // providing title for the ActionBar
        actionBar.setTitle("  GfG | Action Bar");

        // providing subtitle for the ActionBar
        actionBar.setSubtitle("   Design a custom Action Bar");

        // adding icon in the ActionBar
        actionBar.setIcon(R.drawable.app_logo);

        // methods to display the icon in the ActionBar
        actionBar.setDisplayUseLogoEnabled(true);
        actionBar.setDisplayShowHomeEnabled(true);

    }

    // method to inflate the options menu when
    // the user opens the menu for the first time
    @Override
    public boolean onCreateOptionsMenu( Menu menu ) {

        getMenuInflater().inflate(R.menu.main, menu);
        return super.onCreateOptionsMenu(menu);
    }

    // methods to control the operations that will
    // happen when user clicks on the action buttons
    @Override
    public boolean onOptionsItemSelected( @NonNull MenuItem item ) {

        switch (item.getItemId()){
            case R.id.search:
                Toast.makeText(this, "Search Clicked", Toast.LENGTH_SHORT).show();
                break;
            case R.id.refresh:
                Toast.makeText(this, "Refresh Clicked", Toast.LENGTH_SHORT).show();
                break;
            case R.id.copy:
                Toast.makeText(this, "Copy Clicked", Toast.LENGTH_SHORT).show();
                break;
        }
        return super.onOptionsItemSelected(item);
    }
}
Kotlin
import android.os.Bundle
import android.view.Menu
import android.view.MenuItem
import android.widget.Toast
import androidx.appcompat.app.AppCompatActivity

class MainActivity : AppCompatActivity() {
    override fun onCreate(savedInstanceState: Bundle?) {
        super.onCreate(savedInstanceState)
        setContentView(R.layout.activity_main)

        // calling this activity's function to
        // use ActionBar utility methods
        val actionBar = supportActionBar

        // providing title for the ActionBar
        actionBar!!.title = "  GfG | Action Bar"

        // providing subtitle for the ActionBar
        actionBar.subtitle = "   Design a custom Action Bar"

        // adding icon in the ActionBar
        actionBar.setIcon(R.drawable.app_logo)

        // methods to display the icon in the ActionBar
        actionBar.setDisplayUseLogoEnabled(true)
        actionBar.setDisplayShowHomeEnabled(true)
    }

    // method to inflate the options menu when
    // the user opens the menu for the first time
    override fun onCreateOptionsMenu(menu: Menu): Boolean {
        menuInflater.inflate(R.menu.main, menu)
        return super.onCreateOptionsMenu(menu)
    }

    // methods to control the operations that will
    // happen when user clicks on the action buttons
    override fun onOptionsItemSelected(item: MenuItem): Boolean {
        when (item.itemId) {
            R.id.search -> Toast.makeText(this, "Search Clicked", Toast.LENGTH_SHORT).show()
            R.id.refresh -> Toast.makeText(this, "Refresh Clicked", Toast.LENGTH_SHORT).show()
            R.id.copy -> Toast.makeText(this, "Copy Clicked", Toast.LENGTH_SHORT).show()
        }
        return super.onOptionsItemSelected(item)
    }
}
XML
XML
输出:

步骤3:使用活动文件
ActionBar的项目旨在执行一些操作。项目的那些操作/动作在为其设计了ActionBar的那个Activity文件中声明。在此示例中,目标活动是MainActivity文件。此外,该文件中还定义了自定义标题,副标题和应用程序徽标。下面是设计所有提到的项目并在用户单击ActionBar的项目时显示敬酒消息的正确代码。
Java
import androidx.annotation.NonNull;
import androidx.appcompat.app.ActionBar;
import androidx.appcompat.app.AppCompatActivity;
import android.os.Bundle;
import android.view.Menu;
import android.view.MenuItem;
import android.widget.Toast;

public class MainActivity extends AppCompatActivity {

    @Override
    protected void onCreate( Bundle savedInstanceState ) {
        super.onCreate(savedInstanceState);
        setContentView(R.layout.activity_main);

        // calling this activity's function to
        // use ActionBar utility methods
        ActionBar actionBar = getSupportActionBar();

        // providing title for the ActionBar
        actionBar.setTitle("  GfG | Action Bar");

        // providing subtitle for the ActionBar
        actionBar.setSubtitle("   Design a custom Action Bar");

        // adding icon in the ActionBar
        actionBar.setIcon(R.drawable.app_logo);

        // methods to display the icon in the ActionBar
        actionBar.setDisplayUseLogoEnabled(true);
        actionBar.setDisplayShowHomeEnabled(true);

    }

    // method to inflate the options menu when
    // the user opens the menu for the first time
    @Override
    public boolean onCreateOptionsMenu( Menu menu ) {

        getMenuInflater().inflate(R.menu.main, menu);
        return super.onCreateOptionsMenu(menu);
    }

    // methods to control the operations that will
    // happen when user clicks on the action buttons
    @Override
    public boolean onOptionsItemSelected( @NonNull MenuItem item ) {

        switch (item.getItemId()){
            case R.id.search:
                Toast.makeText(this, "Search Clicked", Toast.LENGTH_SHORT).show();
                break;
            case R.id.refresh:
                Toast.makeText(this, "Refresh Clicked", Toast.LENGTH_SHORT).show();
                break;
            case R.id.copy:
                Toast.makeText(this, "Copy Clicked", Toast.LENGTH_SHORT).show();
                break;
        }
        return super.onOptionsItemSelected(item);
    }
}
科特林
import android.os.Bundle
import android.view.Menu
import android.view.MenuItem
import android.widget.Toast
import androidx.appcompat.app.AppCompatActivity

class MainActivity : AppCompatActivity() {
    override fun onCreate(savedInstanceState: Bundle?) {
        super.onCreate(savedInstanceState)
        setContentView(R.layout.activity_main)

        // calling this activity's function to
        // use ActionBar utility methods
        val actionBar = supportActionBar

        // providing title for the ActionBar
        actionBar!!.title = "  GfG | Action Bar"

        // providing subtitle for the ActionBar
        actionBar.subtitle = "   Design a custom Action Bar"

        // adding icon in the ActionBar
        actionBar.setIcon(R.drawable.app_logo)

        // methods to display the icon in the ActionBar
        actionBar.setDisplayUseLogoEnabled(true)
        actionBar.setDisplayShowHomeEnabled(true)
    }

    // method to inflate the options menu when
    // the user opens the menu for the first time
    override fun onCreateOptionsMenu(menu: Menu): Boolean {
        menuInflater.inflate(R.menu.main, menu)
        return super.onCreateOptionsMenu(menu)
    }

    // methods to control the operations that will
    // happen when user clicks on the action buttons
    override fun onOptionsItemSelected(item: MenuItem): Boolean {
        when (item.itemId) {
            R.id.search -> Toast.makeText(this, "Search Clicked", Toast.LENGTH_SHORT).show()
            R.id.refresh -> Toast.makeText(this, "Refresh Clicked", Toast.LENGTH_SHORT).show()
            R.id.copy -> Toast.makeText(this, "Copy Clicked", Toast.LENGTH_SHORT).show()
        }
        return super.onOptionsItemSelected(item)
    }
}
输出:

步骤4:ActionBar的颜色
转至位于res文件夹的values目录中的style.xml文件。要更改ActionBar的默认颜色,必须更改colorPrimary资源。以下是使ActionBar颜色为“绿色”的代码。
XML格式
输出:

步骤5:使用activity_main.xml文件
该文件定义活动的布局。在此示例中,主要重点是ActionBar,因此该活动将仅包含一个简单的TextView。下面是代码。
XML格式
输出:
ActionBar的优点
- 提供自定义区域以设计应用程序的身份
- 通过显示当前活动的标题来指定用户在应用中的位置。
- 提供对重要且经常使用的操作的访问
- 支持选项卡和一个用于视图切换和导航的下拉列表。
ActionBar的缺点
- ActionaBar的所有功能不是一次引入,而是随着不同的API级别(例如API 15、17和19)的发布而引入。
- 当ActionBar在不同的API级别上运行时,其行为会有所不同。
- 特定API引入的功能不提供向后兼容性。
Note: To resolve all the problems related to ActionBar, Google introduced ToolBar along with the release of API 21(Android Lollipop).