AppBar通常是应用程序的最顶层组件(有时甚至是最底层),它包含工具栏和一些其他常用操作按钮。由于flutter应用程序中的所有组件都是小部件或小部件的组合。因此, AppBar还是flutter的内置类或窗口小部件,提供了开箱即用的AppBar的功能。 AppBar小部件基于Material Design,并且其他信息已经由其他类(如MediaQuery , Scaffold)提供了有关应放置AppBar内容的信息。尽管AppBar类非常灵活并且可以轻松自定义,但我们也可以使用SilverAppBar小部件,该小部件为应用程序栏提供了可滚动的功能。或者,我们可以从头开始创建自己的自定义应用栏。
AppBar类的构造方法:
AppBar(
{Key key,
Widget leading,
bool automaticallyImplyLeading: true,
Widget title,
List actions,
double elevation,
Color shadowColor,
ShapeBorder shape,
Color backgroundColor,
Brightness brightness,
IconThemeData iconTheme,
IconThemeData actionsIconTheme,
TextTheme textTheme,
...}
)
Appbar小部件的关键属性:
- 操作:如果AppBar是row,则此属性将小部件列表作为要显示在标题之后的参数。
- title:此属性通常将主窗口小部件作为要在AppBar中显示的参数。
- backgroundColor:此属性用于向Appbar的背景添加颜色。
- 高程:此属性用于设置相对于其父级放置此应用栏的z坐标。
- shape:此属性用于为Appbar赋予形状并管理其阴影。
范例1:
Dart
import 'package:flutter/material.dart';

void main() {
  runApp(MaterialApp(
    home: Scaffold(
      appBar: AppBar(
        title: Text('GeeksforGeeks'),
      ), //AppBar
      body: const Center(
        child: Text(
          'GeeksforGeeks',
          style: TextStyle(fontSize: 24),
        ), //Text
      ), // center
    ), //Scaffold
    debugShowCheckedModeBanner: false, //Removing Debug Banner
  )); //MaterialApp
}
Dart
import "package:flutter/material.dart";

void main() {
  runApp(MaterialApp(
    home: Scaffold(
      appBar: AppBar(
        title: Text("GeeksforGeeks"),
        titleSpacing: 00.0,
        centerTitle: true,
        toolbarHeight: 60.2,
        shape: RoundedRectangleBorder(borderRadius: BorderRadius.circular(360)),
        elevation: 0.00,
        backgroundColor: Colors.greenAccent[400],
      ), //AppBar
      body: const Center(
        child: Text(
          'GeeksforGeeks',
          style: TextStyle(fontSize: 24),
        ), //Text
      ), //Center
    ), //Scaffold
    debugShowCheckedModeBanner: false, //Removing Debug Banner
  )); //MaterialApp
}
Dart
import "package:flutter/material.dart";

void main() {
  runApp(MaterialApp(
    home: Scaffold(
      appBar: AppBar(
        title: Text("GeeksforGeeks"),
        actions: [
          IconButton(
            icon: Icon(Icons.comment),
            tooltip: 'Comment Icon',
            onPressed: () {},
          ), //IconButton
          IconButton(
            icon: Icon(Icons.settings),
            tooltip: 'Setting Icon',
            onPressed: () {},
          ), //IconButton
        ], //[]
        backgroundColor: Colors.greenAccent[400],
        elevation: 50.0,
        leading: IconButton(
          icon: Icon(Icons.menu),
          tooltip: 'Menu Icon',
          onPressed: () {},
        ), //IconButton
        brightness: Brightness.dark,
      ), //AppBar
      body: const Center(
        child: Text(
          "Geeksforgeeks",
          style: TextStyle(fontSize: 24),
        ), //Text
      ), //Center
    ), //Scaffold
    debugShowCheckedModeBanner: false, //Removing Debug Banner
  )); //MaterialApp
}
输出:

解释:
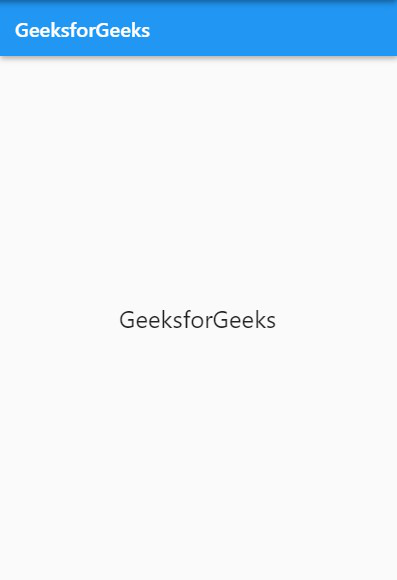
首先,我们已导入材料。由于AppBar小部件使用了dart文件,因此在以下两个示例中也将执行相同的操作。然后,我们有我们的主要函数调用runApp。在顶部,我们有MaterialApp小部件,然后是Scaffold 。 MaterialApp小部件为AppBar提供了样式,默认情况下Scaffold小部件将AppBar小部件放置在屏幕顶部。这只是flutter提供的开箱即用的AppBar的基本知识。此AppBar仅利用AppBar类的title属性,该属性接受要在AppBar中显示的主窗口小部件。在这种情况下,它是一个文本小部件。
在主体中,我们在中央小部件内有一个子文本小部件,显示文本’ GeeksforGeeks ‘,字体大小为24。最后,调试标语已被禁用。接下来是下面的两个示例。
范例2:
Dart
import "package:flutter/material.dart";

void main() {
  runApp(MaterialApp(
    home: Scaffold(
      appBar: AppBar(
        title: Text("GeeksforGeeks"),
        titleSpacing: 00.0,
        centerTitle: true,
        toolbarHeight: 60.2,
        shape: RoundedRectangleBorder(borderRadius: BorderRadius.circular(360)),
        elevation: 0.00,
        backgroundColor: Colors.greenAccent[400],
      ), //AppBar
      body: const Center(
        child: Text(
          'GeeksforGeeks',
          style: TextStyle(fontSize: 24),
        ), //Text
      ), //Center
    ), //Scaffold
    debugShowCheckedModeBanner: false, //Removing Debug Banner
  )); //MaterialApp
}
输出:

解释:
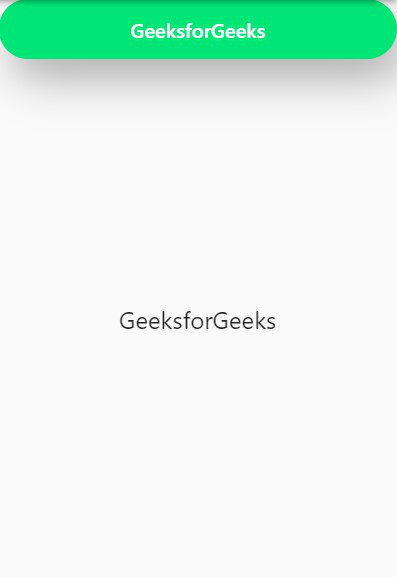
在这里, AppBar小部件总共利用了七个属性。它以标题“ GeeksforGeeks”开头。第二个是titlespacing ,它采用双精度作为参数,在这种情况下,将其设置为00.0以使文本保持紧密。第三个属性是centerTitle ,它将布尔值作为参数,并在此处设置为true。第四个属性是toolbarHeight ,它也将double作为参数。此属性在AppBar下方提供了一个阴影,从而使它看起来升高了。第五个属性是shape,它用于通过修改AppBar的边框为AppBar提供不同的形状。第六个属性是height ,它定义了AppBar相对于其父对象放置的z坐标。它还将double作为参数。最后一个是backgroundColor ,它控制AppBar的背景色,在这种情况下,我们具有签名geeksforgeeks greenAccect 。
范例3:
Dart
import "package:flutter/material.dart";

void main() {
  runApp(MaterialApp(
    home: Scaffold(
      appBar: AppBar(
        title: Text("GeeksforGeeks"),
        actions: [
          IconButton(
            icon: Icon(Icons.comment),
            tooltip: 'Comment Icon',
            onPressed: () {},
          ), //IconButton
          IconButton(
            icon: Icon(Icons.settings),
            tooltip: 'Setting Icon',
            onPressed: () {},
          ), //IconButton
        ], //[]
        backgroundColor: Colors.greenAccent[400],
        elevation: 50.0,
        leading: IconButton(
          icon: Icon(Icons.menu),
          tooltip: 'Menu Icon',
          onPressed: () {},
        ), //IconButton
        brightness: Brightness.dark,
      ), //AppBar
      body: const Center(
        child: Text(
          "Geeksforgeeks",
          style: TextStyle(fontSize: 24),
        ), //Text
      ), //Center
    ), //Scaffold
    debugShowCheckedModeBanner: false, //Removing Debug Banner
  )); //MaterialApp
}
输出:

解释:
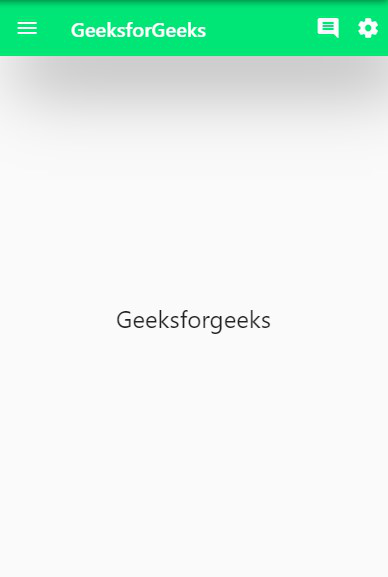
在这里,我们可以看到,除了应用栏上的标题外,AppBar上还有三个图标,分别位于标题的左侧和右侧的两个图标上。这个AppBar小部件以通常的title属性开头,该属性将Text小部件作为参数。如果AppBar为一行,则标题后跟action属性,该属性将小部件列表作为参数显示在标题后。在这种情况下,我们可以看到两个图标,即注释和设置。这两个图标是IconsButton小部件,利用了三个属性,即icon , tooltip和onPressed 函数。没有在任何IconButton中指定onPressed函数,因此该函数为null。 icon属性将字符串作为参数,它是特定图标的名称。 当用鼠标或长按鼠标悬停时, tooltip属性还将一个字符串作为参数显示在浮动标签中。在第一个IconButton中,我们有Icons.comment & Comment图标,在第二个IconButton中,我们有Icons.settin g和Setting Icon分别是图标和工具提示的参数。现在,这一切之后,但和的backgroundColor海拔分别设置为Colors.greenAccent [400]和50.0。之后,我们有了Leading属性,该属性将小部件作为参数,显示在AppBar的标题之前。在这种情况下,标题也是IconButton ,它显示菜单图标。没有提到onPressed属性,并且给工具提示属性提供了字符串’Menu Icon’的参数。并且主体类似于第一示例和第二示例。